CONSOLE_V1-1_ENG.pdf
Page 1
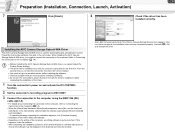
... XP (Service Pack 2) only. You can adjust and save the Custom Preset settings of a camcorder from a computer and to record on the tape in the camcorder and onto the computer's hard disk by connecting the camcorder using a waveform monitor and a vector scope to adjust the settings of the... camcorder and analyze a shooting image using an IEEE1394 (DV) cable. Shortcut Keys English Uninstalling the ...
... XP (Service Pack 2) only. You can adjust and save the Custom Preset settings of a camcorder from a computer and to record on the tape in the camcorder and onto the computer's hard disk by connecting the camcorder using a waveform monitor and a vector scope to adjust the settings of the... camcorder and analyze a shooting image using an IEEE1394 (DV) cable. Shortcut Keys English Uninstalling the ...
CONSOLE_V1-1_ENG.pdf
Page 2
...Software and Drivers 1-6 Installing CONSOLE and the Canon Virtual VCR Driver 1-6 Installing the AV/C Camera Storage Subunit-WIA Driver 1-7 Connecting the Camcorder 1-8 Connecting the Camcorder to the Computer 1-8 Launching CONSOLE 1-9 ...Preset 4-37 Adjusting the Custom Preset Settings 4-37 Importing the Custom Preset 4-38 Exporting the Custom Preset 4-39 Practical Usages of the Custom Preset Files 4-40 Use of the Disconnected Camcorder After Adjusting the Custom Preset Files ....... 4-40 Passing Down the Custom Preset Setting to the Other Camcorders 4-41 Creating a New Custom Preset...
...Software and Drivers 1-6 Installing CONSOLE and the Canon Virtual VCR Driver 1-6 Installing the AV/C Camera Storage Subunit-WIA Driver 1-7 Connecting the Camcorder 1-8 Connecting the Camcorder to the Computer 1-8 Launching CONSOLE 1-9 ...Preset 4-37 Adjusting the Custom Preset Settings 4-37 Importing the Custom Preset 4-38 Exporting the Custom Preset 4-39 Practical Usages of the Custom Preset Files 4-40 Use of the Disconnected Camcorder After Adjusting the Custom Preset Files ....... 4-40 Passing Down the Custom Preset Setting to the Other Camcorders 4-41 Creating a New Custom Preset...
CONSOLE_V1-1_ENG.pdf
Page 4
... can adjust and save the Custom Preset file to the camcorder when it is available for AUDIO MONITOR button • Camera mode ( ): This mode is set to EXT.CONT. All audio related adjustments except for directly controlling the camcorder. - Camcorder XH G1/XH A1 XL H1 XL2 Mode EXT. Camera... „ Differences from CONSOLE 1.0 • Supports XH G1 and XH A1 • New plug in: Color Correction, Skin Detail and Sky Detail • Allowed to save the Custom Preset settings of CONSOLE cannot be able to: • Record the camcorder image onto the computer's hard disk. • ...
... can adjust and save the Custom Preset file to the camcorder when it is available for AUDIO MONITOR button • Camera mode ( ): This mode is set to EXT.CONT. All audio related adjustments except for directly controlling the camcorder. - Camcorder XH G1/XH A1 XL H1 XL2 Mode EXT. Camera... „ Differences from CONSOLE 1.0 • Supports XH G1 and XH A1 • New plug in: Color Correction, Skin Detail and Sky Detail • Allowed to save the Custom Preset settings of CONSOLE cannot be able to: • Record the camcorder image onto the computer's hard disk. • ...
CONSOLE_V1-1_ENG.pdf
Page 7
...camcorder's power off and do not quit ...camcorder's recording program to EXT.CONT. 3 Connect the camcorder to the computer using the IEEE1394 (DV) cable. ( 1-8) • For details about connecting the camcorder to the computer, refer to Connecting the Camcorder... You need to connect the camcorder to the Computer ( 1-8). •...you connect a camcorder for downloading and uploading the Custom Preset file (Camcorder settings) from and...Preset settings. This driver will not be displayed. Refer to Connecting the Camcorder to the camcorder...connect the camcorder, the driver...
...camcorder's power off and do not quit ...camcorder's recording program to EXT.CONT. 3 Connect the camcorder to the computer using the IEEE1394 (DV) cable. ( 1-8) • For details about connecting the camcorder to the computer, refer to Connecting the Camcorder... You need to connect the camcorder to the Computer ( 1-8). •...you connect a camcorder for downloading and uploading the Custom Preset file (Camcorder settings) from and...Preset settings. This driver will not be displayed. Refer to Connecting the Camcorder to the camcorder...connect the camcorder, the driver...
CONSOLE_V1-1_ENG.pdf
Page 10
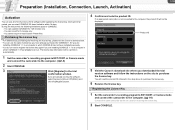
... software after registering the license key. You can operate CONSOLE for receiving the license key. 2 Start CONSOLE. Product ID 5 Visit the Canon's download site where you are already running the software, select [Version] [About CONSOLE] and click the [Register] button. 4 Confirm ...purchase the license key. You cannot export or load Custom Preset files. If you downloaded the trial version software and follow the instructions on automatically. 1 Set the camcorder's recording program to EXT.CONT. or Camera mode and connect the camcorder to the computer. ( 1-8) 2 Start CONSOLE. 3...
... software after registering the license key. You can operate CONSOLE for receiving the license key. 2 Start CONSOLE. Product ID 5 Visit the Canon's download site where you are already running the software, select [Version] [About CONSOLE] and click the [Register] button. 4 Confirm ...purchase the license key. You cannot export or load Custom Preset files. If you downloaded the trial version software and follow the instructions on automatically. 1 Set the camcorder's recording program to EXT.CONT. or Camera mode and connect the camcorder to the computer. ( 1-8) 2 Start CONSOLE. 3...
CONSOLE_V1-1_ENG.pdf
Page 13
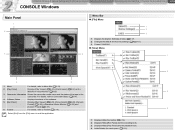
... Viewer] ( 4-23), [Focus Assist] ( 4-28), [Camera Control] ( 4-28), a Waveform Vector Monitor ( 4-32) and [Custom Preset] ( 4-37). 4 6 Toolbar For details, refer to Menu Bar ( 2-13). 2 [Play Panel] Displays [Play Viewer] ( 6-50), [File Browser] ( 6-52) and a Waveform Vector Monitor ( 4-32). 3 3 Camcorder Information Shows the camcorder model name and the status of the tape in the...
... Viewer] ( 4-23), [Focus Assist] ( 4-28), [Camera Control] ( 4-28), a Waveform Vector Monitor ( 4-32) and [Custom Preset] ( 4-37). 4 6 Toolbar For details, refer to Menu Bar ( 2-13). 2 [Play Panel] Displays [Play Viewer] ( 6-50), [File Browser] ( 6-52) and a Waveform Vector Monitor ( 4-32). 3 3 Camcorder Information Shows the camcorder model name and the status of the tape in the...

CONSOLE_V1-1_ENG.pdf
Page 14
... [Color Control] window. 4 Displays/Hides the [Focus Assist] window. 5 Displays/Hides the waveform vector monitor. 6 Displays/Hides the [Custom Preset] window. „ Playback Toolbar 1 23 1 Displays/Hides the [Play Viewer] window. 2 Displays/Hides the [File Browser] window. 3 Displays/Hides ...the waveform vector monitor. Camcorder Status This status shows the name of the camcorder connected and status of the toolbar you want to redisplay. Tape error Toolbar There are "Main Toolbar", "Recording Toolbar...
... [Color Control] window. 4 Displays/Hides the [Focus Assist] window. 5 Displays/Hides the waveform vector monitor. 6 Displays/Hides the [Custom Preset] window. „ Playback Toolbar 1 23 1 Displays/Hides the [Play Viewer] window. 2 Displays/Hides the [File Browser] window. 3 Displays/Hides ...the waveform vector monitor. Camcorder Status This status shows the name of the camcorder connected and status of the toolbar you want to redisplay. Tape error Toolbar There are "Main Toolbar", "Recording Toolbar...
CONSOLE_V1-1_ENG.pdf
Page 17
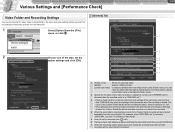
...[DV Rec] tab of the [Option Settings] window, the Custom Preset file will be recorded separately from the [File] menu, or click . 1 2 2 Choose one of the camcorder when the recoding is started the recording. 4 When the camcorder's sound setting is selected in video folder. 5 Sets the cache recording... . You can name the folder after the specified prefix (e.g."CNSL0001.avi"). 3 • Place a check mark to record the Custom Preset settings of the camcorder onto the hard disk. CONSOLE only saves the settings of the tabs, set to 4ch, channel 3 and 4 sounds will be recorded...
...[DV Rec] tab of the [Option Settings] window, the Custom Preset file will be recorded separately from the [File] menu, or click . 1 2 2 Choose one of the camcorder when the recoding is started the recording. 4 When the camcorder's sound setting is selected in video folder. 5 Sets the cache recording... . You can name the folder after the specified prefix (e.g."CNSL0001.avi"). 3 • Place a check mark to record the Custom Preset settings of the camcorder onto the hard disk. CONSOLE only saves the settings of the tabs, set to 4ch, channel 3 and 4 sounds will be recorded...
CONSOLE_V1-1_ENG.pdf
Page 22
... [Detail] ...4-35 [Custom Preset]...4-37 Adjusting the Custom Preset Settings...4-37 Importing the Custom Preset ...4-38 Exporting the Custom Preset ...4-39 Practical Usages of the Custom Preset Files 4-40 Use of the Disconnected Camcorder After Adjusting the Custom Preset Files 4-40 Passing Down the Custom Preset Setting to the Other Camcorders 4-41 Creating a New Custom Preset File Using an Existing...
... [Detail] ...4-35 [Custom Preset]...4-37 Adjusting the Custom Preset Settings...4-37 Importing the Custom Preset ...4-38 Exporting the Custom Preset ...4-39 Practical Usages of the Custom Preset Files 4-40 Use of the Disconnected Camcorder After Adjusting the Custom Preset Files 4-40 Passing Down the Custom Preset Setting to the Other Camcorders 4-41 Creating a New Custom Preset File Using an Existing...
CONSOLE_V1-1_ENG.pdf
Page 29
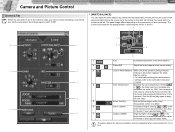
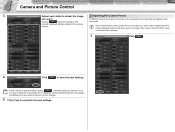
... by clicking the indicated marks. The screen shot below will be adjusted when connecting the XL H1 or XL2. Set the camcorder's recording program to the right; Placing the mouse cursor on the keyboard. Clicking or in the Kelvin text box increases/decreases...Control 4-29 [Control] Tab When the camcorder is being selected, clicking on [Control] tab. The Kelvin degree for indoor and outdoor cannot be displayed when connecting the XH G1 or XH A1. 12 3 7 8 1 6 4 5 1 Auto Automated adjustment of the white balance. 2 / Preset A/B Adjust the white balance to the ...
... by clicking the indicated marks. The screen shot below will be adjusted when connecting the XL H1 or XL2. Set the camcorder's recording program to the right; Placing the mouse cursor on the keyboard. Clicking or in the Kelvin text box increases/decreases...Control 4-29 [Control] Tab When the camcorder is being selected, clicking on [Control] tab. The Kelvin degree for indoor and outdoor cannot be displayed when connecting the XH G1 or XH A1. 12 3 7 8 1 6 4 5 1 Auto Automated adjustment of the white balance. 2 / Preset A/B Adjust the white balance to the ...

CONSOLE_V1-1_ENG.pdf
Page 34
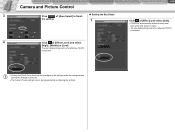
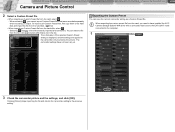
You can switch over each panel by moving the sliders. • For details about each parameter, refer to the camcorder instruction manual. • The area that will be corrected will appear as a white area alternating with the normal image. 3 Click of [Color Phase], [Chroma...more vivid and richer colors. • [Area]: Adjust the color range for [Color Correction] and skin and sky details are . The Custom Preset settings cannot be adjusted while configuring the settings. „ Adjusting the Color Correction • [R Gain]: Adjust the red gain of the color to be detected...
You can switch over each panel by moving the sliders. • For details about each parameter, refer to the camcorder instruction manual. • The area that will be corrected will appear as a white area alternating with the normal image. 3 Click of [Color Phase], [Chroma...more vivid and richer colors. • [Area]: Adjust the color range for [Color Correction] and skin and sky details are . The Custom Preset settings cannot be adjusted while configuring the settings. „ Adjusting the Color Correction • [R Gain]: Adjust the red gain of the color to be detected...

CONSOLE_V1-1_ENG.pdf
Page 35
...4-34). • The area that will be corrected if [OFF] is selected. Skin and sky details settings are . 2 The Custom Preset settings cannot be adjusted while configuring the settings. „ Executing the Color Correction 1 Click of [CORRECT] and select an area in which the color... will be activated. 3 Click of [Area Select]. For details about each parameter, refer to the camcorder instruction manual. „ Setting the Skin Detail Area 1 Click the [Detail] tab and of [A Area Review] to finish the setting. Click ...
...4-34). • The area that will be corrected if [OFF] is selected. Skin and sky details settings are . 2 The Custom Preset settings cannot be adjusted while configuring the settings. „ Executing the Color Correction 1 Click of [CORRECT] and select an area in which the color... will be activated. 3 Click of [Area Select]. For details about each parameter, refer to the camcorder instruction manual. „ Setting the Skin Detail Area 1 Click the [Detail] tab and of [A Area Review] to finish the setting. Click ...
CONSOLE_V1-1_ENG.pdf
Page 36
...] is selected. Clicking the [Color Correction] tab while configuring the settings ends the setting process leaving the settings as they are. The Custom Preset settings cannot be effective if [OFF] is selected. 4 Click of [Effect Level] and select [High], [Middle] or [Low].
...] is selected. Clicking the [Color Correction] tab while configuring the settings ends the setting process leaving the settings as they are. The Custom Preset settings cannot be effective if [OFF] is selected. 4 Click of [Effect Level] and select [High], [Middle] or [Low].
CONSOLE_V1-1_ENG.pdf
Page 37
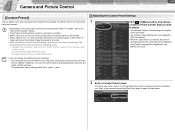
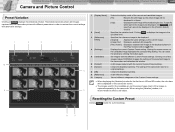
... When using the keyboard. - Changing the position of [Memory No.] and choose a Custom Preset number that you wish to adjust. • The selected Custom Preset settings are applied to the camcorder. • The Custom Preset settings will not be used when recording. When using XL2, you need to set... the camcorder's recording program to apply the new name. to other modes - to import and export the Custom Preset file saved on the [Preset Name] box with the [ ] or [Shift] + [Tab] keys. CONSOLE Windows ...
... When using the keyboard. - Changing the position of [Memory No.] and choose a Custom Preset number that you wish to adjust. • The selected Custom Preset settings are applied to the camcorder. • The Custom Preset settings will not be used when recording. When using XL2, you need to set... the camcorder's recording program to apply the new name. to other modes - to import and export the Custom Preset file saved on the [Preset Name] box with the [ ] or [Shift] + [Tab] keys. CONSOLE Windows ...
CONSOLE_V1-1_ENG.pdf
Page 38
.... mode connected to the computer. 1 Click . 4 Click to obtain the image Importing the Custom Preset you want. When importing the custom preset file from the card, you wish to the camcorder. CONSOLE Windows Various Settings and [Performance Check] Camera and Picture Control Recording onto the Hard Disk Playback... the new settings and displays the new selected memory number settings. 5 Click [Yes] to the memory number. CONSOLE imports the Custom Preset file in the camcorder or the hard disk and applies to the Clicking resets the settings to save the new settings.
.... mode connected to the computer. 1 Click . 4 Click to obtain the image Importing the Custom Preset you want. When importing the custom preset file from the card, you wish to the camcorder. CONSOLE Windows Various Settings and [Performance Check] Camera and Picture Control Recording onto the Hard Disk Playback... the new settings and displays the new selected memory number settings. 5 Click [Yes] to the memory number. CONSOLE imports the Custom Preset file in the camcorder or the hard disk and applies to the Clicking resets the settings to save the new settings.
CONSOLE_V1-1_ENG.pdf
Page 39
... separately when recording on a tape. Click to the EXT.CONT. The camcorder settings have installed the AV/C Camera Storage Subunit-WIA driver with a camcorder that is set yet. When exporting the custom preset file from the list. Clicking [Cancel] stops importing the file and returns... of the recently imported and saved files. Selecting displays a list of the selected Custom Preset setting is not in the list. You can save the current camcorder setting as a Custom Preset file. CONSOLE Windows Various Settings and [Performance Check] Camera and Picture Control Recording onto...
... separately when recording on a tape. Click to the EXT.CONT. The camcorder settings have installed the AV/C Camera Storage Subunit-WIA driver with a camcorder that is set yet. When exporting the custom preset file from the list. Clicking [Cancel] stops importing the file and returns... of the recently imported and saved files. Selecting displays a list of the selected Custom Preset setting is not in the list. You can save the current camcorder setting as a Custom Preset file. CONSOLE Windows Various Settings and [Performance Check] Camera and Picture Control Recording onto...
CONSOLE_V1-1_ENG.pdf
Page 40
...the protect mode and click [OK]. • When a confirmation window appears, click [Yes]. • The Custom Preset file will be saved, and the camcorder settings will lose the new Custom Preset settings adjusted from the computer if you will be saved. - If you wish to export when selecting . •...; When selecting , specify a file name to be returned to the camcorder by the computer. Select a file from a list of the selected Custom Preset setting is set yet. • Select the preset number you wish to export a file that is not in step 2 to the ...
...the protect mode and click [OK]. • When a confirmation window appears, click [Yes]. • The Custom Preset file will be saved, and the camcorder settings will lose the new Custom Preset settings adjusted from the computer if you will be saved. - If you wish to export when selecting . •...; When selecting , specify a file name to be returned to the camcorder by the computer. Select a file from a list of the selected Custom Preset setting is set yet. • Select the preset number you wish to export a file that is not in step 2 to the ...
CONSOLE_V1-1_ENG.pdf
Page 41
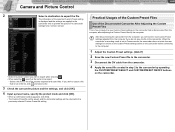
...base. Save the Custom Preset file to the camcorder and on the hard disc in step 2. 5 Adjust the Custom Preset file. ( 4-37) Import and save the file on the camcorder. 6 Apply the saved file to the camcorder by XH G1 and XH A1 are not compatible to XH G1/XH A1 and vice versa. [...Preparations] Insert the card to the camcorder that is how to create a new Custom Preset file using a card to make clone camcorders. CONSOLE Windows Various ...
...base. Save the Custom Preset file to the camcorder and on the hard disc in step 2. 5 Adjust the Custom Preset file. ( 4-37) Import and save the file on the camcorder. 6 Apply the saved file to the camcorder by XH G1 and XH A1 are not compatible to XH G1/XH A1 and vice versa. [...Preparations] Insert the card to the camcorder that is how to create a new Custom Preset file using a card to make clone camcorders. CONSOLE Windows Various ...
CONSOLE_V1-1_ENG.pdf
Page 42
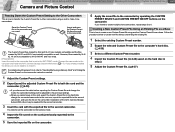
... the current settings with different parameters in a frame. Displays a captured still image of the camcorder returns to apply the settings of the Custom Preset settings. When displaying the [Variation] window for the candidate are not the same images...] 7 [Cancel] 8 [OK] 9 [Reference] 10 Category Selects the display mode of the images is recommended to the camcorder, and refreshes the window. Resetting the Custom Preset Clicking resets the current settings. 8 7 CONSOLE Windows Various Settings and [Performance Check] Camera and Picture Control Recording onto the...
... the current settings with different parameters in a frame. Displays a captured still image of the camcorder returns to apply the settings of the Custom Preset settings. When displaying the [Variation] window for the candidate are not the same images...] 7 [Cancel] 8 [OK] 9 [Reference] 10 Category Selects the display mode of the images is recommended to the camcorder, and refreshes the window. Resetting the Custom Preset Clicking resets the current settings. 8 7 CONSOLE Windows Various Settings and [Performance Check] Camera and Picture Control Recording onto the...

CONSOLE_V1-1_ENG.pdf
Page 45
...45 Recording onto the Hard Disk Recording a Movie File By Operating the Camcorder 1 Press the start/stop button on the camcorder. • Recording starts on both the tape in the camcorder and the hard disk. • When [Save custom preset file when recording start.] is the same as the video folder. The.... To stop button after changing the tape when you restart the recording by pressing the camcorder's Start/Stop button. The name of the Custom Preset file is saved only on the hard disk. • Even when the tape reaches the end, recording onto the hard disk continues. &#...
...45 Recording onto the Hard Disk Recording a Movie File By Operating the Camcorder 1 Press the start/stop button on the camcorder. • Recording starts on both the tape in the camcorder and the hard disk. • When [Save custom preset file when recording start.] is the same as the video folder. The.... To stop button after changing the tape when you restart the recording by pressing the camcorder's Start/Stop button. The name of the Custom Preset file is saved only on the hard disk. • Even when the tape reaches the end, recording onto the hard disk continues. &#...

