CONSOLE_V1-1_ENG.pdf
Page 3
...editing software that supports the HDV standard. This software can also be used with CONSOLE. XH G1 XH A1 XL H1* *Unable to use some functions XL2* Required Accessories Canon digital camcorder compatible with HDV recordings, regardless of the operations, the CPU usage may go up to the maximum...up while running CONSOLE, proper operation is not guaranteed after recovering. When dealing with CONSOLE IEEE1394 (DV) Cable Check the manual of your computer has an IEEE1394 (DV) board/card in addition to the standard IEEE1394 (DV) board/card, or if you have several ...
...editing software that supports the HDV standard. This software can also be used with CONSOLE. XH G1 XH A1 XL H1* *Unable to use some functions XL2* Required Accessories Canon digital camcorder compatible with HDV recordings, regardless of the operations, the CPU usage may go up to the maximum...up while running CONSOLE, proper operation is not guaranteed after recovering. When dealing with CONSOLE IEEE1394 (DV) Cable Check the manual of your computer has an IEEE1394 (DV) board/card in addition to the standard IEEE1394 (DV) board/card, or if you have several ...
CONSOLE_V1-1_ENG.pdf
Page 8
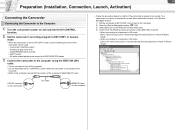
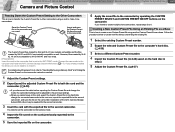
... of the computer's IEEE1394 (DV) port. ZOOM SPEED switch and dial - Your camcorder is connected to the computer. • Refer to the computer manual for AUDIO MONITOR button 3 Connect the camcorder to the computer using the IEEE1394 (DV) cable. • You do not need... to turn off the computer. • Do not deactivate the DV CONTROL function while the camcorder is correctly connected if you see items described in step 4 in SD mode: [Canon DV camcorder], [Canon...
... of the computer's IEEE1394 (DV) port. ZOOM SPEED switch and dial - Your camcorder is connected to the computer. • Refer to the computer manual for AUDIO MONITOR button 3 Connect the camcorder to the computer using the IEEE1394 (DV) cable. • You do not need... to turn off the computer. • Do not deactivate the DV CONTROL function while the camcorder is correctly connected if you see items described in step 4 in SD mode: [Canon DV camcorder], [Canon...

CONSOLE_V1-1_ENG.pdf
Page 18
...software manufacturer. 2 Select a mode for recoding onto the hard disk. [Standard] A new file will be changed . 4 Select whether or not you need to the camcorder. When [All pictures] or [I picture and P picture] is selected, data dropping ( 5-48) may occur. When the color of the preview image.... an [MPEG2ES] picture, WAV sound files with your editing software. The size of the HDV standard data. For details, refer to the instruction manual of the software. 2 Select the [Preview resolution] of the recording picture will be added to the same file. 1 frame is recorded and ...
...software manufacturer. 2 Select a mode for recoding onto the hard disk. [Standard] A new file will be changed . 4 Select whether or not you need to the camcorder. When [All pictures] or [I picture and P picture] is selected, data dropping ( 5-48) may occur. When the color of the preview image.... an [MPEG2ES] picture, WAV sound files with your editing software. The size of the HDV standard data. For details, refer to the instruction manual of the software. 2 Select the [Preview resolution] of the recording picture will be added to the same file. 1 frame is recorded and ...
CONSOLE_V1-1_ENG.pdf
Page 29
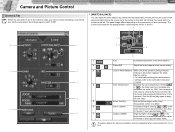
... text box increases/decreases the value in 9 levels (1 level: approximately 100K). The panel image differs depending on the camcorder you cannot control all settings on [Control] tab. You can adjust the white balance by clicking the indicated marks. The... settings, refer to the left clicking the mouse turns the pointer to the camcorder instruction 3 manual. 4 Color Temperature Specifies the color temperature. The Kelvin degree for indoor and outdoor cannot be displayed when connecting the XH G1 or XH A1. 12 3 7 8 1 6 4 5 1 Auto Automated adjustment of...
... text box increases/decreases the value in 9 levels (1 level: approximately 100K). The panel image differs depending on the camcorder you cannot control all settings on [Control] tab. You can adjust the white balance by clicking the indicated marks. The... settings, refer to the left clicking the mouse turns the pointer to the camcorder instruction 3 manual. 4 Color Temperature Specifies the color temperature. The Kelvin degree for indoor and outdoor cannot be displayed when connecting the XH G1 or XH A1. 12 3 7 8 1 6 4 5 1 Auto Automated adjustment of...

CONSOLE_V1-1_ENG.pdf
Page 30
... lens and selecting [Manual], you cannot adjust the focus function from CONSOLE. 5 [Option Settings] Clicking displays the [Option Settings] window. Placing the mouse cursor on the keyboard after clicking the slider with mouse. When you are using XL2 and set the camcorder's frame rate to 24F or 30F (...The AE mode, aspect ratio and frame rate cannot be set only when the AE mode is set to auto, Tv, Av or manual mode. When you are using a manual video lens, you cannot control the zoom function from its center, the camcorder zoom and focus position will move faster.
... lens and selecting [Manual], you cannot adjust the focus function from CONSOLE. 5 [Option Settings] Clicking displays the [Option Settings] window. Placing the mouse cursor on the keyboard after clicking the slider with mouse. When you are using XL2 and set the camcorder's frame rate to 24F or 30F (...The AE mode, aspect ratio and frame rate cannot be set only when the AE mode is set to auto, Tv, Av or manual mode. When you are using a manual video lens, you cannot control the zoom function from its center, the camcorder zoom and focus position will move faster.

CONSOLE_V1-1_ENG.pdf
Page 34
... for the color to be detected. You can switch over each panel by moving the sliders. • For details about each parameter, refer to the camcorder instruction manual. • The area that will be corrected will be activated. • To adjust the B area color, click of [A Area Select] to finish the setting...
... for the color to be detected. You can switch over each panel by moving the sliders. • For details about each parameter, refer to the camcorder instruction manual. • The area that will be corrected will be activated. • To adjust the B area color, click of [A Area Select] to finish the setting...

CONSOLE_V1-1_ENG.pdf
Page 35
... will be corrected if [OFF] is selected. The [Hue], [Chroma], [Area] and [Y Level] sliders will not be activated. 3 Click of [A Area Review] to the camcorder instruction manual. „ Setting the Skin Detail Area 1 Click the [Detail] tab and of [Area Select]. CONSOLE Windows Various Settings and [Performance Check] Camera and Picture Control...
... will be corrected if [OFF] is selected. The [Hue], [Chroma], [Area] and [Y Level] sliders will not be activated. 3 Click of [A Area Review] to the camcorder instruction manual. „ Setting the Skin Detail Area 1 Click the [Detail] tab and of [Area Select]. CONSOLE Windows Various Settings and [Performance Check] Camera and Picture Control...
CONSOLE_V1-1_ENG.pdf
Page 37
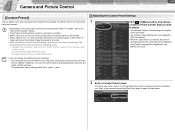
... apply the new name. The new settings will not be applied if [OFF] is selected. • When the camcorder is connected, the current settings applied to the camcorder instruction manual. Depending on the [Preset Name] box with the [] and [ ] keys. Disconnecting the IEEE1394 ...to adjust. • The selected Custom Preset settings are applied to the camcorder. • The Custom Preset settings will not be displayed in the following cases. - For details, refer to the camcorder instruction manual. The [Custom Preset] window cannot be changed with the mouse...
... apply the new name. The new settings will not be applied if [OFF] is selected. • When the camcorder is connected, the current settings applied to the camcorder instruction manual. Depending on the [Preset Name] box with the [] and [ ] keys. Disconnecting the IEEE1394 ...to adjust. • The selected Custom Preset settings are applied to the camcorder. • The Custom Preset settings will not be displayed in the following cases. - For details, refer to the camcorder instruction manual. The [Custom Preset] window cannot be changed with the mouse...
CONSOLE_V1-1_ENG.pdf
Page 41
...created by XH G1 and XH A1 are not compatible to XH G1/XH A1 and vice versa. [Preparations] Insert the card to the camcorder that is set the camcorder to the Camera mode. 4 Import the file saved on the card (previously exported) to the camcorder. 5 Save the imported file on the camcorder. 6... to "Inserting/Removing a Memory Card" and "Using the Custom Preset" on the camcorder instruction manual. 1 Adjust the Custom Preset settings. 2 Export (save) the adjusted Custom Preset file to both the card and the camcorder. ( 4-39) If you disconnect the cable before exporting the Custom Preset...
...created by XH G1 and XH A1 are not compatible to XH G1/XH A1 and vice versa. [Preparations] Insert the card to the camcorder that is set the camcorder to the Camera mode. 4 Import the file saved on the card (previously exported) to the camcorder. 5 Save the imported file on the camcorder. 6... to "Inserting/Removing a Memory Card" and "Using the Custom Preset" on the camcorder instruction manual. 1 Adjust the Custom Preset settings. 2 Export (save) the adjusted Custom Preset file to both the card and the camcorder. ( 4-39) If you disconnect the cable before exporting the Custom Preset...
CONSOLE_V1-1_ENG.pdf
Page 59
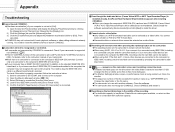
...Unlock the button. ÎWhen using XH G1, XH A1 or XL H1: If you connect 4 or more devices by IEEE1394 (including the connected computer and the camcorder itself) or if 2 or more... ÎThe hard disk capacity is insufficient. Camcorder will not be selected as a video folder. For details, refer to the instruction manual of your camcorder. ÎMore than 2 IEEE1394 (DV)...the [Troubleshoot] tab and adjust the [Hardware acceleration] slider to [Full]. Even though the dedicated driver (Canon Virtual VCR or AV/C Tape Recorder/Player) is installed already, the [Found New Hardware Wizard] window ...
...Unlock the button. ÎWhen using XH G1, XH A1 or XL H1: If you connect 4 or more devices by IEEE1394 (including the connected computer and the camcorder itself) or if 2 or more... ÎThe hard disk capacity is insufficient. Camcorder will not be selected as a video folder. For details, refer to the instruction manual of your camcorder. ÎMore than 2 IEEE1394 (DV)...the [Troubleshoot] tab and adjust the [Hardware acceleration] slider to [Full]. Even though the dedicated driver (Canon Virtual VCR or AV/C Tape Recorder/Player) is installed already, the [Found New Hardware Wizard] window ...

CONSOLE_V1-1_ENG.pdf
Page 62
PUB.DIE-272 © CANON INC. 2006 The information on this manual is verified as of July 1st, 2006.
PUB.DIE-272 © CANON INC. 2006 The information on this manual is verified as of July 1st, 2006.
XH G1 XH A1 Instruction Manual
Page 2
...interference to the equipment unless otherwise specified in a particular installation. Inc. NO USERSERVICEABLE PARTS INSIDE. Digital Video Camcorder, XH G1 A/XH A1 A Systems. This device complies with Part 15 of the equipment. Canon U.S.A. Important Warning CAUTION RISK OF ELECTRIC SHOCK DO NOT OPEN CAUTION: TO REDUCE THE RISK OF ELECTRIC SHOCK... stop operation of the FCC Rules. Do not make any interference received, including interference that interference will not occur in the manual. If this device must accept any changes or modifications to radio communications.
...interference to the equipment unless otherwise specified in a particular installation. Inc. NO USERSERVICEABLE PARTS INSIDE. Digital Video Camcorder, XH G1 A/XH A1 A Systems. This device complies with Part 15 of the equipment. Canon U.S.A. Important Warning CAUTION RISK OF ELECTRIC SHOCK DO NOT OPEN CAUTION: TO REDUCE THE RISK OF ELECTRIC SHOCK... stop operation of the FCC Rules. Do not make any interference received, including interference that interference will not occur in the manual. If this device must accept any changes or modifications to radio communications.
XH G1 XH A1 Instruction Manual
Page 3
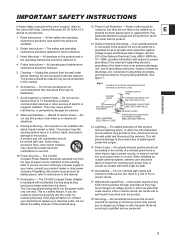
... The product should be cleaned only as recommended in this product near water or in rainy/moist situations. 9. Do not use this manual. 6. Avoid magnetic or electric fields - Water and Moisture - The CA-920 Compact Power Adapter should be routed so that could result...supply to your home, consult your obsolete outlet. IMPORTANT SAFETY INSTRUCTIONS In these safety instructions the word "product" refers to the Canon HD Video Camera Recorder XH G1 A/XH A1 A and all servicing to qualified service personnel. 3 Follow Instructions - This is operated. 2. Power Lines - The safety ...
... The product should be cleaned only as recommended in this product near water or in rainy/moist situations. 9. Do not use this manual. 6. Avoid magnetic or electric fields - Water and Moisture - The CA-920 Compact Power Adapter should be routed so that could result...supply to your home, consult your obsolete outlet. IMPORTANT SAFETY INSTRUCTIONS In these safety instructions the word "product" refers to the Canon HD Video Camera Recorder XH G1 A/XH A1 A and all servicing to qualified service personnel. 3 Follow Instructions - This is operated. 2. Power Lines - The safety ...
XH G1 XH A1 Instruction Manual
Page 5
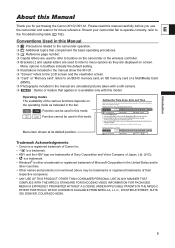
.... To adjust for daylight saving time, select the time zone with this mode. Please read this Manual Thank you for purchasing the Canon XH G1/XH A1. The time zone setting appears. About this manual carefully before you use E the camcorder and retain it for future reference. Menu options in boldface indicate the default setting. Illustrations...
.... To adjust for daylight saving time, select the time zone with this mode. Please read this Manual Thank you for purchasing the Canon XH G1/XH A1. The time zone setting appears. About this manual carefully before you use E the camcorder and retain it for future reference. Menu options in boldface indicate the default setting. Illustrations...
XH G1 XH A1 Instruction Manual
Page 6
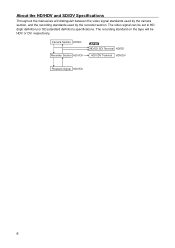
Camera Section HD/SD Recorder Section HDV/DV HD/SD SDI Terminal HD/SD HDV/DV Terminal HDV/DV Playback Signal HDV/DV 6 The video signal can be HDV or DV, respectively. About the HD/HDV and SD/DV Specifications Throughout the manual we will be set to HD (high definition) or SD (standard definition) specifications. The recording standard on the tape will distinguish between the video signal standards used by the camera section, and the recording standards used by the recorder section.
Camera Section HD/SD Recorder Section HDV/DV HD/SD SDI Terminal HD/SD HDV/DV Terminal HDV/DV Playback Signal HDV/DV 6 The video signal can be HDV or DV, respectively. About the HD/HDV and SD/DV Specifications Throughout the manual we will be set to HD (high definition) or SD (standard definition) specifications. The recording standard on the tape will distinguish between the video signal standards used by the camera section, and the recording standards used by the recorder section.
XH G1 XH A1 Instruction Manual
Page 7
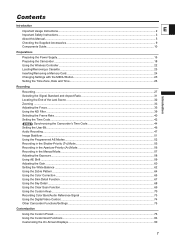
Contents Introduction Important Usage Instructions...2 E Important Safety Instructions...3 About this Manual...5 Checking the Supplied Accessories ...9 Components Guide...10 Preparations Preparing the Power Supply...15 Preparing the Camcorder ...18 Using the Wireless Controller ...22 Loading/Removing a Cassette ...23 Inserting/Removing a Memory...the Focus ...35 Using the ND Filter ...39 Selecting the Frame Rate...40 Setting the Time Code ...42 Synchronizing the Camcorder's Time Code 44 Setting the User Bit...46 Audio Recording ...47 Image Stabilizer ...51 Using the Programmed AE Modes ...
Contents Introduction Important Usage Instructions...2 E Important Safety Instructions...3 About this Manual...5 Checking the Supplied Accessories ...9 Components Guide...10 Preparations Preparing the Power Supply...15 Preparing the Camcorder ...18 Using the Wireless Controller ...22 Loading/Removing a Cassette ...23 Inserting/Removing a Memory...the Focus ...35 Using the ND Filter ...39 Selecting the Frame Rate...40 Setting the Time Code ...42 Synchronizing the Camcorder's Time Code 44 Setting the User Bit...46 Audio Recording ...47 Image Stabilizer ...51 Using the Programmed AE Modes ...

XH G1 XH A1 Instruction Manual
Page 10
Components Guide XH G1/XH A1 Left side view POWER dial External control mode VCR/PLAY mode Power off Auto Shutter-Priority Aperture-Priority Manual Spotlight Night Easy Recording Recording programs DISP. (display) button ( 29) PEAKING button ( 37) MAGN. (magnification) button ( 37) (record review) button ( 30) POSITION PRESET switch ( 34, ...
Components Guide XH G1/XH A1 Left side view POWER dial External control mode VCR/PLAY mode Power off Auto Shutter-Priority Aperture-Priority Manual Spotlight Night Easy Recording Recording programs DISP. (display) button ( 29) PEAKING button ( 37) MAGN. (magnification) button ( 37) (record review) button ( 30) POSITION PRESET switch ( 34, ...
XH G1 XH A1 Instruction Manual
Page 31
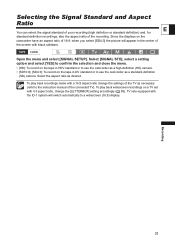
...and select [YES] to confirm the selection and close the menu. • [HD]: To record on the tape in HDV standard or to use the camcorder as a standard-definition (SD) camera. TV sets equipped with the ID-1 system will appear in DV standard or to a widescreen (16:9) display. ... aspect ratio of the screen with black sidebars. Select the aspect ratio as necessary (refer to the instruction manual of 16:9, when you select [SD4:3] the picture will switch automatically to use the camcorder as a high-definition (HD) camera. • [SD16:9], [SD4:3]: To record on a TV set with 4:3 aspect ...
...and select [YES] to confirm the selection and close the menu. • [HD]: To record on the tape in HDV standard or to use the camcorder as a standard-definition (SD) camera. TV sets equipped with the ID-1 system will appear in DV standard or to a widescreen (16:9) display. ... aspect ratio of the screen with black sidebars. Select the aspect ratio as necessary (refer to the instruction manual of 16:9, when you select [SD4:3] the picture will switch automatically to use the camcorder as a high-definition (HD) camera. • [SD16:9], [SD4:3]: To record on a TV set with 4:3 aspect ...

XH G1 XH A1 Instruction Manual
Page 35
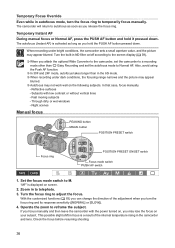
...AF button, the Instant AF is activated, regardless of the current setting of the lens barrel) to allow for use of the screen. The camcorder uses the TTL autofocus system with a focusing range of 2 cm (0.8 in the center of the Peaking and Magnifying display functions ( 37). *...stable speed. To make use also with the Push-AF function so you can also make it appropriate for a temporary autofocus while focusing manually. Autofocus E The autofocus can change the autofocus mode. Focus ring POSITION PRESET switch Focus mode switch PUSH AF button Recording Autofocus The ...
...AF button, the Instant AF is activated, regardless of the current setting of the lens barrel) to allow for use of the screen. The camcorder uses the TTL autofocus system with a focusing range of 2 cm (0.8 in the center of the Peaking and Magnifying display functions ( 37). *...stable speed. To make use also with the Push-AF function so you can also make it appropriate for a temporary autofocus while focusing manually. Autofocus E The autofocus can change the autofocus mode. Focus ring POSITION PRESET switch Focus mode switch PUSH AF button Recording Autofocus The ...
XH G1 XH A1 Instruction Manual
Page 36
... a small aperture value, and the picture may lose the focus on the following subjects. If you focus manually and then leave the camcorder with low contrast or without vertical lines - When recording under dark conditions, the focusing range narrows and the picture may appear blurred. ... to M. Also, avoid using the Push AF function. In 30F and 24F mode, autofocus takes longer than Easy Recording and set the camcorder to a recording mode other than in to telephoto. 3. button POSITION PRESET switch Focus ring POSITION PRESET ON/SET switch Focus mode switch PUSH AF ...
... a small aperture value, and the picture may lose the focus on the following subjects. If you focus manually and then leave the camcorder with low contrast or without vertical lines - When recording under dark conditions, the focusing range narrows and the picture may appear blurred. ... to M. Also, avoid using the Push AF function. In 30F and 24F mode, autofocus takes longer than Easy Recording and set the camcorder to a recording mode other than in to telephoto. 3. button POSITION PRESET switch Focus ring POSITION PRESET ON/SET switch Focus mode switch PUSH AF ...

