
XA10 Instruction Manual
Page 2
... OF ELECTRIC SHOCK DO NOT OPEN CAUTION: TO REDUCE THE RISK OF ELECTRIC SHOCK, DO NOT REMOVE COVER (OR BACK). HD Camcorder, XA10 A systems This device complies with the limits for help. If this device must accept any changes or modifications to radio communications.... into an outlet on a circuit different from that may cause harmful interference to the equipment unless otherwise specified in a particular installation. Canon U.S.A., Inc. NO USER-SERVICEABLE PARTS INSIDE. REFER SERVICING TO QUALIFIED SERVICE PERSONNEL. The exclamation point, within the product's enclosure, that...
... OF ELECTRIC SHOCK DO NOT OPEN CAUTION: TO REDUCE THE RISK OF ELECTRIC SHOCK, DO NOT REMOVE COVER (OR BACK). HD Camcorder, XA10 A systems This device complies with the limits for help. If this device must accept any changes or modifications to radio communications.... into an outlet on a circuit different from that may cause harmful interference to the equipment unless otherwise specified in a particular installation. Canon U.S.A., Inc. NO USER-SERVICEABLE PARTS INSIDE. REFER SERVICING TO QUALIFIED SERVICE PERSONNEL. The exclamation point, within the product's enclosure, that...
XA10 Instruction Manual
Page 3
... registers, stoves, or other power sources such as this manual. 23 Polarization - IMPORTANT SAFETY INSTRUCTIONS In these safety instructions the word "product" refers to the Canon HD Camcorder XA10 A and all its accessories. 1 Read these instructions. 2 Keep these instructions. 3 Heed all warnings. 4 Follow all servicing to qualified service personnel. This will fit into...
... registers, stoves, or other power sources such as this manual. 23 Polarization - IMPORTANT SAFETY INSTRUCTIONS In these safety instructions the word "product" refers to the Canon HD Camcorder XA10 A and all its accessories. 1 Read these instructions. 2 Keep these instructions. 3 Heed all warnings. 4 Follow all servicing to qualified service personnel. This will fit into...
XA10 Instruction Manual
Page 5
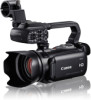
... the XLR terminals, you can even use the built-in the camcorder. Furthermore, you can create a pleasing blurred background effect at your recordings. Highlights of the XA10 The Canon XA10 HD Camcorder is a high-performance camcorder whose compact size makes it (0 53). Manual controls at full telephoto.... With the built-in infrared light on it ideal in focus. Operability Emphasis on recording video without interruption. This allows the camcorder to autofocus only when a face is detected, ensuring that captures video at full wide angle of -the-art DIGIC DV III...
... the XLR terminals, you can even use the built-in the camcorder. Furthermore, you can create a pleasing blurred background effect at your recordings. Highlights of the XA10 The Canon XA10 HD Camcorder is a high-performance camcorder whose compact size makes it (0 53). Manual controls at full telephoto.... With the built-in infrared light on it ideal in focus. Operability Emphasis on recording video without interruption. This allows the camcorder to autofocus only when a face is detected, ensuring that captures video at full wide angle of -the-art DIGIC DV III...

XA10 Instruction Manual
Page 7
... on the device used *. 7 Eye-Fi Use an Eye-Fi card (0 142) to wirelessly upload recordings to your HD movies, in the camcorder itself, to standard definition files (0 139). * Refer to the instruction manual of memory card used , correct playback may not be possible even if ...the device is AVCHD-compatible. Enjoying your Recordings on Other Devices Connect the camcorder to an HDTV (0 127) Play video directly from your recorded memory card AVCHD-compatible HDTVs and digital recorders with a card slot compatible with ...
... on the device used *. 7 Eye-Fi Use an Eye-Fi card (0 142) to wirelessly upload recordings to your HD movies, in the camcorder itself, to standard definition files (0 139). * Refer to the instruction manual of memory card used , correct playback may not be possible even if ...the device is AVCHD-compatible. Enjoying your Recordings on Other Devices Connect the camcorder to an HDTV (0 127) Play video directly from your recorded memory card AVCHD-compatible HDTVs and digital recorders with a card slot compatible with ...
XA10 Instruction Manual
Page 8
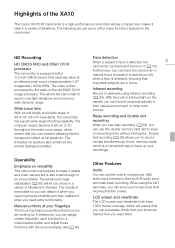
... Used in this Manual 11 Supplied Accessories and CD-ROMs 13 Names of Parts 15 8 2 Preparations 22 Charging the Battery Pack 22 Preparing the Camcorder 24 Attaching the Microphone Holder Unit 24 Attaching the Handle Unit 24 Attaching the Lens Hood 25 Using the Viewfinder 25 Adjusting the Position and...the Date and Time 34 Changing the Language 34 Changing the Time Zone 35 Using a Memory Card 36 Memory Cards Compatible for Use with the Camcorder 36 Inserting and Removing a Memory Card 37 Selecting the Memory for the Recordings 38 Relay Recording 38 Double Slot Recording 39 Initializing the Memory ...
... Used in this Manual 11 Supplied Accessories and CD-ROMs 13 Names of Parts 15 8 2 Preparations 22 Charging the Battery Pack 22 Preparing the Camcorder 24 Attaching the Microphone Holder Unit 24 Attaching the Handle Unit 24 Attaching the Lens Hood 25 Using the Viewfinder 25 Adjusting the Position and...the Date and Time 34 Changing the Language 34 Changing the Time Zone 35 Using a Memory Card 36 Memory Cards Compatible for Use with the Camcorder 36 Inserting and Removing a Memory Card 37 Selecting the Memory for the Recordings 38 Relay Recording 38 Double Slot Recording 39 Initializing the Memory ...
XA10 Instruction Manual
Page 9
... Music 119 Copying and Moving Scenes Within/ Between Stories 121 Selecting a Story's Thumbnail Image 122 Changing a Story's Title 123 7 External Connections 124 Terminals on the Camcorder 124 Connection Diagrams 125 Playback on a TV Screen 127 8 Photos 128 Viewing Photos 128 Photo Jump Function 129 Deleting Photos 130 Deleting a Single Photo 130...
... Music 119 Copying and Moving Scenes Within/ Between Stories 121 Selecting a Story's Thumbnail Image 122 Changing a Story's Title 123 7 External Connections 124 Terminals on the Camcorder 124 Connection Diagrams 125 Playback on a TV Screen 127 8 Photos 128 Viewing Photos 128 Photo Jump Function 129 Deleting Photos 130 Deleting a Single Photo 130...
XA10 Instruction Manual
Page 10
... Computer and Uploading your Videos 141 Converting Scenes into Standard Definition from a Story by Rating 141 Converting Only Part of Messages 164 Handling Precautions 171 Camcorder 171 Battery Pack 172 Memory Card 172 Built-in Rechargeable Lithium Battery 173 Lithium Button Battery 173 Disposal 173 Maintenance/Others 174 Cleaning 174 Condensation...
... Computer and Uploading your Videos 141 Converting Scenes into Standard Definition from a Story by Rating 141 Converting Only Part of Messages 164 Handling Precautions 171 Camcorder 171 Battery Pack 172 Memory Card 172 Built-in Rechargeable Lithium Battery 173 Lithium Button Battery 173 Disposal 173 Maintenance/Others 174 Cleaning 174 Condensation...
XA10 Instruction Manual
Page 11
... simplified to both. 1 Introduction Introduction About this Manual About this Manual Thank you use the camcorder and retain it for purchasing the Canon XA10. Should your camcorder fail to operate correctly, refer to Troubleshooting (0 159). 11 Conventions Used in this Manual ...• IMPORTANT: Precautions related to the camcorder's operation. • NOTES: Additional topics that complement the basic operating ...
... simplified to both. 1 Introduction Introduction About this Manual About this Manual Thank you use the camcorder and retain it for purchasing the Canon XA10. Should your camcorder fail to operate correctly, refer to Troubleshooting (0 159). 11 Conventions Used in this Manual ...• IMPORTANT: Precautions related to the camcorder's operation. • NOTES: Additional topics that complement the basic operating ...
XA10 Instruction Manual
Page 12
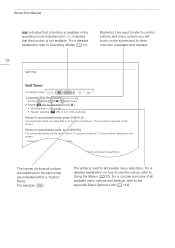
...to refer to control buttons and menu options you will touch on the screen. • Repeat, selecting [B Off], to abbreviate menu selections. The camcorder starts recording after a 10-second countdown*. Photos: In record pause mode, touch [PHOTO]. Brackets [ ] are indicated within a "button" frame...all available menu options and settings, refer to Operating Modes (0 31). The arrow is not available. For a detailed explanation on the camcorder are used to turn off the self timer. Pressing g, when recording movies. Movies: In record pause mode, press g. For a ...
...to refer to control buttons and menu options you will touch on the screen. • Repeat, selecting [B Off], to abbreviate menu selections. The camcorder starts recording after a 10-second countdown*. Photos: In record pause mode, touch [PHOTO]. Brackets [ ] are indicated within a "button" frame...all available menu options and settings, refer to Operating Modes (0 31). The arrow is not available. For a detailed explanation on the camcorder are used to turn off the self timer. Pressing g, when recording movies. Movies: In record pause mode, press g. For a ...
XA10 Instruction Manual
Page 13
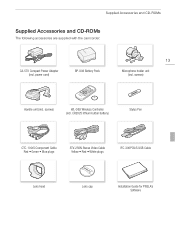
Supplied Accessories and CD-ROMs Supplied Accessories and CD-ROMs The following accessories are supplied with the camcorder: CA-570 Compact Power Adapter (incl. power cord) BP-808 Battery Pack 13 Microphone holder unit (incl. screws) WL-D89 Wireless Controller (incl. CR2025 lithium button battery) Stylus Pen CTC-100/S Component Cable Red • Green • Blue plugs STV-250N Stereo Video Cable Yellow • Red • White plugs IFC-300PCU/S USB Cable Lens hood Lens cap Installation Guide for PIXELA's Software screws) Handle unit (incl.
Supplied Accessories and CD-ROMs Supplied Accessories and CD-ROMs The following accessories are supplied with the camcorder: CA-570 Compact Power Adapter (incl. power cord) BP-808 Battery Pack 13 Microphone holder unit (incl. screws) WL-D89 Wireless Controller (incl. CR2025 lithium button battery) Stylus Pen CTC-100/S Component Cable Red • Green • Blue plugs STV-250N Stereo Video Cable Yellow • Red • White plugs IFC-300PCU/S USB Cable Lens hood Lens cap Installation Guide for PIXELA's Software screws) Handle unit (incl.
XA10 Instruction Manual
Page 14
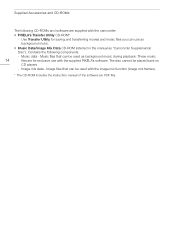
... mix function (image mix frames). * The CD-ROM includes the instruction manual of the software (on CD players. - Image files that can be used as "Camcorder Supplemental Disc"). Music files that can be played back on PDF file). Supplied Accessories and CD-ROMs The following components. - Contains the following CD-ROMs...
... mix function (image mix frames). * The CD-ROM includes the instruction manual of the software (on CD players. - Image files that can be used as "Camcorder Supplemental Disc"). Music files that can be played back on PDF file). Supplied Accessories and CD-ROMs The following components. - Contains the following CD-ROMs...
XA10 Instruction Manual
Page 22
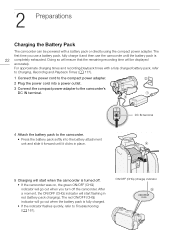
...OFF (CHG) indicator will go out when the battery pack is 22 completely exhausted. 2Charging the BPattreerypPaackrations Preparations Charging the Battery Pack The camcorder can be displayed accurately. ON/OFF (CHG) (charge) indicator DC IN terminal 5 Charging will start flashing in place. After a moment,... Troubleshooting (0 161). Doing so will ensure that the remaining recording time will start when the camcorder is turned off the camcorder. The first time you turn off . • If the camcorder was on, the green ON/OFF (CHG) indicator will go out when you use a ...
...OFF (CHG) indicator will go out when the battery pack is 22 completely exhausted. 2Charging the BPattreerypPaackrations Preparations Charging the Battery Pack The camcorder can be displayed accurately. ON/OFF (CHG) (charge) indicator DC IN terminal 5 Charging will start flashing in place. After a moment,... Troubleshooting (0 161). Doing so will ensure that the remaining recording time will start when the camcorder is turned off the camcorder. The first time you turn off . • If the camcorder was on, the green ON/OFF (CHG) indicator will go out when you use a ...
XA10 Instruction Manual
Page 23
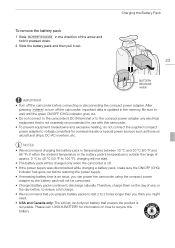
... or the battery pack's temperature is outside the range of approx. 0 °C to 40 °C (32 °F to turn off the camcorder before connecting or disconnecting the compact power adapter. After pressing x to 104 °F), charging will not start. • The battery pack will not be... °C and 30 °C (50 °F and 86 °F). Charging the Battery Pack 23 BATTERY RELEASE switch IMPORTANT • Turn off the camcorder, important data is an issue, you might need. • USA and Canada only: The Lithium ion/polymer battery that is recyclable. NOTES • ...
... or the battery pack's temperature is outside the range of approx. 0 °C to 40 °C (32 °F to turn off the camcorder before connecting or disconnecting the compact power adapter. After pressing x to 104 °F), charging will not start. • The battery pack will not be... °C and 30 °C (50 °F and 86 °F). Charging the Battery Pack 23 BATTERY RELEASE switch IMPORTANT • Turn off the camcorder, important data is an issue, you might need. • USA and Canada only: The Lithium ion/polymer battery that is recyclable. NOTES • ...
XA10 Instruction Manual
Page 24
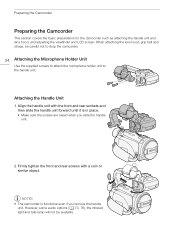
... similar object. However, some audio options (0 73, 76), the infrared light and tally lamp will not be careful not to drop the camcorder. 24 Attaching the Microphone Holder Unit Use the supplied screws to attach the microphone holder unit to the handle unit. When attaching the lens... hood, grip belt and straps, be available. Preparing the Camcorder Preparing the Camcorder This section covers the basic preparations for the camcorder such as attaching the handle unit and lens hood, and adjusting the viewfinder and LCD screen.
... similar object. However, some audio options (0 73, 76), the infrared light and tally lamp will not be careful not to drop the camcorder. 24 Attaching the Microphone Holder Unit Use the supplied screws to attach the microphone holder unit to the handle unit. When attaching the lens... hood, grip belt and straps, be available. Preparing the Camcorder Preparing the Camcorder This section covers the basic preparations for the camcorder such as attaching the handle unit and lens hood, and adjusting the viewfinder and LCD screen.
XA10 Instruction Manual
Page 25
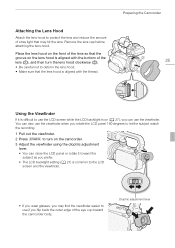
... with the thread. Attaching the Lens Hood Attach the lens hood to protect the lens and reduce the amount of the eye cup toward the camcorder body. Dioptric adjustment lever You can also use the viewfinder when you rotate the LCD panel 180 degrees to let the subject watch the recording... viewfinder. 2 Press x to turn the lens hood clockwise (ባ). • Be careful not to use the LCD screen while the LCD backlight is on the camcorder. 3 Adjust the viewfinder using the dioptric adjustment lever. • You can use if you flip back the outer edge of stray light that may find...
... with the thread. Attaching the Lens Hood Attach the lens hood to protect the lens and reduce the amount of the eye cup toward the camcorder body. Dioptric adjustment lever You can also use the viewfinder when you rotate the LCD panel 180 degrees to let the subject watch the recording... viewfinder. 2 Press x to turn the lens hood clockwise (ባ). • Be careful not to use the LCD screen while the LCD backlight is on the camcorder. 3 Adjust the viewfinder using the dioptric adjustment lever. • You can use if you flip back the outer edge of stray light that may find...
XA10 Instruction Manual
Page 26
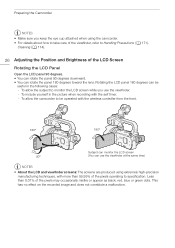
... Make sure you use the viewfinder at the same time) NOTES • About the LCD and viewfinder screens: The screens are produced using the camcorder. • For details about how to take care of the viewfinder, refer to Handling Precautions (0 171), Cleaning (0 174). 26 Adjusting the ...may occasionally misfire or appear as black, red, blue or green dots. To include yourself in the following cases: - To allow the camcorder to specification. To allow the subject to monitor the LCD screen while you keep the eye cup attached when using extremely high-precision manufacturing...
... Make sure you use the viewfinder at the same time) NOTES • About the LCD and viewfinder screens: The screens are produced using the camcorder. • For details about how to take care of the viewfinder, refer to Handling Precautions (0 171), Cleaning (0 174). 26 Adjusting the ...may occasionally misfire or appear as black, red, blue or green dots. To include yourself in the following cases: - To allow the camcorder to specification. To allow the subject to monitor the LCD screen while you keep the eye cup attached when using extremely high-precision manufacturing...
XA10 Instruction Manual
Page 27
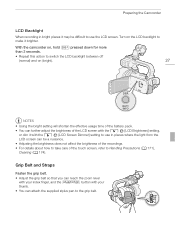
...of the battery pack. • You can further adjust the brightness of the touch screen, refer to use in bright places it brighter. With the camcorder on, hold h pressed down for more than 2 seconds. • Repeat this action to switch the LCD backlight between off (normal) and on the... LCD backlight to the grip belt. Preparing the Camcorder LCD Backlight When recording in places where the light from the LCD screen can be difficult to Handling Precautions (0 171), Cleaning (0 174).
...of the battery pack. • You can further adjust the brightness of the touch screen, refer to use in bright places it brighter. With the camcorder on, hold h pressed down for more than 2 seconds. • Repeat this action to switch the LCD backlight between off (normal) and on the... LCD backlight to the grip belt. Preparing the Camcorder LCD Backlight When recording in places where the light from the LCD screen can be difficult to Handling Precautions (0 171), Cleaning (0 174).
XA10 Instruction Manual
Page 28
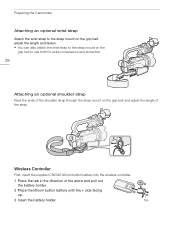
... Controller First, insert the supplied CR2025 lithium button battery into the wireless controller. 1 Press the tab in the direction of the strap. Tab Preparing the Camcorder Attaching an optional wrist strap Attach the wrist strap to the strap mount on the grip belt, adjust the length and fasten. • You can...
... Controller First, insert the supplied CR2025 lithium button battery into the wireless controller. 1 Press the tab in the direction of the strap. Tab Preparing the Camcorder Attaching an optional wrist strap Attach the wrist strap to the strap mount on the grip belt, adjust the length and fasten. • You can...
XA10 Instruction Manual
Page 29
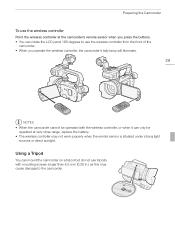
... the LCD panel 180 degrees to use the wireless controller from the front of the camcorder. • When you operate the wireless controller, the camcorder's tally lamp will illuminate. 29 NOTES • When the camcorder cannot be operated at very close range, replace the battery. • The wireless... controller may cause damage to the camcorder. Using a Tripod You can only be operated with the wireless controller, or when it can mount the camcorder on a tripod but do not use tripods with mounting screws longer than 6.5 mm (0.26...
... the LCD panel 180 degrees to use the wireless controller from the front of the camcorder. • When you operate the wireless controller, the camcorder's tally lamp will illuminate. 29 NOTES • When the camcorder cannot be operated at very close range, replace the battery. • The wireless... controller may cause damage to the camcorder. Using a Tripod You can only be operated with the wireless controller, or when it can mount the camcorder on a tripod but do not use tripods with mounting screws longer than 6.5 mm (0.26...
XA10 Instruction Manual
Page 30
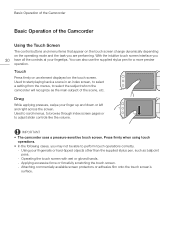
... - Drag While applying pressure, swipe your fingernails or hard-tipped objects other than the supplied stylus pen, such as the main subject of the Camcorder Using the Touch Screen The control buttons and menu items that appear on the touch screen change dynamically depending on the touch screen. Press firmly... the touch screen with wet or gloved hands. - Using your finger up and down or left and right across the screen. IMPORTANT • The camcorder uses a pressure-sensitive touch screen. Used to scroll menus, to browse through index screen pages or to select the subject whom the...
... - Drag While applying pressure, swipe your fingernails or hard-tipped objects other than the supplied stylus pen, such as the main subject of the Camcorder Using the Touch Screen The control buttons and menu items that appear on the touch screen change dynamically depending on the touch screen. Press firmly... the touch screen with wet or gloved hands. - Using your finger up and down or left and right across the screen. IMPORTANT • The camcorder uses a pressure-sensitive touch screen. Used to scroll menus, to browse through index screen pages or to select the subject whom the...


