

XA10 Instruction Manual
Page 2
...ELECTRIC SHOCK AND TO REDUCE ANNOYING INTERFERENCE, USE THE RECOMMENDED ACCESSORIES ONLY. HD Camcorder, XA10 A systems This device complies with Part 15 of electric shock, do not expose this ... to try to provide reasonable protection against harmful interference in the literature accompanying the product. One Canon Plaza, Lake Success, NY 11042, U.S.A. CAUTION: • Danger of explosion if the wrong... to the presence of the FCC Rules. Use only the same type of batteries. • Do not expose batteries or product to radio or television reception, which the receiver is used as...
...ELECTRIC SHOCK AND TO REDUCE ANNOYING INTERFERENCE, USE THE RECOMMENDED ACCESSORIES ONLY. HD Camcorder, XA10 A systems This device complies with Part 15 of electric shock, do not expose this ... to try to provide reasonable protection against harmful interference in the literature accompanying the product. One Canon Plaza, Lake Success, NY 11042, U.S.A. CAUTION: • Danger of explosion if the wrong... to the presence of the FCC Rules. Use only the same type of batteries. • Do not expose batteries or product to radio or television reception, which the receiver is used as...
XA10 Instruction Manual
Page 3
...in rainy/moist situations. 21 Placing or Moving - IMPORTANT SAFETY INSTRUCTIONS In these safety instructions the word "product" refers to the Canon HD Camcorder XA10 A and all its accessories. 1 Read these instructions. 2 Keep these instructions. 3 Heed all warnings. 4 Follow all servicing to... interference, or permanently damage the camera. 20 Water and Moisture - The safety and operating instructions should be cleaned only as battery power, refer to grounding electrodes, and requirements for the grounding electrode. Hazard of the polarized plug. 24 Power Cord Protection ...
...in rainy/moist situations. 21 Placing or Moving - IMPORTANT SAFETY INSTRUCTIONS In these safety instructions the word "product" refers to the Canon HD Camcorder XA10 A and all its accessories. 1 Read these instructions. 2 Keep these instructions. 3 Heed all warnings. 4 Follow all servicing to... interference, or permanently damage the camera. 20 Water and Moisture - The safety and operating instructions should be cleaned only as battery power, refer to grounding electrodes, and requirements for the grounding electrode. Hazard of the polarized plug. 24 Power Cord Protection ...

XA10 Instruction Manual
Page 4
Refer all power sources including battery, and refer servicing to qualified service personnel under the AT&T patents to dangerous voltage or other products (including amplifiers) that have fallen into this product ... the product has been exposed to determine that are trademarks of Dolby Laboratories. • YouTube is in damage and will often require extensive work by Canon or that produce heat. When replacement parts are required, be sure the service technician has used for encoding MPEG-4 compliant video and/or decoding MPEG...
Refer all power sources including battery, and refer servicing to qualified service personnel under the AT&T patents to dangerous voltage or other products (including amplifiers) that have fallen into this product ... the product has been exposed to determine that are trademarks of Dolby Laboratories. • YouTube is in damage and will often require extensive work by Canon or that produce heat. When replacement parts are required, be sure the service technician has used for encoding MPEG-4 compliant video and/or decoding MPEG...
XA10 Instruction Manual
Page 8
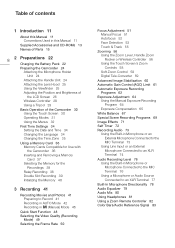
... 11 About this Manual 11 Conventions Used in this Manual 11 Supplied Accessories and CD-ROMs 13 Names of Parts 15 8 2 Preparations 22 Charging the Battery Pack 22 Preparing the Camcorder 24 Attaching the Microphone Holder Unit 24 Attaching the Handle Unit 24 Attaching the Lens Hood 25 Using the Viewfinder...
... 11 About this Manual 11 Conventions Used in this Manual 11 Supplied Accessories and CD-ROMs 13 Names of Parts 15 8 2 Preparations 22 Charging the Battery Pack 22 Preparing the Camcorder 24 Attaching the Microphone Holder Unit 24 Attaching the Handle Unit 24 Attaching the Lens Hood 25 Using the Viewfinder...
XA10 Instruction Manual
Page 10
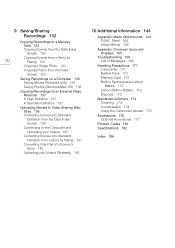
... into Standard Definition from a Story by Rating 141 Converting Only Part of Messages 164 Handling Precautions 171 Camcorder 171 Battery Pack 172 Memory Card 172 Built-in Rechargeable Lithium Battery 173 Lithium Button Battery 173 Disposal 173 Maintenance/Others 174 Cleaning 174 Condensation 174 Using the Camcorder Abroad 175 Accessories 176 Optional Accessories...
... into Standard Definition from a Story by Rating 141 Converting Only Part of Messages 164 Handling Precautions 171 Camcorder 171 Battery Pack 172 Memory Card 172 Built-in Rechargeable Lithium Battery 173 Lithium Button Battery 173 Disposal 173 Maintenance/Others 174 Cleaning 174 Condensation 174 Using the Camcorder Abroad 175 Accessories 176 Optional Accessories...
XA10 Instruction Manual
Page 13
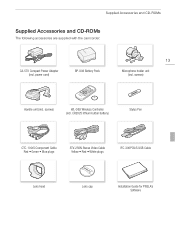
screws) WL-D89 Wireless Controller (incl. CR2025 lithium button battery) Stylus Pen CTC-100/S Component Cable Red • Green • Blue plugs STV-250N Stereo Video Cable Yellow • Red • White plugs IFC-300PCU/S USB Cable Lens hood Lens cap Installation Guide for PIXELA's Software screws) Handle unit (incl. power cord) BP-808 Battery Pack 13 Microphone holder unit (incl. Supplied Accessories and CD-ROMs Supplied Accessories and CD-ROMs The following accessories are supplied with the camcorder: CA-570 Compact Power Adapter (incl.
screws) WL-D89 Wireless Controller (incl. CR2025 lithium button battery) Stylus Pen CTC-100/S Component Cable Red • Green • Blue plugs STV-250N Stereo Video Cable Yellow • Red • White plugs IFC-300PCU/S USB Cable Lens hood Lens cap Installation Guide for PIXELA's Software screws) Handle unit (incl. power cord) BP-808 Battery Pack 13 Microphone holder unit (incl. Supplied Accessories and CD-ROMs Supplied Accessories and CD-ROMs The following accessories are supplied with the camcorder: CA-570 Compact Power Adapter (incl.

XA10 Instruction Manual
Page 15
...) 18 ATT (microphone attenuator) switches for CH1 and CH2 (0 75) 19 XLR terminal switches for CH1 and CH2 (0 75) Standby (0 48) Red - ON Orange - INFO (battery info) button (0 158) 5 Double memory card slot cover 6 Memory card slot X (0 37) 7 Memory card slot Y (0 37) 8 Handle unit rear screw (0 24) 9 ON/OFF (CHG) indicator...
...) 18 ATT (microphone attenuator) switches for CH1 and CH2 (0 75) 19 XLR terminal switches for CH1 and CH2 (0 75) Standby (0 48) Red - ON Orange - INFO (battery info) button (0 158) 5 Double memory card slot cover 6 Memory card slot X (0 37) 7 Memory card slot Y (0 37) 8 Handle unit rear screw (0 24) 9 ON/OFF (CHG) indicator...

XA10 Instruction Manual
Page 19
Top view Names of Parts 1 23 4 19 7 6 5 1 Accessory shoe Cold shoe for attaching accessories such as the optional VL-10Li II Battery Video Light. 2 START/STOP button (0 41) 3 START/STOP lock ( ) lever (0 47) 4 Mode switch (0 31) 5 Eye cup 6 POWER button 7 Handle zoom rocker (0 56)
Top view Names of Parts 1 23 4 19 7 6 5 1 Accessory shoe Cold shoe for attaching accessories such as the optional VL-10Li II Battery Video Light. 2 START/STOP button (0 41) 3 START/STOP lock ( ) lever (0 47) 4 Mode switch (0 31) 5 Eye cup 6 POWER button 7 Handle zoom rocker (0 56)
XA10 Instruction Manual
Page 20
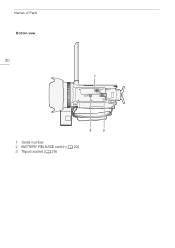
Names of Parts Bottom view 20 1 3 2 1 Serial number 2 BATTERY RELEASE switch (0 23) 3 Tripod socket (0 29)
Names of Parts Bottom view 20 1 3 2 1 Serial number 2 BATTERY RELEASE switch (0 23) 3 Tripod socket (0 29)
XA10 Instruction Manual
Page 22
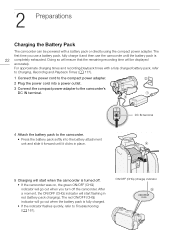
... cord into a power outlet. 3 Connect the compact power adapter to the camcorder's DC IN terminal. 4 Attach the battery pack to Troubleshooting (0 161). 2Charging the BPattreerypPaackrations Preparations Charging the Battery Pack The camcorder can be displayed accurately. For approximate charging times and recording/playback times with... ensure that the remaining recording time will go out when you use the camcorder until it and then use a battery pack, fully charge it clicks in red (battery pack charging). The first time you turn off . • If the camcorder was on, the green ON...
... cord into a power outlet. 3 Connect the compact power adapter to the camcorder's DC IN terminal. 4 Attach the battery pack to Troubleshooting (0 161). 2Charging the BPattreerypPaackrations Preparations Charging the Battery Pack The camcorder can be displayed accurately. For approximate charging times and recording/playback times with... ensure that the remaining recording time will go out when you use the camcorder until it and then use a battery pack, fully charge it clicks in red (battery pack charging). The first time you turn off . • If the camcorder was on, the green ON...
XA10 Instruction Manual
Page 23
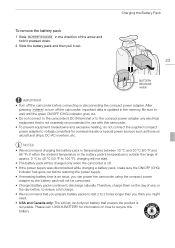
...to the camcorder's DC IN terminal or to the compact power adapter any electrical equipment that powers the product is recyclable. To remove the battery pack 1 Slide U in the direction of approx. 0 °C to 40 °C (32 °F to 104 °F), charging will not start. ...• The battery pack will not be consumed. • Charged battery packs continue to discharge naturally. NOTES • We recommend charging the battery pack in the memory. After pressing x to turn off the camcorder before restoring the power supply...
...to the camcorder's DC IN terminal or to the compact power adapter any electrical equipment that powers the product is recyclable. To remove the battery pack 1 Slide U in the direction of approx. 0 °C to 40 °C (32 °F to 104 °F), charging will not start. ...• The battery pack will not be consumed. • Charged battery packs continue to discharge naturally. NOTES • We recommend charging the battery pack in the memory. After pressing x to turn off the camcorder before restoring the power supply...
XA10 Instruction Manual
Page 27
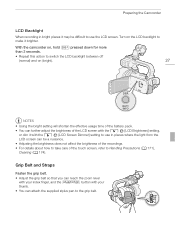
... 6 [LCD Brightness] setting, or dim it brighter. Turn on (bright). 27 NOTES • Using the bright setting will shorten the effective usage time of the battery pack. • You can further adjust the brightness of the touch screen, refer to make it with your index finger, and the g button with the...
... 6 [LCD Brightness] setting, or dim it brighter. Turn on (bright). 27 NOTES • Using the bright setting will shorten the effective usage time of the battery pack. • You can further adjust the brightness of the touch screen, refer to make it with your index finger, and the g button with the...
XA10 Instruction Manual
Page 28
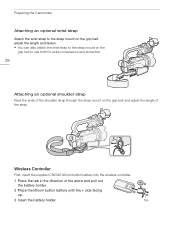
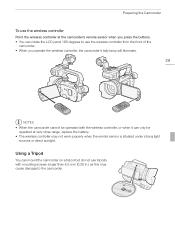
... the grip belt and adjust the length of the arrow and pull out the battery holder. 2 Place the lithium button battery with the + side facing up. 3 Insert the battery holder. Tab Wireless Controller First, insert the supplied CR2025 lithium button battery into the wireless controller. 1 Press the tab in the direction of the strap...
... the grip belt and adjust the length of the arrow and pull out the battery holder. 2 Place the lithium button battery with the + side facing up. 3 Insert the battery holder. Tab Wireless Controller First, insert the supplied CR2025 lithium button battery into the wireless controller. 1 Press the tab in the direction of the strap...
XA10 Instruction Manual
Page 29
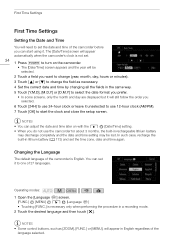
... LCD panel 180 degrees to the camcorder. Preparing the Camcorder To use the wireless controller Point the wireless controller at very close range, replace the battery. • The wireless controller may cause damage to use tripods with the wireless controller, or when it can mount the camcorder on a tripod but do...
... LCD panel 180 degrees to the camcorder. Preparing the Camcorder To use the wireless controller Point the wireless controller at very close range, replace the battery. • The wireless controller may cause damage to use tripods with the wireless controller, or when it can mount the camcorder on a tripod but do...
XA10 Instruction Manual
Page 34
... Operating modes: 1 Open the [Language a] screen. [FUNC.] [MENU] 6 [Language a] • Touching [FUNC.] is English. In such case, recharge the built-in lithium battery (0 173) and set . 34 1 Press x to turn on with the 6 [Date/Time] setting. • When you selected. 6 Touch [24H] to use 24-hour ... selected. NOTES • Some control buttons, such as necessary. 4 Set the correct date and time by changing all the fields in rechargeable lithium battery may discharge completely and the date and time setting may be selected. 2 Touch a field you want to change (year, month, day, hours or...
... Operating modes: 1 Open the [Language a] screen. [FUNC.] [MENU] 6 [Language a] • Touching [FUNC.] is English. In such case, recharge the built-in lithium battery (0 173) and set . 34 1 Press x to turn on with the 6 [Date/Time] setting. • When you selected. 6 Touch [24H] to use 24-hour ... selected. NOTES • Some control buttons, such as necessary. 4 Set the correct date and time by changing all the fields in rechargeable lithium battery may discharge completely and the date and time setting may be selected. 2 Touch a field you want to change (year, month, day, hours or...

XA10 Instruction Manual
Page 41
...; Before you need to use the viewfinder, pull it out and, if necessary, adjust it using an Eye-Fi card. Preparing to Record 1 Attach a charged battery pack to the camcorder (0 22). 2 Turn on recording audio, refer to record movies and photos (0 38). You can select the memory that the camcorder is...
...; Before you need to use the viewfinder, pull it out and, if necessary, adjust it using an Eye-Fi card. Preparing to Record 1 Attach a charged battery pack to the camcorder (0 22). 2 Turn on recording audio, refer to record movies and photos (0 38). You can select the memory that the camcorder is...
XA10 Instruction Manual
Page 45
... orange or blue backgrounds, the sunset or one of photos that appears on the camcorder. • When recording in bright places, it is powered by a battery 45 pack and is activated or while fading in mode (0 46). • In mode, most camcorder settings will return to default values, but the following...
... orange or blue backgrounds, the sunset or one of photos that appears on the camcorder. • When recording in bright places, it is powered by a battery 45 pack and is activated or while fading in mode (0 46). • In mode, most camcorder settings will return to default values, but the following...

XA10 Instruction Manual
Page 47
... and shooting conditions. • Photos cannot be recorded while the digital zoom is activated or while fading in bright places, it is powered by a battery pack and is left without any loss or corruption of data. • Photos recorded on or flashing. The photo size (1920x1080) and quality cannot... actual number of photos that Eye-Fi cards have been approved in memory card slot Y will be uploaded automatically after making important recordings. 47 Canon shall not be recorded will shut off the camcorder. - Set the lock lever to playback mode, if you are recorded as when you do...
... and shooting conditions. • Photos cannot be recorded while the digital zoom is activated or while fading in bright places, it is powered by a battery pack and is left without any loss or corruption of data. • Photos recorded on or flashing. The photo size (1920x1080) and quality cannot... actual number of photos that Eye-Fi cards have been approved in memory card slot Y will be uploaded automatically after making important recordings. 47 Canon shall not be recorded will shut off the camcorder. - Set the lock lever to playback mode, if you are recorded as when you do...
XA10 Instruction Manual
Page 48
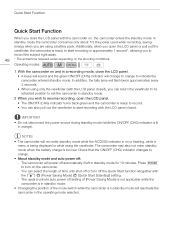
... Changing the position of time until shut-off automatically if left in orange). The camcorder may also not enter standby mode when the battery charge is ready to orange. • About standby mode and auto power off the Quick Start function altogether with the LCD panel ...actual time required varies depending on or flashing, while a menu is in standby mode will flash twice approximately every 3 seconds. • When using a battery pack. Operating modes: 1 With the camcorder on and in approximately 1 second*, allowing you wish to turn off : - Additionally, when you are using ...
... Changing the position of time until shut-off automatically if left in orange). The camcorder may also not enter standby mode when the battery charge is ready to orange. • About standby mode and auto power off the Quick Start function altogether with the LCD panel ...actual time required varies depending on or flashing, while a menu is in standby mode will flash twice approximately every 3 seconds. • When using a battery pack. Operating modes: 1 With the camcorder on and in approximately 1 second*, allowing you wish to turn off : - Additionally, when you are using ...
XA10 Instruction Manual
Page 135
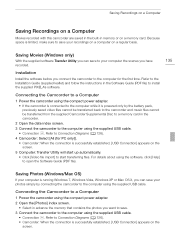
... Installation Guide (supplied leaflet) and follow the instructions in the camcorder. 2 Open the date index screen. 3 Connect the camcorder to your photos simply by the battery pack, previously saved video files cannot be transferred back to the camcorder and music files cannot be transferred from the supplied Camcorder Supplemental Disc to...
... Installation Guide (supplied leaflet) and follow the instructions in the camcorder. 2 Open the date index screen. 3 Connect the camcorder to your photos simply by the battery pack, previously saved video files cannot be transferred back to the camcorder and music files cannot be transferred from the supplied Camcorder Supplemental Disc to...


