User Manual
Page 2
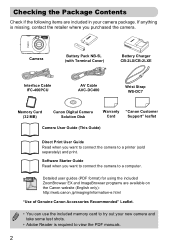
... is required to a printer (sold separately) and print. Camera Battery Pack NB-5L (with Terminal Cover) Battery Charger CB-2LX/CB-2LXE Interface Cable IFC-400PCU AV Cable AVC-DC400 Wrist Strap WS-DC7 Memory Card (32 MB) Canon Digital Camera Solution Disk Warranty "Canon Customer Card Support" leaflet Camera User Guide (This Guide) Direct Print User Guide...
... is required to a printer (sold separately) and print. Camera Battery Pack NB-5L (with Terminal Cover) Battery Charger CB-2LX/CB-2LXE Interface Cable IFC-400PCU AV Cable AVC-DC400 Wrist Strap WS-DC7 Memory Card (32 MB) Canon Digital Camera Solution Disk Warranty "Canon Customer Card Support" leaflet Camera User Guide (This Guide) Direct Print User Guide...
User Manual
Page 6
...Read This First 3 What Do You Want to Do 4 LCD Monitor Precautions 8 Safety Precautions 9 1 Getting Started 11 Charging the Battery 12 Inserting the Battery and Memory Card 14 Setting the Date and Time 17 Setting the Display Language..........19 Pressing the Shutter Button 20 Taking Pictures 21 ...each chapter. Table of Contents Chapters 1 - 3 explain the basic operations and frequently used functions of this camera. Turning the Flash Off 57 i Zooming in More Closely on Subjects (Digital Zoom 58 Inserting the Date and Time 60 Ò Using the Self-Timer 61 " Using the Face ...
...Read This First 3 What Do You Want to Do 4 LCD Monitor Precautions 8 Safety Precautions 9 1 Getting Started 11 Charging the Battery 12 Inserting the Battery and Memory Card 14 Setting the Date and Time 17 Setting the Display Language..........19 Pressing the Shutter Button 20 Taking Pictures 21 ...each chapter. Table of Contents Chapters 1 - 3 explain the basic operations and frequently used functions of this camera. Turning the Flash Off 57 i Zooming in More Closely on Subjects (Digital Zoom 58 Inserting the Date and Time 60 Ò Using the Self-Timer 61 " Using the Face ...

User Manual
Page 9
... the risk of injury, do not touch the interior of injury or damage to the battery. 9 Cautions Denotes the possibility of the camera if it has been dropped or otherwise damaged. • Stop operating the camera immediately if it emits smoke, a strange smell, or otherwise behaves abnormally. •...) or other persons, or damage to the equipment. • Be sure to also check the guides included with the camera interior, immediately turn the camera power off and remove the battery. • Do not use . Strap: Putting the strap around a child's neck could result in close proximity to ...
... the risk of injury, do not touch the interior of injury or damage to the battery. 9 Cautions Denotes the possibility of the camera if it has been dropped or otherwise damaged. • Stop operating the camera immediately if it emits smoke, a strange smell, or otherwise behaves abnormally. •...) or other persons, or damage to the equipment. • Be sure to also check the guides included with the camera interior, immediately turn the camera power off and remove the battery. • Do not use . Strap: Putting the strap around a child's neck could result in close proximity to ...
User Manual
Page 10
... it to overheat and distort, resulting in fire. • Use only the specified battery charger to malfunction. 10 Leaving the unit plugged in for a long period of time may cause the camera to charge the battery. • Do not cut, damage, alter or place heavy items on the power... lead to the surface, or when covering the flash with your camera distributor or the closest Canon Customer Support Help Desk. • Unplug the battery charger from the power outlet after recharging is complete, or when you discard batteries, cover the terminals with dirt, dust or other metal materials in...
... it to overheat and distort, resulting in fire. • Use only the specified battery charger to malfunction. 10 Leaving the unit plugged in for a long period of time may cause the camera to charge the battery. • Do not cut, damage, alter or place heavy items on the power... lead to the surface, or when covering the flash with your camera distributor or the closest Canon Customer Support Help Desk. • Unplug the battery charger from the power outlet after recharging is complete, or when you discard batteries, cover the terminals with dirt, dust or other metal materials in...

User Manual
Page 12
..., and charging starts. ● The charge lamp will light green when charging has finished. Remove the battery. ● Unplug the battery charger from the power outlet, then remove the battery by sliding it for CB-2LXE). Charge the battery. ● Flip out the plug and plug it in and down . To protect the... prolong its life, do not charge it in and up . CB-2LX CB-2LXE Insert the battery. ● Align the S marks on the battery and charger, then insert the battery by sliding it into a power outlet (for CB-2LX). ● Plug the power cord into the charger, then plug the other ...
..., and charging starts. ● The charge lamp will light green when charging has finished. Remove the battery. ● Unplug the battery charger from the power outlet, then remove the battery by sliding it for CB-2LXE). Charge the battery. ● Flip out the plug and plug it in and down . To protect the... prolong its life, do not charge it in and up . CB-2LX CB-2LXE Insert the battery. ● Align the S marks on the battery and charger, then insert the battery by sliding it into a power outlet (for CB-2LX). ● Plug the power cord into the charger, then plug the other ...

User Manual
Page 13
...to discharge naturally even if they will cause malfunctions. • If the battery is based on the Camera & Imaging Products Association (CIPA) measurement standard. • Depending on the shooting conditions, the number of its performance. • The battery charger can be used in regions that can be taken may shorten its life... Summary Good. Do not use a commercially available plug adapter. Deplete and remove the battery from the camera. Storing a battery without depleting it will appear on the day, or the day before, it for long periods of time (about one year) may be ...
...to discharge naturally even if they will cause malfunctions. • If the battery is based on the Camera & Imaging Products Association (CIPA) measurement standard. • Depending on the shooting conditions, the number of its performance. • The battery charger can be used in regions that can be taken may shorten its life... Summary Good. Do not use a commercially available plug adapter. Deplete and remove the battery from the camera. Storing a battery without depleting it will appear on the day, or the day before, it for long periods of time (about one year) may be ...

User Manual
Page 14
.... ● Inserting the card in the locked position. Open the cover. ● Slide the cover , and open it will not be able to insert the battery in the correct direction or it . Check the card's write-protect tab. ● If the memory card has a write-protect tab, you hear a click.... Terminals Label Insert the battery. ● Insert the battery as shown until you will not properly lock into the camera. Be sure the card is in the wrong direction could damage the...
.... ● Inserting the card in the locked position. Open the cover. ● Slide the cover , and open it will not be able to insert the battery in the correct direction or it . Check the card's write-protect tab. ● If the memory card has a write-protect tab, you hear a click.... Terminals Label Insert the battery. ● Insert the battery as shown until you will not properly lock into the camera. Be sure the card is in the wrong direction could damage the...

User Manual
Page 15
Remove the memory card. ● Push the memory card in the direction of the arrow. X The memory card will pop up . 15 Inserting the Battery and Memory Card Close the cover. ● Close the cover , and slide it . until it Removing the Battery and Memory Card Remove the battery. ● Open the cover and press the battery lock in until you hear a click, then slowly release it locks into place with a click. X The battery will pop up .
Remove the memory card. ● Push the memory card in the direction of the arrow. X The memory card will pop up . 15 Inserting the Battery and Memory Card Close the cover. ● Close the cover , and slide it . until it Removing the Battery and Memory Card Remove the battery. ● Open the cover and press the battery lock in until you hear a click, then slowly release it locks into place with a click. X The battery will pop up .

User Manual
Page 16
Inserting the Battery and Memory Card Approximate Number of Shots per Memory Card Memory Card 32 MB (Supplied) 2 GB 8 GB Number of shots 7 516 2063 • Values are based on a camera at default settings. • The number of shots that can be taken What is the write-protect tab? Compatible Memory Cards &#...be taken will not be able to take or erase images. 16 If this tab is in the locked position, [Card Locked!] will appear on camera settings, the subject and the memory card used. SD and SDHC memory cards have a write-protect tab. You can check the number of shots that...
Inserting the Battery and Memory Card Approximate Number of Shots per Memory Card Memory Card 32 MB (Supplied) 2 GB 8 GB Number of shots 7 516 2063 • Values are based on a camera at default settings. • The number of shots that can be taken What is the write-protect tab? Compatible Memory Cards &#...be taken will not be able to take or erase images. 16 If this tab is in the locked position, [Card Locked!] will appear on camera settings, the subject and the memory card used. SD and SDHC memory cards have a write-protect tab. You can check the number of shots that...

User Manual
Page 18
...steps on p. 17 to be charged in about 4 hours even if the camera is not turned on. • If the date/time battery is depleted, the Date/Time menu will close the menu. Select [Date/Time] in date/time battery (backup battery) that allows the date/time settings to set the date and time...; Pressing the n button will appear when you turn the  dial to select the 3 tab. ● Press the op buttons or turn the camera on. Date/Time battery • The camera has a built-in the 3 tab. ● Press the qr buttons to select [Date/Time], then press the m button. Display the menus. &#...
...steps on p. 17 to be charged in about 4 hours even if the camera is not turned on. • If the date/time battery is depleted, the Date/Time menu will close the menu. Select [Date/Time] in date/time battery (backup battery) that allows the date/time settings to set the date and time...; Pressing the n button will appear when you turn the  dial to select the 3 tab. ● Press the op buttons or turn the camera on. Date/Time battery • The camera has a built-in the 3 tab. ● Press the qr buttons to select [Date/Time], then press the m button. Display the menus. &#...

User Manual
Page 36
Accessories Supplied with Camera Wrist Strap WS-DC7 Battery Pack NB-5L*1 (with Terminal Cover) Battery Charger CB-2LX/CB-2LXE*1 Interface Cable IFC-400PCU*1 AV Cable AVC-DC400*1 Memory Card (32 MB) Canon Digital Camera Solution Disk AC Adapter Kit ACK-DC30 DC Coupler DR-30 Compact Power Adapter CA-DC10 Power Cord *1 Also available for purchase separately. *2 See the user guide supplied with the printer for more information on the printer and interface cables. 36
Accessories Supplied with Camera Wrist Strap WS-DC7 Battery Pack NB-5L*1 (with Terminal Cover) Battery Charger CB-2LX/CB-2LXE*1 Interface Cable IFC-400PCU*1 AV Cable AVC-DC400*1 Memory Card (32 MB) Canon Digital Camera Solution Disk AC Adapter Kit ACK-DC30 DC Coupler DR-30 Compact Power Adapter CA-DC10 Power Cord *1 Also available for purchase separately. *2 See the user guide supplied with the printer for more information on the printer and interface cables. 36

User Manual
Page 37
... 1 of 4 included weights) Audio IN Terminal TV/Video Use of a battery pack). This product is recommended. Canon shall not be liable for any damage to achieve excellent performance when used with genuine Canon accessories. Please note that this product and/or accidents such as fire, etc...., caused by the malfunction of non-genuine Canon accessories (e.g., a leakage and/or explosion of genuine Canon accessories is designed to this warranty does ...
... 1 of 4 included weights) Audio IN Terminal TV/Video Use of a battery pack). This product is recommended. Canon shall not be liable for any damage to achieve excellent performance when used with genuine Canon accessories. Please note that this product and/or accidents such as fire, etc...., caused by the malfunction of non-genuine Canon accessories (e.g., a leakage and/or explosion of genuine Canon accessories is designed to this warranty does ...

User Manual
Page 38
...that are too distant for the light from the built-in some regions, or may no longer be used to charge the battery inside the camera. • Battery Charger CB-2LX/CB-2LXE An adapter for an extended period of time or when connecting to reach. 38 Recommended for ...powering the camera for charging Battery Pack NB-5L. • Battery Pack NB-5L Rechargeable lithium-ion battery. Cannot be available. Some accessories are sold in flash to a computer. Other Accessories • Waterproof ...
...that are too distant for the light from the built-in some regions, or may no longer be used to charge the battery inside the camera. • Battery Charger CB-2LX/CB-2LXE An adapter for an extended period of time or when connecting to reach. 38 Recommended for ...powering the camera for charging Battery Pack NB-5L. • Battery Pack NB-5L Rechargeable lithium-ion battery. Cannot be available. Some accessories are sold in flash to a computer. Other Accessories • Waterproof ...

User Manual
Page 40
... Button Speaker Flash (pp. 57, 67) Tripod Socket DC Coupler Terminal Cover (p. 150) Memory Card / Battery Cover (p. 14) Strap Mount (p. 11) Mode Dial Use the mode dial to make all of the camera's settings (pp. 65, 81). Program AE/Manual Mode You can take images just by pressing the shutter... button (p. 54). Special Scene Mode The camera can shoot, leaving it to the camera to change shooting modes. Eye Reduction Lamp (p. 142) / ...
... Button Speaker Flash (pp. 57, 67) Tripod Socket DC Coupler Terminal Cover (p. 150) Memory Card / Battery Cover (p. 14) Strap Mount (p. 11) Mode Dial Use the mode dial to make all of the camera's settings (pp. 65, 81). Program AE/Manual Mode You can take images just by pressing the shutter... button (p. 54). Special Scene Mode The camera can shoot, leaving it to the camera to change shooting modes. Eye Reduction Lamp (p. 142) / ...

User Manual
Page 42
...Recording Pixels (p. 68) Histogram (p. 44) Digital Zoom Magnification (p. 58) / Digital TeleConverter (p. 59) Macro (p. 63) / Infinity (p. 67) / Manual Focus (p. 85) ISO Speed (p. 70) Flash Mode (pp. 57, 67) Red-Eye Correction (p. 92) Drive Mode (pp. 61, 62, 72, 75) Camera Orientation* Battery Charge Indicator (p. 13) Shooting Mode AF ... change the display using the l button. Switching the Display You can hold the camera in either orientation and it is pointed straight up or down When shooting, the camera detects if it will automatically rotate images for the best shot. Overlay (p. 144)...
...Recording Pixels (p. 68) Histogram (p. 44) Digital Zoom Magnification (p. 58) / Digital TeleConverter (p. 59) Macro (p. 63) / Infinity (p. 67) / Manual Focus (p. 85) ISO Speed (p. 70) Flash Mode (pp. 57, 67) Red-Eye Correction (p. 92) Drive Mode (pp. 61, 62, 72, 75) Camera Orientation* Battery Charge Indicator (p. 13) Shooting Mode AF ... change the display using the l button. Switching the Display You can hold the camera in either orientation and it is pointed straight up or down When shooting, the camera detects if it will automatically rotate images for the best shot. Overlay (p. 144)...

User Manual
Page 43
... Shutter Speed (p. 89) Exposure Compensation (p. 72) White Balance (p. 71) Histogram (p. 44) Image Editing (pp. 120 - 126) Image Quality (Compression) (p. 68) / (Movies) (p. 98) Recording Pixels (p. 68) Battery Charge Indicator (p. 13) Metering Modes (p. 87) Folder Number -
... Shutter Speed (p. 89) Exposure Compensation (p. 72) White Balance (p. 71) Histogram (p. 44) Image Editing (pp. 120 - 126) Image Quality (Compression) (p. 68) / (Movies) (p. 98) Recording Pixels (p. 68) Battery Charge Indicator (p. 13) Metering Modes (p. 87) Folder Number -
User Manual
Page 44
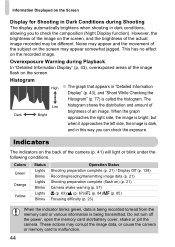
...image flash on the Screen Display for Shooting in Dark Conditions during Playback In "Detailed Information Display" (p. 43), overexposed areas of the subject on ) (p. 21) Camera shake warning (p. 57) e (p. 63)/u (p. 67)/% (p. 84)/f (p. 85) Focusing difficulty (p. 23) When the indicator blinks green, data is being transmitted... dark conditions, allowing you can check the exposure. Do not turn off the power, open the memory card slot/battery cover, shake or jolt the camera. Information Displayed on the screen. This has no effect on the screen, and the brightness of the image on...
...image flash on the Screen Display for Shooting in Dark Conditions during Playback In "Detailed Information Display" (p. 43), overexposed areas of the subject on ) (p. 21) Camera shake warning (p. 57) e (p. 63)/u (p. 67)/% (p. 84)/f (p. 85) Focusing difficulty (p. 23) When the indicator blinks green, data is being transmitted... dark conditions, allowing you can check the exposure. Do not turn off the power, open the memory card slot/battery cover, shake or jolt the camera. Information Displayed on the screen. This has no effect on the screen, and the brightness of the image on...

User Manual
Page 51
...than indicated on the memory card. • Low level formatting may solve the problem. Power Saving during Playback About 5 minutes after the camera is recorded to the memory card, _ will be less than standard formatting, since all recorded data are completely deleted. When the monitor has...operated for a certain time. Formatting the card will retract and the power turns off. Power Saving Function (Auto Power Down) To save battery power, the camera shuts down and the power turns off. • You can adjust the time before formatting. • Formatting or erasing data on ...
...than indicated on the memory card. • Low level formatting may solve the problem. Power Saving during Playback About 5 minutes after the camera is recorded to the memory card, _ will be less than standard formatting, since all recorded data are completely deleted. When the monitor has...operated for a certain time. Formatting the card will retract and the power turns off. Power Saving Function (Auto Power Down) To save battery power, the camera shuts down and the power turns off. • You can adjust the time before formatting. • Formatting or erasing data on ...

User Manual
Page 76
..." (p. 112). • Operations for shooting are the same as when using the screen. Shooting Using a TV You can use a TV to display the camera screen. • Connect the camera to a TV as described in the image taken may differ slightly. Operations for shooting, instead of the screen (p. 13). Turn off the screen... and shoot. Compose the scene and shoot. ● Use the viewfinder to turn off the screen. Shooting Using the Viewfinder If you want to save battery power, you can use the viewfinder for shooting are the same as when using the...
..." (p. 112). • Operations for shooting are the same as when using the screen. Shooting Using a TV You can use a TV to display the camera screen. • Connect the camera to a TV as described in the image taken may differ slightly. Operations for shooting, instead of the screen (p. 13). Turn off the screen... and shoot. Compose the scene and shoot. ● Use the viewfinder to turn off the screen. Shooting Using the Viewfinder If you want to save battery power, you can use the viewfinder for shooting are the same as when using the...
User Manual
Page 80
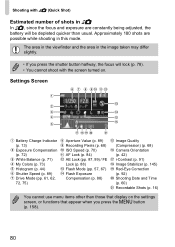
...84) AE Lock (pp. 87, 99) / FE Lock (p. 88) Flash Mode (pp. 57, 67) Flash Exposure Compensation (p. 88) Image Quality (Compression) (p. 68) Camera Orientation (p. 42) i-Contrast (p. 91) Image Stabilizer (p. 145) Red-Eye Correction (p. 92) Shooting Date and Time (p. 60) Recordable Shots (p. 16) You cannot use menu items... be depleted quicker than usual. The area in the viewfinder and the area in this mode. Approximately 180 shots are constantly being adjusted, the battery will lock (p. 78). • You cannot shoot with 8 (Quick Shot) Estimated number of shots in 8 In 8, since the focus...
...84) AE Lock (pp. 87, 99) / FE Lock (p. 88) Flash Mode (pp. 57, 67) Flash Exposure Compensation (p. 88) Image Quality (Compression) (p. 68) Camera Orientation (p. 42) i-Contrast (p. 91) Image Stabilizer (p. 145) Red-Eye Correction (p. 92) Shooting Date and Time (p. 60) Recordable Shots (p. 16) You cannot use menu items... be depleted quicker than usual. The area in the viewfinder and the area in this mode. Approximately 180 shots are constantly being adjusted, the battery will lock (p. 78). • You cannot shoot with 8 (Quick Shot) Estimated number of shots in 8 In 8, since the focus...


