User Guide
Page 2
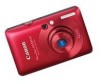
... Read when you want to connect the camera to a printer and print. • Software Starter Guide Read when you purchased the camera. Checking the Package Contents Check if the following items are available on the Canon website (English only): http://web.canon.jp/imaging/information-e.html • A memory...) Battery Charger CB-2LV/CB-2LVE Interface Cable IFC-400PCU AV Cable AVC-DC400 Wrist Strap WS-DC7 Camera User Guide (This Guide) DIGITAL CAMERA Solution Disk Warranty Card "Canon Customer Support" Leaflet Also refer to view the PDF manuals. 2 If anything is required to the PDF...
... Read when you want to connect the camera to a printer and print. • Software Starter Guide Read when you purchased the camera. Checking the Package Contents Check if the following items are available on the Canon website (English only): http://web.canon.jp/imaging/information-e.html • A memory...) Battery Charger CB-2LV/CB-2LVE Interface Cable IFC-400PCU AV Cable AVC-DC400 Wrist Strap WS-DC7 Camera User Guide (This Guide) DIGITAL CAMERA Solution Disk Warranty Card "Canon Customer Support" Leaflet Also refer to view the PDF manuals. 2 If anything is required to the PDF...
User Guide
Page 33
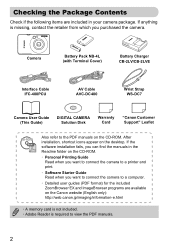
.... Select the playback mode. ● Press the 1 button. 1 Viewing Movies You can view your movies on the computer's capabilities. • If you use the supplied software to copy the movie back onto the memory card, you can also connect the...
.... Select the playback mode. ● Press the 1 button. 1 Viewing Movies You can view your movies on the computer's capabilities. • If you use the supplied software to copy the movie back onto the memory card, you can also connect the...
User Guide
Page 34
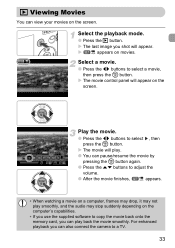
... G4/G5 or Intel Processor Viewing movies Core Duo 1.66 GHz or higher Viewing images 512 MB or more Viewing movies 1 GB or more USB Canon Utilities ImageBrowser: 300 MB or more PhotoStitch: 50 MB or more 1,024 × 768 pixels or higher Macintosh OS Computer model CPU RAM Interface ...-installed on computers with built-in USB ports. System Requirements Even though these are recommended system requirements, not all computer functions can use the included software to transfer your camera images to a Computer You can be pre-installed on computers with built-in USB ports.
... G4/G5 or Intel Processor Viewing movies Core Duo 1.66 GHz or higher Viewing images 512 MB or more Viewing movies 1 GB or more USB Canon Utilities ImageBrowser: 300 MB or more PhotoStitch: 50 MB or more 1,024 × 768 pixels or higher Macintosh OS Computer model CPU RAM Interface ...-installed on computers with built-in USB ports. System Requirements Even though these are recommended system requirements, not all computer functions can use the included software to transfer your camera images to a Computer You can be pre-installed on computers with built-in USB ports.

User Guide
Page 35
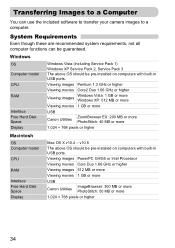
... follow the onscreen instructions to proceed with the installation. Transferring Images to a Computer Items to Prepare • Camera and computer • DIGITAL CAMERA Solution Disk supplied with the camera (p. 2) • Interface cable supplied with the installation. 35 Begin installation. When the install finishes, click ...[Restart] or [Finish]. Windows Place the DIGITAL CAMERA Solution Disk in the computer's CDROM drive and double-click the icon. Macintosh ● Place the CD-ROM in the computer's CD-ROM drive. Install the software. ● Click [Easy Installation] and follow...
... follow the onscreen instructions to proceed with the installation. Transferring Images to a Computer Items to Prepare • Camera and computer • DIGITAL CAMERA Solution Disk supplied with the camera (p. 2) • Interface cable supplied with the installation. 35 Begin installation. When the install finishes, click ...[Restart] or [Finish]. Windows Place the DIGITAL CAMERA Solution Disk in the computer's CDROM drive and double-click the icon. Macintosh ● Place the CD-ROM in the computer's CD-ROM drive. Install the software. ● Click [Easy Installation] and follow...

User Guide
Page 37
... 37 Images transferred to the computer will transfer to the computer. ● After the transfer finishes, turn off the camera and unplug the cable. ● For further operations, refer to a Computer Macintosh CameraWindow will appear when you establish a connection between the... camera and computer. ● If CameraWindow does not appear, click the [CameraWindow] icon on the Dock (the bar which appears at the bottom of the desktop). Transferring Images to the Software Starter Guide.
... 37 Images transferred to the computer will transfer to the computer. ● After the transfer finishes, turn off the camera and unplug the cable. ● For further operations, refer to a Computer Macintosh CameraWindow will appear when you establish a connection between the... camera and computer. ● If CameraWindow does not appear, click the [CameraWindow] icon on the Dock (the bar which appears at the bottom of the desktop). Transferring Images to the Software Starter Guide.

User Guide
Page 62
... insert the shooting date and time in the image's lower right corner. ● To restore to the Personal Printing Guide for details. • Connect the camera to a printer to select [Date Stamp]. Be sure to select [Date] or [Date & Time]. ● Pressing the n button will restore the shooting... date and time • Use the DPOF print settings (p. 126) to print. • Use the included software to print. Refer to the original setting, select [Off] in Step 1. Refer to the Software Starter Guide for details. 62 Shoot. Select [Date Stamp]. ● Press the n button. ● Press...
... insert the shooting date and time in the image's lower right corner. ● To restore to the Personal Printing Guide for details. • Connect the camera to a printer to select [Date Stamp]. Be sure to select [Date] or [Date & Time]. ● Pressing the n button will restore the shooting... date and time • Use the DPOF print settings (p. 126) to print. • Use the included software to print. Refer to the original setting, select [Off] in Step 1. Refer to the Software Starter Guide for details. 62 Shoot. Select [Date Stamp]. ● Press the n button. ● Press...

User Guide
Page 92
... select G. ● Press the qr buttons to select U (rightmost icon), then press the l button. ● Press the qr buttons to the Software Starter Guide. This function is not available when a TV is used as the monitor (p. 76). 92 L Shooting Stitch Assist Images Large subjects can be.... ● Minor discrepancies in the overlapping portions will be corrected when the images are merged. ● You can later be merged together using the included software on how to merge the images, refer to select x or v, then press the m button. Finish shooting. ● Press the m button. Take ...
... select G. ● Press the qr buttons to select U (rightmost icon), then press the l button. ● Press the qr buttons to the Software Starter Guide. This function is not available when a TV is used as the monitor (p. 76). 92 L Shooting Stitch Assist Images Large subjects can be.... ● Minor discrepancies in the overlapping portions will be corrected when the images are merged. ● You can later be merged together using the included software on how to merge the images, refer to select x or v, then press the m button. Finish shooting. ● Press the m button. Take ...

User Guide
Page 134
... you replace the memory card Auto Reset with a new one, file numbering begins with 0001 again. • If you use (p. 22). • Refer to the Software Starter Guide for both the [Continuous] and [Auto Reset] settings. Changing Functions If you change the date or time in the order they were taken...
... you replace the memory card Auto Reset with a new one, file numbering begins with 0001 again. • If you use (p. 22). • Refer to the Software Starter Guide for both the [Continuous] and [Auto Reset] settings. Changing Functions If you change the date or time in the order they were taken...

User Guide
Page 139
... m button. ● Press the qr buttons to select an option. X No start -up image when the camera power is turned on, or change the sounds played for each camera operation with your sounds using the 2 supplied software (ZoomBrowser EX/ ImageBrowser) (p. 140). Selecting the Image that you can register your recorded sounds. Last seen...
... m button. ● Press the qr buttons to select an option. X No start -up image when the camera power is turned on, or change the sounds played for each camera operation with your sounds using the 2 supplied software (ZoomBrowser EX/ ImageBrowser) (p. 140). Selecting the Image that you can register your recorded sounds. Last seen...

User Guide
Page 140
... to select an image, then press the m button. ● Press the qr buttons to select [OK], then press the m button to the camera using the included software (ZoomBrowser EX / ImageBrowser). Any previously registered start-up image will be overwritten when registering a new start-up image. 140 Changing the Start-up Image... or Sound Register the Start-up Screen When you press the 1 button and set the camera to playback mode, you can register images or sounds to complete registration. Refer to the Software Starter Guide for details.
... to select an image, then press the m button. ● Press the qr buttons to select [OK], then press the m button to the camera using the included software (ZoomBrowser EX / ImageBrowser). Any previously registered start-up image will be overwritten when registering a new start-up image. 140 Changing the Start-up Image... or Sound Register the Start-up Screen When you press the 1 button and set the camera to playback mode, you can register images or sounds to complete registration. Refer to the Software Starter Guide for details.
User Guide
Page 145
...breakup when playing back a movie on a computer with the flash, the lamp (on the front of the memory card in the camera (p. 52). Refer to the Software Starter Guide for shooting functions or FUNC. Shooting movies Correct shooting time does not display, or stops. • Format the memory ...card in the camera, or use the digital zoom while recording, but not the optical zoom (p. 96). Even when the shooting time does not display...
...breakup when playing back a movie on a computer with the flash, the lamp (on the front of the memory card in the camera (p. 52). Refer to the Software Starter Guide for shooting functions or FUNC. Shooting movies Correct shooting time does not display, or stops. • Format the memory ...card in the camera, or use the digital zoom while recording, but not the optical zoom (p. 96). Even when the shooting time does not display...

User Guide
Page 160
... Shooting Date and Time Date and Time Shooting Using a TV Monitor 76 Shooting With Macro 67 Shutter Button 23 Slideshow 105 Snow (Scene Mode 58 Software DIGITAL CAMERA Solution Disk 2, 35 Transferring Images to a Computer ...... 34 Sound 49 Stitch Assist (Scene Mode 92 Strap 2, 13 Sunset (Scene Mode 57 Supplementary Flash 40 T Terminal...
... Shooting Date and Time Date and Time Shooting Using a TV Monitor 76 Shooting With Macro 67 Shutter Button 23 Slideshow 105 Snow (Scene Mode 58 Software DIGITAL CAMERA Solution Disk 2, 35 Transferring Images to a Computer ...... 34 Sound 49 Stitch Assist (Scene Mode 92 Strap 2, 13 Sunset (Scene Mode 57 Supplementary Flash 40 T Terminal...


