
User Guide
Page 1
ENGLISH Camera User Guide • Before use, be sure to read this guide, including the safety precautions. • This guide will familiarize you with how to use the camera correctly. • Keep the guide handy for future reference.
ENGLISH Camera User Guide • Before use, be sure to read this guide, including the safety precautions. • This guide will familiarize you with how to use the camera correctly. • Keep the guide handy for future reference.
User Guide
Page 2
... the included software, refer to "Wireless LAN Guide" in the Getting Started guide. ELPH 530 HS IXUS 510 HS ELPH 530 HS IXUS 510 HS Camera Battery Pack NB-9L (with terminal cover) Battery Charger CB-2LB/CB-2LBE ELPH 320 HS IXUS 240 HS ELPH 320 HS IXUS 240 HS Battery Pack NB-11L (with terminal cover) Battery Charger CB-2LD/2LDE Interface Cable...
... the included software, refer to "Wireless LAN Guide" in the Getting Started guide. ELPH 530 HS IXUS 510 HS ELPH 530 HS IXUS 510 HS Camera Battery Pack NB-9L (with terminal cover) Battery Charger CB-2LB/CB-2LBE ELPH 320 HS IXUS 240 HS ELPH 320 HS IXUS 240 HS Battery Pack NB-11L (with terminal cover) Battery Charger CB-2LD/2LDE Interface Cable...
User Guide
Page 3
... to use of your operating system). 3 ELPH 530 HS IXUS 510 HS • microSD memory cards* • microSDHC memory cards* • microSDXC memory cards* ELPH 320 HS IXUS 240 HS • SD memory cards* • SDHC memory cards* • SDXC memory cards* • Eye-Fi cards * Conforms to work with the camera. However, not all memory cards have...
... to use of your operating system). 3 ELPH 530 HS IXUS 510 HS • microSD memory cards* • microSDHC memory cards* • microSDXC memory cards* ELPH 320 HS IXUS 240 HS • SD memory cards* • SDHC memory cards* • SDXC memory cards* • Eye-Fi cards * Conforms to work with the camera. However, not all memory cards have...
User Guide
Page 4
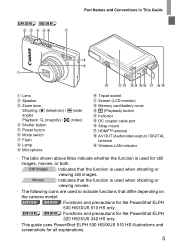
... a page number) • Instructions in this guide, icons are used to represent the corresponding camera buttons and switches on which they appear or which they resemble. • On-screen text is indicated in This Guide ELPH 530 HS IXUS 510 HS Lens Wireless LAN indicator Zoom lever Shooting: i (telephoto) / j (wide angle) Playback: k (... card cover Strap mount HDMITM terminal AV OUT (Audio/video output) / DIGITAL terminal • In this guide apply to the camera under default settings. • For convenience, all supported memory cards are simply referred to as "the memory card". 4
... a page number) • Instructions in this guide, icons are used to represent the corresponding camera buttons and switches on which they appear or which they resemble. • On-screen text is indicated in This Guide ELPH 530 HS IXUS 510 HS Lens Wireless LAN indicator Zoom lever Shooting: i (telephoto) / j (wide angle) Playback: k (... card cover Strap mount HDMITM terminal AV OUT (Audio/video output) / DIGITAL terminal • In this guide apply to the camera under default settings. • For convenience, all supported memory cards are simply referred to as "the memory card". 4
User Guide
Page 5
ELPH 320 HS IXUS 240 HS : Functions and precautions for the PowerShot ELPH 320 HS/IXUS 240 HS only. • This guide uses PowerShot ELPH 530 HS/IXUS 510 HS illustrations and screenshots for still images, movies, or both. Still Images : Indicates that differ depending on the camera model: ELPH 530 HS IXUS 510 HS : Functions and precautions for the PowerShot ELPH 530 HS/IXUS 510 HS only. Movies : Indicates that the function...
ELPH 320 HS IXUS 240 HS : Functions and precautions for the PowerShot ELPH 320 HS/IXUS 240 HS only. • This guide uses PowerShot ELPH 530 HS/IXUS 510 HS illustrations and screenshots for still images, movies, or both. Still Images : Indicates that differ depending on the camera model: ELPH 530 HS IXUS 510 HS : Functions and precautions for the PowerShot ELPH 530 HS/IXUS 510 HS only. Movies : Indicates that the function...

User Guide
Page 6
... Auto Mode..........46 Common, Convenient Features.......53 Using Face ID 59 Image Customization Features........67 Helpful Shooting Features 71 Customizing Camera Operation ......73 3 Other Shooting Modes.....75 Specific Scenes 76 Applying Special Effects 79 Special Modes for Other Purposes 86... 10 Preliminary Notes and Legal Information 13 Touch-Screen Operations 14 Initial Preparations 15 Trying the Camera Out 24 Included Software, PDF Manuals ....29 Accessories 36 1 Camera Basics 37 On/Off 38 Shutter Button 39 Shooting Display Options 40 FUNC. Contents Package Contents...
... Auto Mode..........46 Common, Convenient Features.......53 Using Face ID 59 Image Customization Features........67 Helpful Shooting Features 71 Customizing Camera Operation ......73 3 Other Shooting Modes.....75 Specific Scenes 76 Applying Special Effects 79 Special Modes for Other Purposes 86... 10 Preliminary Notes and Legal Information 13 Touch-Screen Operations 14 Initial Preparations 15 Trying the Camera Out 24 Included Software, PDF Manuals ....29 Accessories 36 1 Camera Basics 37 On/Off 38 Shutter Button 39 Shooting Display Options 40 FUNC. Contents Package Contents...
User Guide
Page 7
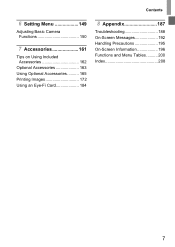
Contents 6 Setting Menu 149 Adjusting Basic Camera Functions 150 7 Accessories 161 Tips on Using Included Accessories 162 Optional Accessories 163 Using Optional Accessories .......... 165 Printing Images 172 Using an Eye-Fi Card 184 8 Appendix 187 Troubleshooting 188 On-Screen Messages 192 Handling Precautions 195 On-Screen Information 196 Functions and Menu Tables .......... 200 Index 208 7
Contents 6 Setting Menu 149 Adjusting Basic Camera Functions 150 7 Accessories 161 Tips on Using Included Accessories 162 Optional Accessories 163 Using Optional Accessories .......... 165 Printing Images 172 Using an Eye-Fi Card 184 8 Appendix 187 Troubleshooting 188 On-Screen Messages 192 Handling Precautions 195 On-Screen Information 196 Functions and Menu Tables .......... 200 Index 208 7
User Guide
Page 8
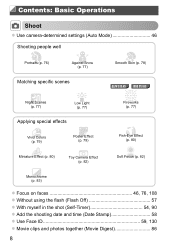
... (p. 78) Matching specific scenes Night Scenes (p. 77) Low Light (p. 77) Applying special effects Vivid Colors (p. 79) Poster Effect (p. 79) ELPH 530 HS IXUS 510 HS t Fireworks (p. 77) Fish-Eye Effect (p. 80) Miniature Effect (p. 80) Toy Camera Effect (p. 82) Soft Focus (p. 82) Monochrome (p. 83) z Focus on faces 46, 76, 108 z Without using the flash (Flash Off...
... (p. 78) Matching specific scenes Night Scenes (p. 77) Low Light (p. 77) Applying special effects Vivid Colors (p. 79) Poster Effect (p. 79) ELPH 530 HS IXUS 510 HS t Fireworks (p. 77) Fish-Eye Effect (p. 80) Miniature Effect (p. 80) Toy Camera Effect (p. 82) Soft Focus (p. 82) Monochrome (p. 83) z Focus on faces 46, 76, 108 z Without using the flash (Flash Off...
User Guide
Page 10
...water) or other persons, or damage to the equipment. • Be sure to the intense light produced by the flash could damage your camera distributor or a Canon Customer Support Help Desk. • Do not look through the viewfinder at bright light sources (such as alcohol, benzine, or thinner to... people's eyes. If liquids or foreign objects come into contact with the camera interior, immediately turn the camera off and remove the battery. In ...
...water) or other persons, or damage to the equipment. • Be sure to the intense light produced by the flash could damage your camera distributor or a Canon Customer Support Help Desk. • Do not look through the viewfinder at bright light sources (such as alcohol, benzine, or thinner to... people's eyes. If liquids or foreign objects come into contact with the camera interior, immediately turn the camera off and remove the battery. In ...
User Guide
Page 11
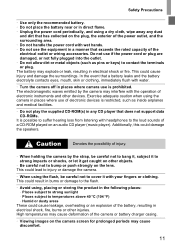
...• Be careful not to bump or push strongly on the lens. Caution Denotes the possibility of injury. • When holding the camera by the camera may cause discomfort. 11 In the event that does not support data CD-ROMs. It is prohibited. Additionally, this could cause injury and ...not use the equipment in a manner that exceeds the rated capacity of the electrical outlet or wiring accessories. Exercise adequate caution when using the camera in places where use of electronic devices is restricted, such as pins or keys) to contact the terminals or plug. This could cause ...
...• Be careful not to bump or push strongly on the lens. Caution Denotes the possibility of injury. • When holding the camera by the camera may cause discomfort. 11 In the event that does not support data CD-ROMs. It is prohibited. Additionally, this could cause injury and ...not use the equipment in a manner that exceeds the rated capacity of the electrical outlet or wiring accessories. Exercise adequate caution when using the camera in places where use of electronic devices is restricted, such as pins or keys) to contact the terminals or plug. This could cause ...
User Guide
Page 12
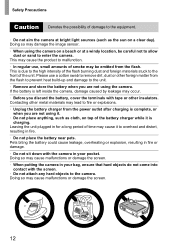
... use a cotton swab to remove dirt, dust or other insulators. Please use , small amounts of smoke may damage the image sensor. • When using the camera on top of the battery charger while it is complete, or when you are not using it to overheat and distort, resulting in for a long... plugged in fire. • Do not place the battery near pets. Doing so may be careful not to allow dust or sand to enter the camera. Contacting other metal materials may cause it . • Do not place anything, such as cloth, on a beach or at bright light sources (such as the...
... use a cotton swab to remove dirt, dust or other insulators. Please use , small amounts of smoke may damage the image sensor. • When using the camera on top of the battery charger while it is complete, or when you are not using it to overheat and distort, resulting in for a long... plugged in fire. • Do not place the battery near pets. Doing so may be careful not to allow dust or sand to enter the camera. Contacting other metal materials may cause it . • Do not place anything, such as cloth, on a beach or at bright light sources (such as the...
User Guide
Page 13
Please note that Canon Inc., its subsidiaries and affiliates, and its distributors are intended for any malfunction of a camera or accessory, including memory cards, that results in the failure of the pixels meet design specifications, in a way that even for protection against scratches during shipment. In case of camera problems while abroad, return to...
Please note that Canon Inc., its subsidiaries and affiliates, and its distributors are intended for any malfunction of a camera or accessory, including memory cards, that results in the failure of the pixels meet design specifications, in a way that even for protection against scratches during shipment. In case of camera problems while abroad, return to...
User Guide
Page 14
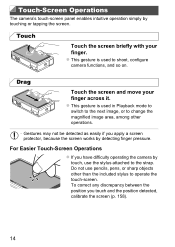
...among other than the included stylus to the strap. Do not use the stylus attached to operate the touch-screen. Touch-Screen Operations The camera's touch-screen panel enables intuitive operation simply by touch, use pencils, pens, or sharp objects other operations. • Gestures may not be... is used in Playback mode to switch to the next image, or to shoot, configure camera functions, and so on. To correct any discrepancy between the position you have difficulty operating the camera by touching or tapping the screen. For Easier Touch-Screen Operations z If you touch and...
...among other than the included stylus to the strap. Do not use the stylus attached to operate the touch-screen. Touch-Screen Operations The camera's touch-screen panel enables intuitive operation simply by touch, use pencils, pens, or sharp objects other operations. • Gestures may not be... is used in Playback mode to switch to the next image, or to shoot, configure camera functions, and so on. To correct any discrepancy between the position you have difficulty operating the camera by touching or tapping the screen. For Easier Touch-Screen Operations z If you touch and...
User Guide
Page 15
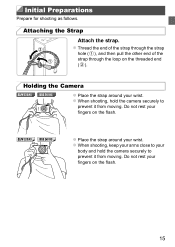
... flash. 15 Do not rest your body and hold the camera securely to prevent it from moving . z When shooting, hold the camera securely to your fingers on the flash. z When shooting, keep your arms close to prevent it from moving . ELPH 320 HS IXUS 240 HS z Place the strap around your wrist. z Thread the end... ( ), and then pull the other end of the strap through the loop on the threaded end ( ). Initial Preparations Prepare for shooting as follows. Holding the Camera ELPH 530 HS IXUS 510 HS z Place the strap around your wrist. Attaching the Strap Attach the strap.
... flash. 15 Do not rest your body and hold the camera securely to prevent it from moving . z When shooting, hold the camera securely to your fingers on the flash. z When shooting, keep your arms close to prevent it from moving . ELPH 320 HS IXUS 240 HS z Place the strap around your wrist. z Thread the end... ( ), and then pull the other end of the strap through the loop on the threaded end ( ). Initial Preparations Prepare for shooting as follows. Holding the Camera ELPH 530 HS IXUS 510 HS z Place the strap around your wrist. Attaching the Strap Attach the strap.
User Guide
Page 16
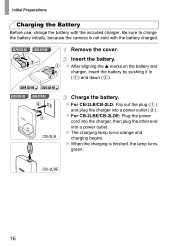
ELPH 530 HS IXUS 510 HS Remove the cover. z For CB-2LB/CB-2LD: Flip out the plug ( ) and plug the charger into a power outlet. z For CB-2LBE/CB-2LDE: Plug ... a power outlet ( ). X The charging lamp turns orange and charging begins. Be sure to charge the battery initially, because the camera is finished, the lamp turns green. ELPH 320 HS IXUS 240 HS ELPH 530 HS IXUS 510 HS CB-2LB Charge the battery. X When the charging is not sold with the included charger. z After aligning the S marks on...
ELPH 530 HS IXUS 510 HS Remove the cover. z For CB-2LB/CB-2LD: Flip out the plug ( ) and plug the charger into a power outlet. z For CB-2LBE/CB-2LDE: Plug ... a power outlet ( ). X The charging lamp turns orange and charging begins. Be sure to charge the battery initially, because the camera is finished, the lamp turns green. ELPH 320 HS IXUS 240 HS ELPH 530 HS IXUS 510 HS CB-2LB Charge the battery. X When the charging is not sold with the included charger. z After aligning the S marks on...
User Guide
Page 18
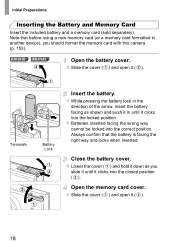
.... z While pressing the battery lock in the direction of the arrow, insert the battery facing as you should format the memory card with this camera (p. 153). Close the battery cover. z Lower the cover ( ) and hold it down as shown and push it in another device), you...new memory card (or a memory card formatted in until it ( ). 18 z Slide the cover ( ) and open it clicks into the correct position. ELPH 530 HS IXUS 510 HS Open the battery cover. Initial Preparations Inserting the Battery and Memory Card Insert the included battery and a memory card (sold separately).
.... z While pressing the battery lock in the direction of the arrow, insert the battery facing as you should format the memory card with this camera (p. 153). Close the battery cover. z Lower the cover ( ) and hold it down as shown and push it in another device), you...new memory card (or a memory card formatted in until it ( ). 18 z Slide the cover ( ) and open it clicks into the correct position. ELPH 530 HS IXUS 510 HS Open the battery cover. Initial Preparations Inserting the Battery and Memory Card Insert the included battery and a memory card (sold separately).
User Guide
Page 19
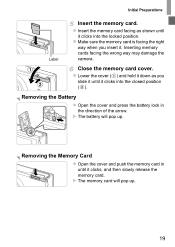
... facing the right way when you slide it until it clicks into the closed position ( ). Inserting memory cards facing the wrong way may damage the camera. X The battery will pop up . z Lower the cover ( ) and hold it down as shown until it . Initial Preparations Label Insert the memory card. X The memory...
... facing the right way when you slide it until it clicks into the closed position ( ). Inserting memory cards facing the wrong way may damage the camera. X The battery will pop up . z Lower the cover ( ) and hold it down as shown until it . Initial Preparations Label Insert the memory card. X The memory...
User Guide
Page 20
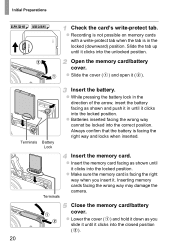
Initial Preparations ELPH 320 HS IXUS 240 HS Check the card's write-protect tab. Open the memory card/battery cover. z Batteries inserted facing the wrong way cannot be locked into the unlocked position. ... the cover ( ) and open it . Close the memory card/battery cover. Insert the memory card. Inserting memory cards facing the wrong way may damage the camera. z Lower the cover ( ) and hold it down as you insert it ( ). z Recording is not possible on memory cards with a write-protect tab when the tab...
Initial Preparations ELPH 320 HS IXUS 240 HS Check the card's write-protect tab. Open the memory card/battery cover. z Batteries inserted facing the wrong way cannot be locked into the unlocked position. ... the cover ( ) and open it . Close the memory card/battery cover. Insert the memory card. Inserting memory cards facing the wrong way may damage the camera. z Lower the cover ( ) and hold it down as you insert it ( ). z Recording is not possible on memory cards with a write-protect tab when the tab...

User Guide
Page 21
... and time, which is the basis for setting the date and time is displayed the first time you turn off the camera, press the power button. 21 z To turn the camera on . Remove the memory card. Setting the Date and Time A screen for dates and times added to your images. Turn the... camera on . Finish the setup process. z Push the memory card in the direction of the arrow. Set the date and time. z Open the cover and press ...
... and time, which is the basis for setting the date and time is displayed the first time you turn off the camera, press the power button. 21 z To turn the camera on . Remove the memory card. Setting the Date and Time A screen for dates and times added to your images. Turn the... camera on . Finish the setup process. z Push the memory card in the direction of the arrow. Set the date and time. z Open the cover and press ...

User Guide
Page 22
... the date/time battery is removed. • The date/time battery will be charged in about 4 hours once you insert a charged battery or connect the camera to set daylight saving time (1 hour ahead), touch and choose in date/time battery (backup battery) after the battery pack is depleted, the [Date/Time...] screen will be displayed each time you turn the camera on. Change the date and time. z Double-touch ^ to close the menu. • Date/time settings can be retained for about 3 weeks by the...
... the date/time battery is removed. • The date/time battery will be charged in about 4 hours once you insert a charged battery or connect the camera to set daylight saving time (1 hour ahead), touch and choose in date/time battery (backup battery) after the battery pack is depleted, the [Date/Time...] screen will be displayed each time you turn the camera on. Change the date and time. z Double-touch ^ to close the menu. • Date/time settings can be retained for about 3 weeks by the...


