User Guide
Page 3
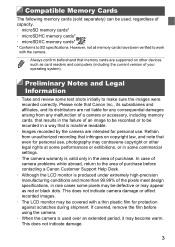
... is machine readable. • Images recorded by the camera are not liable for any malfunction of your operating system). Please note that Canon Inc., its subsidiaries and affiliates, and its distributors are intended for personal use , photography may appear as card readers and computers (including...or other devices such as red or black dots. This does not indicate damage. 3 Preliminary Notes and Legal Information • Take and review some test shots initially to work with a thin plastic film for personal use . However, not all memory cards have been verified to ...
... is machine readable. • Images recorded by the camera are not liable for any malfunction of your operating system). Please note that Canon Inc., its subsidiaries and affiliates, and its distributors are intended for personal use , photography may appear as card readers and computers (including...or other devices such as red or black dots. This does not indicate damage. 3 Preliminary Notes and Legal Information • Take and review some test shots initially to work with a thin plastic film for personal use . However, not all memory cards have been verified to ...
User Guide
Page 77
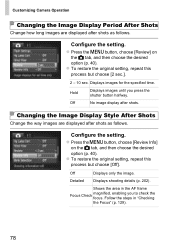
Configure the setting. z Press the n button, choose [Review] on the 4 tab, and then choose the desired option (p. 40). z To restore the original setting, repeat this process but choose [2 sec.]. 2 - 10 sec. Displays images ...for the specified time. Hold Displays images until you to check the focus. Off No image display after shots as follows. z Press the n button, choose [Review Info] on the 4 tab, and then choose the desired option (p. 40). Customizing Camera Operation Changing the Image Display Period After Shots Change how long images...
Configure the setting. z Press the n button, choose [Review] on the 4 tab, and then choose the desired option (p. 40). z To restore the original setting, repeat this process but choose [2 sec.]. 2 - 10 sec. Displays images ...for the specified time. Hold Displays images until you to check the focus. Off No image display after shots as follows. z Press the n button, choose [Review Info] on the 4 tab, and then choose the desired option (p. 40). Customizing Camera Operation Changing the Image Display Period After Shots Change how long images...
User Guide
Page 124
5 Playback Mode Have fun reviewing your shots, and browse or edit them in many ways • To prepare the camera for these operations, press the 1 button to enter Playback mode. • It may not be possible to play back or edit images that were renamed or already edited on a computer, or images from other cameras. 125
5 Playback Mode Have fun reviewing your shots, and browse or edit them in many ways • To prepare the camera for these operations, press the 1 button to enter Playback mode. • It may not be possible to play back or edit images that were renamed or already edited on a computer, or images from other cameras. 125
User Guide
Page 127
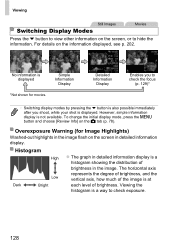
..., how much of brightness in detailed information display. For details on the 4 tab (p. 78). To change the initial display mode, press the n button and choose [Review Info] on the information displayed, see p. 202. Histogram High Dark Low Bright z The graph in detailed information display is displayed. Viewing Still Images Movies Switching...
..., how much of brightness in detailed information display. For details on the 4 tab (p. 78). To change the initial display mode, press the n button and choose [Review Info] on the information displayed, see p. 202. Histogram High Dark Low Bright z The graph in detailed information display is displayed. Viewing Still Images Movies Switching...
User Guide
Page 151
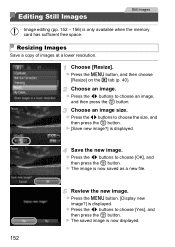
... n button, and then choose [Resize] on the 1 tab (p. 40). Choose an image. X [Save new image?] is now saved as a new file. X The image is displayed. Review the new image. X The saved image is only available when the memory card has sufficient free space. Editing Still Images Still Images • Image editing...
... n button, and then choose [Resize] on the 1 tab (p. 40). Choose an image. X [Save new image?] is now saved as a new file. X The image is displayed. Review the new image. X The saved image is only available when the memory card has sufficient free space. Editing Still Images Still Images • Image editing...
User Guide
Page 152
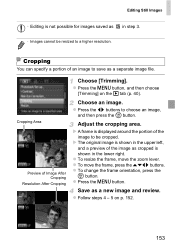
... a preview of the image as cropped is displayed around the portion of the image to be resized to a higher resolution. Save as a new image and review. z Follow steps 4 - 5 on the 1 tab (p. 40). Choose an image. z Press the qr buttons to save as a separate image file. z To move the zoom lever. z To...
... a preview of the image as cropped is displayed around the portion of the image to be resized to a higher resolution. Save as a new image and review. z Follow steps 4 - 5 on the 1 tab (p. 40). Choose an image. z Press the qr buttons to save as a separate image file. z To move the zoom lever. z To...
User Guide
Page 153
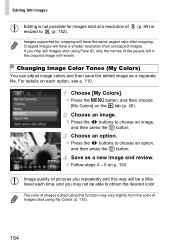
... My Colors (p. 110). 154 Changing Image Color Tones (My Colors) You can adjust image colors and then save the edited image as a new image and review. For details on the 1 tab (p. 40).
... My Colors (p. 110). 154 Changing Image Color Tones (My Colors) You can adjust image colors and then save the edited image as a new image and review. For details on the 1 tab (p. 40).

User Guide
Page 154
...; Images may be detected and automatically adjusted to the optimal brightness. Choose from four correction levels, and then save the image as a new image and review.
...; Images may be detected and automatically adjusted to the optimal brightness. Choose from four correction levels, and then save the image as a new image and review.
User Guide
Page 155
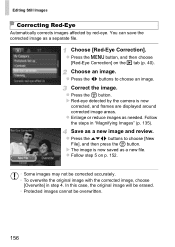
... Images Correcting Red-Eye Automatically corrects images affected by the camera is now saved as a new file. z Enlarge or reduce images as a new image and review. You can save the corrected image as a separate file. z Press the n button, and then choose [Red-Eye Correction] on p. 152. • Some images may not...
... Images Correcting Red-Eye Automatically corrects images affected by the camera is now saved as a new file. z Enlarge or reduce images as a new image and review. You can save the corrected image as a separate file. z Press the n button, and then choose [Red-Eye Correction] on p. 152. • Some images may not...
User Guide
Page 156
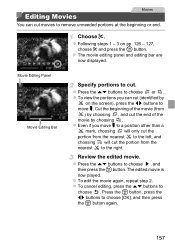
Movie Editing Panel Movie Editing Bar Specify portions to cut movies to the right. Review the edited movie. z To cancel editing, press the op buttons to choose , and then press the m button. z Even if you can cut . z Press the op ...
Movie Editing Panel Movie Editing Bar Specify portions to cut movies to the right. Review the edited movie. z To cancel editing, press the op buttons to choose , and then press the m button. z Even if you can cut . z Press the op ...

User Guide
Page 207
Off Red-Eye On Lamp Off Auto Off Hg Lamp Corr. (p. 71) Wind Filter (p. 73) Review (p. 78) On/Off On/Off Off/2 - 10 sec./Hold Review Info (p. 78) Off Detailed/Focus Check Blink Detection (p. 76) On Off Grid Lines (p. 74) On Off Off { {{{{{{{ IS Mode Continuous IS Settings (p. 123) Shoot Only ...
Off Red-Eye On Lamp Off Auto Off Hg Lamp Corr. (p. 71) Wind Filter (p. 73) Review (p. 78) On/Off On/Off Off/2 - 10 sec./Hold Review Info (p. 78) Off Detailed/Focus Check Blink Detection (p. 76) On Off Grid Lines (p. 74) On Off Off { {{{{{{{ IS Mode Continuous IS Settings (p. 123) Shoot Only ...


