User Manual
Page 2
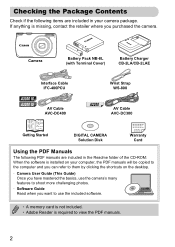
... to use the included software. • A memory card is not included. • Adobe Reader is missing, contact the retailer where you purchased the camera. Camera Battery Pack NB-8L (with Terminal Cover) Battery Charger CB-2LA/CB-2LAE Interface Cable IFC-400PCU A3300 IS A3200 IS AV Cable AVC-DC400 Wrist Strap WS-800 A2200 AV Cable AVC-DC300 Getting Started DIGITAL CAMERA Solution Disk Warranty Card Using the PDF Manuals The...
... to use the included software. • A memory card is not included. • Adobe Reader is missing, contact the retailer where you purchased the camera. Camera Battery Pack NB-8L (with Terminal Cover) Battery Charger CB-2LA/CB-2LAE Interface Cable IFC-400PCU A3300 IS A3200 IS AV Cable AVC-DC400 Wrist Strap WS-800 A2200 AV Cable AVC-DC300 Getting Started DIGITAL CAMERA Solution Disk Warranty Card Using the PDF Manuals The...
User Manual
Page 4
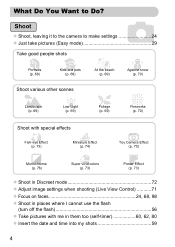
... Fish-eye Effect (p. 73) Miniature Effect (p. 74) Toy Camera Effect (p. 75) Monochrome (p. 76) Super vivid colors (p. 73) Poster Effect (p. 73) z Shoot in Discreet mode 72 z Adjust image settings when shooting (Live View Control 71 z Focus on faces 24, 68, 98 z Shoot in places where I cannot use the flash (turn off the flash 56 z Take pictures with me in them too (self-timer 60, 62, 80 z Insert the date and time into my shots 59...
... Fish-eye Effect (p. 73) Miniature Effect (p. 74) Toy Camera Effect (p. 75) Monochrome (p. 76) Super vivid colors (p. 73) Poster Effect (p. 73) z Shoot in Discreet mode 72 z Adjust image settings when shooting (Live View Control 71 z Focus on faces 24, 68, 98 z Shoot in places where I cannot use the flash (turn off the flash 56 z Take pictures with me in them too (self-timer 60, 62, 80 z Insert the date and time into my shots 59...
User Manual
Page 6
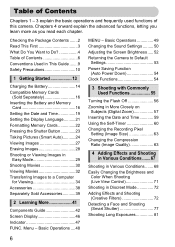
...Screen Display 46 Indicator 47 FUNC. Table of Contents Chapters 1 - 3 explain the basic operations and frequently used functions of Contents 6 Conventions Used in This Guide .......9 Safety Precautions 10 1 Getting Started 13 Charging the Battery 14 Compatible Memory Cards (Sold Separately 16 Inserting the Battery and Memory Card 16 Setting the Date and Time 19 Setting the Display Language..........21 Formatting Memory Cards 22 Pressing the Shutter Button 23 Taking Pictures (Smart Auto)...........24 Viewing Images 27 Erasing Images 28 Shooting or Viewing Images in Discreet Mode...
...Screen Display 46 Indicator 47 FUNC. Table of Contents Chapters 1 - 3 explain the basic operations and frequently used functions of Contents 6 Conventions Used in This Guide .......9 Safety Precautions 10 1 Getting Started 13 Charging the Battery 14 Compatible Memory Cards (Sold Separately 16 Inserting the Battery and Memory Card 16 Setting the Date and Time 19 Setting the Display Language..........21 Formatting Memory Cards 22 Pressing the Shutter Button 23 Taking Pictures (Smart Auto)...........24 Viewing Images 27 Erasing Images 28 Shooting or Viewing Images in Discreet Mode...
User Manual
Page 7
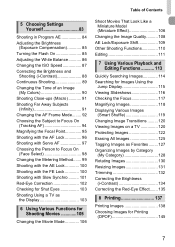
... Red-Eye Correction 102 Checking for Shut Eyes 103 Shooting Using a TV as the Display 103 6 Using Various Functions for Shooting Movies 105 Changing the Movie Mode 106 Shoot Movies That Look Like a Miniature Model (Miniature Effect 106 Changing the Image Quality.......... 108 AE Lock/Exposure Shift 109 Other Shooting Functions 110 Editing 111 7 Using Various Playback and Editing Functions 113 Quickly Searching Images 114 Searching for Images Using the Jump Display 115 Viewing Slideshows 116 Checking the Focus 117 Magnifying Images 118 Displaying...
... Red-Eye Correction 102 Checking for Shut Eyes 103 Shooting Using a TV as the Display 103 6 Using Various Functions for Shooting Movies 105 Changing the Movie Mode 106 Shoot Movies That Look Like a Miniature Model (Miniature Effect 106 Changing the Image Quality.......... 108 AE Lock/Exposure Shift 109 Other Shooting Functions 110 Editing 111 7 Using Various Playback and Editing Functions 113 Quickly Searching Images 114 Searching for Images Using the Jump Display 115 Viewing Slideshows 116 Checking the Focus 117 Magnifying Images 118 Displaying...
User Manual
Page 19
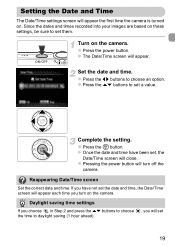
... times recorded into your images are based on the camera. X The Date/Time screen will close. z Press the m button. Reappearing Date/Time screen Set the correct date and time. z Press the qr buttons to set 19 z Press the op buttons to daylight saving (1 hour ahead). , you will set them. z Pressing the power button will turn on these settings, be sure to choose an option. Complete the setting. If you have been set a value. z Press the power button...
... times recorded into your images are based on the camera. X The Date/Time screen will close. z Press the m button. Reappearing Date/Time screen Set the correct date and time. z Press the qr buttons to set 19 z Press the op buttons to daylight saving (1 hour ahead). , you will set them. z Pressing the power button will turn on these settings, be sure to choose an option. Complete the setting. If you have been set a value. z Press the power button...
User Manual
Page 29
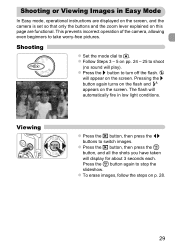
... Press the m button again to shoot (no sound will play). The flash will display for about 3 seconds each. Shooting or Viewing Images in low light conditions. z Press the 1 button, then press the m button, and all the shots you have taken will automatically fire in Easy Mode In Easy mode, operational instructions are displayed on the screen, and the camera is set so that only the buttons and the zoom lever explained on this page are functional.
... Press the m button again to shoot (no sound will play). The flash will display for about 3 seconds each. Shooting or Viewing Images in low light conditions. z Press the 1 button, then press the m button, and all the shots you have taken will automatically fire in Easy Mode In Easy mode, operational instructions are displayed on the screen, and the camera is set so that only the buttons and the zoom lever explained on this page are functional.
User Manual
Page 34
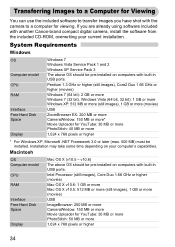
... time depending on your current installation. v10.6) The above OS should be installed. System Requirements Windows OS Computer model CPU RAM Interface Free Hard Disk Space Display Windows 7 Windows Vista Service Pack 1 and 2 Windows XP Service Pack 3 The above OS should be pre-installed on computers with built-in USB ports. If you have shot with the camera to transfer images you are already using software included with another Canon-brand compact digital camera, install...
... time depending on your current installation. v10.6) The above OS should be installed. System Requirements Windows OS Computer model CPU RAM Interface Free Hard Disk Space Display Windows 7 Windows Vista Service Pack 1 and 2 Windows XP Service Pack 3 The above OS should be pre-installed on computers with built-in USB ports. If you have shot with the camera to transfer images you are already using software included with another Canon-brand compact digital camera, install...
User Manual
Page 35
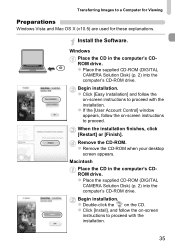
... -screen instructions to a Computer for Viewing Preparations Windows Vista and Mac OS X (v10.5) are used for these explanations. z If the [User Account Control] window appears, follow the on -screen instructions to proceed with the installation. Macintosh Place the CD in the computer's CDROM drive. When the installation finishes, click [Restart] or [Finish]. z Place the supplied CD-ROM (DIGITAL CAMERA Solution Disk) (p. 2) into the computer's CD-ROM drive. z Remove the...
... -screen instructions to a Computer for Viewing Preparations Windows Vista and Mac OS X (v10.5) are used for these explanations. z If the [User Account Control] window appears, follow the on -screen instructions to proceed with the installation. Macintosh Place the CD in the computer's CDROM drive. When the installation finishes, click [Restart] or [Finish]. z Place the supplied CD-ROM (DIGITAL CAMERA Solution Disk) (p. 2) into the computer's CD-ROM drive. z Remove the...
User Manual
Page 36
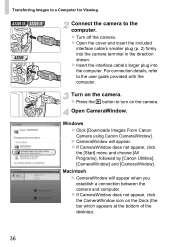
Windows z Click [Downloads Images From Canon Camera using Canon CameraWindow]. Macintosh X CameraWindow will appear. z Insert the interface cable's larger plug into the camera terminal in the direction shown. Open CameraWindow. For connection details, refer to turn on the camera. z If CameraWindow does not appear, click the [Start] menu and choose [All Programs], followed by [Canon Utilities], [CameraWindow] and [CameraWindow]. z If CameraWindow does not appear, click the CameraWindow icon on...
Windows z Click [Downloads Images From Canon Camera using Canon CameraWindow]. Macintosh X CameraWindow will appear. z Insert the interface cable's larger plug into the camera terminal in the direction shown. Open CameraWindow. For connection details, refer to turn on the camera. z If CameraWindow does not appear, click the [Start] menu and choose [All Programs], followed by [Canon Utilities], [CameraWindow] and [CameraWindow]. z If CameraWindow does not appear, click the CameraWindow icon on...
User Manual
Page 37
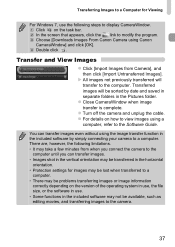
Transfer and View Images z Click [Import Images from when you connect the camera to the computer until you can transfer images even without using the image transfer function in the included software by date and saved in separate folders in the Pictures folder. There are, however, the following steps to display CameraWindow. Choose [Downloads Images From Canon Camera using a computer, refer to the Software Guide. z Close CameraWindow when image transfer is complete. z Turn off the camera and unplug the cable. Double click . Transferred images will...
Transfer and View Images z Click [Import Images from when you connect the camera to the computer until you can transfer images even without using the image transfer function in the included software by date and saved in separate folders in the Pictures folder. There are, however, the following steps to display CameraWindow. Choose [Downloads Images From Canon Camera using a computer, refer to the Software Guide. z Close CameraWindow when image transfer is complete. z Turn off the camera and unplug the cable. Double click . Transferred images will...
User Manual
Page 49
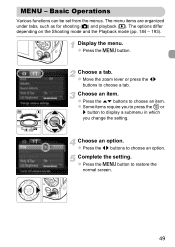
... qr buttons to display a submenu in which you change the setting. z Press the n button. z Move the zoom lever or press the qr buttons to choose an item. Choose an item. z Press the op buttons to choose a tab. Complete the setting. Basic Operations Various functions can be set from the menus. The options differ depending on the Shooting mode and the Playback mode (pp. 184 - 193). The menu...
... qr buttons to display a submenu in which you change the setting. z Press the n button. z Move the zoom lever or press the qr buttons to choose an item. Choose an item. z Press the op buttons to choose a tab. Complete the setting. Basic Operations Various functions can be set from the menus. The options differ depending on the Shooting mode and the Playback mode (pp. 184 - 193). The menu...
User Manual
Page 151
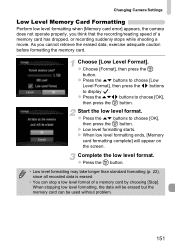
Changing Camera Settings Low Level Memory Card Formatting Perform low level formatting when [Memory card error] appears, the camera does not operate properly, you cannot retrieve the erased data, exercise adequate caution before formatting the memory card. z Press the op buttons to choose [OK], then press the m button. X Low level formatting starts. z Press the m button. • Low level formatting may take longer than standard formatting (p. 22), since all recorded data is erased. • You can be used without problem. 151 z Press...
Changing Camera Settings Low Level Memory Card Formatting Perform low level formatting when [Memory card error] appears, the camera does not operate properly, you cannot retrieve the erased data, exercise adequate caution before formatting the memory card. z Press the op buttons to choose [OK], then press the m button. X Low level formatting starts. z Press the m button. • Low level formatting may take longer than standard formatting (p. 22), since all recorded data is erased. • You can be used without problem. 151 z Press...
User Manual
Page 153
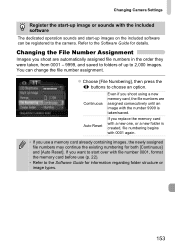
... operation sounds and start-up images on the included software can change the file number assignment. Changing the File Number Assignment Images you shoot are assigned consecutively until an image with file number 0001, format the memory card before use a memory card already containing images, the newly assigned file numbers may continue the existing numbering for both [Continuous] and [Auto Reset]. If you replace the memory card with a new one, or a new folder is taken/saved. z Choose [File Numbering], then press the qr buttons to the Software Guide for details. Changing Camera...
... operation sounds and start-up images on the included software can change the file number assignment. Changing the File Number Assignment Images you shoot are assigned consecutively until an image with file number 0001, format the memory card before use a memory card already containing images, the newly assigned file numbers may continue the existing numbering for both [Continuous] and [Auto Reset]. If you replace the memory card with a new one, or a new folder is taken/saved. z Choose [File Numbering], then press the qr buttons to the Software Guide for details. Changing Camera...
User Manual
Page 165
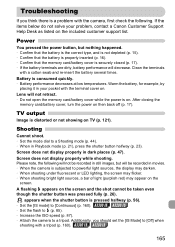
...). A flashing h appears on the screen and the shot cannot be recorded in Playback mode (p. 21), press the shutter button halfway (p. 23). appears when the shutter button is pressed halfway (p. 56). • Set the [IS mode] to a Shooting mode (p. 44). • When in movies. • When the camera is a problem with a cotton swab and re-insert the battery several times. Lens will decrease. Screen does not display properly in your problem, contact a Canon Customer Support Help Desk...
...). A flashing h appears on the screen and the shot cannot be recorded in Playback mode (p. 21), press the shutter button halfway (p. 23). appears when the shutter button is pressed halfway (p. 56). • Set the [IS mode] to a Shooting mode (p. 44). • When in movies. • When the camera is a problem with a cotton swab and re-insert the battery several times. Lens will decrease. Screen does not display properly in your problem, contact a Canon Customer Support Help Desk...
User Manual
Page 166
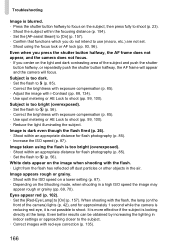
... the camera does not focus. • If you do not intend to use (macro, etc.) are not set. • Shoot using the focus lock or AF lock (pp. 93, 96). Troubleshooting Image is blurred. • Press the shutter button halfway to focus on the subject, then press fully to shoot (p. 23). • Shoot the subject within an appropriate distance for flash photography (p. 85). • Set the flash to ! (p. 56). Eyes appear red...
... the camera does not focus. • If you do not intend to use (macro, etc.) are not set. • Shoot using the focus lock or AF lock (pp. 93, 96). Troubleshooting Image is blurred. • Press the shutter button halfway to focus on the subject, then press fully to shoot (p. 23). • Shoot the subject within an appropriate distance for flash photography (p. 85). • Set the flash to ! (p. 56). Eyes appear red...
User Manual
Page 167
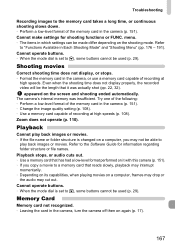
...; Use a memory card that has had a low-level format performed on it was insufficient. Zoom does not operate (p. 110). Memory Card Memory card not recognized. • Leaving the card in the camera (p. 151). The camera's internal memory was actually shot (pp. 22, 32). Playback Cannot play back images or movies. Cannot operate buttons. • When the mode dial is set to play back images or movies. • If the file name or folder structure is set to the Software Guide for shooting functions or...
...; Use a memory card that has had a low-level format performed on it was insufficient. Zoom does not operate (p. 110). Memory Card Memory card not recognized. • Leaving the card in the camera (p. 151). The camera's internal memory was actually shot (pp. 22, 32). Playback Cannot play back images or movies. Cannot operate buttons. • When the mode dial is set to play back images or movies. • If the file name or folder structure is set to the Software Guide for shooting functions or...
User Manual
Page 170
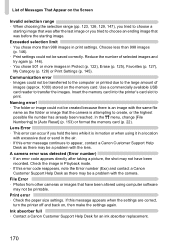
... of Messages That Appear on , then make the settings again. Use a commercially available USB card reader to [Auto Reset] (p. 153) or format the memory card (p. 22). Naming error! • The folder or image could not be a problem with the camera. Lens Error • This error can occur if you tried to create, or the highest possible file number has already been reached. In the 3 menu, change [File Numbering] to transfer the images. File Error • Photos from other cameras or images that...
... of Messages That Appear on , then make the settings again. Use a commercially available USB card reader to [Auto Reset] (p. 153) or format the memory card (p. 22). Naming error! • The folder or image could not be a problem with the camera. Lens Error • This error can occur if you tried to create, or the highest possible file number has already been reached. In the 3 menu, change [File Numbering] to transfer the images. File Error • Photos from other cameras or images that...
User Manual
Page 173
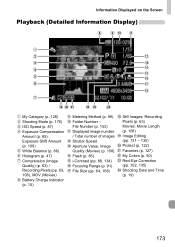
... Displayed on the Screen Playback (Detailed Information Display) My Category (p. 128) Shooting Mode (p. 176) ISO Speed (p. 87) Exposure Compensation Amount (p. 85), Exposure Shift Amount (p. 109) White Balance (p. 86) Histogram (p. 47) Compression (Image Quality) (p. 63) / Recording Pixels (pp. 63, 108), MOV (Movies) Battery Charge Indicator (p. 15) Metering Method (p. 99) Folder Number - File Number (p. 153) Displayed image number / Total number of images Shutter Speed Aperture Value, Image Quality (Movies) (p. 108) Flash (p. 85) i-Contrast (pp. 88, 134) Focusing Range (p. 91) File Size...
... Displayed on the Screen Playback (Detailed Information Display) My Category (p. 128) Shooting Mode (p. 176) ISO Speed (p. 87) Exposure Compensation Amount (p. 85), Exposure Shift Amount (p. 109) White Balance (p. 86) Histogram (p. 47) Compression (Image Quality) (p. 63) / Recording Pixels (pp. 63, 108), MOV (Movies) Battery Charge Indicator (p. 15) Metering Method (p. 99) Folder Number - File Number (p. 153) Displayed image number / Total number of images Shutter Speed Aperture Value, Image Quality (Movies) (p. 108) Flash (p. 85) i-Contrast (pp. 88, 134) Focusing Range (p. 91) File Size...
User Manual
Page 198
... AUTO Mode (Shooting Mode 24, 44 AV Cable 2, 120 B Battery Charge Indicator 15 Power Saving 54, 154, 155 Recharge 14 Beach (Shooting Mode 69 Black and White Images 90 Blink Detection 103 Blur Reduction (Shooting Mode) A2200 68 C Camera Default Settings 53 Holding the Camera 13 Camera Shake 26, 56, 160 Center (AF Frame Mode 93 Clock Functions 54 Components Guide 42 Compression Ratio (Image Quality 63 Continuous Shooting 89 Creative Filters (Shooting Mode 72 Custom White Balance 86 D Date and Time J Date/Time Date/Time Adding to Image 59 Changing 20 Setting...
... AUTO Mode (Shooting Mode 24, 44 AV Cable 2, 120 B Battery Charge Indicator 15 Power Saving 54, 154, 155 Recharge 14 Beach (Shooting Mode 69 Black and White Images 90 Blink Detection 103 Blur Reduction (Shooting Mode) A2200 68 C Camera Default Settings 53 Holding the Camera 13 Camera Shake 26, 56, 160 Center (AF Frame Mode 93 Clock Functions 54 Components Guide 42 Compression Ratio (Image Quality 63 Continuous Shooting 89 Creative Filters (Shooting Mode 72 Custom White Balance 86 D Date and Time J Date/Time Date/Time Adding to Image 59 Changing 20 Setting...
User Manual
Page 200
... Changing Delay and Number of Shots 62 Face Self-Timer (Shooting Mode) ...... 80 Two Second Self-Timer 61 Wink Self-Timer (Shooting Mode) ...... 78 Sepia Tones 90 Servo AF 97 Shooting Display Overlay 159 Number of Shots 15, 18, 64 Shooting Date and Time J Date/Time Shooting Info 171 Shooting Time 32 Shooting Using a TV 103 Slideshow 116 Smart Shuffle 119 Smart Shutter (Shooting Mode 77 Smile (Shooting Mode 77 Snow (Shooting Mode 70 Software DIGITAL CAMERA Solution Disk ......... 2 Installation 35 Software Guide 2 Transferring Images to a Computer for Viewing 34 Sound Settings...
... Changing Delay and Number of Shots 62 Face Self-Timer (Shooting Mode) ...... 80 Two Second Self-Timer 61 Wink Self-Timer (Shooting Mode) ...... 78 Sepia Tones 90 Servo AF 97 Shooting Display Overlay 159 Number of Shots 15, 18, 64 Shooting Date and Time J Date/Time Shooting Info 171 Shooting Time 32 Shooting Using a TV 103 Slideshow 116 Smart Shuffle 119 Smart Shutter (Shooting Mode 77 Smile (Shooting Mode 77 Snow (Shooting Mode 70 Software DIGITAL CAMERA Solution Disk ......... 2 Installation 35 Software Guide 2 Transferring Images to a Computer for Viewing 34 Sound Settings...


