User Manual
Page 4
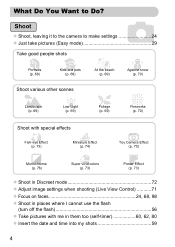
... mode 72 z Adjust image settings when shooting (Live View Control 71 z Focus on faces 24, 68, 98 z Shoot in places where I cannot use the flash (turn off the flash 56 z Take pictures with me in them too (self-timer 60, 62, 80 z Insert the date and time into my shots 59 4
... mode 72 z Adjust image settings when shooting (Live View Control 71 z Focus on faces 24, 68, 98 z Shoot in places where I cannot use the flash (turn off the flash 56 z Take pictures with me in them too (self-timer 60, 62, 80 z Insert the date and time into my shots 59 4
User Manual
Page 5
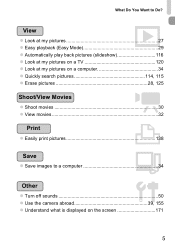
What Do You Want to Do? 1 View z Look at my pictures 27 z Easy playback (Easy Mode 29 z Automatically play back pictures (slideshow 116 z Look at my pictures on a TV 120 z Look at my pictures on a computer 34 z Quickly search pictures 114, 115 z Erase pictures 28, 125 E Shoot/View Movies z Shoot movies 30 z View movies 32 2 Print z Easily print pictures 138 Save z Save images to a computer 34 3 Other z Turn off sounds 50 z Use the camera abroad 39, 155 z Understand what is displayed on the screen 171 5
What Do You Want to Do? 1 View z Look at my pictures 27 z Easy playback (Easy Mode 29 z Automatically play back pictures (slideshow 116 z Look at my pictures on a TV 120 z Look at my pictures on a computer 34 z Quickly search pictures 114, 115 z Erase pictures 28, 125 E Shoot/View Movies z Shoot movies 30 z View movies 32 2 Print z Easily print pictures 138 Save z Save images to a computer 34 3 Other z Turn off sounds 50 z Use the camera abroad 39, 155 z Understand what is displayed on the screen 171 5
User Manual
Page 6
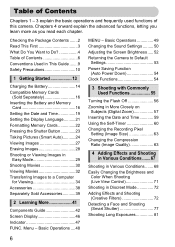
... Viewing Movies 32 Transferring Images to Default Settings 53 Power Saving Function (Auto Power Down 54 Clock Functions 54 3 Shooting with Commonly Used Functions 55 Turning the Flash Off 56 Zooming in More Closely on Subjects (Digital Zoom 57 Inserting the Date and Time 59 Using the Self-Timer 60 Changing...
... Viewing Movies 32 Transferring Images to Default Settings 53 Power Saving Function (Auto Power Down 54 Clock Functions 54 3 Shooting with Commonly Used Functions 55 Turning the Flash Off 56 Zooming in More Closely on Subjects (Digital Zoom 57 Inserting the Date and Time 59 Using the Self-Timer 60 Changing...
User Manual
Page 7
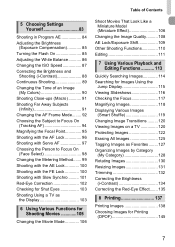
Table of Contents 5 Choosing Settings Yourself 83 Shooting in Program AE 84 Adjusting the Brightness (Exposure Compensation 85 Turning the Flash On 85 Adjusting the White Balance 86 Changing the ISO Speed 87 Correcting the Brightness and Shooting (i-Contrast 88 Continuous Shooting 89 Changing ...
Table of Contents 5 Choosing Settings Yourself 83 Shooting in Program AE 84 Adjusting the Brightness (Exposure Compensation 85 Turning the Flash On 85 Adjusting the White Balance 86 Changing the ISO Speed 87 Correcting the Brightness and Shooting (i-Contrast 88 Continuous Shooting 89 Changing ...
User Manual
Page 10
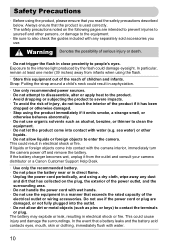
... eyes, mouth, skin or clothing, immediately flush with the camera interior, immediately turn the camera power off and remove the battery. In particular, remain at least one meter (39 inches) away from the outlet and consult your camera distributor or a Canon Customer Support Help Desk. • Use only the recommended battery. •...
... eyes, mouth, skin or clothing, immediately flush with the camera interior, immediately turn the camera power off and remove the battery. In particular, remain at least one meter (39 inches) away from the outlet and consult your camera distributor or a Canon Customer Support Help Desk. • Use only the recommended battery. •...
User Manual
Page 11
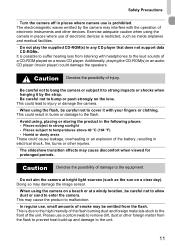
.... • Avoid using the camera in places where use a cotton swab to remove dirt, dust or other foreign matter from the flash. Safety Precautions • Turn the camera off in the following places: - Caution Denotes the possibility of damage to bump or push strongly on a clear day). Places subject to enter...
.... • Avoid using the camera in places where use a cotton swab to remove dirt, dust or other foreign matter from the flash. Safety Precautions • Turn the camera off in the following places: - Caution Denotes the possibility of damage to bump or push strongly on a clear day). Places subject to enter...
User Manual
Page 19
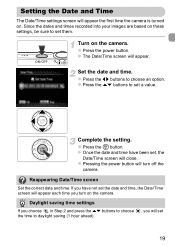
... times recorded into your images are based on the camera. Set the date and time. z Pressing the power button will appear each time you turn off the camera. Turn on . z Press the power button. If you will appear. z Press the qr buttons to set them. z Press the m button. Daylight saving ...choose the time to set a value. X The Date/Time screen will set , the Date/Time screen will appear the first time the camera is turned on the camera. z Press the op buttons to choose an option. Setting the Date and Time The Date/Time settings screen will close. Reappearing ...
... times recorded into your images are based on the camera. Set the date and time. z Pressing the power button will appear each time you turn off the camera. Turn on . z Press the power button. If you will appear. z Press the qr buttons to set them. z Press the m button. Daylight saving ...choose the time to set a value. X The Date/Time screen will set , the Date/Time screen will appear the first time the camera is turned on the camera. z Press the op buttons to choose an option. Setting the Date and Time The Date/Time settings screen will close. Reappearing ...

User Manual
Page 20
... the menu. Setting the Date and Time Changing the Date and Time You can be retained for about 4 hours even if the camera is not turned on. • If the date/time battery is depleted, the Date/Time screen will appear when you...
... the menu. Setting the Date and Time Changing the Date and Time You can be retained for about 4 hours even if the camera is not turned on. • If the date/time battery is depleted, the Date/Time screen will appear when you...
User Manual
Page 24
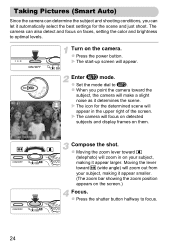
... can also detect and focus on the camera. Compose the shot. X The start-up screen will zoom out from your subject, making it appear larger. Turn on faces, setting the color and brightness to optimal levels. z Press the shutter button halfway to A. z Moving the zoom lever toward j (wide angle) will appear...
... can also detect and focus on the camera. Compose the shot. X The start-up screen will zoom out from your subject, making it appear larger. Turn on faces, setting the color and brightness to optimal levels. z Press the shutter button halfway to A. z Moving the zoom lever toward j (wide angle) will appear...
User Manual
Page 25
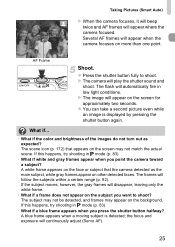
... appears on the background. z Press the shutter button fully to shoot? What if... • What if the color and brightness of the images do not turn out as the main subject, while gray frames appear on the screen for approximately two seconds. The flash will appear on other detected faces.
... appears on the background. z Press the shutter button fully to shoot? What if... • What if the color and brightness of the images do not turn out as the main subject, while gray frames appear on the screen for approximately two seconds. The flash will appear on other detected faces.
User Manual
Page 26
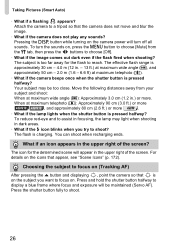
... sounds on . Press and hold the shutter button halfway to reach. Pressing the l button while turning on the camera power will be too close. To turn off all sounds. Move the following distances away from the 3 tab, then press the qr buttons to choose [Mute] from your subject and shoot: When ... shoot when recharging ends. To reduce red-eye and to focus on the icons that is charging. Choosing the subject to assist in .) or more A2200 . • What if the lamp lights when the shutter button is pressed halfway?
... sounds on . Press and hold the shutter button halfway to reach. Pressing the l button while turning on the camera power will be too close. To turn off all sounds. Move the following distances away from the 3 tab, then press the qr buttons to choose [Mute] from your subject and shoot: When ... shoot when recharging ends. To reduce red-eye and to focus on the icons that is charging. Choosing the subject to assist in .) or more A2200 . • What if the lamp lights when the shutter button is pressed halfway?

User Manual
Page 27
... the q button will cycle through the images from newest to Shooting mode. 27 Switching to Shooting mode Pressing the shutter button halfway, or turning the mode dial in Playback mode switches the camera to oldest. z The images change more quickly if you have taken on the screen. ...z The lens will turn off the power. Enter Playback mode. z Pressing the 1 button again while the lens is retracted will retract after approximately 1 minute elapses....
... the q button will cycle through the images from newest to Shooting mode. 27 Switching to Shooting mode Pressing the shutter button halfway, or turning the mode dial in Playback mode switches the camera to oldest. z The images change more quickly if you have taken on the screen. ...z The lens will turn off the power. Enter Playback mode. z Pressing the 1 button again while the lens is retracted will retract after approximately 1 minute elapses....
User Manual
Page 29
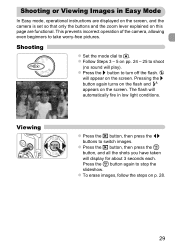
... 1 button, then press the qr buttons to take worry-free pictures. z Follow Steps 3 - 5 on the screen. Pressing the r button again turns on the flash and appears on pp. 24 - 25 to turn off the flash. ! z To erase images, follow the steps on the screen. Shooting z Set the mode dial to stop the...
... 1 button, then press the qr buttons to take worry-free pictures. z Follow Steps 3 - 5 on the screen. Pressing the r button again turns on the flash and appears on pp. 24 - 25 to turn off the flash. ! z To erase images, follow the steps on the screen. Shooting z Set the mode dial to stop the...
User Manual
Page 36
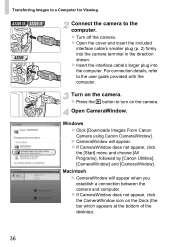
... CameraWindow will appear. z Turn off the camera. z Press the 1 button to the user guide provided with the computer. For connection details, refer to turn on the camera. z If... CameraWindow does not appear, click the [Start] menu and choose [All Programs], followed by [Canon Utilities], [CameraWindow] and [CameraWindow]. z... a connection between the camera and computer. Windows z Click [Downloads Images From Canon Camera using Canon CameraWindow]. z If CameraWindow does not appear, click the CameraWindow icon on the ...
... CameraWindow will appear. z Turn off the camera. z Press the 1 button to the user guide provided with the computer. For connection details, refer to turn on the camera. z If... CameraWindow does not appear, click the [Start] menu and choose [All Programs], followed by [Canon Utilities], [CameraWindow] and [CameraWindow]. z... a connection between the camera and computer. Windows z Click [Downloads Images From Canon Camera using Canon CameraWindow]. z If CameraWindow does not appear, click the CameraWindow icon on the ...
User Manual
Page 37
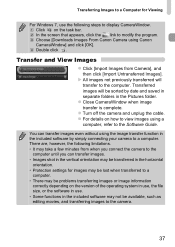
... will be sorted by simply connecting your camera to a computer. z Turn off the camera and unplug the cable. Click on how to view images using Canon CameraWindow] and click [OK]. z Close CameraWindow when image transfer is complete. Choose [Downloads Images From Canon Camera using a computer, refer to the Software Guide. Transferred images will...
... will be sorted by simply connecting your camera to a computer. z Turn off the camera and unplug the cable. Click on how to view images using Canon CameraWindow] and click [OK]. z Close CameraWindow when image transfer is complete. Choose [Downloads Images From Canon Camera using a computer, refer to the Software Guide. Transferred images will...
User Manual
Page 44
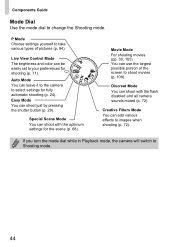
If you turn the mode dial while in Playback mode, the camera will switch to change the Shooting mode. Special Scene Mode You can shoot just by pressing ...
If you turn the mode dial while in Playback mode, the camera will switch to change the Shooting mode. Special Scene Mode You can shoot just by pressing ...
User Manual
Page 47
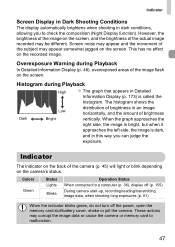
... (p. 36), display off (p. 155) During camera start-up, recording/reading/transmitting image data, when shooting long exposures (p. 81) When the indicator blinks green, do not turn off the power, open the memory card slot/battery cover, shake or jolt the camera. When the graph approaches the right side, the image is...
... (p. 36), display off (p. 155) During camera start-up, recording/reading/transmitting image data, when shooting long exposures (p. 81) When the indicator blinks green, do not turn off the power, open the memory card slot/battery cover, shake or jolt the camera. When the graph approaches the right side, the image is...
User Manual
Page 50
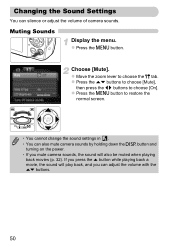
... press the o button while playing back a movie, the sound will play back, and you can also mute camera sounds by holding down the l button and turning on the power. • If you mute camera sounds, the sound will also be muted when playing back movies (p. 32). Changing the Sound Settings You...
... press the o button while playing back a movie, the sound will play back, and you can also mute camera sounds by holding down the l button and turning on the power. • If you mute camera sounds, the sound will also be muted when playing back movies (p. 32). Changing the Sound Settings You...
User Manual
Page 54
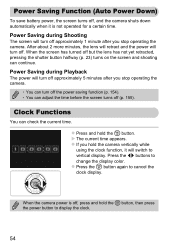
... button to display the clock. 54 When the camera power is not operated for a certain time. Power Saving during Shooting The screen will turn off the power saving function (p. 154). • You can continue. Press the qr buttons to cancel the clock display. Power Saving Function...Press and hold the m button. After about 2 more minutes, the lens will retract and the power will turn off approximately 1 minute after you stop operating the camera. • You can turn off (p. 155). Clock Functions You can check the current time. Power Saving during Playback The power will switch...
... button to display the clock. 54 When the camera power is not operated for a certain time. Power Saving during Shooting The screen will turn off the power saving function (p. 154). • You can continue. Press the qr buttons to cancel the clock display. Power Saving Function...Press and hold the m button. After about 2 more minutes, the lens will retract and the power will turn off approximately 1 minute after you stop operating the camera. • You can turn off (p. 155). Clock Functions You can check the current time. Power Saving during Playback The power will switch...
User Manual
Page 55
3 Shooting with Commonly Used Functions This chapter explains how to use common functions, such as the selftimer, and how to A mode. When shooting in another mode, check which functions are available in that the camera is set to turn off the flash. • This chapter assumes that mode (pp. 176 - 183). 55
3 Shooting with Commonly Used Functions This chapter explains how to use common functions, such as the selftimer, and how to A mode. When shooting in another mode, check which functions are available in that the camera is set to turn off the flash. • This chapter assumes that mode (pp. 176 - 183). 55


