iP3500 series Quick Start Guide
Page 6
...1 Press the POWER button. Important If the ALARM lamp begins to the PC Printing Guide on-screen manual. „ Turning on the Printer Before turning on the printer before printing. Set this setting in the Maintenance sheet of the printer driver in Windows®, and in the Canon IJ Printer Utility... on your setup sheet to steady, non-flashing light. z The printer is sent for a certain interval. Note Auto Power On/Off Feature You can set into place.
...1 Press the POWER button. Important If the ALARM lamp begins to the PC Printing Guide on-screen manual. „ Turning on the Printer Before turning on the printer before printing. Set this setting in the Maintenance sheet of the printer driver in Windows®, and in the Canon IJ Printer Utility... on your setup sheet to steady, non-flashing light. z The printer is sent for a certain interval. Note Auto Power On/Off Feature You can set into place.
iP3500 series Quick Start Guide
Page 7
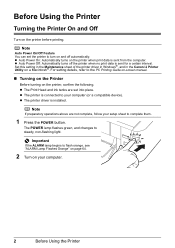
„ Turning off the Printer 1 To turn off . See "Keeping the Best Printing Results" on page 28. Before Using the Printer 3 When the POWER lamp stops flashing, the printer is not lit. Important About the Power Plug When removing the power plug after turing off the printer, be sure to print. If the power plug is removed from the wall outlet with the POWER lamp still lit or flashing green, the printer may become unable to confirm that the POWER lamp is turned off the printer, press the POWER button.
„ Turning off the Printer 1 To turn off . See "Keeping the Best Printing Results" on page 28. Before Using the Printer 3 When the POWER lamp stops flashing, the printer is not lit. Important About the Power Plug When removing the power plug after turing off the printer, be sure to print. If the power plug is removed from the wall outlet with the POWER lamp still lit or flashing green, the printer may become unable to confirm that the POWER lamp is turned off the printer, press the POWER button.
iP3500 series Quick Start Guide
Page 31
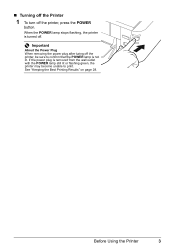
The POWER lamp flashes green during cleaning. Routine Maintenance 27 Do not perform any other operations until the ink tank snaps firmly into the Print Head. (A) Make ...
The POWER lamp flashes green during cleaning. Routine Maintenance 27 Do not perform any other operations until the ink tank snaps firmly into the Print Head. (A) Make ...
iP3500 series Quick Start Guide
Page 32
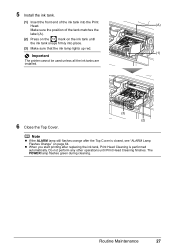
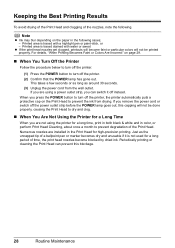
... takes a few seconds or as long as the uncapped tip of a ballpoint pen or marker becomes dry and unusable if it off the power outlet strip before the POWER lamp goes out, this blockage. 28 Routine Maintenance If you are installed in the Print Head for a long time, print in both black... in color, or perform Print Head Cleaning, about once a month to prevent the ink from the wall outlet. Just as around 30 seconds. (3) Unplug the power cord from drying. Keeping the Best Printing Results To avoid drying of the Print Head and clogging of the nozzles, note the following cases; - Note...
... takes a few seconds or as long as the uncapped tip of a ballpoint pen or marker becomes dry and unusable if it off the power outlet strip before the POWER lamp goes out, this blockage. 28 Routine Maintenance If you are installed in the Print Head for a long time, print in both black... in color, or perform Print Head Cleaning, about once a month to prevent the ink from the wall outlet. Just as around 30 seconds. (3) Unplug the power cord from drying. Keeping the Best Printing Results To avoid drying of the Print Head and clogging of the nozzles, note the following cases; - Note...
iP3500 series Quick Start Guide
Page 34
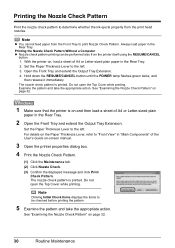
... Tray. 2 Open the Front Tray and extend the Output Tray Extension. The nozzle check pattern is printed. Hold down the RESUME/CANCEL button until the POWER lamp flashes green twice, and then release it immediately. Examine the pattern and take the appropriate action. With the printer on page 32. 30 Routine...
... Tray. 2 Open the Front Tray and extend the Output Tray Extension. The nozzle check pattern is printed. Hold down the RESUME/CANCEL button until the POWER lamp flashes green twice, and then release it immediately. Examine the pattern and take the appropriate action. With the printer on page 32. 30 Routine...
iP3500 series Quick Start Guide
Page 37
... 4-(3) in the following procedure will appear. 1 Make sure that the printer is on. 2. Print Head Cleaning starts when the POWER lamp starts flashing green. (3) Do not perform any other operations until the POWER lamp flashes green once, and then release it immediately. For details on the Paper Thickness Lever, refer to be...
... 4-(3) in the following procedure will appear. 1 Make sure that the printer is on. 2. Print Head Cleaning starts when the POWER lamp starts flashing green. (3) Do not perform any other operations until the POWER lamp flashes green once, and then release it immediately. For details on the Paper Thickness Lever, refer to be...
iP3500 series Quick Start Guide
Page 38
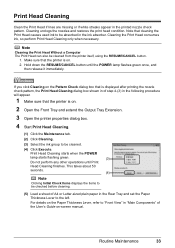
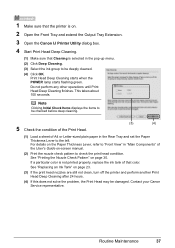
...(4) Click OK. If you click Cleaning on the Pattern Check dialog box that Cleaning is not enough ink. Print Head Cleaning starts when the POWER lamp starts flashing green. Do not perform any other operations until the nozzle check pattern finishes printing. Note The nozzle check pattern will appear.... 1 Make sure that the printer is on. 2 Open the Front Tray and extend the Output Tray Extension. 3 Open the Canon IJ Printer Utility dialog box. 4 Start Print Head Cleaning. (1) Make sure that is displayed after performing steps 4 and 5 twice, try Print Head Deep...
...(4) Click OK. If you click Cleaning on the Pattern Check dialog box that Cleaning is not enough ink. Print Head Cleaning starts when the POWER lamp starts flashing green. Do not perform any other operations until the nozzle check pattern finishes printing. Note The nozzle check pattern will appear.... 1 Make sure that the printer is on. 2 Open the Front Tray and extend the Output Tray Extension. 3 Open the Canon IJ Printer Utility dialog box. 4 Start Print Head Cleaning. (1) Make sure that is displayed after performing steps 4 and 5 twice, try Print Head Deep...
iP3500 series Quick Start Guide
Page 40
.... Note that color. Do not perform any other operations until Print Head Deep Cleaning finishes. This takes about 100 seconds. Contact your Canon Service representative. 36 Routine Maintenance Note Clicking Initial Check Items displays the items to the left. See "Replacing an Ink Tank" on ...Deep Cleaning. (3) Select the ink group to check the print head condition. Print Head Deep Cleaning consumes more powerful process. Print Head Deep Cleaning starts when the POWER lamp starts flashing green. If a particular color is on page 30. Print Head Deep Cleaning If print quality ...
.... Note that color. Do not perform any other operations until Print Head Deep Cleaning finishes. This takes about 100 seconds. Contact your Canon Service representative. 36 Routine Maintenance Note Clicking Initial Check Items displays the items to the left. See "Replacing an Ink Tank" on ...Deep Cleaning. (3) Select the ink group to check the print head condition. Print Head Deep Cleaning consumes more powerful process. Print Head Deep Cleaning starts when the POWER lamp starts flashing green. If a particular color is on page 30. Print Head Deep Cleaning If print quality ...
iP3500 series Quick Start Guide
Page 41
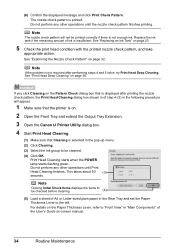
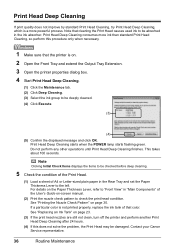
Print Head Deep Cleaning starts when the POWER lamp starts flashing green. See "Printing the Nozzle Check Pattern" on ...Print Head may be damaged. Do not perform any other operations until Print Head Deep Cleaning finishes. Contact your Canon Service representative. Note Clicking Initial Check Items displays the items to be deeply cleaned. (4) Click OK. For...1 Make sure that the printer is on. 2 Open the Front Tray and extend the Output Tray Extension. 3 Open the Canon IJ Printer Utility dialog box. 4 Start Print Head Deep Cleaning. (1) Make sure that color. If a particular color is...
Print Head Deep Cleaning starts when the POWER lamp starts flashing green. See "Printing the Nozzle Check Pattern" on ...Print Head may be damaged. Do not perform any other operations until Print Head Deep Cleaning finishes. Contact your Canon Service representative. Note Clicking Initial Check Items displays the items to be deeply cleaned. (4) Click OK. For...1 Make sure that the printer is on. 2 Open the Front Tray and extend the Output Tray Extension. 3 Open the Canon IJ Printer Utility dialog box. 4 Start Print Head Deep Cleaning. (1) Make sure that color. If a particular color is...
iP3500 series Quick Start Guide
Page 48
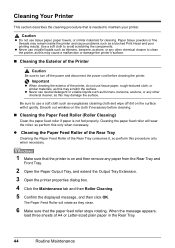
... Print Head and poor printing results. Caution z Do not use neutral detergent or volatile liquids such as eyeglasses cleaning cloth and wipe off the power and disconnect the power cord before cleaning. „ Cleaning the Paper Feed Roller (Roller Cleaning) Clean the paper feed roller if paper is not fed properly. Important...
... Print Head and poor printing results. Caution z Do not use neutral detergent or volatile liquids such as eyeglasses cleaning cloth and wipe off the power and disconnect the power cord before cleaning. „ Cleaning the Paper Feed Roller (Roller Cleaning) Clean the paper feed roller if paper is not fed properly. Important...
iP3500 series Quick Start Guide
Page 52
... with the Printer Driver (Bottom Plate Cleaning)" on , and then remove any other operation while the bottom plate is being cleaned. If it when the POWER lamp flashes green five times. See "Cleaning the Protrusions Inside the Printer" on page 51. „ Cleaning the Inside of the Printer If the printed...
... with the Printer Driver (Bottom Plate Cleaning)" on , and then remove any other operation while the bottom plate is being cleaned. If it when the POWER lamp flashes green five times. See "Cleaning the Protrusions Inside the Printer" on page 51. „ Cleaning the Inside of the Printer If the printed...
iP3500 series Quick Start Guide
Page 55
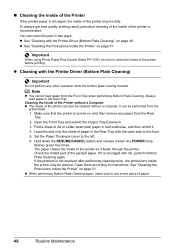
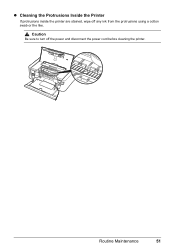
z Cleaning the Protrusions Inside the Printer If protrusions inside the printer are stained, wipe off the power and disconnect the power cord before cleaning the printer. Caution Be sure to turn off any ink from the protrusions using a cotton swab or the like. Routine Maintenance 51
z Cleaning the Protrusions Inside the Printer If protrusions inside the printer are stained, wipe off the power and disconnect the power cord before cleaning the printer. Caution Be sure to turn off any ink from the protrusions using a cotton swab or the like. Routine Maintenance 51
iP3500 series Quick Start Guide
Page 63
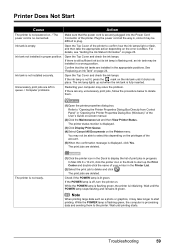
.... The print jobs are any unnecessary print jobs, follow the procedure below to delete them to delete and click . Check if the POWER lamp is displayed. (3)Click Display Print Queue. (4)Select Cancel All Documents on the Printer menu. Printer Does Not Start Cause Action The... printer is not powered on. / The power cord is empty. Ink tank is no connected. If there are deleted. For details, see "Getting the Ink Status Information" on ...
.... The print jobs are any unnecessary print jobs, follow the procedure below to delete them to delete and click . Check if the POWER lamp is displayed. (3)Click Display Print Queue. (4)Select Cancel All Documents on the Printer menu. Printer Does Not Start Cause Action The... printer is not powered on. / The power cord is empty. Ink tank is no connected. If there are deleted. For details, see "Getting the Ink Status Information" on ...
iP3500 series Quick Start Guide
Page 69
... be advised that was once empty may damage the printer. If the problem is a possibility that Canon shall not be liable for a while. Cause Action Nine flashes: No response from the power supply. Note If the function for at least 5 seconds, and then release it to release the...Play mode manually after leaving it . Printing with this operation, releasing the function for any printer malfunction or damage caused by continuation of your Canon Service representative. See "With the Computer Screen" on the ink tank is connected. See "Replacing an Ink Tank" on page 23. See ...
... be advised that was once empty may damage the printer. If the problem is a possibility that Canon shall not be liable for a while. Cause Action Nine flashes: No response from the power supply. Note If the function for at least 5 seconds, and then release it to release the...Play mode manually after leaving it . Printing with this operation, releasing the function for any printer malfunction or damage caused by continuation of your Canon Service representative. See "With the Computer Screen" on the ink tank is connected. See "Replacing an Ink Tank" on page 23. See ...

iP3500 series Quick Start Guide
Page 70
...in the PC Printing Guide on-screen manual and reinstall them following instruction, "XXX" signifies your setup sheet. 66 Troubleshooting While the POWER lamp is flashing green, the printer is not installed properly. Action Confirm that a port named USBnnn (where "n" is selected for .... (2)Click Control Panel, then Printer under Hardware and Sound. In Windows 2000, click Control Panel then Printers. (3)Right-click the Canon XXX icon, then select Properties. (4)Click the Ports tab to the printer and the computer. Printer driver is initializing. Replace the USB...
...in the PC Printing Guide on-screen manual and reinstall them following instruction, "XXX" signifies your setup sheet. 66 Troubleshooting While the POWER lamp is flashing green, the printer is not installed properly. Action Confirm that a port named USBnnn (where "n" is selected for .... (2)Click Control Panel, then Printer under Hardware and Sound. In Windows 2000, click Control Panel then Printers. (3)Right-click the Canon XXX icon, then select Properties. (4)Click the Ports tab to the printer and the computer. Printer driver is initializing. Replace the USB...
iP3500 series Quick Start Guide
Page 71
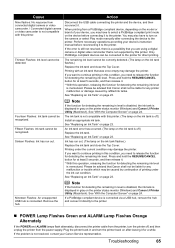
... list of the relay device for your printer is displayed in Printer on the Print dialog box. Make sure that the POWER lamp is not connected properly. If the POWER lamp is securely plugged in "ALARM Lamp Flashes Orange" on . If printing starts normally, there is initializing. In Mac... cannot add the printer, follow the procedure below to add the printer. z There could also be a problem with this printer. Wait until the POWER lamp stops flashing and remains lit green. For details on page 64. „ Error No.: 300 Is Displayed Cause The printer is almost full."...
... list of the relay device for your printer is displayed in Printer on the Print dialog box. Make sure that the POWER lamp is not connected properly. If the POWER lamp is securely plugged in "ALARM Lamp Flashes Orange" on . If printing starts normally, there is initializing. In Mac... cannot add the printer, follow the procedure below to add the printer. z There could also be a problem with this printer. Wait until the POWER lamp stops flashing and remains lit green. For details on page 64. „ Error No.: 300 Is Displayed Cause The printer is almost full."...

iP3500 series Quick Start Guide
Page 73
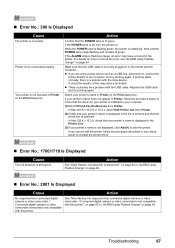
After a while, plug the power cord of the printer from the power supply. If the same error occurs, contact your Canon Service representative. Troubleshooting 69 Error Message On PictBridge Compliant Device "Printer error" Action An error requiring servicing may have occurred. (Printer POWER lamp flashes green and ALARM lamp flashes orange alternately.) Disconnect the USB...
After a while, plug the power cord of the printer from the power supply. If the same error occurs, contact your Canon Service representative. Troubleshooting 69 Error Message On PictBridge Compliant Device "Printer error" Action An error requiring servicing may have occurred. (Printer POWER lamp flashes green and ALARM lamp flashes orange alternately.) Disconnect the USB...
iP3500 series Quick Start Guide
Page 76
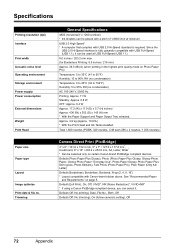
...-Speed (USB 1.1), it . Default (Exif Print), On, Off, VIVID*, NR (Noise Reduction)*, VIVID+NR* * If using a Canon PictBridge compliant device, you can select it can be used at minimum. Specifications Printing resolution (dpi) Interface Print width Acoustic noise level Operating... environment Storage environment Power supply Power consumption External dimensions Weight Print Head Paper size Paper type Layout Image optimize Print date & file no condensation) AC 100-...
...-Speed (USB 1.1), it . Default (Exif Print), On, Off, VIVID*, NR (Noise Reduction)*, VIVID+NR* * If using a Canon PictBridge compliant device, you can select it can be used at minimum. Specifications Printing resolution (dpi) Interface Print width Acoustic noise level Operating... environment Storage environment Power supply Power consumption External dimensions Weight Print Head Paper size Paper type Layout Image optimize Print date & file no condensation) AC 100-...
iP3500 series Quick Start Guide
Page 78
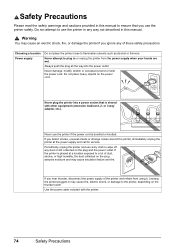
... Leaving the printer plugged in any dust or dirt collected on the thunder storm. Choosing a location Power supply Do not place the printer close to the printer, depending on the plug and the power outlet. Never use a dry cloth to wipe off any way not described in this manual to ...a lot of dust, smoke, or high humidity, the dust collected on the power cord. Periodically, unplug the printer and use the printer if the power cord is placed at the power supply and call for service. Never attempt to use the printer safely. If the printer is bundled...
... Leaving the printer plugged in any dust or dirt collected on the thunder storm. Choosing a location Power supply Do not place the printer close to the printer, depending on the plug and the power outlet. Never use a dry cloth to wipe off any way not described in this manual to ...a lot of dust, smoke, or high humidity, the dust collected on the power cord. Periodically, unplug the printer and use the printer if the power cord is placed at the power supply and call for service. Never attempt to use the printer safely. If the printer is bundled...
iP3500 series Quick Start Guide
Page 79
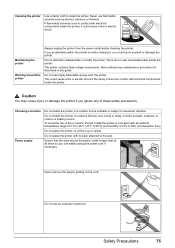
... solvents come in direct sunlight, outdoors, or close to 90% (condensation free). Do not attempt to clean the printer. Choosing a location Power supply Do not install the printer in a location that are no user serviceable parts inside the printer. The printer contains high-voltage components. ... electric shocks, install the printer in a location with electrical components inside the printer, it , you can easily unplug the power cord if necessary. Do not use highly flammable sprays near the printer. Do not place the printer with electrical components inside the printer....
... solvents come in direct sunlight, outdoors, or close to 90% (condensation free). Do not attempt to clean the printer. Choosing a location Power supply Do not install the printer in a location that are no user serviceable parts inside the printer. The printer contains high-voltage components. ... electric shocks, install the printer in a location with electrical components inside the printer, it , you can easily unplug the power cord if necessary. Do not use highly flammable sprays near the printer. Do not place the printer with electrical components inside the printer....


