iP3500 series Quick Start Guide
Page 4
... accuracy and completeness thereof are not guaranteed or warranted, and they are trademarks of Canon U.S.A., Inc. © 2007 Canon U.S.A., Inc. The steps described in this manual are available for energy efficiency. has determined that it will be an easy-to...a trademark of your application. z "Windows" is made regarding non-Canon products was compiled from publicly available information. and other countries. Canon PIXMA iP3500 series Photo Printer Quick Start Guide. Depending on your Canon PIXMA iP3500 series Photo Printer. Under the copyright laws, this product meets the ...
... accuracy and completeness thereof are not guaranteed or warranted, and they are trademarks of Canon U.S.A., Inc. © 2007 Canon U.S.A., Inc. The steps described in this manual are available for energy efficiency. has determined that it will be an easy-to...a trademark of your application. z "Windows" is made regarding non-Canon products was compiled from publicly available information. and other countries. Canon PIXMA iP3500 series Photo Printer Quick Start Guide. Depending on your Canon PIXMA iP3500 series Photo Printer. Under the copyright laws, this product meets the ...
iP3500 series Quick Start Guide
Page 5
... the Computer Screen 66 Error Message Appears on a PictBridge Compliant Device 68 Appendix 70 How to Use the Documentation Provided.....70 Reading the On-screen Manuals 71 Specifications 72 Safety Precautions 74 Users in the U.S.A 77 Index 81 1
... the Computer Screen 66 Error Message Appears on a PictBridge Compliant Device 68 Appendix 70 How to Use the Documentation Provided.....70 Reading the On-screen Manuals 71 Specifications 72 Safety Precautions 74 Users in the U.S.A 77 Index 81 1
iP3500 series Quick Start Guide
Page 6
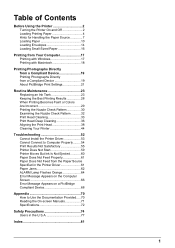
.... Note If preparatory operations above are set the printer to steady, non-flashing light. For setting details, refer to the PC Printing Guide on-screen manual. „ Turning on the Printer Before turning on your setup sheet to flash orange, see "ALARM Lamp Flashes Orange" on page 64. 2 Turn on the... On/Off Feature You can set into place. Set this setting in the Maintenance sheet of the printer driver in Windows®, and in the Canon IJ Printer Utility on and off the printer when no print data is connected to your computer (or a compatible device). z The Print Head and ink...
.... Note If preparatory operations above are set the printer to steady, non-flashing light. For setting details, refer to the PC Printing Guide on-screen manual. „ Turning on the Printer Before turning on your setup sheet to flash orange, see "ALARM Lamp Flashes Orange" on page 64. 2 Turn on the... On/Off Feature You can set into place. Set this setting in the Maintenance sheet of the printer driver in Windows®, and in the Canon IJ Printer Utility on and off the printer when no print data is connected to your computer (or a compatible device). z The Print Head and ink...
iP3500 series Quick Start Guide
Page 9
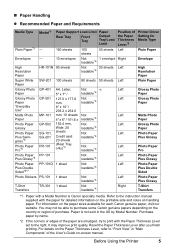
...Paper Plus Semigloss*6 Photo Paper Pro*6 Photo Paper Plus Glossy*6 Photo Paper Plus Double Sided*6*7 Photo Stickers T-Shirt Transfers Model*1 - - Paper is Canon specialty media. Reset the Paper Thickness Lever after you finish printing. For details on the Paper Thickness Lever, refer to "Front View" in the ... Components" of the paper are smudged, try to print with the paper for each Canon genuine paper, visit our website. Purchase paper by Model Number. It may not be able to the instruction manual supplied with the Paper Thickness Lever set to the right. HR-101N SW-201 GP...
...Paper Plus Semigloss*6 Photo Paper Pro*6 Photo Paper Plus Glossy*6 Photo Paper Plus Double Sided*6*7 Photo Stickers T-Shirt Transfers Model*1 - - Paper is Canon specialty media. Reset the Paper Thickness Lever after you finish printing. For details on the Paper Thickness Lever, refer to "Front View" in the ... Components" of the paper are smudged, try to print with the paper for each Canon genuine paper, visit our website. Purchase paper by Model Number. It may not be able to the instruction manual supplied with the Paper Thickness Lever set to the right. HR-101N SW-201 GP...
iP3500 series Quick Start Guide
Page 10
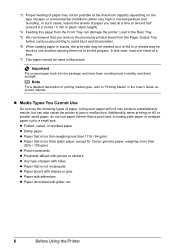
... Output Tray before continuously printing to avoid blurs and discoloration. *6 When loading paper in the User's Guide onscreen manual. Load in the Rear Tray. *5 We recommend that is too thick (plain paper, except for Canon genuine paper, weighing more than a post card, including plain paper or notepad paper cut to around half...
... Output Tray before continuously printing to avoid blurs and discoloration. *6 When loading paper in the User's Guide onscreen manual. Load in the Rear Tray. *5 We recommend that is too thick (plain paper, except for Canon genuine paper, weighing more than a post card, including plain paper or notepad paper cut to around half...
iP3500 series Quick Start Guide
Page 11
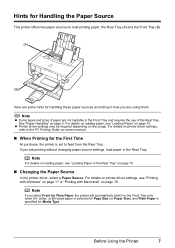
... 7 Note If you are using them. Hints for Handling the Paper Source This printer offers two paper sources to the PC Printing Guide on-screen manual. „ When Printing for the First Time At purchase, the printer is specified for Media Type.
... 7 Note If you are using them. Hints for Handling the Paper Source This printer offers two paper sources to the PC Printing Guide on-screen manual. „ When Printing for the First Time At purchase, the printer is specified for Media Type.
iP3500 series Quick Start Guide
Page 12
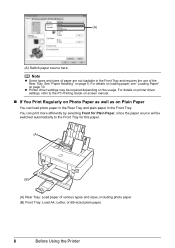
... A4, Letter, or B5-sized plain paper. 8 Before Using the Printer For details on printer driver settings, refer to the PC Printing Guide on-screen manual. „ If You Print Regularly on Photo Paper as well as on Plain Paper You can print more efficiently by selecting Front for Plain Paper...
... A4, Letter, or B5-sized plain paper. 8 Before Using the Printer For details on printer driver settings, refer to the PC Printing Guide on-screen manual. „ If You Print Regularly on Photo Paper as well as on Plain Paper You can print more efficiently by selecting Front for Plain Paper...
iP3500 series Quick Start Guide
Page 15
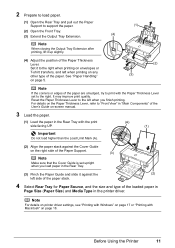
... set to the right. Important Do not load higher than the Load Limit Mark (A). (A) (1) (2) Align the paper stack against the (2) left when printing on -screen manual. 3 Load the paper. (1) Load the paper in the Rear Tray with the Paper Thickness Lever set upright when you finish printing. 2 Prepare to load paper...
... set to the right. Important Do not load higher than the Load Limit Mark (A). (A) (1) (2) Align the paper stack against the (2) left when printing on -screen manual. 3 Load the paper. (1) Load the paper in the Rear Tray with the Paper Thickness Lever set upright when you finish printing. 2 Prepare to load paper...
iP3500 series Quick Start Guide
Page 16
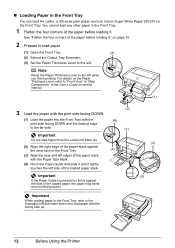
on -screen manual. (1) 3 Load the paper with the print side facing DOWN. (1) Load the paper into the Front Tray with the print side facing DOWN and the leading ... until it lightly touches the left . . „ Loading Paper in the Front Tray You can load A4, Letter, or B5-sized plain paper (such as Canon Super White Paper SW-201) in the Front Tray. 1 Flatten the four corners of the paper before loading it. Important Do not load higher than...
on -screen manual. (1) 3 Load the paper with the print side facing DOWN. (1) Load the paper into the Front Tray with the print side facing DOWN and the leading ... until it lightly touches the left . . „ Loading Paper in the Front Tray You can load A4, Letter, or B5-sized plain paper (such as Canon Super White Paper SW-201) in the Front Tray. 1 Flatten the four corners of the paper before loading it. Important Do not load higher than...
iP3500 series Quick Start Guide
Page 18
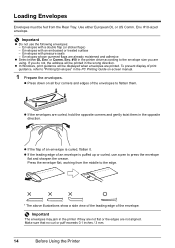
... (or sticker flaps) - Envelopes with pressure seals - If you are already moistened and adhesive z Select either European DL or US Comm. z Press down on -screen manual. 1 Prepare the envelopes. Env. #10-sized envelope. Use either DL Env. z If the flap of the envelope. To prevent display of the envelopes to the...
... (or sticker flaps) - Envelopes with pressure seals - If you are already moistened and adhesive z Select either European DL or US Comm. z Press down on -screen manual. 1 Prepare the envelopes. Env. #10-sized envelope. Use either DL Env. z If the flap of the envelope. To prevent display of the envelopes to the...
iP3500 series Quick Start Guide
Page 19
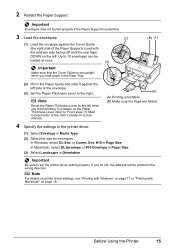
... printer driver settings, see "Printing with Windows" on page 17 or "Printing with the address side facing UP and the rear flaps DOWN on -screen manual. 4 Specify the settings in the printer driver. (1) Select Envelope in the wrong direction. Important Make sure that the Cover Guide is extended. 3 Load the envelopes...
... printer driver settings, see "Printing with Windows" on page 17 or "Printing with the address side facing UP and the rear flaps DOWN on -screen manual. 4 Specify the settings in the printer driver. (1) Select Envelope in the wrong direction. Important Make sure that the Cover Guide is extended. 3 Load the envelopes...
iP3500 series Quick Start Guide
Page 21
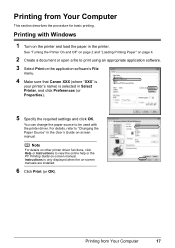
...using an appropriate application software. 3 Select Print on the application software's File menu. 4 Make sure that Canon XXX (where "XXX" is your printer's name) is only displayed when the on -screen manual. Instructions is selected in the printer. You can change the paper source to view the online help or... the PC Printing Guide on -screen manuals are installed. 6 Click Print (or OK). Printing from Your Computer 17 Printing with the printer driver. Note For details on other printer driver...
...using an appropriate application software. 3 Select Print on the application software's File menu. 4 Make sure that Canon XXX (where "XXX" is your printer's name) is only displayed when the on -screen manual. Instructions is selected in the printer. You can change the paper source to view the online help or... the PC Printing Guide on -screen manuals are installed. 6 Click Print (or OK). Printing from Your Computer 17 Printing with the printer driver. Note For details on other printer driver...
iP3500 series Quick Start Guide
Page 22
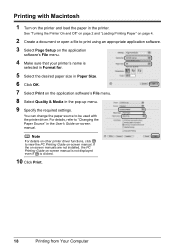
... is clicked. 10 Click Print. 18 Printing from Your Computer You can change the paper source to view the PC Printing Guide on -screen manual. For details, refer to print using an appropriate application software. 3 Select Page Setup on the printer and load the paper in the User's... Guide on -screen manual. Printing with the printer driver. See "Turning the Printer On and Off" on page 2 and "Loading Printing Paper" on page 4. 2 Create a document or...
... is clicked. 10 Click Print. 18 Printing from Your Computer You can change the paper source to view the PC Printing Guide on -screen manual. For details, refer to print using an appropriate application software. 3 Select Page Setup on the printer and load the paper in the User's... Guide on -screen manual. Printing with the printer driver. See "Turning the Printer On and Off" on page 2 and "Loading Printing Paper" on page 4. 2 Create a document or...
iP3500 series Quick Start Guide
Page 23
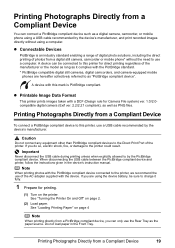
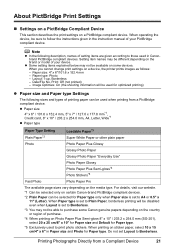
... directly from a Compliant Device To connect a PictBridge compliant device to use the Rear Tray as PNG files. Do not load paper in the device's instruction manual. A device can only use a computer. Printing Photographs Directly from a PictBridge compliant device, you can be sure to charge it complies with a DCF (Design rule for...
... directly from a Compliant Device To connect a PictBridge compliant device to use the Rear Tray as PNG files. Do not load paper in the device's instruction manual. A device can only use a computer. Printing Photographs Directly from a PictBridge compliant device, you can be sure to charge it complies with a DCF (Design rule for...
iP3500 series Quick Start Guide
Page 24
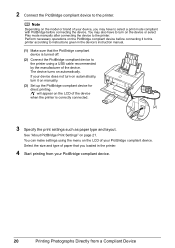
...If your device does not turn on automatically, turn on the device or select Play mode manually after connecting the device to select a print mode compliant with PictBridge before connecting it on manually. (3) Set up the PictBridge compliant device for direct printing. Select the size and type of...PictBridge compliant device. You can make settings using a USB cable recommended by the manufacturer of your device, you loaded in the device's instruction manual. (1) Make sure that you may also have to the printer. will appear on the LCD of the device when the printer is turned ...
...If your device does not turn on automatically, turn on the device or select Play mode manually after connecting the device to select a print mode compliant with PictBridge before connecting it on manually. (3) Set up the PictBridge compliant device for direct printing. Select the size and type of...PictBridge compliant device. You can make settings using a USB cable recommended by the manufacturer of your device, you loaded in the device's instruction manual. (1) Make sure that you may also have to the printer. will appear on the LCD of the device when the printer is turned ...
iP3500 series Quick Start Guide
Page 25
...and Photo for Paper type. Print: Off (not printed) - When Paper type is set Layout to follow the instructions given in the instruction manual of your device. When you cannot change print settings on the media type. z Some setting items explained below may be sure to Borderless. ... be disabled even when Layout is set to Borderless. *3 You may not be available on some Canon genuine papers depending on the country or region of purchase. *4 When printing on certain Canon-brand PictBridge compliant devices. *2 Plain Paper can be selected for Paper type only when Paper size...
...and Photo for Paper type. Print: Off (not printed) - When Paper type is set Layout to follow the instructions given in the instruction manual of your device. When you cannot change print settings on the media type. z Some setting items explained below may be sure to Borderless. ... be disabled even when Layout is set to Borderless. *3 You may not be available on some Canon genuine papers depending on the country or region of purchase. *4 When printing on certain Canon-brand PictBridge compliant devices. *2 Plain Paper can be selected for Paper type only when Paper size...
iP3500 series Quick Start Guide
Page 28
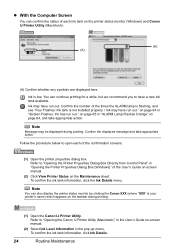
...Box Directly from Control Panel" in "Opening the Printer Properties Dialog Box (Windows)" of the User's Guide on-screen manual. (2) Click View Printer Status on -screen manual. (2) Select Ink Level Information in the pop-up menu. Confirm the number of the times the ALARM lamp is ...the status of each of the confirmation screens. (1) Open the printer properties dialog box. Ink is low. on the printer status monitor (Windows) and Canon IJ Printer Utility (Macintosh). (A) (A) (A) Confirm whether any symbols are displayed here. Note Message may have a new ink tank available. You can ...
...Box Directly from Control Panel" in "Opening the Printer Properties Dialog Box (Windows)" of the User's Guide on-screen manual. (2) Click View Printer Status on -screen manual. (2) Select Ink Level Information in the pop-up menu. Confirm the number of the times the ALARM lamp is ...the status of each of the confirmation screens. (1) Open the printer properties dialog box. Ink is low. on the printer status monitor (Windows) and Canon IJ Printer Utility (Macintosh). (A) (A) (A) Confirm whether any symbols are displayed here. Note Message may have a new ink tank available. You can ...
iP3500 series Quick Start Guide
Page 33
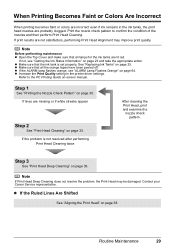
... then perform Print Head Cleaning. Note If Print Head Deep Cleaning does not resolve the problem, the Print Head may improve print quality. Contact your Canon Service representative. Note Before performing maintenance z Open the Top Cover and make sure that all lamps for the ink tanks are lit red. If not..., see "ALARM Lamp Flashes Orange" on -screen manual. z Make sure that the ink tank is not resolved after performing Print Head Cleaning twice After cleaning the Print Head, print and examine the nozzle...
... then perform Print Head Cleaning. Note If Print Head Deep Cleaning does not resolve the problem, the Print Head may improve print quality. Contact your Canon Service representative. Note Before performing maintenance z Open the Top Cover and make sure that all lamps for the ink tanks are lit red. If not..., see "ALARM Lamp Flashes Orange" on -screen manual. z Make sure that the ink tank is not resolved after performing Print Head Cleaning twice After cleaning the Print Head, print and examine the nozzle...
iP3500 series Quick Start Guide
Page 34
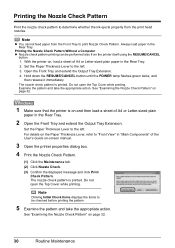
... the ink ejects properly from the printer itself using the RESUME/CANCEL button. 1. With the printer on, load a sheet of the User's Guide on-screen manual. 3 Open the printer properties dialog box. 4 Print the Nozzle Check Pattern. (1) Click the Maintenance tab. (2) Click Nozzle Check. (3) Confirm the displayed message and click Print...
... the ink ejects properly from the printer itself using the RESUME/CANCEL button. 1. With the printer on, load a sheet of the User's Guide on-screen manual. 3 Open the printer properties dialog box. 4 Print the Nozzle Check Pattern. (1) Click the Maintenance tab. (2) Click Nozzle Check. (3) Confirm the displayed message and click Print...
iP3500 series Quick Start Guide
Page 35
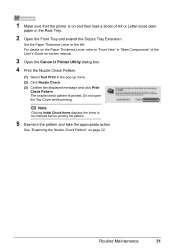
... Print Check Pattern. For details on page 32. The nozzle check pattern is on and then load a sheet of the User's Guide on-screen manual. 3 Open the Canon IJ Printer Utility dialog box. 4 Print the Nozzle Check Pattern. (1) Select Test Print in the Rear Tray. 2 Open the Front Tray and extend the...
... Print Check Pattern. For details on page 32. The nozzle check pattern is on and then load a sheet of the User's Guide on-screen manual. 3 Open the Canon IJ Printer Utility dialog box. 4 Print the Nozzle Check Pattern. (1) Select Test Print in the Rear Tray. 2 Open the Front Tray and extend the...


