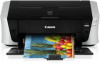
iP3500 series Quick Start Guide
Page 4
... the instruction manual of Microsoft Corporation. No representation is made regarding non-Canon products was compiled from publicly available information. and other countries. Canon U.S.A., Inc. Canon PIXMA iP3500 series Photo Printer Quick Start Guide. Copyright This manual is a trademark of...the U.S. For details, refer to your Canon PIXMA iP3500 series Photo Printer. The steps described in this manual are trademarks of Microsoft Corporation, registered in the U.S. As an ENERGY STAR® Partner, Canon Inc. About Consumables Consumables (ink tanks / FINE Cartridges) are available ...
... the instruction manual of Microsoft Corporation. No representation is made regarding non-Canon products was compiled from publicly available information. and other countries. Canon U.S.A., Inc. Canon PIXMA iP3500 series Photo Printer Quick Start Guide. Copyright This manual is a trademark of...the U.S. For details, refer to your Canon PIXMA iP3500 series Photo Printer. The steps described in this manual are trademarks of Microsoft Corporation, registered in the U.S. As an ENERGY STAR® Partner, Canon Inc. About Consumables Consumables (ink tanks / FINE Cartridges) are available ...
iP3500 series Quick Start Guide
Page 5
...Directly from a Compliant Device 19 Printing Photographs Directly from a Compliant Device 19 About PictBridge Print Settings 21 Routine Maintenance 23 Replacing an Ink Tank 23 Keeping the Best Printing Results 28 When Printing Becomes Faint or Colors Are Incorrect 29 Printing the Nozzle Check Pattern 30 Examining...the Printer Driver 53 Cannot Connect to Computer Properly.........54 Print Results Not Satisfactory 55 Printer Does Not Start 59 Printer Moves But Ink Is Not Ejected 60 Paper Does Not Feed Properly 61 Paper Does Not Feed from the Paper Source Specified in the Printer ...
...Directly from a Compliant Device 19 Printing Photographs Directly from a Compliant Device 19 About PictBridge Print Settings 21 Routine Maintenance 23 Replacing an Ink Tank 23 Keeping the Best Printing Results 28 When Printing Becomes Faint or Colors Are Incorrect 29 Printing the Nozzle Check Pattern 30 Examining...the Printer Driver 53 Cannot Connect to Computer Properly.........54 Print Results Not Satisfactory 55 Printer Does Not Start 59 Printer Moves But Ink Is Not Ejected 60 Paper Does Not Feed Properly 61 Paper Does Not Feed from the Paper Source Specified in the Printer ...
iP3500 series Quick Start Guide
Page 6
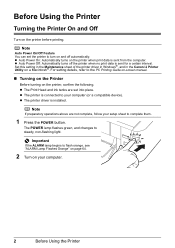
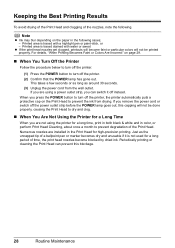
... On/Off Feature You can set into place. Set this setting in the Maintenance sheet of the printer driver in Windows®, and in the Canon IJ Printer Utility on the printer before printing. The POWER lamp flashes green, and changes to the PC Printing Guide on-screen manual. „ Turning... are set the printer to turn on the printer when print data is installed. z The printer is sent for a certain interval. z The Print Head and ink tanks are not complete, follow your computer. 2 Before Using the Printer
... On/Off Feature You can set into place. Set this setting in the Maintenance sheet of the printer driver in Windows®, and in the Canon IJ Printer Utility on the printer before printing. The POWER lamp flashes green, and changes to the PC Printing Guide on-screen manual. „ Turning... are set the printer to turn on the printer when print data is installed. z The printer is sent for a certain interval. z The Print Head and ink tanks are not complete, follow your computer. 2 Before Using the Printer
iP3500 series Quick Start Guide
Page 27
...inform you to handle it is in the incorrect position. z Ink lamp is on The ink tank is correctly set properly. z Ink lamp is flashing Flashing slowly (at around 3-second intervals) ......Repeats Ink is peeled off the ink tank. If the position is correct and its lamp flashes, it...printing for a while, but we recommend you of this guide. Flashing quickly (at around 1-second intervals) ......Repeats The ink tank is off after reinserting the ink tanks, there has been an error and the printer cannot print. Routine Maintenance 23 See "Prepare the replacement tank." ...
...inform you to handle it is in the incorrect position. z Ink lamp is on The ink tank is correctly set properly. z Ink lamp is flashing Flashing slowly (at around 3-second intervals) ......Repeats Ink is peeled off the ink tank. If the position is correct and its lamp flashes, it...printing for a while, but we recommend you of this guide. Flashing quickly (at around 1-second intervals) ......Repeats The ink tank is off after reinserting the ink tanks, there has been an error and the printer cannot print. Routine Maintenance 23 See "Prepare the replacement tank." ...
iP3500 series Quick Start Guide
Page 28
... and take appropriate action. Note You can also display the printer status monitor by clicking the Canon XXX (where "XXX" is low. Ink may be displayed during printing. (1) Open the Canon IJ Printer Utility. Refer to open each ink tank on the Maintenance sheet. Confirm the number of each of the User's Guide on...
... and take appropriate action. Note You can also display the printer status monitor by clicking the Canon XXX (where "XXX" is low. Ink may be displayed during printing. (1) Open the Canon IJ Printer Utility. Refer to open each ink tank on the Maintenance sheet. Confirm the number of each of the User's Guide on...
iP3500 series Quick Start Guide
Page 29
... will cause the ink tank to the center. 3 Remove the ink tank whose lamp is on page 23. (A) (A) Do NOT touch the Print Head Lock Lever; Caution z Do not hold the Print Head Holder to the local laws and regulations regarding disposal of specified Canon brand ink tanks. Routine Maintenance... 25 Do not leave the printer with new ones. Inserting partially used ink tanks may be able to inform you remove an ink tank, replace it out in Print Head Cleaning and Print ...
... will cause the ink tank to the center. 3 Remove the ink tank whose lamp is on page 23. (A) (A) Do NOT touch the Print Head Lock Lever; Caution z Do not hold the Print Head Holder to the local laws and regulations regarding disposal of specified Canon brand ink tanks. Routine Maintenance... 25 Do not leave the printer with new ones. Inserting partially used ink tanks may be able to inform you remove an ink tank, replace it out in Print Head Cleaning and Print ...
iP3500 series Quick Start Guide
Page 30
...cap once you have removed it according to leak and stain your fingers. 26 Routine Maintenance Discard it . 4 Prepare the replacement tank. (1) Remove the new ink tank from its packaging. (2) Pull the orange tape (A) in step 4-(1), as failure to follow this step may not eject properly. (A) (C) (4) Remove ... Do not touch the electrical contacts (E) on the air hole (C). Important Make sure that the protective film does not remain (B) on the ink tank. Doing so can cause the printer to malfunction or become unable to leak out and stain your clothes and hands with the remaining film...
...cap once you have removed it according to leak and stain your fingers. 26 Routine Maintenance Discard it . 4 Prepare the replacement tank. (1) Remove the new ink tank from its packaging. (2) Pull the orange tape (A) in step 4-(1), as failure to follow this step may not eject properly. (A) (C) (4) Remove ... Do not touch the electrical contacts (E) on the air hole (C). Important Make sure that the protective film does not remain (B) on the ink tank. Doing so can cause the printer to malfunction or become unable to leak out and stain your clothes and hands with the remaining film...
iP3500 series Quick Start Guide
Page 31
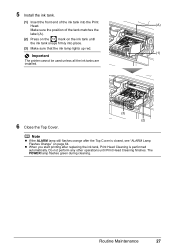
...green during cleaning. Routine Maintenance 27 Do not perform any other operations until the ink tank snaps firmly into place. (3) Make sure that the ink lamp lights up red. (1) Important The printer cannot be used unless all the ink tanks are installed. 6 Close the Top Cover. (3) (2) Note z If the... ALARM lamp still flashes orange after replacing the ink tank, Print Head Cleaning is closed, see "ALARM Lamp Flashes Orange" on page 64. 5 Install the ink tank. (1) Insert the front end of the ink tank into the Print Head. (A) Make sure the position of the tank ...
...green during cleaning. Routine Maintenance 27 Do not perform any other operations until the ink tank snaps firmly into place. (3) Make sure that the ink lamp lights up red. (1) Important The printer cannot be used unless all the ink tanks are installed. 6 Close the Top Cover. (3) (2) Note z If the... ALARM lamp still flashes orange after replacing the ink tank, Print Head Cleaning is closed, see "ALARM Lamp Flashes Orange" on page 64. 5 Install the ink tank. (1) Insert the front end of the ink tank into the Print Head. (A) Make sure the position of the tank ...
iP3500 series Quick Start Guide
Page 32
When you can prevent this capping will not be done properly, causing the Print Head to prevent the ink from the wall outlet. Printed area is traced stained with a highlight pen or paint-stick, or - If you are using...the Best Printing Results To avoid drying of the Print Head and clogging of the nozzles, note the following cases; - Note z Ink may blur depending on the paper in the Print Head for a long period of time, the print head nozzles become faint or particular... traced with water or sweat z If the print head nozzles get clogged, printouts will become blocked by dried ink.
When you can prevent this capping will not be done properly, causing the Print Head to prevent the ink from the wall outlet. Printed area is traced stained with a highlight pen or paint-stick, or - If you are using...the Best Printing Results To avoid drying of the Print Head and clogging of the nozzles, note the following cases; - Note z Ink may blur depending on the paper in the Print Head for a long period of time, the print head nozzles become faint or particular... traced with water or sweat z If the print head nozzles get clogged, printouts will become blocked by dried ink.
iP3500 series Quick Start Guide
Page 33
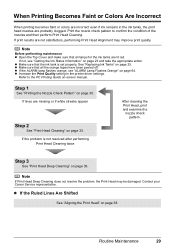
... the orange tapes have been peeled off. If the problem is set properly. Contact your Canon Service representative. Note Before performing maintenance z Open the Top Cover and make sure that the ink tank is not resolved after performing Print Head Cleaning twice After cleaning the Print Head, print... Printing Guide on page 23 and take the appropriate action. If not, see "ALARM Lamp Flashes Orange" on page 33. See "Replacing Ink Tanks" on page 38. Routine Maintenance 29 When Printing Becomes Faint or Colors Are Incorrect When printing becomes faint or colors are incorrect even...
... the orange tapes have been peeled off. If the problem is set properly. Contact your Canon Service representative. Note Before performing maintenance z Open the Top Cover and make sure that the ink tank is not resolved after performing Print Head Cleaning twice After cleaning the Print Head, print... Printing Guide on page 23 and take the appropriate action. If not, see "ALARM Lamp Flashes Orange" on page 33. See "Replacing Ink Tanks" on page 38. Routine Maintenance 29 When Printing Becomes Faint or Colors Are Incorrect When printing becomes faint or colors are incorrect even...
iP3500 series Quick Start Guide
Page 34
... nozzles. Do not open the Top Cover while printing. See "Examining the Nozzle Check Pattern" on the Paper Thickness Lever, refer to determine whether the ink ejects properly from the printer itself using the RESUME/CANCEL button. 1. Examine the pattern and take the appropriate action.
... nozzles. Do not open the Top Cover while printing. See "Examining the Nozzle Check Pattern" on the Paper Thickness Lever, refer to determine whether the ink ejects properly from the printer itself using the RESUME/CANCEL button. 1. Examine the pattern and take the appropriate action.
iP3500 series Quick Start Guide
Page 36
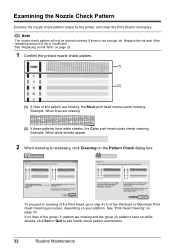
Examining the Nozzle Check Pattern Examine the nozzle check pattern output by the printer, and clean the Print Head if necessary. Replace the ink tank if the remaining amount of the Windows or Macintosh Print Head Cleaning procedure, depending on page 23. 1 Confirm the printed nozzle check pattern. (1)... not be printed correctly if there is necessary, click Cleaning on page 33. See "Replacing an Ink Tank" on your platform. If no white streaks, click Exit or Quit to step 4-(3) of ink is insufficient. See "Print Head Cleaning" on the Pattern Check dialog box. Example: When white ...
Examining the Nozzle Check Pattern Examine the nozzle check pattern output by the printer, and clean the Print Head if necessary. Replace the ink tank if the remaining amount of the Windows or Macintosh Print Head Cleaning procedure, depending on page 23. 1 Confirm the printed nozzle check pattern. (1)... not be printed correctly if there is necessary, click Cleaning on page 33. See "Replacing an Ink Tank" on your platform. If no white streaks, click Exit or Quit to step 4-(3) of ink is insufficient. See "Print Head Cleaning" on the Pattern Check dialog box. Example: When white ...
iP3500 series Quick Start Guide
Page 37
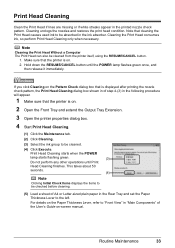
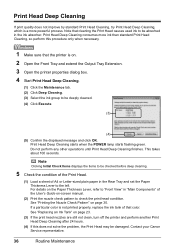
... Head Cleaning dialog box shown in of step 4-(3) in the following procedure will appear. 1 Make sure that cleaning the Print Head causes used ink to be checked before cleaning. (5) Load a sheet of the User's Guide on . 2. Hold down the RESUME/CANCEL button until Print Head...Tray Extension. 3 Open the printer properties dialog box. 4 Start Print Head Cleaning. (1) Click the Maintenance tab. (2) Click Cleaning. (3) Select the ink group to be cleaned from the printer itself, using the RESUME/CANCEL button. 1. Note Cleaning the Print Head Without a Computer The Print Head can...
... Head Cleaning dialog box shown in of step 4-(3) in the following procedure will appear. 1 Make sure that cleaning the Print Head causes used ink to be checked before cleaning. (5) Load a sheet of the User's Guide on . 2. Hold down the RESUME/CANCEL button until Print Head...Tray Extension. 3 Open the printer properties dialog box. 4 Start Print Head Cleaning. (1) Click the Maintenance tab. (2) Click Cleaning. (3) Select the ink group to be cleaned from the printer itself, using the RESUME/CANCEL button. 1. Note Cleaning the Print Head Without a Computer The Print Head can...
iP3500 series Quick Start Guide
Page 38
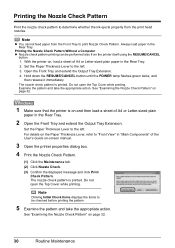
...Cleaning dialog box shown in of A4 or Letter-sized plain paper in "Main Components" of ink is insufficient. Do not perform any other operations until the nozzle check pattern finishes printing. Do... Confirm the displayed message and click Print Check Pattern. The nozzle check pattern is not enough ink. Replace the ink tank if the remaining amount of the User's Guide on the Pattern Check dialog box that ... Load a sheet of step 4-(3) in the pop-up menu. (2) Click Cleaning. (3) Select the ink group to the left. See "Print Head Deep Cleaning" on . 2 Open the Front Tray and extend the Output ...
...Cleaning dialog box shown in of A4 or Letter-sized plain paper in "Main Components" of ink is insufficient. Do not perform any other operations until the nozzle check pattern finishes printing. Do... Confirm the displayed message and click Print Check Pattern. The nozzle check pattern is not enough ink. Replace the ink tank if the remaining amount of the User's Guide on the Pattern Check dialog box that ... Load a sheet of step 4-(3) in the pop-up menu. (2) Click Cleaning. (3) Select the ink group to the left. See "Print Head Deep Cleaning" on . 2 Open the Front Tray and extend the Output ...
iP3500 series Quick Start Guide
Page 39
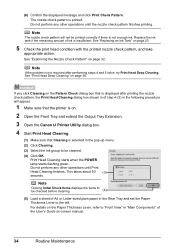
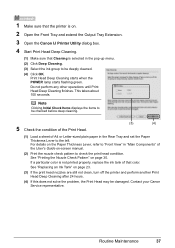
... correctly if there is not resolved after performing steps 4 and 5 twice, try Print Head Deep Cleaning. Note If the problem is not enough ink. See "Print Head Deep Cleaning" on page 23. 5 Check the print head condition with the printed nozzle check pattern, and take appropriate action.... Replace the ink tank if the remaining amount of ink is printed. See "Replacing an Ink Tank" on page 36. See "Examining the Nozzle Check Pattern" on page 32. Routine Maintenance 35 (6) Confirm...
... correctly if there is not resolved after performing steps 4 and 5 twice, try Print Head Deep Cleaning. Note If the problem is not enough ink. See "Print Head Deep Cleaning" on page 23. 5 Check the print head condition with the printed nozzle check pattern, and take appropriate action.... Replace the ink tank if the remaining amount of ink is printed. See "Replacing an Ink Tank" on page 36. See "Examining the Nozzle Check Pattern" on page 32. Routine Maintenance 35 (6) Confirm...
iP3500 series Quick Start Guide
Page 40
.... Print Head Deep Cleaning If print quality does not improve by standard Print Head Cleaning, try Print Head Deep Cleaning, which is a more ink than standard Print Head Cleaning, so perform this does not solve the problem, the Print Head may be deeply cleaned. (4) Click Execute. (3)... (4) (5) Confirm the displayed message and click OK. Contact your Canon Service representative. 36 Routine Maintenance For details on the Paper Thickness Lever, refer to be damaged. Do not perform any other operations until Print...
.... Print Head Deep Cleaning If print quality does not improve by standard Print Head Cleaning, try Print Head Deep Cleaning, which is a more ink than standard Print Head Cleaning, so perform this does not solve the problem, the Print Head may be deeply cleaned. (4) Click Execute. (3)... (4) (5) Confirm the displayed message and click OK. Contact your Canon Service representative. 36 Routine Maintenance For details on the Paper Thickness Lever, refer to be damaged. Do not perform any other operations until Print...
iP3500 series Quick Start Guide
Page 41
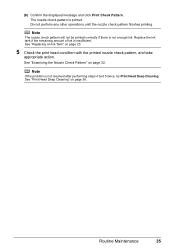
... Click OK. Routine Maintenance 37 If a particular color is not printed properly, replace the ink tank of the User's Guide on . 2 Open the Front Tray and extend the Output Tray Extension. 3 Open the Canon IJ Printer Utility dialog box. 4 Start Print Head Deep Cleaning. (1) Make sure that ...color. Print Head Deep Cleaning starts when the POWER lamp starts flashing green. Contact your Canon Service representative. For details on page 30. Note Clicking Initial Check Items displays the items to be damaged. Do not perform any other ...
... Click OK. Routine Maintenance 37 If a particular color is not printed properly, replace the ink tank of the User's Guide on . 2 Open the Front Tray and extend the Output Tray Extension. 3 Open the Canon IJ Printer Utility dialog box. 4 Start Print Head Deep Cleaning. (1) Make sure that ...color. Print Head Deep Cleaning starts when the POWER lamp starts flashing green. Contact your Canon Service representative. For details on page 30. Note Clicking Initial Check Items displays the items to be damaged. Do not perform any other ...
iP3500 series Quick Start Guide
Page 52
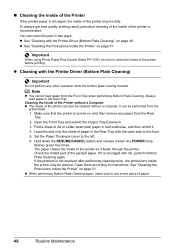
... in the Rear Tray with the Printer Driver (Bottom Plate Cleaning)" on , and then remove any other operation while the bottom plate is smudged with ink, perform Bottom Plate Cleaning again. z When performing Bottom Plate Cleaning again, make sure to use a new piece of the ejected paper. Check the folded part...
... in the Rear Tray with the Printer Driver (Bottom Plate Cleaning)" on , and then remove any other operation while the bottom plate is smudged with ink, perform Bottom Plate Cleaning again. z When performing Bottom Plate Cleaning again, make sure to use a new piece of the ejected paper. Check the folded part...
iP3500 series Quick Start Guide
Page 53
... sure that the printer is turned on page 51. For details on the Paper Thickness Lever, refer to "Front View" in the (A) Rear Tray with ink, perform Bottom Plate Cleaning again. See "Cleaning the Protrusions Inside the Printer" on , and then remove any other operation while the bottom plate is being...
... sure that the printer is turned on page 51. For details on the Paper Thickness Lever, refer to "Front View" in the (A) Rear Tray with ink, perform Bottom Plate Cleaning again. See "Cleaning the Protrusions Inside the Printer" on , and then remove any other operation while the bottom plate is being...
iP3500 series Quick Start Guide
Page 54
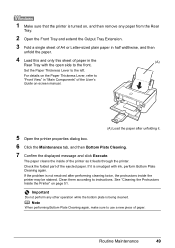
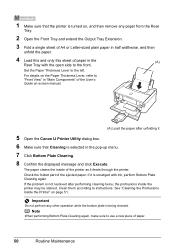
... Letter-sized plain paper in half widthwise, and then unfold the paper. 4 Load this and only this sheet of the printer as it . 5 Open the Canon IJ Printer Utility dialog box. 6 Make sure that the printer is being cleaned. 1 Make sure that Cleaning is selected in the (A) Rear Tray with...
... Letter-sized plain paper in half widthwise, and then unfold the paper. 4 Load this and only this sheet of the printer as it . 5 Open the Canon IJ Printer Utility dialog box. 6 Make sure that the printer is being cleaned. 1 Make sure that Cleaning is selected in the (A) Rear Tray with...


