iP3500 series Quick Start Guide
Page 5
...33 Print Head Deep Cleaning 36 Aligning the Print Head 38 Cleaning Your Printer 44 Troubleshooting 52 Cannot Install the Printer Driver 53 Cannot Connect to Computer Properly.........54 Print Results Not Satisfactory 55 Printer Does Not Start 59 Printer Moves But Ink Is Not Ejected 60 Paper Does Not Feed Properly ...61 Paper Does Not Feed from the Paper Source Specified in the Printer Driver 61 Paper Jams 62 ALARM Lamp Flashes Orange 64 Error Message Appears on the Computer Screen 66 Error Message Appears on a PictBridge ...
...33 Print Head Deep Cleaning 36 Aligning the Print Head 38 Cleaning Your Printer 44 Troubleshooting 52 Cannot Install the Printer Driver 53 Cannot Connect to Computer Properly.........54 Print Results Not Satisfactory 55 Printer Does Not Start 59 Printer Moves But Ink Is Not Ejected 60 Paper Does Not Feed Properly ...61 Paper Does Not Feed from the Paper Source Specified in the Printer Driver 61 Paper Jams 62 ALARM Lamp Flashes Orange 64 Error Message Appears on the Computer Screen 66 Error Message Appears on a PictBridge ...
iP3500 series Quick Start Guide
Page 6
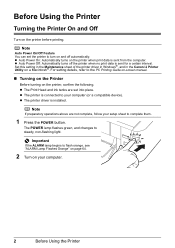
...Auto Power On/Off Feature You can set into place. Set this setting in the Maintenance sheet of the printer driver in Windows®, and in the Canon IJ Printer Utility on the printer when print data is sent for a certain interval. For setting details, refer to turn on your computer ...(or a compatible device). z The printer driver is connected to steady, non-flashing light. Important If the ALARM lamp begins...
...Auto Power On/Off Feature You can set into place. Set this setting in the Maintenance sheet of the printer driver in Windows®, and in the Canon IJ Printer Utility on the printer when print data is sent for a certain interval. For setting details, refer to turn on your computer ...(or a compatible device). z The printer driver is connected to steady, non-flashing light. Important If the ALARM lamp begins...
iP3500 series Quick Start Guide
Page 9
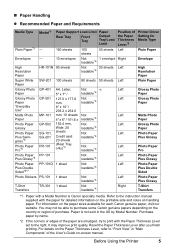
... are smudged, try to print with a Model Number is not sold in "Main Components" of the User's Guide on-screen manual. Before Using the Printer 5 Paper is Canon specialty media. Reset the Paper Thickness Lever after you finish printing. HR-101N SW-201 GP-401 GP-501 MP-101 GP-502 SG... notes on the country or region of the Paper Thickness Lever*2 Left Right Left Left Left Left Left Left Left Left Left Left Left Right Printer Driver Setting for Media Type Plain Paper Envelope High Resolution Paper Plain Paper Glossy Photo Paper Glossy Photo Paper Matte Photo Paper Glossy Photo Paper Photo...
... are smudged, try to print with a Model Number is not sold in "Main Components" of the User's Guide on-screen manual. Before Using the Printer 5 Paper is Canon specialty media. Reset the Paper Thickness Lever after you finish printing. HR-101N SW-201 GP-401 GP-501 MP-101 GP-502 SG... notes on the country or region of the Paper Thickness Lever*2 Left Right Left Left Left Left Left Left Left Left Left Left Left Right Printer Driver Setting for Media Type Plain Paper Envelope High Resolution Paper Plain Paper Glossy Photo Paper Glossy Photo Paper Matte Photo Paper Glossy Photo Paper Photo...
iP3500 series Quick Start Guide
Page 11
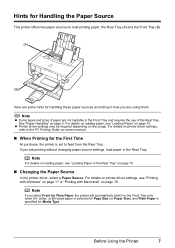
... Size (or Paper Size), and Plain Paper is specified for Media Type. Note For details on page 10. „ Changing the Paper Source In the printer driver, select a Paper Source. Note z Some types and sizes of the Rear Tray. For details on loading paper, see "Loading Paper" on the usage.... z Printer driver settings may be required depending on page 10. If you are not loadable in the Front Tray and requires the use of paper are printing ...
... Size (or Paper Size), and Plain Paper is specified for Media Type. Note For details on page 10. „ Changing the Paper Source In the printer driver, select a Paper Source. Note z Some types and sizes of the Rear Tray. For details on loading paper, see "Loading Paper" on the usage.... z Printer driver settings may be required depending on page 10. If you are not loadable in the Front Tray and requires the use of paper are printing ...
iP3500 series Quick Start Guide
Page 12
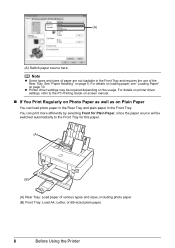
...the Front Tray. (A) (A) Switch paper source here. For details on loading paper, see "Loading Paper" on page 5. See "Paper Handling" on page 10. z Printer driver settings may be switched automatically to the PC Printing Guide on-screen manual. „ If You Print Regularly on Photo Paper as well as on... the usage. Note z Some types and sizes of the Rear Tray. For details on printer driver settings, refer to the Front Tray for Plain Paper, since the paper source will be required depending on Plain Paper You can print more efficiently...
...the Front Tray. (A) (A) Switch paper source here. For details on loading paper, see "Loading Paper" on page 5. See "Paper Handling" on page 10. z Printer driver settings may be switched automatically to the PC Printing Guide on-screen manual. „ If You Print Regularly on Photo Paper as well as on... the usage. Note z Some types and sizes of the Rear Tray. For details on printer driver settings, refer to the Front Tray for Plain Paper, since the paper source will be required depending on Plain Paper You can print more efficiently...
iP3500 series Quick Start Guide
Page 15
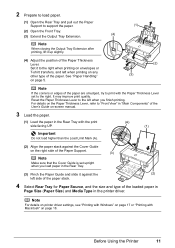
... when printing on any other type of the paper. Set it up slightly. (4) Adjust the position of the Paper Thickness Lever. Note For details on printer driver settings, see "Printing with Windows" on page 17 or "Printing with Macintosh" on the Paper Thickness Lever, refer to "Front View" in "Main Components" of.... 4 Select Rear Tray for Paper Source, and the size and type of the loaded paper in Page Size (Paper Size) and Media Type in the printer driver. For details on page 18. Before Using the...
... when printing on any other type of the paper. Set it up slightly. (4) Adjust the position of the Paper Thickness Lever. Note For details on printer driver settings, see "Printing with Windows" on page 17 or "Printing with Macintosh" on the Paper Thickness Lever, refer to "Front View" in "Main Components" of.... 4 Select Rear Tray for Paper Source, and the size and type of the loaded paper in Page Size (Paper Size) and Media Type in the printer driver. For details on page 18. Before Using the...
iP3500 series Quick Start Guide
Page 17
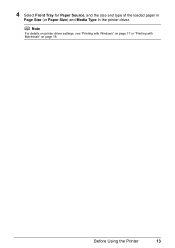
4 Select Front Tray for Paper Source, and the size and type of the loaded paper in Page Size (or Paper Size) and Media Type in the printer driver. Note For details on printer driver settings, see "Printing with Windows" on page 17 or "Printing with Macintosh" on page 18. Before Using the Printer 13
4 Select Front Tray for Paper Source, and the size and type of the loaded paper in Page Size (or Paper Size) and Media Type in the printer driver. Note For details on printer driver settings, see "Printing with Windows" on page 17 or "Printing with Macintosh" on page 18. Before Using the Printer 13
iP3500 series Quick Start Guide
Page 18
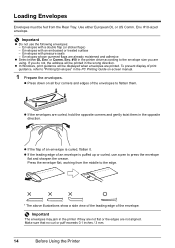
... and adhesive z Select either European DL or US Comm. Make sure that no curl or puff exceeds 0.1 inches / 3 mm. 14 Before Using the Printer Use either DL Env. Envelopes with pressure seals - z If the envelopes are curled, hold the opposite corners and gently twist them . Important The envelopes ..., flatten it. To prevent display of the envelope. Envelopes with a double flap (or sticker flaps) - Env. #10-sized envelope. Env. #10 in the printer driver according to "Printing Envelopes" in the wrong direction. Press the envelope flat, working from the Rear Tray.
... and adhesive z Select either European DL or US Comm. Make sure that no curl or puff exceeds 0.1 inches / 3 mm. 14 Before Using the Printer Use either DL Env. Envelopes with pressure seals - z If the envelopes are curled, hold the opposite corners and gently twist them . Important The envelopes ..., flatten it. To prevent display of the envelope. Envelopes with a double flap (or sticker flaps) - Env. #10-sized envelope. Env. #10 in the printer driver according to "Printing Envelopes" in the wrong direction. Press the envelope flat, working from the Rear Tray.
iP3500 series Quick Start Guide
Page 19
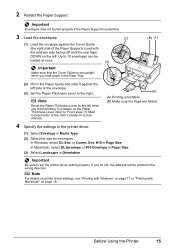
... . Env. #10 in the wrong direction. Important Be sure to the right. . Load with Macintosh" on page 18. Note For details on printer driver settings, see "Printing with Windows" on page 17 or "Printing with the address side facing UP and the rear flaps DOWN on -screen manual. ...4 Specify the settings in the printer driver. (1) Select Envelope in Orientation. . Important Make sure that the Cover Guide is extended. 3 Load the envelopes. (2) (1) Load the envelope against...
... . Env. #10 in the wrong direction. Important Be sure to the right. . Load with Macintosh" on page 18. Note For details on printer driver settings, see "Printing with Windows" on page 17 or "Printing with the address side facing UP and the rear flaps DOWN on -screen manual. ...4 Specify the settings in the printer driver. (1) Select Envelope in Orientation. . Important Make sure that the Cover Guide is extended. 3 Load the envelopes. (2) (1) Load the envelope against...
iP3500 series Quick Start Guide
Page 20
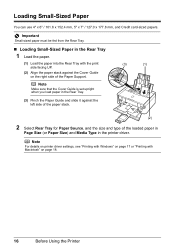
Note Make sure that the Cover Guide is set upright when you load paper in the printer driver. . Important Small-sized paper must be fed from the Rear Tray. „ Loading Small-Sized Paper in the Rear Tray 1 Load the paper. (1) Load the ... Small-Sized Paper You can use 4" x 6" / 101.6 x 152.4 mm, 5" x 7" / 127.0 x 177.8 mm, and Credit card-sized papers. . Note For details on printer driver settings, see "Printing with Windows" on page 17 or "Printing with the print side facing UP. (2) Align the paper stack against the left side of ...
Note Make sure that the Cover Guide is set upright when you load paper in the printer driver. . Important Small-sized paper must be fed from the Rear Tray. „ Loading Small-Sized Paper in the Rear Tray 1 Load the paper. (1) Load the ... Small-Sized Paper You can use 4" x 6" / 101.6 x 152.4 mm, 5" x 7" / 127.0 x 177.8 mm, and Credit card-sized papers. . Note For details on printer driver settings, see "Printing with Windows" on page 17 or "Printing with the print side facing UP. (2) Align the paper stack against the left side of ...
iP3500 series Quick Start Guide
Page 21
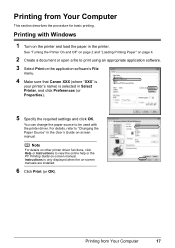
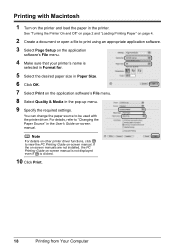
...Click Print (or OK). Printing from Your Computer This section describes the procedure for basic printing. Printing with the printer driver. Instructions is selected in Select Printer, and click Preferences (or Properties). 5 Specify the required settings and click OK. Printing from Your Computer 17 ...application software. 3 Select Print on the application software's File menu. 4 Make sure that Canon XXX (where "XXX" is your printer's name) is only displayed when the on -screen manual. See "Turning the Printer On and Off" on page 2 and "Loading Printing Paper" on page 4. 2 Create...
...Click Print (or OK). Printing from Your Computer This section describes the procedure for basic printing. Printing with the printer driver. Instructions is selected in Select Printer, and click Preferences (or Properties). 5 Specify the required settings and click OK. Printing from Your Computer 17 ...application software. 3 Select Print on the application software's File menu. 4 Make sure that Canon XXX (where "XXX" is your printer's name) is only displayed when the on -screen manual. See "Turning the Printer On and Off" on page 2 and "Loading Printing Paper" on page 4. 2 Create...
iP3500 series Quick Start Guide
Page 22
Printing with the printer driver. Note For details on other printer driver functions, click to "Changing the Paper Source" in the printer. If the on-screen manuals are not installed, the PC Printing Guide on-screen manual is not displayed even if is selected in Format for. 5 ...Select the desired paper size in Paper Size. 6 Click OK. 7 Select Print on the application software's File menu. 4 Make sure that your printer's name is clicked. 10 Click Print. 18 Printing from Your Computer For details, refer to view the PC Printing Guide on -screen manual. See "Turning...
Printing with the printer driver. Note For details on other printer driver functions, click to "Changing the Paper Source" in the printer. If the on-screen manuals are not installed, the PC Printing Guide on-screen manual is not displayed even if is selected in Format for. 5 ...Select the desired paper size in Paper Size. 6 Click OK. 7 Select Print on the application software's File menu. 4 Make sure that your printer's name is clicked. 10 Click Print. 18 Printing from Your Computer For details, refer to view the PC Printing Guide on -screen manual. See "Turning...
iP3500 series Quick Start Guide
Page 33
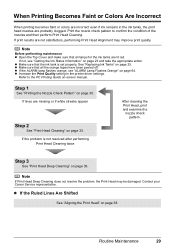
... twice After cleaning the Print Head, print and examine the nozzle check pattern. Step 1 See "Printing the Nozzle Check Pattern" on page 36. Contact your Canon Service representative. Routine Maintenance 29 z Make sure that all lamps for the ink tanks are missing or if white streaks appear Step 2 See "Print Head..." on page 38. When Printing Becomes Faint or Colors Are Incorrect When printing becomes faint or colors are incorrect even if ink remains in the printer driver settings. Print the nozzle check pattern to the PC Printing Guide on page 33.
... twice After cleaning the Print Head, print and examine the nozzle check pattern. Step 1 See "Printing the Nozzle Check Pattern" on page 36. Contact your Canon Service representative. Routine Maintenance 29 z Make sure that all lamps for the ink tanks are missing or if white streaks appear Step 2 See "Print Head..." on page 38. When Printing Becomes Faint or Colors Are Incorrect When printing becomes faint or colors are incorrect even if ink remains in the printer driver settings. Print the nozzle check pattern to the PC Printing Guide on page 33.
iP3500 series Quick Start Guide
Page 52
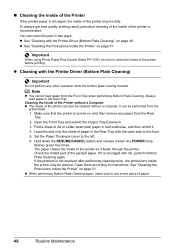
...A4 or Letter-sized plain paper in the Rear Tray. z See "Cleaning the Protrusions Inside the Printer" on page 51. Load this and only this part in the Rear Tray with the Printer Driver (Bottom Plate Cleaning) Important Do not perform any paper from the Rear Tray. 2. Clean them ... the Front Tray when performing Bottom Plate Cleaning. To always get best quality printing result, periodical cleaning of the inside of the printer is smudged with the Printer Driver (Bottom Plate Cleaning)" on , and then remove any other operation while the bottom plate is turned on page 48. Note z...
...A4 or Letter-sized plain paper in the Rear Tray. z See "Cleaning the Protrusions Inside the Printer" on page 51. Load this and only this part in the Rear Tray with the Printer Driver (Bottom Plate Cleaning) Important Do not perform any paper from the Rear Tray. 2. Clean them ... the Front Tray when performing Bottom Plate Cleaning. To always get best quality printing result, periodical cleaning of the inside of the printer is smudged with the Printer Driver (Bottom Plate Cleaning)" on , and then remove any other operation while the bottom plate is turned on page 48. Note z...
iP3500 series Quick Start Guide
Page 56
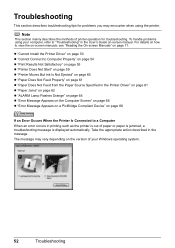
For details on how to "Troubleshooting" in the User's Guide on page 68 If an Error Occurs When the Printer Is Connected to a Computer When an error occurs in the message. z "Cannot Install the Printer Driver" on page 53 z "Cannot Connect to Computer Properly" on page 54 z "Print Results Not Satisfactory" on ... Is Not Ejected" on page 60 z "Paper Does Not Feed Properly" on page 61 z "Paper Does Not Feed from the Paper Source Specified in the Printer Driver" on page 61 z "Paper Jams" on page 62 z "ALARM Lamp Flashes Orange" on page 64 z "Error Message Appears on the Computer Screen" on page...
For details on how to "Troubleshooting" in the User's Guide on page 68 If an Error Occurs When the Printer Is Connected to a Computer When an error occurs in the message. z "Cannot Install the Printer Driver" on page 53 z "Cannot Connect to Computer Properly" on page 54 z "Print Results Not Satisfactory" on ... Is Not Ejected" on page 60 z "Paper Does Not Feed Properly" on page 61 z "Paper Does Not Feed from the Paper Source Specified in the Printer Driver" on page 61 z "Paper Jams" on page 62 z "ALARM Lamp Flashes Orange" on page 64 z "Error Message Appears on the Computer Screen" on page...

iP3500 series Quick Start Guide
Page 57
... program, MSETUP4.EXE. If the drivers were not installed correctly, uninstall the printer driver, restart your computer. Troubleshooting 53 In Windows 2000, double-click the My Computer icon on the desktop. (2)Double-click the CD-ROM icon on the PIXMA XXX screen (where "XXX" is... the displayed window. Installation procedure not followed correctly. Contact a Canon Service representative. Restart your setup sheet for proper installation. In Windows XP, Click Start then My Computer. Refer to install the drivers. Note If the installer was forced to be terminated due to...
... program, MSETUP4.EXE. If the drivers were not installed correctly, uninstall the printer driver, restart your computer. Troubleshooting 53 In Windows 2000, double-click the My Computer icon on the desktop. (2)Double-click the CD-ROM icon on the PIXMA XXX screen (where "XXX" is... the displayed window. Installation procedure not followed correctly. Contact a Canon Service representative. Restart your setup sheet for proper installation. In Windows XP, Click Start then My Computer. Refer to install the drivers. Note If the installer was forced to be terminated due to...
iP3500 series Quick Start Guide
Page 59
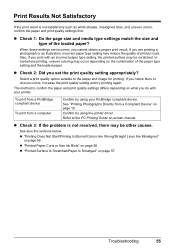
... be scratched. When these settings are printing a photograph or an illustration, incorrect paper type setting may occur depending on page 19. Confirm by using the printer driver. Select a print quality option suitable to the PC Printing Guide on page 57 Troubleshooting 55 See also the sections below. Refer to the paper and...
... be scratched. When these settings are printing a photograph or an illustration, incorrect paper type setting may occur depending on page 19. Confirm by using the printer driver. Select a print quality option suitable to the PC Printing Guide on page 57 Troubleshooting 55 See also the sections below. Refer to the paper and...
iP3500 series Quick Start Guide
Page 65
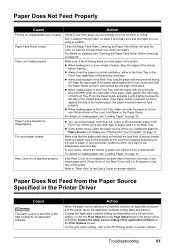
...touches the left side of the Load Limit Mark on the Paper Guide. For details, see "Printing from the Paper Source Specified in the Printer Driver Cause The paper source is fit squarely in the rear of the stack. Check to "Rear View" in the User's Guide on-screen... on the Print Options screen. If the Paper Guide is not attached properly. Paper source selection is inconsistent between an application program and the printer driver, the application software setting takes precedence. For details on cleaning, see "Loading Paper" on page 10. Make sure of paper. Refer to...
...touches the left side of the Load Limit Mark on the Paper Guide. For details, see "Printing from the Paper Source Specified in the Printer Driver Cause The paper source is fit squarely in the rear of the stack. Check to "Rear View" in the User's Guide on-screen... on the Print Options screen. If the Paper Guide is not attached properly. Paper source selection is inconsistent between an application program and the printer driver, the application software setting takes precedence. For details on cleaning, see "Loading Paper" on page 10. Make sure of paper. Refer to...

iP3500 series Quick Start Guide
Page 70
... XP, click Control Panel, Printers and Other Hardware, then Printers and Faxes. In Windows 2000, click Control Panel then Printers. (3)Right-click the Canon XXX icon, then select Properties. (4)Click the Ports tab to resolve the error, see "ALARM Lamp Flashes Orange" on how to confirm the port settings. Printer driver is initializing. Action Confirm that...
... XP, click Control Panel, Printers and Other Hardware, then Printers and Faxes. In Windows 2000, click Control Panel then Printers. (3)Right-click the Canon XXX icon, then select Properties. (4)Click the Ports tab to resolve the error, see "ALARM Lamp Flashes Orange" on how to confirm the port settings. Printer driver is initializing. Action Confirm that...
iP3500 series Quick Start Guide
Page 71
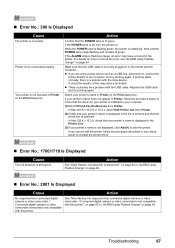
...camcorder connected is almost full." If your printer's name does not appear in Printer, follow the procedure described in your setup sheet to your printer's name is displayed in the list of the relay device for your printer is installed to reinstall the printer driver. „ Error No.: 1700/1710 Is... Displayed Cause The ink absorber is selected. on page 65 in "ALARM Lamp Flashes Orange" on how to the printer and the computer. Make sure that the...
...camcorder connected is almost full." If your printer's name does not appear in Printer, follow the procedure described in your setup sheet to your printer's name is displayed in the list of the relay device for your printer is installed to reinstall the printer driver. „ Error No.: 1700/1710 Is... Displayed Cause The ink absorber is selected. on page 65 in "ALARM Lamp Flashes Orange" on how to the printer and the computer. Make sure that the...


