MX700 series Quick Start Guide
Page 5
... Using Useful Printing Functions 29 Setting Items 30 Printing from Your Computer 32 Printing with Windows 32 Printing with Macintosh 33 Scanning Images 34 Scanning Methods 34 Printing Photographs Directly from a Compliant Device 36 Printing Photographs Directly from a Compliant Device 36 About PictBridge Print ...and Lists 77 Routine Maintenance 80 Replacing an Ink Tank 80 Keeping the Best Printing Results 85 When Printing Becomes Faint or Colors Are Incorrect 86 Printing the Nozzle Check Pattern 87 Examining the Nozzle Check Pattern ...........88 Print Head Cleaning 89 Print Head...
... Using Useful Printing Functions 29 Setting Items 30 Printing from Your Computer 32 Printing with Windows 32 Printing with Macintosh 33 Scanning Images 34 Scanning Methods 34 Printing Photographs Directly from a Compliant Device 36 Printing Photographs Directly from a Compliant Device 36 About PictBridge Print ...and Lists 77 Routine Maintenance 80 Replacing an Ink Tank 80 Keeping the Best Printing Results 85 When Printing Becomes Faint or Colors Are Incorrect 86 Printing the Nozzle Check Pattern 87 Examining the Nozzle Check Pattern ...........88 Print Head Cleaning 89 Print Head...
MX700 series Quick Start Guide
Page 6
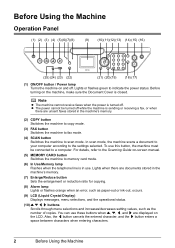
... documents stored in the machine's memory. (2) COPY button Switches the machine to copy mode. (3) FAX button Switches the machine to fax mode. (4) SCAN button Switches the machine to the Scanning Guide on the LCD. Also, the [ button cancels the entered character, and the ] button enters a space between characters when entering characters. 2 Before...
... documents stored in the machine's memory. (2) COPY button Switches the machine to copy mode. (3) FAX button Switches the machine to fax mode. (4) SCAN button Switches the machine to the Scanning Guide on the LCD. Also, the [ button cancels the entered character, and the ] button enters a space between characters when entering characters. 2 Before...

MX700 series Quick Start Guide
Page 7
... to customize operation of the fax you are sending. (23) Feed Switch button Selects the paper source. Ejects documents remaining in progress. (17) Color button Starts color copying, photo printing, scanning, or faxing. (18) Coded Dial button Press this button and a two-digit code to dial a pre-registered fax/telephone number. (19) Tone...
... to customize operation of the fax you are sending. (23) Feed Switch button Selects the paper source. Ejects documents remaining in progress. (17) Color button Starts color copying, photo printing, scanning, or faxing. (18) Coded Dial button Press this button and a two-digit code to dial a pre-registered fax/telephone number. (19) Tone...
MX700 series Quick Start Guide
Page 9
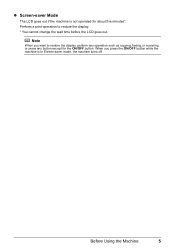
Perform a print operation to restore the display, perform any operation such as copying, faxing, or scanning, or press any button except for about five minutes*. Before Using the Machine 5 Note When you press the ON/OFF button while the machine is not operated for the ON/OFF button. When you want to restore the display. * You cannot change the wait time before the LCD goes out. z Screen-saver Mode The LCD goes out if the machine is in Screen-saver mode, the machine turns off.
Perform a print operation to restore the display, perform any operation such as copying, faxing, or scanning, or press any button except for about five minutes*. Before Using the Machine 5 Note When you press the ON/OFF button while the machine is not operated for the ON/OFF button. When you want to restore the display. * You cannot change the wait time before the LCD goes out. z Screen-saver Mode The LCD goes out if the machine is in Screen-saver mode, the machine turns off.
MX700 series Quick Start Guide
Page 10
... Thickness Weight Platen Glass ADF z Paper documents z Photographs Multipage documents of the same size, thickness, and weight z Books z Documents that are not suitable for copying, scanning, or faxing must meet these Max. 0.39 inches / 10 mm 0.002 to 0.005 inches / 0.06 to 0.13 mm - 13 to 24 lb / 50 to ... 6 Before Using the Machine z Load Legal-size documents in the ADF. They will jam. - Handling the Original Document This section describes how to copy, scan, or fax on the Platen Glass or the ADF. Onion skin or thin paper - Wrinkled or creased paper - Torn paper -
... Thickness Weight Platen Glass ADF z Paper documents z Photographs Multipage documents of the same size, thickness, and weight z Books z Documents that are not suitable for copying, scanning, or faxing must meet these Max. 0.39 inches / 10 mm 0.002 to 0.005 inches / 0.06 to 0.13 mm - 13 to 24 lb / 50 to ... 6 Before Using the Machine z Load Legal-size documents in the ADF. They will jam. - Handling the Original Document This section describes how to copy, scan, or fax on the Platen Glass or the ADF. Onion skin or thin paper - Wrinkled or creased paper - Torn paper -
MX700 series Quick Start Guide
Page 11
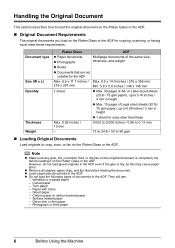
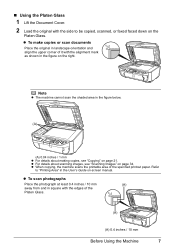
... original in landscape orientation and align the upper corner of it with the alignment mark as shown in the figure on the Platen Glass. z To scan photographs Place the photograph at least 0.4 inches / 10 mm (A) away from and in square with the edges of the specified printout paper. z For ...details about making copies, see "Scanning Images" on page 34. „ Using the Platen Glass 1 Lift the Document Cover. 2 Load the original with the side to "Printing Area" in the ...
... original in landscape orientation and align the upper corner of it with the alignment mark as shown in the figure on the Platen Glass. z To scan photographs Place the photograph at least 0.4 inches / 10 mm (A) away from and in square with the edges of the specified printout paper. z For ...details about making copies, see "Scanning Images" on page 34. „ Using the Platen Glass 1 Lift the Document Cover. 2 Load the original with the side to "Printing Area" in the ...
MX700 series Quick Start Guide
Page 12
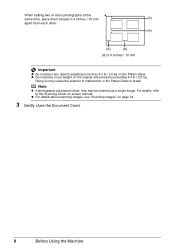
...z Do not press or put weight on -screen manual. Doing so may be scanned as a single image. Note z If photographs are placed closer, they may cause the scanner to malfunction or the Platen Glass to the Scanning Guide on the original with pressure exceeding 4.4 lb / 2.0 kg. z For ...details about scanning images, see "Scanning Images" on the Platen Glass. When setting two or more photographs at the same time, ...
...z Do not press or put weight on -screen manual. Doing so may be scanned as a single image. Note z If photographs are placed closer, they may cause the scanner to malfunction or the Platen Glass to the Scanning Guide on the original with pressure exceeding 4.4 lb / 2.0 kg. z For ...details about scanning images, see "Scanning Images" on the Platen Glass. When setting two or more photographs at the same time, ...
MX700 series Quick Start Guide
Page 13
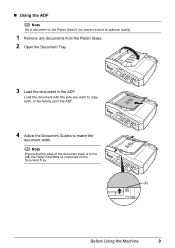
Note Ensure that the edge of the document stack is in line with the side you want to copy, scan, or fax facing up in the ADF. 4 Adjust the Document Guides to scan it at optimum quality. 1 Remove any documents from the Platen Glass. 2 Open the Document Tray. 3 Load the document in the ADF. „ Using the ADF Note Set a document on the Document Tray. (A) Before Using the Machine 9 Load the document with the Paper Size Mark (A) imprinted on the Platen Glass if you want to match the document width.
Note Ensure that the edge of the document stack is in line with the side you want to copy, scan, or fax facing up in the ADF. 4 Adjust the Document Guides to scan it at optimum quality. 1 Remove any documents from the Platen Glass. 2 Open the Document Tray. 3 Load the document in the ADF. „ Using the ADF Note Set a document on the Document Tray. (A) Before Using the Machine 9 Load the document with the Paper Size Mark (A) imprinted on the Platen Glass if you want to match the document width.
MX700 series Quick Start Guide
Page 27
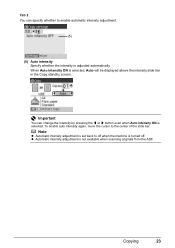
... can specify whether to enable automatic intensity adjustment. (5) (5) Auto intensity Specify whether the intensity is turned off. When Auto intensity ON is not available when scanning originals from the ADF. z Automatic intensity adjustment is selected, Auto will be displayed above the intensity slide bar in the Copy standby screen.
... can specify whether to enable automatic intensity adjustment. (5) (5) Auto intensity Specify whether the intensity is turned off. When Auto intensity ON is not available when scanning originals from the ADF. z Automatic intensity adjustment is selected, Auto will be displayed above the intensity slide bar in the Copy standby screen.
MX700 series Quick Start Guide
Page 38
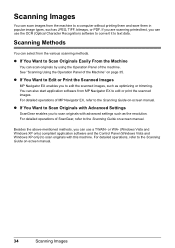
... save them in popular image types, such as JPEG, TIFF, bitmaps, or PDF. You can select from the machine to the Scanning Guide on -screen manual. Besides the above-mentioned methods, you can use the OCR (Optical Character Recognition) software to convert it to the... Scanning Guide on -screen manual. See "Scanning Using the Operation Panel of the Machine" on -screen manual. 34 Scanning Images Scanning Images You can scan originals by using the Operation Panel of the machine. z If You Want to...
... save them in popular image types, such as JPEG, TIFF, bitmaps, or PDF. You can select from the machine to the Scanning Guide on -screen manual. Besides the above-mentioned methods, you can use the OCR (Optical Character Recognition) software to convert it to the... Scanning Guide on -screen manual. See "Scanning Using the Operation Panel of the Machine" on -screen manual. 34 Scanning Images Scanning Images You can scan originals by using the Operation Panel of the machine. z If You Want to...
MX700 series Quick Start Guide
Page 39
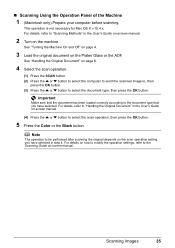
...(2) Press the { or } button to select the computer to send the scanned image to, then press the OK button. (3) Press the { or } button to select the scan operation, then press the OK button. 5 Press the Color or the Black button. Scanning Images 35 See "Turning the Machine On and Off" on page 4. 3...10.4.x. For details on how to modify the operation settings, refer to the document type that the document has been loaded correctly according to the Scanning Guide on the Platen Glass or the ADF. Important Make sure that you have selected in the User's Guide on-screen manual. 2 Turn ...
...(2) Press the { or } button to select the computer to send the scanned image to, then press the OK button. (3) Press the { or } button to select the scan operation, then press the OK button. 5 Press the Color or the Black button. Scanning Images 35 See "Turning the Machine On and Off" on page 4. 3...10.4.x. For details on how to modify the operation settings, refer to the document type that the document has been loaded correctly according to the Scanning Guide on the Platen Glass or the ADF. Important Make sure that you have selected in the User's Guide on-screen manual. 2 Turn ...

MX700 series Quick Start Guide
Page 63
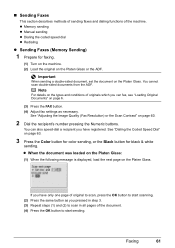
... page 6. If you have two or more pages of the original, load the next page on the Platen Glass and press the Color or the Black button. (2) After scanning all pages of sending faxes is sent automatically. See "Loading Original Documents" on page 60. Step 3 Dial the recipient's number.... z Using the Platen Glass (1) Press the Color or the Black button. Faxing 59 The fax is as follows. Sending Faxes „ Flow ...
... page 6. If you have two or more pages of the original, load the next page on the Platen Glass and press the Color or the Black button. (2) After scanning all pages of sending faxes is sent automatically. See "Loading Original Documents" on page 60. Step 3 Dial the recipient's number.... z Using the Platen Glass (1) Press the Color or the Black button. Faxing 59 The fax is as follows. Sending Faxes „ Flow ...
MX700 series Quick Start Guide
Page 64
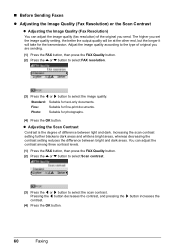
... Press the { or } button to select FAX resolution. (3) Press the [ or ] button to select the image quality. Increasing the scan contrast setting further blackens dark areas and whitens bright areas, whereas decreasing the contrast setting reduces the difference between light and dark. Pressing the ... and dark areas. Standard: Suitable for the transmission. „ Before Sending Faxes z Adjusting the Image Quality (Fax Resolution) or the Scan Contrast z Adjusting the Image Quality (Fax Resolution) You can adjust the contrast among three contrast levels. (1) Press the FAX button, then...
... Press the { or } button to select FAX resolution. (3) Press the [ or ] button to select the image quality. Increasing the scan contrast setting further blackens dark areas and whitens bright areas, whereas decreasing the contrast setting reduces the difference between light and dark. Pressing the ... and dark areas. Standard: Suitable for the transmission. „ Before Sending Faxes z Adjusting the Image Quality (Fax Resolution) or the Scan Contrast z Adjusting the Image Quality (Fax Resolution) You can adjust the contrast among three contrast levels. (1) Press the FAX button, then...
MX700 series Quick Start Guide
Page 65
... functions of the document. (4) Press the OK button to start scanning. (2) Press the same button as necessary. You can fax, see ...Adjust fax settings as you have only one page of original to scan, press the OK button to start sending. Note For details ...recipient you pressed in step 3. (3) Repeat steps (1) and (2) to scan in all pages of the machine. z When the document was loaded... Quality (Fax Resolution) or the Scan Contrast" on the Platen Glass. See "Dialing the Coded Speed...Dial" on the Platen Glass or the ADF. You cannot scan double-sided documents from the ADF. z Memory sending z Manual...
... functions of the document. (4) Press the OK button to start scanning. (2) Press the same button as necessary. You can fax, see ...Adjust fax settings as you have only one page of original to scan, press the OK button to start sending. Note For details ...recipient you pressed in step 3. (3) Repeat steps (1) and (2) to scan in all pages of the machine. z When the document was loaded... Quality (Fax Resolution) or the Scan Contrast" on the Platen Glass. See "Dialing the Coded Speed...Dial" on the Platen Glass or the ADF. You cannot scan double-sided documents from the ADF. z Memory sending z Manual...
MX700 series Quick Start Guide
Page 66
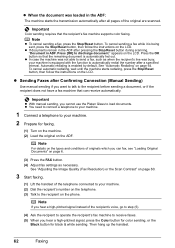
...wait until the machine starts redialing, press the Stop/Reset button, then follow the instructions on the types and conditions of the original are scanned. Note z To cancel sending a fax, press the Stop/Reset button. z Sending Faxes after a specified interval. See "Adjusting the Image ... Glass to automatically redial the number after Confirming Connection (Manual Sending) Use manual sending if you hear a high-pitched signal, press the Color button for color sending, or the Black button for faxing. (1) Turn on the machine. (2) Load the original on the telephone. (3) Talk to send...
...wait until the machine starts redialing, press the Stop/Reset button, then follow the instructions on the types and conditions of the original are scanned. Note z To cancel sending a fax, press the Stop/Reset button. z Sending Faxes after a specified interval. See "Adjusting the Image ... Glass to automatically redial the number after Confirming Connection (Manual Sending) Use manual sending if you hear a high-pitched signal, press the Color button for color sending, or the Black button for faxing. (1) Turn on the machine. (2) Load the original on the telephone. (3) Talk to send...

MX700 series Quick Start Guide
Page 84
... LCD of this Machine You can check the current ink level by the label on the compatible ink tanks, see "When Printing Becomes Faint or Colors Are Incorrect" on page 86. „ Getting the Ink Status Information You can continue printing for a while, but we recommend you of the mode ...buttons (COPY, FAX, SCAN, or MEMORY CARD). The machine cannot print if an ink tank is installed in the screen that appears during printing. 80 Routine Maintenance Note The...
... LCD of this Machine You can check the current ink level by the label on the compatible ink tanks, see "When Printing Becomes Faint or Colors Are Incorrect" on page 86. „ Getting the Ink Status Information You can continue printing for a while, but we recommend you of the mode ...buttons (COPY, FAX, SCAN, or MEMORY CARD). The machine cannot print if an ink tank is installed in the screen that appears during printing. 80 Routine Maintenance Note The...

MX700 series Quick Start Guide
Page 85
... To maintain optimal printing quality, use an ink tank within six months of first use of specified Canon brand ink tanks. When an ink tank is correctly set properly. Ink has run out. z...to dry out, and the machine may be necessary to have a new ink tank available. z Color ink may not operate properly when it immediately. See ""The ink has run out. You can ... it is low. on page 101 and take appropriate action. (B) (B) Empty ink tank. Open the Scanning Unit (Printer Cover) of ink, replace them using the following steps. Flashing quickly (at around 1-second...
... To maintain optimal printing quality, use an ink tank within six months of first use of specified Canon brand ink tanks. When an ink tank is correctly set properly. Ink has run out. z...to dry out, and the machine may be necessary to have a new ink tank available. z Color ink may not operate properly when it immediately. See ""The ink has run out. You can ... it is low. on page 101 and take appropriate action. (B) (B) Empty ink tank. Open the Scanning Unit (Printer Cover) of ink, replace them using the following steps. Flashing quickly (at around 1-second...
MX700 series Quick Start Guide
Page 86
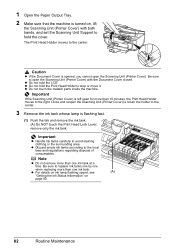
... ink tank. (A) Do NOT touch the Print Head Lock Lever; Important If the Scanning Unit (Printer Cover) is left open the Scanning Unit (Printer Cover). Be sure to open the Scanning Unit (Printer Cover) with both hands, and set the Scanning Unit Support to the right. z Do not touch the metallic parts inside the... machine. Close and reopen the Scanning Unit (Printer Cover) to return the holder to the center. 1 Open the Paper Output Tray. 2 Make sure that the machine is turned on page 80. ...
... ink tank. (A) Do NOT touch the Print Head Lock Lever; Important If the Scanning Unit (Printer Cover) is left open the Scanning Unit (Printer Cover). Be sure to open the Scanning Unit (Printer Cover) with both hands, and set the Scanning Unit Support to the right. z Do not touch the metallic parts inside the... machine. Close and reopen the Scanning Unit (Printer Cover) to return the holder to the center. 1 Open the Paper Output Tray. 2 Make sure that the machine is turned on page 80. ...
MX700 series Quick Start Guide
Page 88
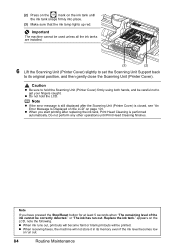
.... z When ink runs out, printouts will become faint or blank printouts will not store it in its original position, and then gently close the Scanning Unit (Printer Cover). Note z If the error message is still displayed after replacing the ink tank, Print Head Cleaning is closed, see "An ... Important The machine cannot be printed. z When receiving faxes, the machine will be used unless all the ink tanks are installed. (3) (2) 6 Lift the Scanning Unit (Printer Cover) slightly to set the Scanning Unit Support back to hold the LCD. Note If you start printing after the...
.... z When ink runs out, printouts will become faint or blank printouts will not store it in its original position, and then gently close the Scanning Unit (Printer Cover). Note z If the error message is still displayed after replacing the ink tank, Print Head Cleaning is closed, see "An ... Important The machine cannot be printed. z When receiving faxes, the machine will be used unless all the ink tanks are installed. (3) (2) 6 Lift the Scanning Unit (Printer Cover) slightly to set the Scanning Unit Support back to hold the LCD. Note If you start printing after the...
MX700 series Quick Start Guide
Page 90
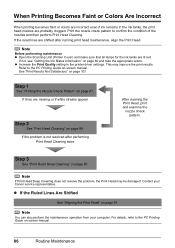
... and take the appropriate action. Note You can also perform the maintenance operation from your Canon service representative. When Printing Becomes Faint or Colors Are Incorrect When printing becomes faint or colors are incorrect even if ink remains in the printer driver settings. If not, see "Getting...the problem, the Print Head may improve the print results. If lines are probably clogged. Note Before performing maintenance z Open the Scanning Unit (Printer Cover) and make sure that all lamps for the ink tanks are shifted after performing Print Head Cleaning twice After ...
... and take the appropriate action. Note You can also perform the maintenance operation from your Canon service representative. When Printing Becomes Faint or Colors Are Incorrect When printing becomes faint or colors are incorrect even if ink remains in the printer driver settings. If not, see "Getting...the problem, the Print Head may improve the print results. If lines are probably clogged. Note Before performing maintenance z Open the Scanning Unit (Printer Cover) and make sure that all lamps for the ink tanks are shifted after performing Print Head Cleaning twice After ...


