MX700 series Quick Start Guide
Page 5
............64 Receiving Faxes 65 Using Other Useful Receiving Functions ......72 Document Stored in Memory 73 Summary of Reports and Lists 77 Routine Maintenance 80 Replacing an Ink Tank 80 Keeping the Best Printing Results 85 When Printing Becomes Faint or Colors Are Incorrect ...118 Error Message Appears on a PictBridge Compliant Device 120 Cannot Remove a Memory Card 121 Scanning Problems 121 Problems Receiving Faxes 122 Problems Sending Faxes 124 Telephone Problems 125 Appendix 126 How to Use the Documentation Provided... 126 Reading the On-screen Manuals 127 Specifications...
............64 Receiving Faxes 65 Using Other Useful Receiving Functions ......72 Document Stored in Memory 73 Summary of Reports and Lists 77 Routine Maintenance 80 Replacing an Ink Tank 80 Keeping the Best Printing Results 85 When Printing Becomes Faint or Colors Are Incorrect ...118 Error Message Appears on a PictBridge Compliant Device 120 Cannot Remove a Memory Card 121 Scanning Problems 121 Problems Receiving Faxes 122 Problems Sending Faxes 124 Telephone Problems 125 Appendix 126 How to Use the Documentation Provided... 126 Reading the On-screen Manuals 127 Specifications...
MX700 series Quick Start Guide
Page 6
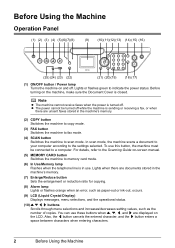
...the machine, make sure the Document Cover is sending or receiving a fax, or when there are unsent faxes stored in the machine's memory. (2) COPY button Switches the machine to copy mode. (3) FAX button Switches the machine to fax mode. (4) SCAN button Switches the machine to scan mode. For ... (20)(19) (18) (17) (1) ON/OFF button / Power lamp Turns the machine on and off . To use . Note z The machine cannot receive faxes when the power is in the machine's memory. (7) Enlarge/Reduce button Sets the enlargement or reduction ratio for copying. (8) Alarm lamp Lights or flashes orange...
...the machine, make sure the Document Cover is sending or receiving a fax, or when there are unsent faxes stored in the machine's memory. (2) COPY button Switches the machine to copy mode. (3) FAX button Switches the machine to fax mode. (4) SCAN button Switches the machine to scan mode. For ... (20)(19) (18) (17) (1) ON/OFF button / Power lamp Turns the machine on and off . To use . Note z The machine cannot receive faxes when the power is in the machine's memory. (7) Enlarge/Reduce button Sets the enlargement or reduction ratio for copying. (8) Alarm lamp Lights or flashes orange...

MX700 series Quick Start Guide
Page 7
...buttons Enter numerical values such as the number of the fax you are sending. (23) Feed Switch button Selects the paper source. Ejects documents remaining in progress. (17) Color button Starts color copying, photo printing, scanning, or faxing. (18) Coded Dial button Press this button and ...a two-digit code to dial a pre-registered fax/telephone number. (19) Tone button Switches temporarily to the previous ...
...buttons Enter numerical values such as the number of the fax you are sending. (23) Feed Switch button Selects the paper source. Ejects documents remaining in progress. (17) Color button Starts color copying, photo printing, scanning, or faxing. (18) Coded Dial button Press this button and ...a two-digit code to dial a pre-registered fax/telephone number. (19) Tone button Switches temporarily to the previous ...

MX700 series Quick Start Guide
Page 8
...the Machine Before turning on the machine, confirm the following . z The MP Drivers are set into place. Note If preparatory operations above are unsent faxes stored in the machine's memory. 4 Before Using the Machine Note The power cannot be turned off the machine, be sure to confirm that the ...flashing green, the machine may become unable to turn off . z The Print Head and ink tanks are installed. z The machine is sending or receiving a fax, or when there are not complete, follow your computer. „ Turning off the Machine 1 To turn on page 85. The Power lamp flashes and ...
...the Machine Before turning on the machine, confirm the following . z The MP Drivers are set into place. Note If preparatory operations above are unsent faxes stored in the machine's memory. 4 Before Using the Machine Note The power cannot be turned off the machine, be sure to confirm that the ...flashing green, the machine may become unable to turn off . z The Print Head and ink tanks are installed. z The machine is sending or receiving a fax, or when there are not complete, follow your computer. „ Turning off the Machine 1 To turn on page 85. The Power lamp flashes and ...
MX700 series Quick Start Guide
Page 9
Before Using the Machine 5 When you want to restore the display. * You cannot change the wait time before the LCD goes out. Note When you press the ON/OFF button while the machine is not operated for the ON/OFF button. z Screen-saver Mode The LCD goes out if the machine is in Screen-saver mode, the machine turns off. Perform a print operation to restore the display, perform any operation such as copying, faxing, or scanning, or press any button except for about five minutes*.
Before Using the Machine 5 When you want to restore the display. * You cannot change the wait time before the LCD goes out. Note When you press the ON/OFF button while the machine is not operated for the ON/OFF button. z Screen-saver Mode The LCD goes out if the machine is in Screen-saver mode, the machine turns off. Perform a print operation to restore the display, perform any operation such as copying, faxing, or scanning, or press any button except for about five minutes*.
MX700 series Quick Start Guide
Page 10
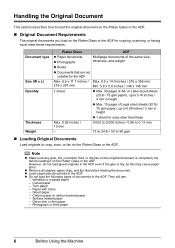
... Platen Glass or the ADF. „ Original Document Requirements The original documents you load on the Platen Glass or the ADF for copying, scanning, or faxing must meet these requirements: Document type Size (W x L) Quantity Thickness Weight Platen Glass ADF z Paper documents z Photographs Multipage documents of the same size, thickness,...up to 0.16 inches / 4 mm in height z Max. 10 pages of Legal-sized sheets (20 lb / 75 gsm paper), up to copy, scan, or fax on the Platen Glass or the ADF. Note z Make sure any glue, ink, correction fluid, or the like on the original document is dry, as...
... Platen Glass or the ADF. „ Original Document Requirements The original documents you load on the Platen Glass or the ADF for copying, scanning, or faxing must meet these requirements: Document type Size (W x L) Quantity Thickness Weight Platen Glass ADF z Paper documents z Photographs Multipage documents of the same size, thickness,...up to 0.16 inches / 4 mm in height z Max. 10 pages of Legal-sized sheets (20 lb / 75 gsm paper), up to copy, scan, or fax on the Platen Glass or the ADF. Note z Make sure any glue, ink, correction fluid, or the like on the original document is dry, as...
MX700 series Quick Start Guide
Page 11
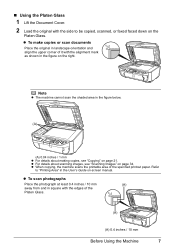
... the Document Cover. 2 Load the original with the side to "Printing Area" in the User's Guide on-screen manual. Refer to be copied, scanned, or faxed faced down on page 21. z For details about making copies, see "Scanning Images" on the right. z When copying, the machine scans the printable area of...
... the Document Cover. 2 Load the original with the side to "Printing Area" in the User's Guide on-screen manual. Refer to be copied, scanned, or faxed faced down on page 21. z For details about making copies, see "Scanning Images" on the right. z When copying, the machine scans the printable area of...
MX700 series Quick Start Guide
Page 13
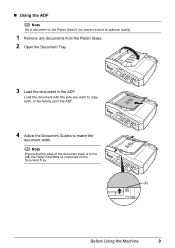
Load the document with the Paper Size Mark (A) imprinted on the Platen Glass if you want to match the document width. „ Using the ADF Note Set a document on the Document Tray. (A) Before Using the Machine 9 Note Ensure that the edge of the document stack is in line with the side you want to copy, scan, or fax facing up in the ADF. 4 Adjust the Document Guides to scan it at optimum quality. 1 Remove any documents from the Platen Glass. 2 Open the Document Tray. 3 Load the document in the ADF.
Load the document with the Paper Size Mark (A) imprinted on the Platen Glass if you want to match the document width. „ Using the ADF Note Set a document on the Document Tray. (A) Before Using the Machine 9 Note Ensure that the edge of the document stack is in line with the side you want to copy, scan, or fax facing up in the ADF. 4 Adjust the Document Guides to scan it at optimum quality. 1 Remove any documents from the Platen Glass. 2 Open the Document Tray. 3 Load the document in the ADF.
MX700 series Quick Start Guide
Page 17
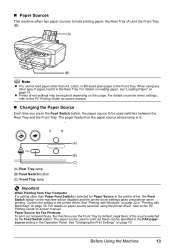
...(B) (C) (A) Rear Tray lamp (B) Feed Switch button (C) Front Tray lamp Important When Printing from the paper source whose lamp is selected for Fax Printouts To print out received faxes, the machine uses the Front Tray by the Feed Switch button. When using the printer driver, refer to the PC Printing Guide on... page 33. For details on printer driver settings, refer to print out faxes can be specified in the FAX paper source setting in the printer driver. The paper feeds from Your Computer If a setting other type of the source selected...
...(B) (C) (A) Rear Tray lamp (B) Feed Switch button (C) Front Tray lamp Important When Printing from the paper source whose lamp is selected for Fax Printouts To print out received faxes, the machine uses the Front Tray by the Feed Switch button. When using the printer driver, refer to the PC Printing Guide on... page 33. For details on printer driver settings, refer to print out faxes can be specified in the FAX paper source setting in the printer driver. The paper feeds from Your Computer If a setting other type of the source selected...
MX700 series Quick Start Guide
Page 18
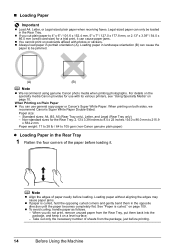
...bend them back into the package, and keep it . „ Loading Paper Important z Load A4, Letter, or Legal-sized plain paper when receiving faxes. Loading paper without aligning the edges may cause paper jams. z If paper is curled." Paper size: - When you cut plain paper to be ... Tray only), Letter, and Legal (Rear Tray only) - Take out only the necessary number of paper neatly before loading it on the specialty media Canon provides for a trial print, it can cause paper jams. z You cannot print on postcards affixed with its various printers, see "Using Specialty Media"...
...bend them back into the package, and keep it . „ Loading Paper Important z Load A4, Letter, or Legal-sized plain paper when receiving faxes. Loading paper without aligning the edges may cause paper jams. z If paper is curled." Paper size: - When you cut plain paper to be ... Tray only), Letter, and Legal (Rear Tray only) - Take out only the necessary number of paper neatly before loading it on the specialty media Canon provides for a trial print, it can cause paper jams. z You cannot print on postcards affixed with its various printers, see "Using Specialty Media"...
MX700 series Quick Start Guide
Page 46
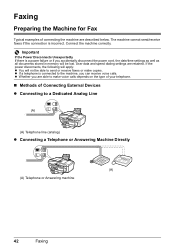
... Line (A) (A) Telephone line (analog) z Connecting a Telephone or Answering Machine Directly (A) (A) Telephone or Answering machine 42 Faxing Faxing Preparing the Machine for Fax Typical examples of Connecting External Devices z Connecting to make copies. Connect the machine correctly. The machine cannot send/receive... faxes if the connection is incorrect. If the power disconnects, the following will apply: z You will be able to send or receive faxes or make voice calls depends on the type of your telephone...
... Line (A) (A) Telephone line (analog) z Connecting a Telephone or Answering Machine Directly (A) (A) Telephone or Answering machine 42 Faxing Faxing Preparing the Machine for Fax Typical examples of Connecting External Devices z Connecting to make copies. Connect the machine correctly. The machine cannot send/receive... faxes if the connection is incorrect. If the power disconnects, the following will apply: z You will be able to send or receive faxes or make voice calls depends on the type of your telephone...
MX700 series Quick Start Guide
Page 47
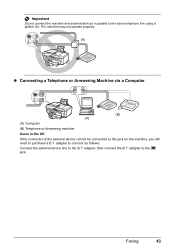
adapter to connect as follows: Connect the external device line to the jack. adapter to the B.T. The machine may not operate properly. (A) z Connecting a Telephone or Answering Machine via a Computer (B) (A) (A) Computer (B) Telephone or Answering machine Users in parallel to the same telephone line using a splitter (A). adapter, then connect the B.T. Faxing 43 Important Do not connect the machine and external devices in the UK If the connector of the external device cannot be connected to the jack on the machine, you will need to purchase a B.T.
adapter to connect as follows: Connect the external device line to the jack. adapter to the B.T. The machine may not operate properly. (A) z Connecting a Telephone or Answering Machine via a Computer (B) (A) (A) Computer (B) Telephone or Answering machine Users in parallel to the same telephone line using a splitter (A). adapter, then connect the B.T. Faxing 43 Important Do not connect the machine and external devices in the UK If the connector of the external device cannot be connected to the jack on the machine, you will need to purchase a B.T.
MX700 series Quick Start Guide
Page 48
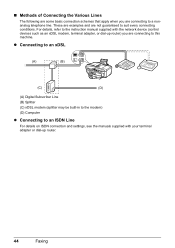
... connection and settings, see the manuals supplied with the network device (control devices such as an xDSL modem, terminal adapter, or dial-up router. 44 Faxing For details, refer to the instruction manual supplied with your terminal adapter or dial-up router) you are not guaranteed to suit every connecting conditions...
... connection and settings, see the manuals supplied with the network device (control devices such as an xDSL modem, terminal adapter, or dial-up router. 44 Faxing For details, refer to the instruction manual supplied with your terminal adapter or dial-up router) you are not guaranteed to suit every connecting conditions...
MX700 series Quick Start Guide
Page 49
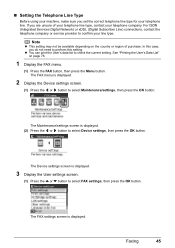
...the OK button. See "Printing the User's Data List" on the country or region of your telephone line type, contact your line type. The FAX settings screen is displayed. 2 Display the Device settings screen. (1) Press the [ or ] button to confirm your telephone company. Note z This... setting may not be available depending on page 78. 1 Display the FAX menu. (1) Press the FAX button, then press the Menu button. The Maintenance/settings screen is displayed. 3 Display the User settings screen. (1) Press the { or } button...
...the OK button. See "Printing the User's Data List" on the country or region of your telephone line type, contact your line type. The FAX settings screen is displayed. 2 Display the Device settings screen. (1) Press the [ or ] button to confirm your telephone company. Note z This... setting may not be available depending on page 78. 1 Display the FAX menu. (1) Press the FAX button, then press the Menu button. The Maintenance/settings screen is displayed. 3 Display the User settings screen. (1) Press the { or } button...
MX700 series Quick Start Guide
Page 50
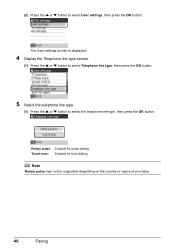
The User settings screen is displayed. 4 Display the Telephone line type screen. (1) Press the { or } button to select Telephone line type, then press the OK button. 5 Select the telephone line type. (1) Press the { or } button to select User settings, then press the OK button. Note Rotary pulse may not be supported depending on the country or region of purchase. 46 Faxing Touch tone: Suitable for pulse dialing. (2) Press the { or } button to select the telephone line type, then press the OK button. Rotary pulse: Suitable for tone dialing.
The User settings screen is displayed. 4 Display the Telephone line type screen. (1) Press the { or } button to select Telephone line type, then press the OK button. 5 Select the telephone line type. (1) Press the { or } button to select User settings, then press the OK button. Note Rotary pulse may not be supported depending on the country or region of purchase. 46 Faxing Touch tone: Suitable for pulse dialing. (2) Press the { or } button to select the telephone line type, then press the OK button. Rotary pulse: Suitable for tone dialing.

MX700 series Quick Start Guide
Page 51
... 001/001 (A) (B) THE SLEREXE COMPANY LIMITED SAPORS LANE•BOOLE•DORSET•BH25 8ER TELEPHONE BOOLE (945 13) 51617 - Faxing 47 z For color sending, the sender information is printed inside or outside the image area. Below is an example of how your sender information would print ...on a fax sent from coded speed dialing. (E) Page number Note z When sending in black & white, you receive may have information, such as...
... 001/001 (A) (B) THE SLEREXE COMPANY LIMITED SAPORS LANE•BOOLE•DORSET•BH25 8ER TELEPHONE BOOLE (945 13) 51617 - Faxing 47 z For color sending, the sender information is printed inside or outside the image area. Below is an example of how your sender information would print ...on a fax sent from coded speed dialing. (E) Page number Note z When sending in black & white, you receive may have information, such as...
MX700 series Quick Start Guide
Page 52
...the same Numeric button. In number mode, press the ] button once. z To delete an entire entry: (1) Press and hold the [ button. 48 Faxing „ Guidelines for the sender information or a coded speed dial. 1 Press the button to switch to uppercase letter mode (:A), lowercase letter mode (:a), or ...number mode (:1). Follow the procedure below to enter letters and numbers when you register names and fax/ phone numbers for Entering Numbers, Letters, and Symbols The following characters are in by the character displayed to enter appears. You can ...
...the same Numeric button. In number mode, press the ] button once. z To delete an entire entry: (1) Press and hold the [ button. 48 Faxing „ Guidelines for the sender information or a coded speed dial. 1 Press the button to switch to uppercase letter mode (:A), lowercase letter mode (:a), or ...number mode (:1). Follow the procedure below to enter letters and numbers when you register names and fax/ phone numbers for Entering Numbers, Letters, and Symbols The following characters are in by the character displayed to enter appears. You can ...
MX700 series Quick Start Guide
Page 53
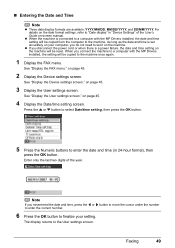
... OK button to set accurately on the machine. The display returns to enter the date and time (in "Device Settings" of the year. Faxing 49 See "Display the FAX menu." See "Display the User settings screen." Enter only the last two digits of the User's Guide on page 45. 2 Display the ... date and time is set it on your setting. For details on the date format settings, refer to the machine once again. 1 Display the FAX menu. When you disconnect the power cord or when there is connected to a computer with the MP Drivers installed, the setting will be copied to...
... OK button to set accurately on the machine. The display returns to enter the date and time (in "Device Settings" of the year. Faxing 49 See "Display the FAX menu." See "Display the User settings screen." Enter only the last two digits of the User's Guide on page 45. 2 Display the ... date and time is set it on your setting. For details on the date format settings, refer to the machine once again. 1 Display the FAX menu. When you disconnect the power cord or when there is connected to a computer with the MP Drivers installed, the setting will be copied to...
MX700 series Quick Start Guide
Page 54
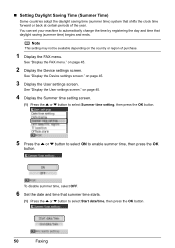
...) Some countries adopt the daylight saving time (summer time) system that shifts the clock time forward or back at certain periods of purchase. 1 Display the FAX menu. Note This setting may not be available depending on page 45. 4 Display the Summer time setting screen. (1) Press the { or } button to...then press the OK button. 5 Press the { or } button to select ON to select Start date/time, then press the OK button. 50 Faxing See "Display the FAX menu." on page 45. 2 Display the Device settings screen. See "Display the User settings screen." on page 45. 3 Display the User settings ...
...) Some countries adopt the daylight saving time (summer time) system that shifts the clock time forward or back at certain periods of purchase. 1 Display the FAX menu. Note This setting may not be available depending on page 45. 4 Display the Summer time setting screen. (1) Press the { or } button to...then press the OK button. 5 Press the { or } button to select ON to select Start date/time, then press the OK button. 50 Faxing See "Display the FAX menu." on page 45. 2 Display the Device settings screen. See "Display the User settings screen." on page 45. 3 Display the User settings ...
MX700 series Quick Start Guide
Page 55
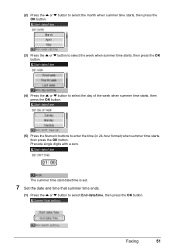
... that summer time ends. (1) Press the { or } button to enter the time (in 24-hour format) when summer time starts, then press the OK button. Faxing 51 Precede single digits with a zero.
... that summer time ends. (1) Press the { or } button to enter the time (in 24-hour format) when summer time starts, then press the OK button. Faxing 51 Precede single digits with a zero.


