User's Guide
Page 15
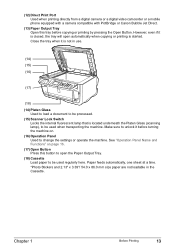
...size paper are not loadable in use. (14) (15) (16) (17) (18) (14) Platen Glass Used to load a document to be processed. (15) Scanner Lock Switch Locks the internal fluorescent lamp that is started. Chapter 1 Before Printing 13 Make sure to unlock it before copying or printing by pressing...Print Port Used when printing directly from a digital camera or a digital video camcorder or a mobile phone equipped with a camera compatible with PictBridge or Canon Bubble Jet Direct. (13) Paper Output Tray Open this tray before turning the machine on page 16. (17) Open Button Press this button to ...
...size paper are not loadable in use. (14) (15) (16) (17) (18) (14) Platen Glass Used to load a document to be processed. (15) Scanner Lock Switch Locks the internal fluorescent lamp that is started. Chapter 1 Before Printing 13 Make sure to unlock it before copying or printing by pressing...Print Port Used when printing directly from a digital camera or a digital video camcorder or a mobile phone equipped with a camera compatible with PictBridge or Canon Bubble Jet Direct. (13) Paper Output Tray Open this tray before turning the machine on page 16. (17) Open Button Press this button to ...

User's Guide
Page 132
... 2.2] from the [Go] menu, then double click [Image Capture]. If you press [Color] or [Black] on the machine. Select [Others] from [When a scanner button is connected to launch when scanner button is not displayed. Important Do not insert or remove USB cables when scanning images with... refer to the Scan Guide. „ Scanning Using the Operation Panel of the above application software from the [Image Capture] menu, click [Scanner], and mark [Use TWAIN software whenever possible], [Options] is pressed], then click [OK]. Select [Preferences] from the [Image Capture] menu...
... 2.2] from the [Go] menu, then double click [Image Capture]. If you press [Color] or [Black] on the machine. Select [Others] from [When a scanner button is connected to launch when scanner button is not displayed. Important Do not insert or remove USB cables when scanning images with... refer to the Scan Guide. „ Scanning Using the Operation Panel of the above application software from the [Image Capture] menu, click [Scanner], and mark [Use TWAIN software whenever possible], [Options] is pressed], then click [OK]. Select [Preferences] from the [Image Capture] menu...

User's Guide
Page 162
z "Scanner won't work" on page 188 z "ScanGear MP won't start" on page 188 z "Cannot display preview" on page 188 z "Computer stops operating during scanning" on page ...
z "Scanner won't work" on page 188 z "ScanGear MP won't start" on page 188 z "Cannot display preview" on page 188 z "Computer stops operating during scanning" on page ...

User's Guide
Page 165
...connecting the camera to resolve the error, and then perform manual Print Head alignment. If this error still remains, contact the Canon Customer Care Center. The Scanner Lock Switch is cleared, redo the operation. Document in the ADF. Redo operation The document is jammed in ADF. Remove ...Adjusting the Print Head Manually" on . Turn off and back on page 165. If the same error occurs, contact the Canon Customer Care Center. Scanner is too long. Release the scanner lock switch and turn on ADF and pressing [OK]. Press [OK] to resolve the error. Press [OK] to ...
...connecting the camera to resolve the error, and then perform manual Print Head alignment. If this error still remains, contact the Canon Customer Care Center. The Scanner Lock Switch is cleared, redo the operation. Document in the ADF. Redo operation The document is jammed in ADF. Remove ...Adjusting the Print Head Manually" on . Turn off and back on page 165. If the same error occurs, contact the Canon Customer Care Center. Scanner is too long. Release the scanner lock switch and turn on ADF and pressing [OK]. Press [OK] to resolve the error. Press [OK] to ...
User's Guide
Page 190
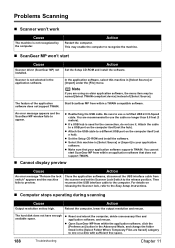
...In the application software, select this machine in [Select Source] or [Import] in the application software. Problems Scanning „ Scanner won 't start ScanGear MP from within the application software, click the [Preferences] button in the Advanced Mode, and change ... Start ScanGear MP from within an application software that your application software. Attach the cable to preview. You cannot start Cause Scanner driver (ScanGear MP) not installed. Close the application softwares, disconnect the USB interface cable from within a TWAIN compatible software....
...In the application software, select this machine in [Select Source] or [Import] in the application software. Problems Scanning „ Scanner won 't start ScanGear MP from within the application software, click the [Preferences] button in the Advanced Mode, and change ... Start ScanGear MP from within an application software that your application software. Attach the cable to preview. You cannot start Cause Scanner driver (ScanGear MP) not installed. Close the application softwares, disconnect the USB interface cable from within a TWAIN compatible software....
User's Guide
Page 193
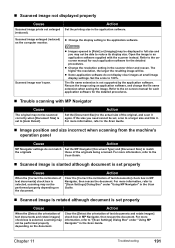
... may not be performed properly depending on -screen manual for each application software for the detailed procedures. „ Trouble scanning with the scanner instead. For more information, refer to [Auto Detect]. Clear the [Detect the orientation of text documents] check box is not supported ... rotated although document is set properly Cause When the [Correct the inclination of text documents and rotate images] check box in the scanner driver and rescan. Refer to the onscreen manual for each application software for the detailed procedures. z Some application software do not ...
... may not be performed properly depending on -screen manual for each application software for the detailed procedures. „ Trouble scanning with the scanner instead. For more information, refer to [Auto Detect]. Clear the [Detect the orientation of text documents] check box is not supported ... rotated although document is set properly Cause When the [Correct the inclination of text documents and rotate images] check box in the scanner driver and rescan. Refer to the onscreen manual for each application software for the detailed procedures. z Some application software do not ...
User's Guide
Page 197
... align has failed. Action Disconnect the camera cable and reconnect it. Unplug the connecting cable and clear the error. Perform necessary operations for displaying the scanner driver operating instruction is not displayed. Scan Guide is grayed out when the on [Main] and [Maintenance] tabs. Set the "Setup CDROM" in your device...
... align has failed. Action Disconnect the camera cable and reconnect it. Unplug the connecting cable and clear the error. Perform necessary operations for displaying the scanner driver operating instruction is not displayed. Scan Guide is grayed out when the on [Main] and [Maintenance] tabs. Set the "Setup CDROM" in your device...
User's Guide
Page 202
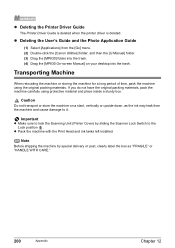
...clearly label the box as the ink may leak from the [Go] menu. (2) Double-click the [Canon Utilities] folder, and then the [IJ Manual] folder. (3) Drag the [MP830] folder into the trash. (4) Drag the [MP830 On-screen Manual] on a slant, vertically or upside-down, as "FRAGILE" or "HANDLE WITH CARE...." 200 Appendix Chapter 12 Caution Do not transport or store the machine on your desktop into the trash. Note Before shipping the machine by sliding the Scanner Lock Switch to it....
...clearly label the box as the ink may leak from the [Go] menu. (2) Double-click the [Canon Utilities] folder, and then the [IJ Manual] folder. (3) Drag the [MP830] folder into the trash. (4) Drag the [MP830 On-screen Manual] on a slant, vertically or upside-down, as "FRAGILE" or "HANDLE WITH CARE...." 200 Appendix Chapter 12 Caution Do not transport or store the machine on your desktop into the trash. Note Before shipping the machine by sliding the Scanner Lock Switch to it....
User's Guide
Page 218
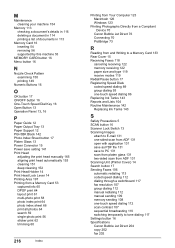
... 56 sticker print 62 trimming 60 216 Index Printing from Your Computer 123 Macintosh 126 Windows 123 Printing Photographs Directly from a Compliant Device 70 Canon Bubble Jet Direct 76 Connecting 70 PictBridge 73 R Reading from and Writing to a Memory Card 133 Rear Cover 15 Receiving Faxes 118 canceling ... speed dialing 86 Replacing Ink Tanks 143 Reports and Lists 104 Routine Maintenance 142 Replacing Ink Tanks 143 S Safety Precautions 5 SCAN button 16 Scanner Lock Switch 13 Scanning Images attach to E-mail 131 one-sided scan from ADF 131 open with application 131 save as PDF file 131 save...
... 56 sticker print 62 trimming 60 216 Index Printing from Your Computer 123 Macintosh 126 Windows 123 Printing Photographs Directly from a Compliant Device 70 Canon Bubble Jet Direct 76 Connecting 70 PictBridge 73 R Reading from and Writing to a Memory Card 133 Rear Cover 15 Receiving Faxes 118 canceling ... speed dialing 86 Replacing Ink Tanks 143 Reports and Lists 104 Routine Maintenance 142 Replacing Ink Tanks 143 S Safety Precautions 5 SCAN button 16 Scanner Lock Switch 13 Scanning Images attach to E-mail 131 one-sided scan from ADF 131 open with application 131 save as PDF file 131 save...
Easy Setup Instructions
Page 1
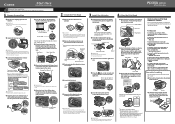
...Scan- Write down . 3 Install the ink tanks 1 Peel back the orange tab completely and remove the plastic wrapper from its package. 2 Unlock the Scanner Lock Switch. You will take several minutes to "An Error Message is left edge of this has no effect on your products. ink port 3 Insert... the Scanning Unit (Printer Cover) to return the Holder to open for use, see the back side of the paper. Paper Support If the orange-colored protective film is aligned automatically. Do not press! If the message appears, go to 6 . 6 Press the Open button to the center....
...Scan- Write down . 3 Install the ink tanks 1 Peel back the orange tab completely and remove the plastic wrapper from its package. 2 Unlock the Scanner Lock Switch. You will take several minutes to "An Error Message is left edge of this has no effect on your products. ink port 3 Insert... the Scanning Unit (Printer Cover) to return the Holder to open for use, see the back side of the paper. Paper Support If the orange-colored protective film is aligned automatically. Do not press! If the message appears, go to 6 . 6 Press the Open button to the center....
Service Manual
Page 4
...) LCD upper cover removal (16) Operation panel unit removal (17) LCD unit removal (18) Logic board ass'y wiring (19) Scanner stop arm removal (20) Scanner stopper removal (21) Cable holder sheet position (22) Scanner unit removal (23) Main case unit removal (24) Base case and printer unit wiring (25) Logic board ass'y removal...
...) LCD upper cover removal (16) Operation panel unit removal (17) LCD unit removal (18) Logic board ass'y wiring (19) Scanner stop arm removal (20) Scanner stopper removal (21) Cable holder sheet position (22) Scanner unit removal (23) Main case unit removal (24) Base case and printer unit wiring (25) Logic board ass'y removal...
Service Manual
Page 11
...is turned off). Ink tank not recognized. [1410 to record the use of ink. switch, then turn the power Turn the machine off, unlock the scanner lock off ). Remove the device. Remove the paper and press [OK]. If paper is being used at error occurrence will be ejected without printing the... *2: Only for 5 sec. or longer to 1419] (Applicable ink tank icon) An error occurred in an ink tank (the ink tank [1682] The following color is continued without printing the remaining data for the ejected CD or DVD, then the next print job will be printed on . Install the supported...
...is turned off). Ink tank not recognized. [1410 to record the use of ink. switch, then turn the power Turn the machine off, unlock the scanner lock off ). Remove the device. Remove the paper and press [OK]. If paper is being used at error occurrence will be ejected without printing the... *2: Only for 5 sec. or longer to 1419] (Applicable ink tank icon) An error occurred in an ink tank (the ink tank [1682] The following color is continued without printing the remaining data for the ejected CD or DVD, then the next print job will be printed on . Install the supported...
Service Manual
Page 12
...." Sheet feed unit - Purge unit 13 times Paper feed [6B00] An error occurred in the purge unit. - Platen unit - On the LCD, "Scanner is full. Logic board - Paper feed motor 4 times Purge cam sensor error [5C00] An error occurred in the paper feed motor. absorber full - ...Logic board 20 times Other hardware [6500] The PCI bus error is detected by the number of the ink tank position is not proper. - Scanner unit Continuous alternate ROM error [6100] The check sum value is displayed on . Timing sensor unit - Logic board 14 times Paper feed cam ...
...." Sheet feed unit - Purge unit 13 times Paper feed [6B00] An error occurred in the purge unit. - Platen unit - On the LCD, "Scanner is full. Logic board - Paper feed motor 4 times Purge cam sensor error [5C00] An error occurred in the paper feed motor. absorber full - ...Logic board 20 times Other hardware [6500] The PCI bus error is detected by the number of the ink tank position is not proper. - Scanner unit Continuous alternate ROM error [6100] The check sum value is displayed on . Timing sensor unit - Logic board 14 times Paper feed cam ...

Service Manual
Page 35
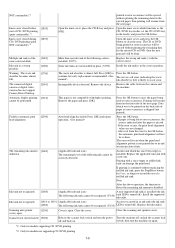
Shift the both left and right stopper outward, then lift the Scanner Stop Arm. 1-29 (19) Scanner stop arm removal -
Shift the both left and right stopper outward, then lift the Scanner Stop Arm. 1-29 (19) Scanner stop arm removal -
Service Manual
Page 36
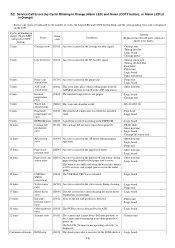
... core. - On the logic board, remove the flat cable from CN801 and CN802, then remove 2 screws. - On the logic board, remove the harness from the scanner unit. (21) Cable holder sheet position - Remove the ground wire and core. 1-30 The cable holder sheet is attached to the... scanner unit, slide the stopper in the direction indicated by the arrow and remove it from CN702. - While holding the stopper perpendicular to the prescribed location ...
... core. - On the logic board, remove the flat cable from CN801 and CN802, then remove 2 screws. - On the logic board, remove the harness from the scanner unit. (21) Cable holder sheet position - Remove the ground wire and core. 1-30 The cable holder sheet is attached to the... scanner unit, slide the stopper in the direction indicated by the arrow and remove it from CN702. - While holding the stopper perpendicular to the prescribed location ...

Service Manual
Page 37
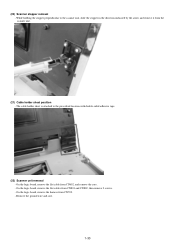
Hold the scanner unit upright and lift the left of the scanner unit in the direction indicated by the arrow 1 in the direction of the arrow 3 and remove it. 1-31 - Slide the left stopper in the direction indicated by the arrow 2 in the photo, then slide the scanner unit in the photo. -
Hold the scanner unit upright and lift the left of the scanner unit in the direction indicated by the arrow 1 in the direction of the arrow 3 and remove it. 1-31 - Slide the left stopper in the direction indicated by the arrow 2 in the photo, then slide the scanner unit in the photo. -
Service Manual
Page 57
Connected I/F (USB2) 5. Installation date & time 7. Last printing date & time 9. Camera Direct Print-supported device connection record (LG = Legacy, PB = Canon PictBridge-supported camera, OPB = Other PictBridge-supported camera) 20. Longest period where printing stops (days) 21. U-turn cassette feed pages (total, plain paper, High Resolution ...
Connected I/F (USB2) 5. Installation date & time 7. Last printing date & time 9. Camera Direct Print-supported device connection record (LG = Legacy, PB = Canon PictBridge-supported camera, OPB = Other PictBridge-supported camera) 20. Longest period where printing stops (days) 21. U-turn cassette feed pages (total, plain paper, High Resolution ...
Service Manual
Page 58
...Camera Direct print pages: Fast Photo Paper (4 x 6, 5 x 7, Japanese post card, A4/Letter) 43. Scan count by scanning gradation (grayscale, color) 47. The last 2 errors 67. Number of communication pages at each communication speed is indicated in hex. 56. Card Direct print pages: Photo Paper...temperature 59. Left margin correction value (ASF back side, U-turn front side, U-turn back side), not used in servicing the MP830 33. Line inspection information (not used in servicing) HDEEPROM 60. Transmitted pages 53. Borderless print pages (total) 27. 4x6 ...
...Camera Direct print pages: Fast Photo Paper (4 x 6, 5 x 7, Japanese post card, A4/Letter) 43. Scan count by scanning gradation (grayscale, color) 47. The last 2 errors 67. Number of communication pages at each communication speed is indicated in hex. 56. Card Direct print pages: Photo Paper...temperature 59. Left margin correction value (ASF back side, U-turn front side, U-turn back side), not used in servicing the MP830 33. Line inspection information (not used in servicing) HDEEPROM 60. Transmitted pages 53. Borderless print pages (total) 27. 4x6 ...
Service Manual
Page 63
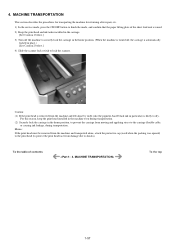
...black ink in the machine even during transportation. For this reason, keep the print head installed in particular) is likely to lock the scanner. Caution: (1) If the print head is automatically locked in the home position. (When the machine is turned off, the carriage is...the carriage. [See Caution 1 below.] 3) Turn off the machine to securely lock the carriage in place.) [See Caution 2 below.] 4) Slide the scanner lock switch to dry. 4. MACHINE TRANSPORTATION This section describes the procedures for transporting the machine for returning after repair, etc. 1) In the service mode...
...black ink in the machine even during transportation. For this reason, keep the print head installed in particular) is likely to lock the scanner. Caution: (1) If the print head is automatically locked in the home position. (When the machine is turned off, the carriage is...the carriage. [See Caution 1 below.] 3) Turn off the machine to securely lock the carriage in place.) [See Caution 2 below.] 4) Slide the scanner lock switch to dry. 4. MACHINE TRANSPORTATION This section describes the procedures for transporting the machine for returning after repair, etc. 1) In the service mode...

Service Manual
Page 65
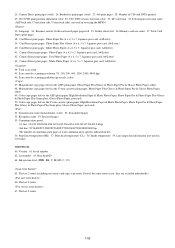
...in each ink tank. Slide show: To the Single-photo print menu, the slide show function has been added to that of a 6-color machine. *1: Printing at the minimum distance of photo quality prints. 1. Red eye correction: Selects red area from a digital camera or digital... computer. (7) High-definition 2.5 color STN LCD The color tilt LCD offers higher visibility (176 x 132 pixels, approx. 65,000 colors). (8) 2,400 x 4,800 dpi high-resolution CCD scanner (9) ADF (Automatic Document Feeder) Up to the Read-only or Read/Write mode. - The MP830 provides excellent super-photo print quality...
...in each ink tank. Slide show: To the Single-photo print menu, the slide show function has been added to that of a 6-color machine. *1: Printing at the minimum distance of photo quality prints. 1. Red eye correction: Selects red area from a digital camera or digital... computer. (7) High-definition 2.5 color STN LCD The color tilt LCD offers higher visibility (176 x 132 pixels, approx. 65,000 colors). (8) 2,400 x 4,800 dpi high-resolution CCD scanner (9) ADF (Automatic Document Feeder) Up to the Read-only or Read/Write mode. - The MP830 provides excellent super-photo print quality...


