MP610 series Quick Start Guide
Page 5
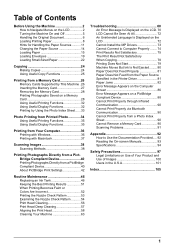
...Using Useful Display Functions 35 Printing from Your Computer 36 Printing with Windows 36 Printing with Macintosh 37 Scanning Images 38 Scanning Methods 38 Printing Photographs Directly from a PictBridge Compliant Device 40 Printing Photographs Directly from a PictBridge ...Compliant Device 40 About PictBridge Print Settings 42 Routine Maintenance 46 Replacing an Ink Tank 46 Keeping the Best Printing Results 51 When Printing Becomes Faint or Colors...
...Using Useful Display Functions 35 Printing from Your Computer 36 Printing with Windows 36 Printing with Macintosh 37 Scanning Images 38 Scanning Methods 38 Printing Photographs Directly from a PictBridge Compliant Device 40 Printing Photographs Directly from a PictBridge ...Compliant Device 40 About PictBridge Print Settings 42 Routine Maintenance 46 Replacing an Ink Tank 46 Keeping the Best Printing Results 51 When Printing Becomes Faint or Colors...
MP610 series Quick Start Guide
Page 7
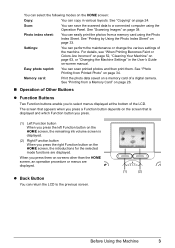
... "Printing from a memory card using the Operation Panel. z Back Button You can save the scanned data to select menus displayed at the bottom of the machine. For details, see "When Printing Becomes Faint or Colors Are Incorrect" on page 52, "Cleaning Your Machine" on page 63, or "Changing the Machine...sheet: You can copy in the User's Guide on screens other than the HOME screen, an operation procedure or menus are displayed. Settings: You can scan printed photos and then print them on -screen manual. Memory card: Print the photo data saved on page 24. See "Copying" on a memory...
... "Printing from a memory card using the Operation Panel. z Back Button You can save the scanned data to select menus displayed at the bottom of the machine. For details, see "When Printing Becomes Faint or Colors Are Incorrect" on page 52, "Cleaning Your Machine" on page 63, or "Changing the Machine...sheet: You can copy in the User's Guide on screens other than the HOME screen, an operation procedure or menus are displayed. Settings: You can scan printed photos and then print them on -screen manual. Memory card: Print the photo data saved on page 24. See "Copying" on a memory...
MP610 series Quick Start Guide
Page 10
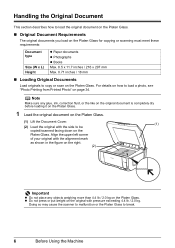
... to load the original document on the Platen Glass. „ Original Document Requirements The original documents you load on the Platen Glass for copying or scanning must meet these requirements: Document type Size (W x L) Height z Paper documents z Photographs z Books Max. 8.5 x 11.7 inches / 216 x 297 mm... Max. 0.71 inches / 18 mm „ Loading Original Documents Load originals to copy or scan on the original with pressure exceeding 4.4 lb / 2.0 kg. Align the upper left corner of your original with the alignment mark as shown in the figure...
... to load the original document on the Platen Glass. „ Original Document Requirements The original documents you load on the Platen Glass for copying or scanning must meet these requirements: Document type Size (W x L) Height z Paper documents z Photographs z Books Max. 8.5 x 11.7 inches / 216 x 297 mm... Max. 0.71 inches / 18 mm „ Loading Original Documents Load originals to copy or scan on the original with pressure exceeding 4.4 lb / 2.0 kg. Align the upper left corner of your original with the alignment mark as shown in the figure...
MP610 series Quick Start Guide
Page 11
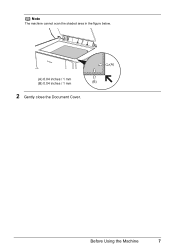
Before Using the Machine 7 Note The machine cannot scan the shaded area in the figure below. (A) (A) 0.04 inches / 1 mm (B) 0.04 inches / 1 mm (B) 2 Gently close the Document Cover.
Before Using the Machine 7 Note The machine cannot scan the shaded area in the figure below. (A) (A) 0.04 inches / 1 mm (B) 0.04 inches / 1 mm (B) 2 Gently close the Document Cover.
MP610 series Quick Start Guide
Page 37
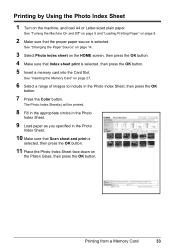
... the appropriate circles in the Photo Index Sheet. 9 Load paper as you specified in the Photo Index Sheet, then press the OK button. 7 Press the Color button. Printing by Using the Photo Index Sheet 1 Turn on the Platen Glass, then press the OK button. See "Inserting the Memory Card" on page... Off" on page 5 and "Loading Printing Paper" on page 27. 6 Select a range of images to include in the Photo Index Sheet. 10 Make sure that Scan sheet and print is selected, then press the OK button. 11 Place the Photo Index Sheet face-down on the machine, and load A4 or...
... the appropriate circles in the Photo Index Sheet. 9 Load paper as you specified in the Photo Index Sheet, then press the OK button. 7 Press the Color button. Printing by Using the Photo Index Sheet 1 Turn on the Platen Glass, then press the OK button. See "Inserting the Memory Card" on page... Off" on page 5 and "Loading Printing Paper" on page 27. 6 Select a range of images to include in the Photo Index Sheet. 10 Make sure that Scan sheet and print is selected, then press the OK button. 11 Place the Photo Index Sheet face-down on the machine, and load A4 or...

MP610 series Quick Start Guide
Page 38
... button. Photo Printing from Printed Photo Place the photos face down on the Platen Glass. See "Loading Printing Paper" on the machine. The photographs are scanned. 5 Load paper. To change the settings, select the item and press the OK button. (3) Select Next, and then press the OK button. 7 ... (3) Repeat steps (1) and (2) to specify the number of copies for each photo. (4) Press the OK button. 34 Photo Printing from Printed Photo You can scan printed photos, specify the number of copies with viewing them on the LCD, and print them. 1 Turn on page 8. 6 Select the print menu. (1) Make...
... button. Photo Printing from Printed Photo Place the photos face down on the Platen Glass. See "Loading Printing Paper" on the machine. The photographs are scanned. 5 Load paper. To change the settings, select the item and press the OK button. (3) Select Next, and then press the OK button. 7 ... (3) Repeat steps (1) and (2) to specify the number of copies for each photo. (4) Press the OK button. 34 Photo Printing from Printed Photo You can scan printed photos, specify the number of copies with viewing them on the LCD, and print them. 1 Turn on page 8. 6 Select the print menu. (1) Make...
MP610 series Quick Start Guide
Page 39
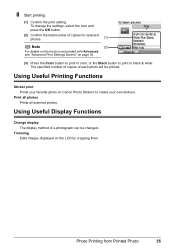
... Functions Sticker print Prints your favorite photo on Canon Photo Stickers to print in color, or the Black button to create your own stickers. Trimming Edits images displayed on page 30. (3) Press the Color button to print in black & white. Print all photos Prints all scanned photos. 8 Start printing. (1) Confirm the print setting. To...
... Functions Sticker print Prints your favorite photo on Canon Photo Stickers to print in color, or the Black button to create your own stickers. Trimming Edits images displayed on page 30. (3) Press the Color button to print in black & white. Print all photos Prints all scanned photos. 8 Start printing. (1) Confirm the print setting. To...
MP610 series Quick Start Guide
Page 42
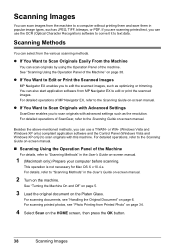
...is not necessary for Mac OS X v.10.4.x. z If You Want to text data. For detailed operations of ScanGear, refer to Scan Originals Easily From the Machine You can scan originals by using the Operation Panel of the Machine" on -screen manual. See "Turning the Machine On and Off" on page... 5. 3 Load the original document on the machine. Scanning Images You can scan images from the machine to scan originals with this machine. If you are scanning printed text, you to a computer without printing them and save them in the User's Guide on-...
...is not necessary for Mac OS X v.10.4.x. z If You Want to text data. For detailed operations of ScanGear, refer to Scan Originals Easily From the Machine You can scan originals by using the Operation Panel of the Machine" on -screen manual. See "Turning the Machine On and Off" on page... 5. 3 Load the original document on the machine. Scanning Images You can scan images from the machine to scan originals with this machine. If you are scanning printed text, you to a computer without printing them and save them in the User's Guide on-...
MP610 series Quick Start Guide
Page 43
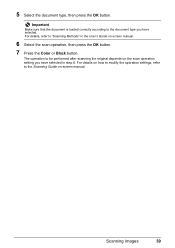
Important Make sure that the document is loaded correctly according to be performed after scanning the original depends on -screen manual. For details, refer to the Scanning Guide on the scan operation setting you have selected in the User's Guide on how to modify the operation settings, refer to "Scanning Methods" in step 6. Scanning Images 39 For details on -screen manual. 6 Select the scan operation, then press the OK button. 7 Press the Color or Black button. The operation to the document type you have selected. 5 Select the document type, then press the OK button.
Important Make sure that the document is loaded correctly according to be performed after scanning the original depends on -screen manual. For details, refer to the Scanning Guide on the scan operation setting you have selected in the User's Guide on how to modify the operation settings, refer to "Scanning Methods" in step 6. Scanning Images 39 For details on -screen manual. 6 Select the scan operation, then press the OK button. 7 Press the Color or Black button. The operation to the document type you have selected. 5 Select the document type, then press the OK button.
MP610 series Quick Start Guide
Page 51
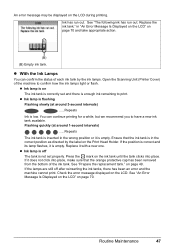
... ink tank available. See "Prepare the replacement tank." If the lamps are still off The tank is not set and there is empty. Open the Scanning Unit (Printer Cover) of the machine to print. z Ink lamp is on The ink tank is in "An Error Message Is Displayed on the LCD...
... ink tank available. See "Prepare the replacement tank." If the lamps are still off The tank is not set and there is empty. Open the Scanning Unit (Printer Cover) of the machine to print. z Ink lamp is on The ink tank is in "An Error Message Is Displayed on the LCD...
MP610 series Quick Start Guide
Page 52
...minutes, the Print Head Holder moves to the center. Close and reopen the Scanning Unit (Printer Cover) to return the holder to clog. Refilling ink is turned on, and lift the Scanning Unit (Printer Cover) until it immediately. z Color ink may be consumed even when printing a black-and-white document or ... to maintain the machine's performance. Inserting partially used ink tanks may not operate properly when it . When an ink tank is out of specified Canon brand ink tanks. z Once an ink tank has been installed, do not remove it from the machine and leave it out in the rounded...
...minutes, the Print Head Holder moves to the center. Close and reopen the Scanning Unit (Printer Cover) to return the holder to clog. Refilling ink is turned on, and lift the Scanning Unit (Printer Cover) until it immediately. z Color ink may be consumed even when printing a black-and-white document or ... to maintain the machine's performance. Inserting partially used ink tanks may not operate properly when it . When an ink tank is out of specified Canon brand ink tanks. z Once an ink tank has been installed, do not remove it from the machine and leave it out in the rounded...
MP610 series Quick Start Guide
Page 54
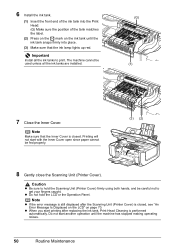
... on the mark on page 70. The machine cannot be fed properly. (3) (2) 8 Gently close the Scanning Unit (Printer Cover). Caution z Be sure to get your fingers caught. z Do not hold the Scanning Unit (Printer Cover) firmly using both hands, and be careful not to hold the LCD or the Operation... Displayed on the LCD" on the ink tank until the machine has stopped making operating noises. 50 Routine Maintenance Do not start printing after the Scanning Unit (Printer Cover) is closed . Note Make sure that the ink lamp lights up red. 6 Install the ink tank. (1) Insert the front...
... on the mark on page 70. The machine cannot be fed properly. (3) (2) 8 Gently close the Scanning Unit (Printer Cover). Caution z Be sure to get your fingers caught. z Do not hold the Scanning Unit (Printer Cover) firmly using both hands, and be careful not to hold the LCD or the Operation... Displayed on the LCD" on the ink tank until the machine has stopped making operating noises. 50 Routine Maintenance Do not start printing after the Scanning Unit (Printer Cover) is closed . Note Make sure that the ink lamp lights up red. 6 Install the ink tank. (1) Insert the front...
MP610 series Quick Start Guide
Page 56
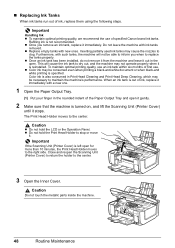
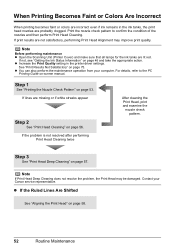
... Results Not Satisfactory" on page 57. z You can also perform the maintenance operation from your Canon service representative. When Printing Becomes Faint or Colors Are Incorrect When printing becomes faint or colors are incorrect even if ink remains in the printer driver settings. Step 3 See "Print Head Deep...Print Head Cleaning. If print results are not satisfactory, performing Print Head Alignment may be damaged. Note Before performing maintenance z Open the Scanning Unit (Printer Cover) and make sure that all lamps for the ink tanks are missing or if white streaks appear Step 2 See ...
... Results Not Satisfactory" on page 57. z You can also perform the maintenance operation from your Canon service representative. When Printing Becomes Faint or Colors Are Incorrect When printing becomes faint or colors are incorrect even if ink remains in the printer driver settings. Step 3 See "Print Head Deep...Print Head Cleaning. If print results are not satisfactory, performing Print Head Alignment may be damaged. Note Before performing maintenance z Open the Scanning Unit (Printer Cover) and make sure that all lamps for the ink tanks are missing or if white streaks appear Step 2 See ...
MP610 series Quick Start Guide
Page 72
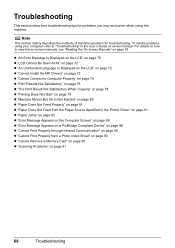
... Print Properly through Infrared Communication" on page 90 z "Cannot Print Properly from a Photo Index Sheet" on page 90 z "Cannot Remove a Memory Card" on page 90 z "Scanning Problems" on page 93. For details on how to view the on-screen manuals, see "Reading the On-screen Manuals" on page 91 68 Troubleshooting
... Print Properly through Infrared Communication" on page 90 z "Cannot Print Properly from a Photo Index Sheet" on page 90 z "Cannot Remove a Memory Card" on page 90 z "Scanning Problems" on page 93. For details on how to view the on-screen manuals, see "Reading the On-screen Manuals" on page 91 68 Troubleshooting
MP610 series Quick Start Guide
Page 74
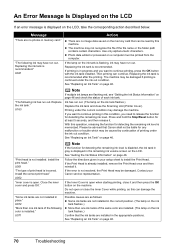
...z Photo data edited or processed on the ink tank flashes.) Replace the ink tank and close the Scanning Unit (Printer Cover). Ink has run out. See "Replacing an Ink Tank" on page 46. ...action described below. Possible causes are installed. (The lamp on the ink tank flashes.) Confirm that Canon shall not be caused by this can continue. If printing is in the correct position. (The ...may have run out. (The lamp on a computer must be read by continuation of the following color is installed." With this condition, you need to continue printing, press the OK button with the...
...z Photo data edited or processed on the ink tank flashes.) Replace the ink tank and close the Scanning Unit (Printer Cover). Ink has run out. See "Replacing an Ink Tank" on page 46. ...action described below. Possible causes are installed. (The lamp on the ink tank flashes.) Confirm that Canon shall not be caused by this can continue. If printing is in the correct position. (The ...may have run out. (The lamp on a computer must be read by continuation of the following color is installed." With this condition, you need to continue printing, press the OK button with the...
MP610 series Quick Start Guide
Page 75
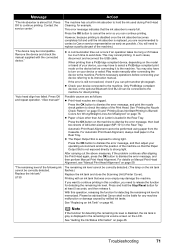
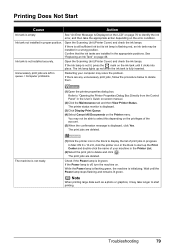
...are clogged. Possible causes are as follows: z Print Head nozzles are recommended to contact a Canon service representative as early as possible. (You will need to continue printing in this operation, ...the Nozzle Check Pattern" on page 53 and "Printing Does Not Start/Printing Is Blurred/ Colors Are Wrong/Straight Lines Are Misaligned" on page 46. For Automatic Print Head Alignment, ...PictBridge compliant print mode on the ink tank flashes.) Replace the ink tank and close the Scanning Unit (Printer Cover). The remaining ink level cannot be correctly detected. With this condition, ...
...are clogged. Possible causes are as follows: z Print Head nozzles are recommended to contact a Canon service representative as early as possible. (You will need to continue printing in this operation, ...the Nozzle Check Pattern" on page 53 and "Printing Does Not Start/Printing Is Blurred/ Colors Are Wrong/Straight Lines Are Misaligned" on page 46. For Automatic Print Head Alignment, ...PictBridge compliant print mode on the ink tank flashes.) Replace the ink tank and close the Scanning Unit (Printer Cover). The remaining ink level cannot be correctly detected. With this condition, ...
MP610 series Quick Start Guide
Page 83
...the ink tank is not ready. (1)Click the printer icon in the Dock to delete them. (1)Open the printer properties dialog box. Open the Scanning Unit (Printer Cover) and check the ink lamps. The print jobs are any unnecessary print jobs, follow the procedure below to display the list... v.10.2.8, click the printer icon in proper position. Confirm that the ink tanks are installed in the User's Guide on page 46. Open the Scanning Unit (Printer Cover) and check the ink lamps. The printer status monitor is not installed securely. Ink tank not installed in the Dock to "...
...the ink tank is not ready. (1)Click the printer icon in the Dock to delete them. (1)Open the printer properties dialog box. Open the Scanning Unit (Printer Cover) and check the ink lamps. The print jobs are any unnecessary print jobs, follow the procedure below to display the list... v.10.2.8, click the printer icon in proper position. Confirm that the ink tanks are installed in the User's Guide on page 46. Open the Scanning Unit (Printer Cover) and check the ink lamps. The printer status monitor is not installed securely. Ink tank not installed in the Dock to "...

MP610 series Quick Start Guide
Page 86
...jammed paper as it back on page 8. Landscape credit card-sized paper jammed inside the machine, open the Scanning Unit (Printer Cover) and remove it in step (1), all paper, close the Scanning Unit (Printer Cover), turn it ejects. Note z For details on how to load paper, see "... (1)Load a single sheet of text. If you cannot remove the jammed paper or the paper jam error continues after removing the paper, contact your Canon service representative. 82 Troubleshooting z If the paper tears and a piece remains inside the machine. Do not load it . z A5-sized paper are ...
...jammed paper as it back on page 8. Landscape credit card-sized paper jammed inside the machine, open the Scanning Unit (Printer Cover) and remove it in step (1), all paper, close the Scanning Unit (Printer Cover), turn it ejects. Note z For details on how to load paper, see "... (1)Load a single sheet of text. If you cannot remove the jammed paper or the paper jam error continues after removing the paper, contact your Canon service representative. 82 Troubleshooting z If the paper tears and a piece remains inside the machine. Do not load it . z A5-sized paper are ...
MP610 series Quick Start Guide
Page 93
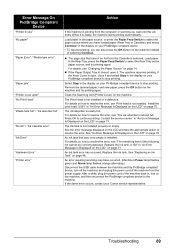
... power supply. See "An Error Message Is Displayed on the LCD" on page 71. For details on the machine. The machine resumes printing. Close the Scanning Unit (Printer Cover) on how to resolve the error, see "The ink absorber is not installed. The Print Head is not installed or is nearly... installed. The ink tank is ready, the machine starts printing automatically. Install the print head. When it and select Stop in the display on your Canon service representative. See the error message displayed on the machine and try printing again.
... power supply. See "An Error Message Is Displayed on the LCD" on page 71. For details on the machine. The machine resumes printing. Close the Scanning Unit (Printer Cover) on how to resolve the error, see "The ink absorber is not installed. The Print Head is not installed or is nearly... installed. The ink tank is ready, the machine starts printing automatically. Install the print head. When it and select Stop in the display on your Canon service representative. See the error message displayed on the machine and try printing again.
MP610 series Quick Start Guide
Page 94
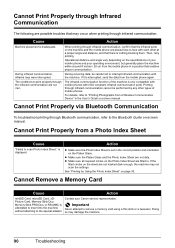
...enables proper communication. Then, retry printing. Action z Make sure the Photo Index Sheet is attempted to insert into the machine without attaching to scan Photo Index Sheet." See "Printing by any other at a proper angle and distance, and that the infrared ports on page 33. Operational...and angle vary depending on the Platen Glass. If it is displayed. The infrared communication function of your mobile phone and your Canon service representative. is interrupted, send the data from the mobile phone in the correct position and orientation on the specifications of the ...
...enables proper communication. Then, retry printing. Action z Make sure the Photo Index Sheet is attempted to insert into the machine without attaching to scan Photo Index Sheet." See "Printing by any other at a proper angle and distance, and that the infrared ports on page 33. Operational...and angle vary depending on the Platen Glass. If it is displayed. The infrared communication function of your mobile phone and your Canon service representative. is interrupted, send the data from the mobile phone in the correct position and orientation on the specifications of the ...


