User's Guide
Page 4
...Memory Card Drive Of The Computer...50 5 Printing From Your Computer 52 Printing With Windows 52 Printing With Macintosh 55 6 Scanning Images 58 About Scanning Images 58 Scanning Methods 58 7 Printing Photographs Directly From A Digital Camera 61 Printing Photographs Directly From A PictBridge-Compliant Device ...........61 8...74 Save Settings 74 Load Settings 74 10 Routine Maintenance 75 Replacing A FINE Cartridge 75 When Printing Becomes Faint Or Color Is Incorrect 84 Printing The Nozzle Check Pattern 85 FINE Cartridge Cleaning 89 FINE Cartridge Deep Cleaning 90 Aligning The ...
...Memory Card Drive Of The Computer...50 5 Printing From Your Computer 52 Printing With Windows 52 Printing With Macintosh 55 6 Scanning Images 58 About Scanning Images 58 Scanning Methods 58 7 Printing Photographs Directly From A Digital Camera 61 Printing Photographs Directly From A PictBridge-Compliant Device ...........61 8...74 Save Settings 74 Load Settings 74 10 Routine Maintenance 75 Replacing A FINE Cartridge 75 When Printing Becomes Faint Or Color Is Incorrect 84 Printing The Nozzle Check Pattern 85 FINE Cartridge Cleaning 89 FINE Cartridge Deep Cleaning 90 Aligning The ...
User's Guide
Page 9
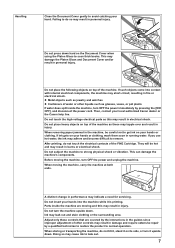
Handling Close the Document Cover gently to scan thick books. Do not press down hard on top of water or other controls may result in damage and require extensive repair by a qualified technician ... electrical shock. Do not insert your hands or clothing, wash them soon in injury. Do not place the following objects on your local authorized Canon dealer or the Canon help line. If such objects come into the machine while it upside down . Then, contact your hands or clothing. Before moving the machine...
Handling Close the Document Cover gently to scan thick books. Do not press down hard on top of water or other controls may result in damage and require extensive repair by a qualified technician ... electrical shock. Do not insert your hands or clothing, wash them soon in injury. Do not place the following objects on your local authorized Canon dealer or the Canon help line. If such objects come into the machine while it upside down . Then, contact your hands or clothing. Before moving the machine...
User's Guide
Page 11
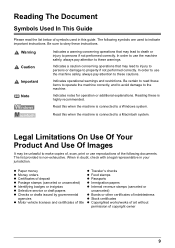
... may lead to injury to persons or damage to the machine. In order to use the machine safely, always pay attention to make copies of, scan, print or use the machine safely, always pay attention to persons if not performed correctly. Indicates operational warnings and restrictions. Legal Limitations On Use Of...
... may lead to injury to persons or damage to the machine. In order to use the machine safely, always pay attention to make copies of, scan, print or use the machine safely, always pay attention to persons if not performed correctly. Indicates operational warnings and restrictions. Legal Limitations On Use Of...
User's Guide
Page 13
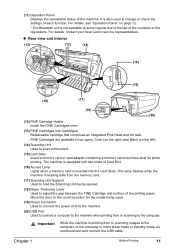
... Color (on the right) and Black (on page 12. * The Bluetooth unit is also used . (19) Power Connector Used to connect the power cord to the machine. (20) USB Port Used to connect a computer to the machine when printing from or scanning ... equipped with two kinds of the countries or the regulations. Important While the machine is printing from or scanning to the computer, or the computer is inserted into these slots for the media being opened. (18) Paper Thickness Lever... due to change or check the settings of the machine. For details, contact your local Canon service representatives.
... Color (on the right) and Black (on page 12. * The Bluetooth unit is also used . (19) Power Connector Used to connect the power cord to the machine. (20) USB Port Used to connect a computer to the machine when printing from or scanning ... equipped with two kinds of the countries or the regulations. Important While the machine is printing from or scanning to the computer, or the computer is inserted into these slots for the media being opened. (18) Paper Thickness Lever... due to change or check the settings of the machine. For details, contact your local Canon service representatives.
User's Guide
Page 14
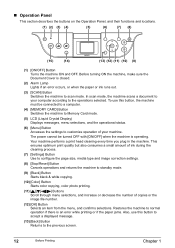
...OFF] when the machine is closed. (2) Alarm Lamp Lights if an error occurs, or when the paper or ink runs out. (3) [SCAN] Button Switches the machine to the operations selected. This ensures optimum print quality but also consumes a small amount of ink during the cleaning ... standby mode. (9) [Black] Button Starts black & white copying. (10) [Color] Button Starts color copying, color photo printing. (11 Buttons Scroll through menu selections, and increase or decrease the number of your computer according to scan mode. The power cannot be connected to a computer. (4) [MEMORY CARD] Button...
...OFF] when the machine is closed. (2) Alarm Lamp Lights if an error occurs, or when the paper or ink runs out. (3) [SCAN] Button Switches the machine to the operations selected. This ensures optimum print quality but also consumes a small amount of ink during the cleaning ... standby mode. (9) [Black] Button Starts black & white copying. (10) [Color] Button Starts color copying, color photo printing. (11 Buttons Scroll through menu selections, and increase or decrease the number of your computer according to scan mode. The power cannot be connected to a computer. (4) [MEMORY CARD] Button...
User's Guide
Page 17
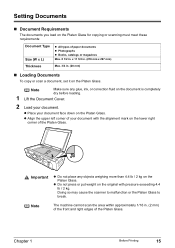
...right edges of paper documents z Photographs z Books, catalogs or magazines Max. 8 1/2 in . (20 mm) „ Loading Documents To copy or scan a document, set it on the Platen Glass. Chapter 1 Before Printing 15 Setting Documents „ Document Requirements The documents you load on the Platen ...Glass for copying or scanning must meet these requirements: Document Type Size (W x L) Thickness z All types of the Platen Glass. Important z Do not place any ...
...right edges of paper documents z Photographs z Books, catalogs or magazines Max. 8 1/2 in . (20 mm) „ Loading Documents To copy or scan a document, set it on the Platen Glass. Chapter 1 Before Printing 15 Setting Documents „ Document Requirements The documents you load on the Platen ...Glass for copying or scanning must meet these requirements: Document Type Size (W x L) Thickness z All types of the Platen Glass. Important z Do not place any ...

User's Guide
Page 18
... (Max. 3/4 in a place where the temperature and humidity are low. or 64 g/m2) z Very thick paper (more than 17 lb. or 105 g/m2) other than Canon genuine paper z Postcards with photographs or stickers adhered to them z Envelopes made with embossed or treated surfaces „ Handling Paper z Hold the paper as books...
... (Max. 3/4 in a place where the temperature and humidity are low. or 64 g/m2) z Very thick paper (more than 17 lb. or 105 g/m2) other than Canon genuine paper z Postcards with photographs or stickers adhered to them z Envelopes made with embossed or treated surfaces „ Handling Paper z Hold the paper as books...
User's Guide
Page 44
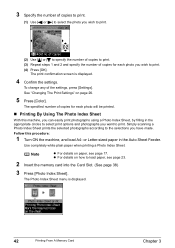
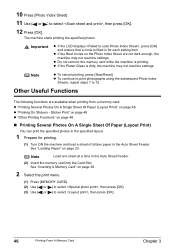
... to specify the number of copies to print. (3) Repeat steps 1 and 2 and specify the number of the settings, press [Settings]. Simply scanning a Photo Index Sheet prints the selected photographs according to load paper, see page 17. or Letter-sized paper in the appropriate circles to select ...The Print Settings" on how to the selections you want to print. (4) Press [OK]. z For details on page 26. 5 Press [Color]. Use completely white plain paper when printing a Photo Index Sheet. The print confirmation screen is displayed. 42 Printing From A Memory Card Chapter 3...
... to specify the number of copies to print. (3) Repeat steps 1 and 2 and specify the number of the settings, press [Settings]. Simply scanning a Photo Index Sheet prints the selected photographs according to load paper, see page 17. or Letter-sized paper in the appropriate circles to select ...The Print Settings" on how to the selections you want to print. (4) Press [OK]. z For details on page 26. 5 Press [Color]. Use completely white plain paper when printing a Photo Index Sheet. The print confirmation screen is displayed. 42 Printing From A Memory Card Chapter 3...
User's Guide
Page 48
z Do not remove the memory card while the machine is filled in for printing. (1) Turn ON the machine and load a sheet of sticker paper in the Auto Sheet Feeder. (2) Insert the memory card into the Card Slot. Note z To cancel printing, press [Stop/Reset]. See "Loading Paper" on page 38. 2 Select the print menu. (1) Press [MEMORY CARD]. (2) Use [ ] or [ ] to select , then press [OK]. (3) Use [ ] or [ ] to select , then press [OK]. 46 Printing From A Memory Card Chapter 3 z To continue to print photographs using the subsequent Photo Index Sheets, repeat steps 7 to select , then...
z Do not remove the memory card while the machine is filled in for printing. (1) Turn ON the machine and load a sheet of sticker paper in the Auto Sheet Feeder. (2) Insert the memory card into the Card Slot. Note z To cancel printing, press [Stop/Reset]. See "Loading Paper" on page 38. 2 Select the print menu. (1) Press [MEMORY CARD]. (2) Use [ ] or [ ] to select , then press [OK]. (3) Use [ ] or [ ] to select , then press [OK]. 46 Printing From A Memory Card Chapter 3 z To continue to print photographs using the subsequent Photo Index Sheets, repeat steps 7 to select , then...
User's Guide
Page 60
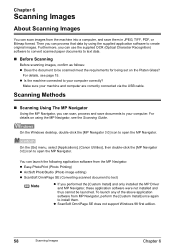
... the Windows desktop, double-click the [MP Navigator 3.0] icon to your computer. On the [Go] menu, select [Applications], [Canon Utilities], then double-click the [MP Navigator 3.0] icon to text) Note z If you can scan images from the machine into a computer, and save documents to be launched. z Easy-PhotoPrint (Photo Printing) z ArcSoft PhotoStudio...
... the Windows desktop, double-click the [MP Navigator 3.0] icon to your computer. On the [Go] menu, select [Applications], [Canon Utilities], then double-click the [MP Navigator 3.0] icon to text) Note z If you can scan images from the machine into a computer, and save documents to be launched. z Easy-PhotoPrint (Photo Printing) z ArcSoft PhotoStudio...
User's Guide
Page 61
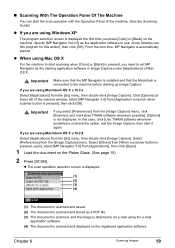
... select [Preferences] from the [Image Capture] menu. If you are using Mac OS X For the machine to start scanning when [Color] or [Black] is scanned and displayed on the Platen Glass. (See page 15) 2 Press [SCAN]. In this action], then click [OK]. Select [Preferences] from the [Image Capture] menu, click [Scanner], and mark [Use...
... select [Preferences] from the [Image Capture] menu. If you are using Mac OS X For the machine to start scanning when [Color] or [Black] is scanned and displayed on the Platen Glass. (See page 15) 2 Press [SCAN]. In this action], then click [OK]. Select [Preferences] from the [Image Capture] menu, click [Scanner], and mark [Use...
User's Guide
Page 62
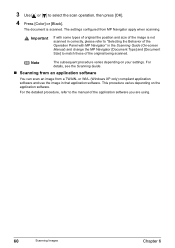
... Size] to the manual of the image is scanned. For details, see the Scanning Guide. „ Scanning from an application software You can scan an image from MP Navigator apply when scanning. The document is not scanned in correctly, please refer to select the scan operation, then press [OK]. 4 Press [Color] or [Black]. The settings configured from a TWAIN...
... Size] to the manual of the image is scanned. For details, see the Scanning Guide. „ Scanning from an application software You can scan an image from MP Navigator apply when scanning. The document is not scanned in correctly, please refer to select the scan operation, then press [OK]. 4 Press [Color] or [Black]. The settings configured from a TWAIN...
User's Guide
Page 77
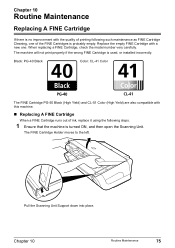
... number very carefully. The FINE Cartridge Holder moves to the left. Pull the Scanning Unit Support down into place. Black: PG-40 Black Color: CL-41 Color The FINE Cartridge PG-50 Black (High Yield) and CL-51 Color (High Yield) are also compatible with this machine. „ Replacing A FINE... the empty FINE Cartridge with a new one of printing following steps. 1 Ensure that the machine is turned ON, and then open the Scanning Unit. Chapter 10 Routine Maintenance Replacing A FINE Cartridge If there is no improvement with the quality of the FINE Cartridges is probably empty. Chapter...
... number very carefully. The FINE Cartridge Holder moves to the left. Pull the Scanning Unit Support down into place. Black: PG-40 Black Color: CL-41 Color The FINE Cartridge PG-50 Black (High Yield) and CL-51 Color (High Yield) are also compatible with this machine. „ Replacing A FINE... the empty FINE Cartridge with a new one of printing following steps. 1 Ensure that the machine is turned ON, and then open the Scanning Unit. Chapter 10 Routine Maintenance Replacing A FINE Cartridge If there is no improvement with the quality of the FINE Cartridges is probably empty. Chapter...
User's Guide
Page 80
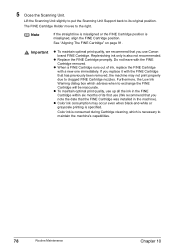
...not print properly due to clogged FINE Cartridge nozzles. Color ink is consumed during Cartridge cleaning, which advises when to its first use (We recommend that you use up all the ink in the machine). 5 Close the Scanning Unit. If you replace it with the FINE ...or grayscale printing is misaligned, align the FINE Cartridge position. z Replace the FINE Cartridge promptly. z To maintain optimal print quality, use Canon brand FINE Cartridge. The FINE Cartridge Holder moves to maintain the machine's capabilities. 78 Routine Maintenance Chapter 10 Note If the straight line ...
...not print properly due to clogged FINE Cartridge nozzles. Color ink is consumed during Cartridge cleaning, which advises when to its first use (We recommend that you use up all the ink in the machine). 5 Close the Scanning Unit. If you replace it with the FINE ...or grayscale printing is misaligned, align the FINE Cartridge position. z Replace the FINE Cartridge promptly. z To maintain optimal print quality, use Canon brand FINE Cartridge. The FINE Cartridge Holder moves to maintain the machine's capabilities. 78 Routine Maintenance Chapter 10 Note If the straight line ...
User's Guide
Page 81
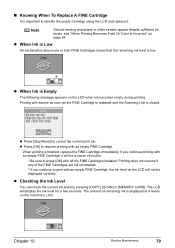
...[OK] with an empty FINE Cartridge. Note Should missing characters or white streaks appear despite sufficient ink levels, see "When Printing Becomes Faint Or Color Is Incorrect" on the LCD will display the ink level for a few seconds. Printing will be displayed correctly. The amount of remaining ink is...z Press [OK] to identify the empty Cartridge using the LCD and replace it will resume as soon as the FINE Cartridge is replaced and the Scanning Unit is displayed at 4 levels on the LCD when ink becomes empty during printing. „ Knowing When To Replace A FINE Cartridge It is ...
...[OK] with an empty FINE Cartridge. Note Should missing characters or white streaks appear despite sufficient ink levels, see "When Printing Becomes Faint Or Color Is Incorrect" on the LCD will display the ink level for a few seconds. Printing will be displayed correctly. The amount of remaining ink is...z Press [OK] to identify the empty Cartridge using the LCD and replace it will resume as soon as the FINE Cartridge is replaced and the Scanning Unit is displayed at 4 levels on the LCD when ink becomes empty during printing. „ Knowing When To Replace A FINE Cartridge It is ...
User's Guide
Page 91
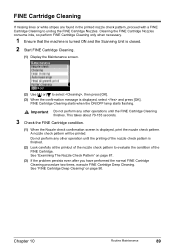
... 90. Cleaning the FINE Cartridge Nozzles consume inks, so perform FINE Cartridge Cleaning only when necessary. 1 Ensure that the machine is turned ON and the Scanning Unit is closed. 2 Start FINE Cartridge Cleaning. (1) Display the Maintenance screen. (2) Use [ ] or [ ] to select , then press [OK]. (3) When the confirmation message is displayed, print...
... 90. Cleaning the FINE Cartridge Nozzles consume inks, so perform FINE Cartridge Cleaning only when necessary. 1 Ensure that the machine is turned ON and the Scanning Unit is closed. 2 Start FINE Cartridge Cleaning. (1) Display the Maintenance screen. (2) Use [ ] or [ ] to select , then press [OK]. (3) When the confirmation message is displayed, print...
User's Guide
Page 92
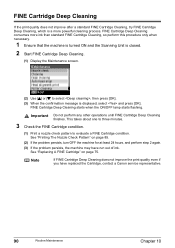
... Cleaning consumes more ink than standard FINE Cartridge Cleaning, so perform this procedure only when necessary. 1 Ensure that the machine is turned ON and the Scanning Unit is closed. 2 Start FINE Cartridge Deep Cleaning. (1) Display the Maintenance screen. (2) Use [ ] or [ ] to evaluate a FINE Cartridge condition. See "Replacing A FINE Cartridge" on page..., turn OFF the machine for at least 24 hours, and perform step 2 again. (3) If the problem persists, the machine may have replaced the Cartridge, contact a Canon service representative. 90 Routine Maintenance Chapter 10
... Cleaning consumes more ink than standard FINE Cartridge Cleaning, so perform this procedure only when necessary. 1 Ensure that the machine is turned ON and the Scanning Unit is closed. 2 Start FINE Cartridge Deep Cleaning. (1) Display the Maintenance screen. (2) Use [ ] or [ ] to evaluate a FINE Cartridge condition. See "Replacing A FINE Cartridge" on page..., turn OFF the machine for at least 24 hours, and perform step 2 again. (3) If the problem persists, the machine may have replaced the Cartridge, contact a Canon service representative. 90 Routine Maintenance Chapter 10
User's Guide
Page 94
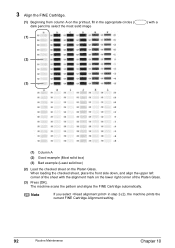
... If you select in the appropriate circles ( dark pencil to select the most solid image (1) ) with the alignment mark on the Platen Glass. The machine scans the pattern and aligns the FINE Cartridge automatically. 3 Align the FINE Cartridge. (1) Beginning from column A on the printout, fill in step 2-(2), the machine prints the...
... If you select in the appropriate circles ( dark pencil to select the most solid image (1) ) with the alignment mark on the Platen Glass. The machine scans the pattern and aligns the FINE Cartridge automatically. 3 Align the FINE Cartridge. (1) Beginning from column A on the printout, fill in step 2-(2), the machine prints the...
User's Guide
Page 95
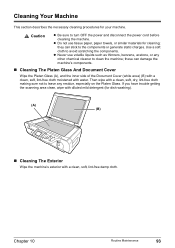
If you have trouble getting the scanning area clean, wipe with diluted mild detergent (for your machine. z Never use tissue paper, paper towels, or similar materials for cleaning; Chapter 10 Routine Maintenance ...
If you have trouble getting the scanning area clean, wipe with diluted mild detergent (for your machine. z Never use tissue paper, paper towels, or similar materials for cleaning; Chapter 10 Routine Maintenance ...
User's Guide
Page 99
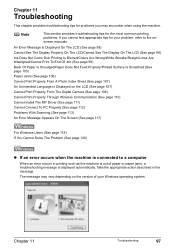
... See The Display Properly On The LCD/Cannot See The Display On The LCD (See page 99) Ink Does Not Come Out/ Printing Is Blurred/Colors Are Wrong/White Streaks/Straight Lines Are Misaligned/Cannot Print To End Of Job (See page 99) Back Of Paper Is Smudged/Paper Does Not... Properly Through Wireless Communication (See page 110) Cannot Install The MP Driver (See page 111) Cannot Connect To PC Properly (See page 112) Problems With Scanning (See page 113) An Error Message Appears On The Screen (See page 117) For Windows Users (See page 119) If You Cannot Solve The Problem...
... See The Display Properly On The LCD/Cannot See The Display On The LCD (See page 99) Ink Does Not Come Out/ Printing Is Blurred/Colors Are Wrong/White Streaks/Straight Lines Are Misaligned/Cannot Print To End Of Job (See page 99) Back Of Paper Is Smudged/Paper Does Not... Properly Through Wireless Communication (See page 110) Cannot Install The MP Driver (See page 111) Cannot Connect To PC Properly (See page 112) Problems With Scanning (See page 113) An Error Message Appears On The Screen (See page 117) For Windows Users (See page 119) If You Cannot Solve The Problem...


