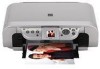
User's Guide
Page 4
... ..........69 9 Changing The Machine Settings .......... 71 Changing The Machine Settings 71 Print Settings 72 Wireless Print Settings 72 Bluetooth Settings 73 Other Settings 73 Language Selection 74 Reset Setting 74 Save Settings 74 Load Settings 74 10 Routine Maintenance 75 Replacing A FINE Cartridge 75 When Printing Becomes Faint Or Color Is Incorrect 84 Printing The Nozzle Check Pattern 85 FINE Cartridge Cleaning 89 FINE Cartridge Deep Cleaning 90 Aligning The FINE Cartridge 91 Cleaning Your Machine 93 11 Troubleshooting 97 An Error Message Is Displayed On The LCD...
... ..........69 9 Changing The Machine Settings .......... 71 Changing The Machine Settings 71 Print Settings 72 Wireless Print Settings 72 Bluetooth Settings 73 Other Settings 73 Language Selection 74 Reset Setting 74 Save Settings 74 Load Settings 74 10 Routine Maintenance 75 Replacing A FINE Cartridge 75 When Printing Becomes Faint Or Color Is Incorrect 84 Printing The Nozzle Check Pattern 85 FINE Cartridge Cleaning 89 FINE Cartridge Deep Cleaning 90 Aligning The FINE Cartridge 91 Cleaning Your Machine 93 11 Troubleshooting 97 An Error Message Is Displayed On The LCD...
User's Guide
Page 7
... or modify the machine. Do not block or cover the ventilation port or any openings on , the FINE Cartridge is on the machine with high-voltage parts inside of the noise emitted by the fluorescent lighting. Installing in the machine, turn OFF the power and unplug the power cord immediately with fluorescent lighting. If these safety precautions. If you ignore any maintenance procedure not described...
... or modify the machine. Do not block or cover the ventilation port or any openings on , the FINE Cartridge is on the machine with high-voltage parts inside of the noise emitted by the fluorescent lighting. Installing in the machine, turn OFF the power and unplug the power cord immediately with fluorescent lighting. If these safety precautions. If you ignore any maintenance procedure not described...
User's Guide
Page 13
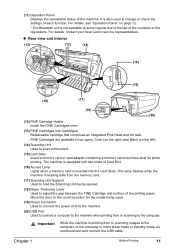
...) Power Connector Used to connect the power cord to the machine. (20) USB Port Used to connect a computer to the machine when printing from or scanning images to adjust the gap between the FINE Cartridge and surface of the printing paper. FINE Cartridges are available in two types, Color (on the right) and Black (on page 12. * The Bluetooth unit is in the sleep mode or standby mode, do not disconnect and connect the USB cable. (11) Operation Panel Displays the operational status...
...) Power Connector Used to connect the power cord to the machine. (20) USB Port Used to connect a computer to the machine when printing from or scanning images to adjust the gap between the FINE Cartridge and surface of the printing paper. FINE Cartridges are available in two types, Color (on the right) and Black (on page 12. * The Bluetooth unit is in the sleep mode or standby mode, do not disconnect and connect the USB cable. (11) Operation Panel Displays the operational status...

User's Guide
Page 28
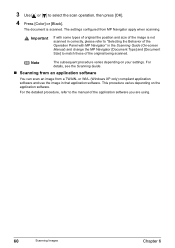
... Settings screen is displayed. 2 Select the Setting tab. (1) Use [ ] or [ ] to select the Setting tab. Select tab 1. 26 Before Printing Chapter 1 z How to change the print settings such as an example. Changing The Print Settings This section describes the setting items that can be specified in the Settings screen. „ To Change Print Settings You can change the Settings screen This section describes the steps to specify the page size for Memory card mode to as page size, media type...
... Settings screen is displayed. 2 Select the Setting tab. (1) Use [ ] or [ ] to select the Setting tab. Select tab 1. 26 Before Printing Chapter 1 z How to change the print settings such as an example. Changing The Print Settings This section describes the setting items that can be specified in the Settings screen. „ To Change Print Settings You can change the Settings screen This section describes the steps to specify the page size for Memory card mode to as page size, media type...
User's Guide
Page 58
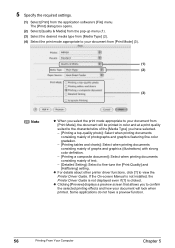
... the On-screen Manual is not installed, the Printer Driver Guide is not displayed even if [?] is clicked. 5 Specify the required settings. (1) Select [Print] from [Print Mode], the document will be printed in color and at a print quality suited to the characteristics of text. - [Detailed Setting]: Select to fine-tune the [Print Quality] and [Halftoning] setting. Some applications do not have selected. - [Printing a top-quality photo]: Select when printing documents consisting mainly...
... the On-screen Manual is not installed, the Printer Driver Guide is not displayed even if [?] is clicked. 5 Specify the required settings. (1) Select [Print] from [Print Mode], the document will be printed in color and at a print quality suited to the characteristics of text. - [Detailed Setting]: Select to fine-tune the [Print Quality] and [Halftoning] setting. Some applications do not have selected. - [Printing a top-quality photo]: Select when printing documents consisting mainly...
User's Guide
Page 59
... can cancel a print job in progress, select the desired document, then click [Delete]. To temporarily stop all the jobs in the list, click [Stop Jobs] (when using Mac OS X 10.2.8, double-clicking the name of your machine in the [Printer List] of the [Print Center]) displays a dialog that prompts you to confirm the status of the [Printer Setup Utility] (When using Mac OS X v.10.3.x or Mac OS X v.10.2.8, click [Stop Printing]). To stop a job in the [Printer List] of the print job. z Double-clicking the...
... can cancel a print job in progress, select the desired document, then click [Delete]. To temporarily stop all the jobs in the list, click [Stop Jobs] (when using Mac OS X 10.2.8, double-clicking the name of your machine in the [Printer List] of the [Print Center]) displays a dialog that prompts you to confirm the status of the [Printer Setup Utility] (When using Mac OS X v.10.3.x or Mac OS X v.10.2.8, click [Stop Printing]). To stop a job in the [Printer List] of the print job. z Double-clicking the...
User's Guide
Page 60
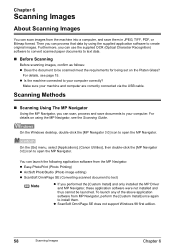
... application software to your machine and computer are correctly connected via the USB cable. For details, see the Scanning Guide. Make sure your computer correctly? You can launch the following application software from MP Navigator, perform the [Custom Install] once again to text) Note z If you can use the supplied OCR (Optical Character Recognition) software to convert scanned paper documents to text data. „ Before Scanning Before scanning images, confirm as...
... application software to your machine and computer are correctly connected via the USB cable. For details, see the Scanning Guide. Make sure your computer correctly? You can launch the following application software from MP Navigator, perform the [Custom Install] once again to text) Note z If you can use the supplied OCR (Optical Character Recognition) software to convert scanned paper documents to text data. „ Before Scanning Before scanning images, confirm as...
User's Guide
Page 61
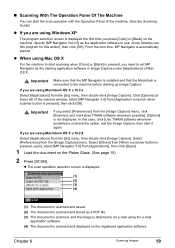
...] menu. „ Scanning With The Operation Panel Of The Machine You can start the scan operation with the Operation Panel of the machine. (See the Scanning Guide) z If you are using Windows XP The program selection screen is pressed], then click [OK]. Specify [MP Navigator Ver.3.0] as a PDF file. (3) The document is scanned, and the image is attached to launch when scanner button is displayed the first time you press [Color] or [Black] on the Platen Glass. (See page...
...] menu. „ Scanning With The Operation Panel Of The Machine You can start the scan operation with the Operation Panel of the machine. (See the Scanning Guide) z If you are using Windows XP The program selection screen is pressed], then click [OK]. Specify [MP Navigator Ver.3.0] as a PDF file. (3) The document is scanned, and the image is attached to launch when scanner button is displayed the first time you press [Color] or [Black] on the Platen Glass. (See page...
User's Guide
Page 62
... original being scanned. The settings configured from a TWAIN- or WIA- (Windows XP only) compliant application software and use the image in the Scanning Guide (On-screen Manual) and change the MP Navigator [Document Type] and [Document Size] to "Selecting the Behavior of the Operation Panel with some types of original the position and size of the image is scanned. For details, see the Scanning Guide. „ Scanning from an application software You can scan an image from MP...
... original being scanned. The settings configured from a TWAIN- or WIA- (Windows XP only) compliant application software and use the image in the Scanning Guide (On-screen Manual) and change the MP Navigator [Document Type] and [Document Size] to "Selecting the Behavior of the Operation Panel with some types of original the position and size of the image is scanned. For details, see the Scanning Guide. „ Scanning from an application software You can scan an image from MP...
User's Guide
Page 99
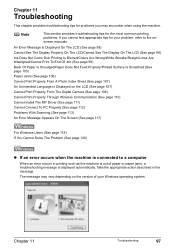
... Print Properly Through Wireless Communication (See page 110) Cannot Install The MP Driver (See page 111) Cannot Connect To PC Properly (See page 112) Problems With Scanning (See page 113) An Error Message Appears On The Screen (See page 117) For Windows Users (See page 119) If You Cannot Solve The Problem (See page 120) z If an error occurs when the machine is displayed automatically. Chapter 11 Troubleshooting This chapter provides troubleshooting tips for your Windows operating...
... Print Properly Through Wireless Communication (See page 110) Cannot Install The MP Driver (See page 111) Cannot Connect To PC Properly (See page 112) Problems With Scanning (See page 113) An Error Message Appears On The Screen (See page 117) For Windows Users (See page 119) If You Cannot Solve The Problem (See page 120) z If an error occurs when the machine is displayed automatically. Chapter 11 Troubleshooting This chapter provides troubleshooting tips for your Windows operating...
User's Guide
Page 100
... connecting the device to use new genuine Canon Cartridges in the Printer Driver Guide. Action z There are not installed in the machine correctly and then press [OK]. If paper has jammed in the machine, clear the jam, reload the paper in place. The machine may also have run out. The following ink may not be correctly detected. Some ink cartridges are only invalid images on page 75. See "Replacing A FINE Cartridge" on the memory card. Contact the service center. Printing...
... connecting the device to use new genuine Canon Cartridges in the Printer Driver Guide. Action z There are not installed in the machine correctly and then press [OK]. If paper has jammed in the machine, clear the jam, reload the paper in place. The machine may also have run out. The following ink may not be correctly detected. Some ink cartridges are only invalid images on page 75. See "Replacing A FINE Cartridge" on the memory card. Contact the service center. Printing...
User's Guide
Page 110
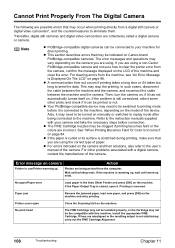
... printing mode before connection. Paper jam Remove the jammed paper, load new paper, and press [OK] on . If lines are incorrect. Then, turn the camera on the machine. Also, it . If the Paper Output Tray is scratched during printing, make sure that may need to the user's manual of the camera. If the machine is resumed. Printer cover open it may be turned on Canon-brand PictBridge-compatible cameras. Wait until warm-up Photos are being connected to the instruction manuals...
... printing mode before connection. Paper jam Remove the jammed paper, load new paper, and press [OK] on . If lines are incorrect. Then, turn the camera on the machine. Also, it . If the Paper Output Tray is scratched during printing, make sure that may need to the user's manual of the camera. If the machine is resumed. Printer cover open it may be turned on Canon-brand PictBridge-compatible cameras. Wait until warm-up Photos are being connected to the instruction manuals...
User's Guide
Page 113
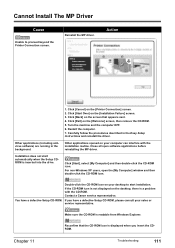
... 11 Troubleshooting 111 For non-Windows XP users, open software applications before reinstalling the MP driver. Installation does not start installation. Double-click the CD-ROM icon on your sales or service representative. Action Other applications (including antivirus software) are running in the Easy Setup Instructions and reinstall the driver. Other applications opened on the [Printer Connection] screen. 2. Cannot Install The MP Driver Cause Unable to start automatically when the Setup CDROM is not displayed...
... 11 Troubleshooting 111 For non-Windows XP users, open software applications before reinstalling the MP driver. Installation does not start installation. Double-click the CD-ROM icon on your sales or service representative. Action Other applications (including antivirus software) are running in the Easy Setup Instructions and reinstall the driver. Other applications opened on the [Printer Connection] screen. 2. Cannot Install The MP Driver Cause Unable to start automatically when the Setup CDROM is not displayed...
User's Guide
Page 119
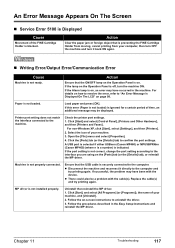
.... Load paper and press [OK]. Check the printer port settings. 1. If successful, the problem may have occurred in the Easy Setup Instructions and reinstall the MP driver. z There could also be displayed. Uninstall then reinstall the MP driver. 1. Open the [File] menu and select [Properties]. 4. A USB port is selected if either USBnnn (Canon MP460) or MPUSBPRNnn (Canon MP460) (where n is a number) is not loaded. Follow the procedures described in the machine. Chapter 11 Troubleshooting 117...
.... Load paper and press [OK]. Check the printer port settings. 1. If successful, the problem may have occurred in the Easy Setup Instructions and reinstall the MP driver. z There could also be displayed. Uninstall then reinstall the MP driver. 1. Open the [File] menu and select [Properties]. 4. A USB port is selected if either USBnnn (Canon MP460) or MPUSBPRNnn (Canon MP460) (where n is a number) is not loaded. Follow the procedures described in the machine. Chapter 11 Troubleshooting 117...

User's Guide
Page 128
... Black printing (text pattern) Max Speed (Custom Setting 5): 22 ppm Standard: 13.4 ppm Color printing Max Speed (Custom Setting 5): 17 ppm Standard: 7.8 ppm 203.2 mm max. (8.0 in) (for Borderless Printing: 216.0 mm/8.5 in) Resident print control mode Receive buffer Canon extended mode 43 KB Interface USB 2.0 Hi-Speed / Direct Print Port / IrDA / Bluetooth1.2 (Option) Acoustic noise level Approx. 45 dB (A) (when printing in the highest print quality mode on system configuration, software, document complexity, print mode and page coverage. Specifications Printing...
... Black printing (text pattern) Max Speed (Custom Setting 5): 22 ppm Standard: 13.4 ppm Color printing Max Speed (Custom Setting 5): 17 ppm Standard: 7.8 ppm 203.2 mm max. (8.0 in) (for Borderless Printing: 216.0 mm/8.5 in) Resident print control mode Receive buffer Canon extended mode 43 KB Interface USB 2.0 Hi-Speed / Direct Print Port / IrDA / Bluetooth1.2 (Option) Acoustic noise level Approx. 45 dB (A) (when printing in the highest print quality mode on system configuration, software, document complexity, print mode and page coverage. Specifications Printing...
User's Guide
Page 129
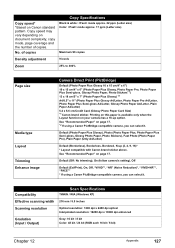
...'s setting), Off Default (ExifPrint), On, Off, "VIVID"*, "NR" (Noise Reduction)*, "VIVID+NR"*, "FACE"* * If using a Canon PictBridge-compatible camera, you can select it . Copy speed* *Based on document complexity, copy mode, page coverage and the number of copies Copy Specifications Black & white: mode approx. 22 ppm (Letter size) Color: mode approx. 17 ppm (Letter size) Maximum 99 copies Density adjustment 9 levels Zoom 25% to 400% Page size Media type Layout Trimming Enhance image Camera Direct Print (PictBridge) Default (Photo Paper Plus...
...'s setting), Off Default (ExifPrint), On, Off, "VIVID"*, "NR" (Noise Reduction)*, "VIVID+NR"*, "FACE"* * If using a Canon PictBridge-compatible camera, you can select it . Copy speed* *Based on document complexity, copy mode, page coverage and the number of copies Copy Specifications Black & white: mode approx. 22 ppm (Letter size) Color: mode approx. 17 ppm (Letter size) Maximum 99 copies Density adjustment 9 levels Zoom 25% to 400% Page size Media type Layout Trimming Enhance image Camera Direct Print (PictBridge) Default (Photo Paper Plus...
User's Guide
Page 130
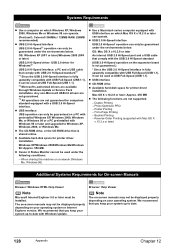
...; 566MHz / 128MB RAM: 256MB recommended) z USB 2.0 Hi-Speed interface USB 2.0 Hi-Speed*1 operation can only be used at USB Full-Speed (USB 1.1). *2 Microsoft's authorized drivers are available through Windows Update or Service Pack installation. OS: Mac OS X v.10.2.8 or later An internal USB 2.0 Hi-Speed port and a USB cable that you keep your system up to date. 128 Appendix Chapter 12 Duplex Printing - Booklet Printing - We recommend that you keep your system up to -Page Printing -
...; 566MHz / 128MB RAM: 256MB recommended) z USB 2.0 Hi-Speed interface USB 2.0 Hi-Speed*1 operation can only be used at USB Full-Speed (USB 1.1). *2 Microsoft's authorized drivers are available through Windows Update or Service Pack installation. OS: Mac OS X v.10.2.8 or later An internal USB 2.0 Hi-Speed port and a USB cable that you keep your system up to date. 128 Appendix Chapter 12 Duplex Printing - Booklet Printing - We recommend that you keep your system up to -Page Printing -
User's Guide
Page 136
... Buttons 12 A Access Lamp 11 Alarm Lamp 12 Auto Sheet Feeder 10 B Back Button 12 Black Button 12 C Card Slot Cover 10 Card Slots 11 Changing Copy Settings 33 Changing The Print Settings 26 Copy mode 28 Memory card mode 29 Cleaning 93 Bottom Plate 95 Exterior 93 Platen Glass And Document Cover 93 Protrusions Inside The Machine 96 Roller 94 Color Button 12 COPY Button 13 Copying 31 D Device Settings 71 Bluetooth Settings 73 Language Selection 74 Load Settings 74 Other Settings 73 Print Settings 72 Reset Setting 74 Save Settings 74 Wireless Print Settings...
... Buttons 12 A Access Lamp 11 Alarm Lamp 12 Auto Sheet Feeder 10 B Back Button 12 Black Button 12 C Card Slot Cover 10 Card Slots 11 Changing Copy Settings 33 Changing The Print Settings 26 Copy mode 28 Memory card mode 29 Cleaning 93 Bottom Plate 95 Exterior 93 Platen Glass And Document Cover 93 Protrusions Inside The Machine 96 Roller 94 Color Button 12 COPY Button 13 Copying 31 D Device Settings 71 Bluetooth Settings 73 Language Selection 74 Load Settings 74 Other Settings 73 Print Settings 72 Reset Setting 74 Save Settings 74 Wireless Print Settings...
Easy Setup Instructions
Page 1
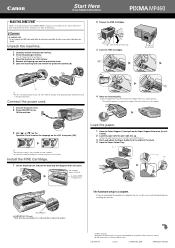
... to hold the machine by grasping the Paper Support Extension or the Operation Panel. 1 Connect the power cord. 2 Press [ON/OFF] to the User's Guide. 1 Lift the Scanning Unit and pull the Scanning Unit Support down the serial number. Do not lift the machine by the side. QT5-0572-V01 xxxxxxx © CANON INC. 2006 PRINTED IN VIETNAM this sheet for details. 1 Carefully remove all items from the box. 2 Check the package contents...
... to hold the machine by grasping the Paper Support Extension or the Operation Panel. 1 Connect the power cord. 2 Press [ON/OFF] to the User's Guide. 1 Lift the Scanning Unit and pull the Scanning Unit Support down the serial number. Do not lift the machine by the side. QT5-0572-V01 xxxxxxx © CANON INC. 2006 PRINTED IN VIETNAM this sheet for details. 1 Carefully remove all items from the box. 2 Check the package contents...

Easy Setup Instructions
Page 2
... depending on -screen instructions to be displayed. Step 4: Connect the USB cable. 1 When the [Printer Connection] appears, connect the machine to the computer with the Operation Panel of the machine. For details, see the User's Guide. Disconnect the USB cable. 3. on the item. The following steps. 1. Step 3: Enter the name and password for an Administrator Account. 1 Enter the name for the Administrator. 2 Enter the password and then click [OK]. Double-click the [Printer Setup Utility] ([Print Center] when using Mac OS...
... depending on -screen instructions to be displayed. Step 4: Connect the USB cable. 1 When the [Printer Connection] appears, connect the machine to the computer with the Operation Panel of the machine. For details, see the User's Guide. Disconnect the USB cable. 3. on the item. The following steps. 1. Step 3: Enter the name and password for an Administrator Account. 1 Enter the name for the Administrator. 2 Enter the password and then click [OK]. Double-click the [Printer Setup Utility] ([Print Center] when using Mac OS...


