

MP210 series Quick Start Guide
Page 5
...Settings 16 Using Useful Copy Functions 16 Printing from Your Computer 17 Printing with Windows 17 Printing with Macintosh 18 Scanning Images 19 Scanning Methods 19 Printing Photographs Directly from a Compliant Device 20 Printing Photographs Directly from a Compliant Device 20 About ...PictBridge Print Settings 22 Routine Maintenance 25 List of Maintenance Codes 25 When Printing Becomes Faint or Colors Are Incorrect 26 Printing the...
...Settings 16 Using Useful Copy Functions 16 Printing from Your Computer 17 Printing with Windows 17 Printing with Macintosh 18 Scanning Images 19 Scanning Methods 19 Printing Photographs Directly from a Compliant Device 20 Printing Photographs Directly from a Compliant Device 20 About ...PictBridge Print Settings 22 Routine Maintenance 25 List of Maintenance Codes 25 When Printing Becomes Faint or Colors Are Incorrect 26 Printing the...
MP210 series Quick Start Guide
Page 6
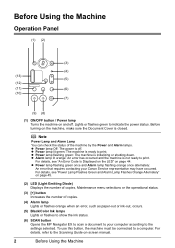
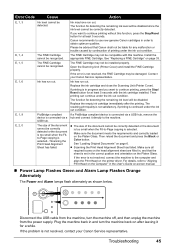
... or flashes orange when an error, such as paper-out or ink-out, occurs. (5) Black/Color Ink lamps Lights or flashes to show the ink status. (6) SCAN button Opens the MP Navigator EX to scan a document to your Canon Service representative may have occurred. z Power lamp flashing green: The machine is ready to print... ready to print. z Power lamp flashing green once and Alarm lamp flashing orange once alternately: An error that requires contacting your computer according to the Scanning Guide on-screen manual. 2 Before Using the Machine For details, refer to the settings selected.
... or flashes orange when an error, such as paper-out or ink-out, occurs. (5) Black/Color Ink lamps Lights or flashes to show the ink status. (6) SCAN button Opens the MP Navigator EX to scan a document to your Canon Service representative may have occurred. z Power lamp flashing green: The machine is ready to print... ready to print. z Power lamp flashing green once and Alarm lamp flashing orange once alternately: An error that requires contacting your computer according to the Scanning Guide on-screen manual. 2 Before Using the Machine For details, refer to the settings selected.
MP210 series Quick Start Guide
Page 10
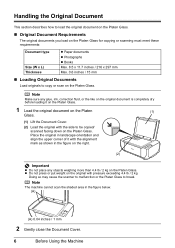
... down on the Platen Glass. Doing so may cause the scanner to malfunction or the Platen Glass to copy or scan on the Platen Glass. Note The machine cannot scan the shaded area in the figure on the right. (2) Important z Do not place any glue, ink, correction ... to load the original document on the Platen Glass. „ Original Document Requirements The original documents you load on the Platen Glass for copying or scanning must meet these requirements: Document type Size (W x L) Thickness z Paper documents z Photographs z Books Max. 8.5 x 11.7 inches / 216 x 297 mm Max. 0.6 inches / 15 ...
... down on the Platen Glass. Doing so may cause the scanner to malfunction or the Platen Glass to copy or scan on the Platen Glass. Note The machine cannot scan the shaded area in the figure on the right. (2) Important z Do not place any glue, ink, correction ... to load the original document on the Platen Glass. „ Original Document Requirements The original documents you load on the Platen Glass for copying or scanning must meet these requirements: Document type Size (W x L) Thickness z Paper documents z Photographs z Books Max. 8.5 x 11.7 inches / 216 x 297 mm Max. 0.6 inches / 15 ...
MP210 series Quick Start Guide
Page 23
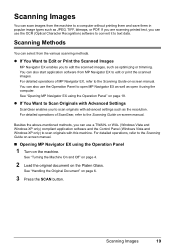
... WIA- (Windows Vista and Windows XP only) compliant application software and the Control Panel (Windows Vista and Windows XP only) to edit or print the scanned images. See "Handling the Original Document" on the Platen Glass. See "Turning the Machine On and Off" on page 4. 2 Load the original document ...also use the Operation Panel to open it to text data. For detailed operations of MP Navigator EX, refer to the Scanning Guide on page 19. Scanning Images You can scan images from the machine to a computer without printing them and save them in popular image types such as open MP ...
... WIA- (Windows Vista and Windows XP only) compliant application software and the Control Panel (Windows Vista and Windows XP only) to edit or print the scanned images. See "Handling the Original Document" on the Platen Glass. See "Turning the Machine On and Off" on page 4. 2 Load the original document ...also use the Operation Panel to open it to text data. For detailed operations of MP Navigator EX, refer to the Scanning Guide on page 19. Scanning Images You can scan images from the machine to a computer without printing them and save them in popular image types such as open MP ...
MP210 series Quick Start Guide
Page 29
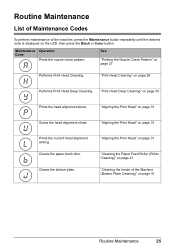
See "Printing the Nozzle Check Pattern" on page 31 Scans the head alignment sheet. "Aligning the Print Head" on page 27 Performs Print Head Cleaning. "Print Head Deep Cleaning" on page 41 Routine Maintenance 25 "... "Cleaning the Inside of the machine, press the Maintenance button repeatedly until the desired code is displayed on the LED, then press the Black or Color button. Maintenance Operation Code Prints the nozzle check pattern. "Print Head Cleaning" on page 31 Prints the current head alignment setting. "Aligning the Print Head...
See "Printing the Nozzle Check Pattern" on page 31 Scans the head alignment sheet. "Aligning the Print Head" on page 27 Performs Print Head Cleaning. "Print Head Deep Cleaning" on page 41 Routine Maintenance 25 "... "Cleaning the Inside of the machine, press the Maintenance button repeatedly until the desired code is displayed on the LED, then press the Black or Color button. Maintenance Operation Code Prints the nozzle check pattern. "Print Head Cleaning" on page 31 Prints the current head alignment setting. "Aligning the Print Head...
MP210 series Quick Start Guide
Page 36
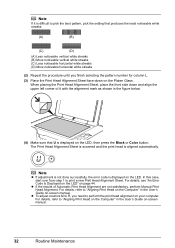
... to R, you finish selecting the pattern number for column L. (3) Place the Print Head Alignment Sheet face-down on the LED, then press the Black or Color button. In this case, start over from step 1 to perform the print head alignment on the LED. For details, see "An Error Code Is Displayed... streaks (D) More noticeable horizontal white streaks (2) Repeat the procedure until you need to print a new Print Head Alignment Sheet. The Print Head Alignment Sheet is scanned and the print head is aligned automatically.
... to R, you finish selecting the pattern number for column L. (3) Place the Print Head Alignment Sheet face-down on the LED, then press the Black or Color button. In this case, start over from step 1 to perform the print head alignment on the LED. For details, see "An Error Code Is Displayed... streaks (D) More noticeable horizontal white streaks (2) Repeat the procedure until you need to print a new Print Head Alignment Sheet. The Print Head Alignment Sheet is scanned and the print head is aligned automatically.
MP210 series Quick Start Guide
Page 40
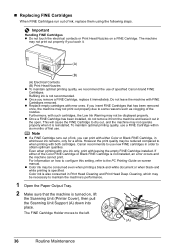
„ Replacing FINE Cartridges When FINE Cartridges run out of ink, you can print with either of specified Canon brand FINE Cartridges. Furthermore, with such cartridges, the Low Ink Warning may not be reduced compared to when printing with new ones. Note z If... is reinstalled. The FINE Cartridge Holder moves to the PC Printing Guide on , lift the Scanning Unit (Printer Cover), then pull the Scanning Unit Support (A) down into place. To maintain optimal printing quality, use . z Color ink may be consumed even when printing a black-and-white document or when black-and white...
„ Replacing FINE Cartridges When FINE Cartridges run out of ink, you can print with either of specified Canon brand FINE Cartridges. Furthermore, with such cartridges, the Low Ink Warning may not be reduced compared to when printing with new ones. Note z If... is reinstalled. The FINE Cartridge Holder moves to the PC Printing Guide on , lift the Scanning Unit (Printer Cover), then pull the Scanning Unit Support (A) down into place. To maintain optimal printing quality, use . z Color ink may be consumed even when printing a black-and-white document or when black-and white...
MP210 series Quick Start Guide
Page 41
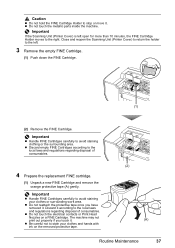
Important If the Scanning Unit (Printer Cover) is left . 3 Remove the empty FINE Cartridge. (1) Push down the FINE Cartridge. (1) (2) Remove the FINE Cartridge. z Discard empty FINE Cartridges according to ... staining clothing or the surrounding area. z Be careful not to the right. z Do not touch the metallic parts inside the machine. Close and reopen the Scanning Unit (Printer Cover) to return the holder to the left open for more than 10 minutes, the FINE Cartridge Holder moves to stain your clothes...
Important If the Scanning Unit (Printer Cover) is left . 3 Remove the empty FINE Cartridge. (1) Push down the FINE Cartridge. (1) (2) Remove the FINE Cartridge. z Discard empty FINE Cartridges according to ... staining clothing or the surrounding area. z Be careful not to the right. z Do not touch the metallic parts inside the machine. Close and reopen the Scanning Unit (Printer Cover) to return the holder to the left open for more than 10 minutes, the FINE Cartridge Holder moves to stain your clothes...

MP210 series Quick Start Guide
Page 42
... the FINE Cartridge. (1) Insert a new FINE Cartridge all the way into place. Caution Be sure to hold the Scanning Unit (Printer Cover) firmly, and be into the left slot ( B ) and the Color FINE Cartridge should be installed into the right slot ( C ). B C (1) (2) Push up the FINE Cartridge ... slightly to set the Scanning Unit Support back to resume printing. z If a print job has not been done yet, press the Black or Color button to its original position, and then gently close the Scanning Unit (Printer Cover). z When you start printing after the Scanning Unit (Printer Cover) ...
... the FINE Cartridge. (1) Insert a new FINE Cartridge all the way into place. Caution Be sure to hold the Scanning Unit (Printer Cover) firmly, and be into the left slot ( B ) and the Color FINE Cartridge should be installed into the right slot ( C ). B C (1) (2) Push up the FINE Cartridge ... slightly to set the Scanning Unit Support back to resume printing. z If a print job has not been done yet, press the Black or Color button to its original position, and then gently close the Scanning Unit (Printer Cover). z When you start printing after the Scanning Unit (Printer Cover) ...
MP210 series Quick Start Guide
Page 47
... z "Paper Jams" on page 54 z "Error Message Appears on the Computer Screen" on page 55 z "Error Message Appears on a PictBridge Compliant Device" on page 57 z "Scanning Problems" on page 60. The message may encounter when using your Windows operating system. To handle problems using the machine. For details on how to...
... z "Paper Jams" on page 54 z "Error Message Appears on the Computer Screen" on page 55 z "Error Message Appears on a PictBridge Compliant Device" on page 57 z "Scanning Problems" on page 60. The message may encounter when using your Windows operating system. To handle problems using the machine. For details on how to...
MP210 series Quick Start Guide
Page 48
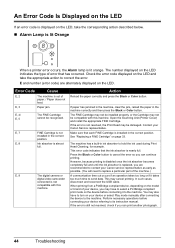
... and reconnect the USB cable. Check the error code displayed on page 33. Error Code Cause E, 2 The machine is almost full. Open the Scanning Unit (Printer Cover) and install the appropriate FINE Cartridge. Make sure that the ink absorber is nearly full. See "Replacing a FINE Cartridge" on... device referring to the machine. Action Reload the paper correctly and press the Black or Color button. When printing from a PictBridge compliant device, depending on the model or brand of your Canon Service representative. An Error Code Is Displayed on the LED If an error code is ...
... and reconnect the USB cable. Check the error code displayed on page 33. Error Code Cause E, 2 The machine is almost full. Open the Scanning Unit (Printer Cover) and install the appropriate FINE Cartridge. Make sure that the ink absorber is nearly full. See "Replacing a FINE Cartridge" on... device referring to the machine. Action Reload the paper correctly and press the Black or Color button. When printing from a PictBridge compliant device, depending on the model or brand of your Canon Service representative. An Error Code Is Displayed on the LED If an error code is ...
MP210 series Quick Start Guide
Page 49
... quality is not satisfactory, if printing is not resolved, contact your Canon Service representative. The size of the document cannot be installed properly. Then reload the document and press the Black or Color button. z Scanning the Print Head Alignment Sheet has failed. For details, refer to ...continue printing without this machine. Open the Scanning Unit (Printer Cover) and install the FINE Cartridge properly. Then printing ...
... quality is not satisfactory, if printing is not resolved, contact your Canon Service representative. The size of the document cannot be installed properly. Then reload the document and press the Black or Color button. z Scanning the Print Head Alignment Sheet has failed. For details, refer to ...continue printing without this machine. Open the Scanning Unit (Printer Cover) and install the FINE Cartridge properly. Then printing ...
MP210 series Quick Start Guide
Page 58
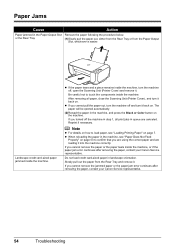
.... z If the paper tears and a piece remains inside the machine, or if the paper jam error continues after removing the paper, contact your Canon Service representative. The paper will be ejected automatically. (2)Reload the paper in queue are loading it . After removing all print jobs in the machine,... and press the Black or Color button on page 7. If you turned off , open the Scanning Unit (Printer Cover) and remove it into the machine correctly. Slowly pull out the paper from the Paper Output ...
.... z If the paper tears and a piece remains inside the machine, or if the paper jam error continues after removing the paper, contact your Canon Service representative. The paper will be ejected automatically. (2)Reload the paper in queue are loading it . After removing all print jobs in the machine,... and press the Black or Color button on page 7. If you turned off , open the Scanning Unit (Printer Cover) and remove it into the machine correctly. Slowly pull out the paper from the Paper Output ...
MP210 series Quick Start Guide
Page 61
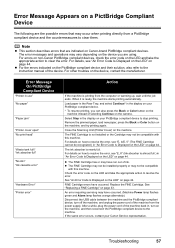
... error occurs, contact your PictBridge compliant device. * To resume printing, you are indicated on Canon-brand PictBridge compliant devices. z For the errors indicated on the device, contact the manufacturer. ...and their solution, also refer to stop printing. When it is nearly full. Close the Scanning Unit (Printer Cover) on the machine, and try printing again. An error requiring servicing ...installed properly or may vary depending on the device you can also press the Black or Color button on the machine instead of selecting Continue on the camera. z The FINE Cartridge may...
... error occurs, contact your PictBridge compliant device. * To resume printing, you are indicated on Canon-brand PictBridge compliant devices. z For the errors indicated on the device, contact the manufacturer. ...and their solution, also refer to stop printing. When it is nearly full. Close the Scanning Unit (Printer Cover) on the machine, and try printing again. An error requiring servicing ...installed properly or may vary depending on the device you can also press the Black or Color button on the machine instead of selecting Continue on the camera. z The FINE Cartridge may...
MP210 series Quick Start Guide
Page 62
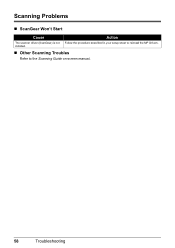
Scanning Problems „ ScanGear Won't Start Cause Action The scanner driver (ScanGear) is not Follow the procedure described in your setup sheet to the Scanning Guide on-screen manual. 58 Troubleshooting installed. „ Other Scanning Troubles Refer to reinstall the MP Drivers.
Scanning Problems „ ScanGear Won't Start Cause Action The scanner driver (ScanGear) is not Follow the procedure described in your setup sheet to the Scanning Guide on-screen manual. 58 Troubleshooting installed. „ Other Scanning Troubles Refer to reinstall the MP Drivers.
MP210 series Quick Start Guide
Page 63
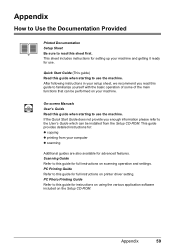
... detailed instructions for: z copying z printing from the Setup CD-ROM. PC Photo Printing Guide Refer to this guide for full instructions on scanning operation and settings. Appendix 59 If the Quick Start Guide does not provide you read this guide when starting to use the machine. On-screen... Manuals User's Guide Read this sheet first. Scanning Guide Refer to this guide to familiarize yourself with the basic operation of some of the main functions that can be performed on your...
... detailed instructions for: z copying z printing from the Setup CD-ROM. PC Photo Printing Guide Refer to this guide for full instructions on scanning operation and settings. Appendix 59 If the Quick Start Guide does not provide you read this guide when starting to use the machine. On-screen... Manuals User's Guide Read this sheet first. Scanning Guide Refer to this guide to familiarize yourself with the basic operation of some of the main functions that can be performed on your...

MP210 series Quick Start Guide
Page 65
Nozzles: Black: 320 nozzles Cyan/Magenta/Yellow: 384 x 3 nozzles Copy Specifications 1 - 9, 20 pages Scan Specifications TWAIN / WIA (Windows Vista and Windows XP only) A4/Letter, 8.5" x 11.7" / 216 x 297 mm Optical resolution (...resolution (dpi) Interface Print width Acoustic noise level Operating environment Storage environment Power supply Power consumption External dimensions Weight Canon FINE Cartridges Multiple copy Scanner driver Maximum scanning size Scanning resolution Gradation (Input/Output) General Specifications 4800 (horizontal)* x 1200 (vertical) * Ink droplets can be placed...
Nozzles: Black: 320 nozzles Cyan/Magenta/Yellow: 384 x 3 nozzles Copy Specifications 1 - 9, 20 pages Scan Specifications TWAIN / WIA (Windows Vista and Windows XP only) A4/Letter, 8.5" x 11.7" / 216 x 297 mm Optical resolution (...resolution (dpi) Interface Print width Acoustic noise level Operating environment Storage environment Power supply Power consumption External dimensions Weight Canon FINE Cartridges Multiple copy Scanner driver Maximum scanning size Scanning resolution Gradation (Input/Output) General Specifications 4800 (horizontal)* x 1200 (vertical) * Ink droplets can be placed...
MP210 series Quick Start Guide
Page 71
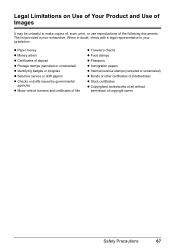
... with a legal representative in your jurisdiction. Legal Limitations on Use of Your Product and Use of Images It may be unlawful to make copies of, scan, print, or use reproductions of copyright owner Safety Precautions 67 The list provided is non-exhaustive.
... with a legal representative in your jurisdiction. Legal Limitations on Use of Your Product and Use of Images It may be unlawful to make copies of, scan, print, or use reproductions of copyright owner Safety Precautions 67 The list provided is non-exhaustive.
MP210 series Quick Start Guide
Page 76
Index A Appendix 59 B Before Using the Machine 2 C Canon U.S.A., Inc. Only 68 Cleaning exterior 40 inside 41 platen glass and document cover 40 protrusions inside the machine 42 roller 41 Copying 15 E Error Code ... Directly from a Compliant Device 20 PictBridge print settings 22 72 Index R Replacing a FINE Cartridge 33 ink status information 33 Routine Maintenance 25 S Safety Precautions 64 Scanning Images 19 Specialty Media 7 Specifications 61 PictBridge 62 T Troubleshooting 43 Turning off the Machine 4 Turning on the Machine 4 Limited Warranty - U.S.
Index A Appendix 59 B Before Using the Machine 2 C Canon U.S.A., Inc. Only 68 Cleaning exterior 40 inside 41 platen glass and document cover 40 protrusions inside the machine 42 roller 41 Copying 15 E Error Code ... Directly from a Compliant Device 20 PictBridge print settings 22 72 Index R Replacing a FINE Cartridge 33 ink status information 33 Routine Maintenance 25 S Safety Precautions 64 Scanning Images 19 Specialty Media 7 Specifications 61 PictBridge 62 T Troubleshooting 43 Turning off the Machine 4 Turning on the Machine 4 Limited Warranty - U.S.

MP210 series Easy Setup Instructions
Page 1
...both ends as shown below. Protective Tape Electrical Contacts e Repeat the procedure for the Color FINE Cartridge, inserting it clicks into place. f Lift the Scanning Unit (Printer Cover) slightly to set the Scanning Unit Support back to its box. Protective Material Caution Before turning on the machine,...the Quick Start Guide. 2 Install the FINE Cartridges a Remove the Black FINE Cartridge from its original position, and then gently close the Scanning Unit (Printer Cover). Click a Place the machine on the outside of the machine. Print Head Nozzles Important • Do not touch ...
...both ends as shown below. Protective Tape Electrical Contacts e Repeat the procedure for the Color FINE Cartridge, inserting it clicks into place. f Lift the Scanning Unit (Printer Cover) slightly to set the Scanning Unit Support back to its box. Protective Material Caution Before turning on the machine,...the Quick Start Guide. 2 Install the FINE Cartridges a Remove the Black FINE Cartridge from its original position, and then gently close the Scanning Unit (Printer Cover). Click a Place the machine on the outside of the machine. Print Head Nozzles Important • Do not touch ...


