ZoomBrowser EX 6.5 for Windows Instruction Manual
Page 20
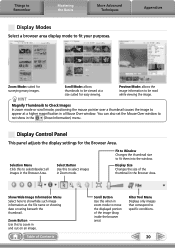
...be read while viewing the image. Table of the thumbnail in the Browser Area. Selection Menu Click this when in zoom mode to specific conditions. 20 Zoom Button Use this to fit your purposes. Things to Remember Mastering the Basics More Advanced Techniques Display Modes Select a... browser area display mode to select images in Zoom mode. Select Button Use this to select/deselect all images in and out on an image. Display Control Panel This panel adjusts ...
...be read while viewing the image. Table of the thumbnail in the Browser Area. Selection Menu Click this when in zoom mode to specific conditions. 20 Zoom Button Use this to fit your purposes. Things to Remember Mastering the Basics More Advanced Techniques Display Modes Select a... browser area display mode to select images in Zoom mode. Select Button Use this to select/deselect all images in and out on an image. Display Control Panel This panel adjusts ...
ZoomBrowser EX 6.5 for Windows Instruction Manual
Page 21
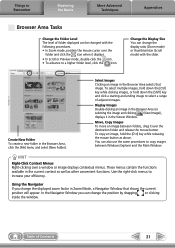
...of folder displayed can also use the same procedures to select a range of adjacent images. Change the Display Size You can change the displayed zoom factor in the Browser Area (or selecting the image and clicking (View Image)), displays it over the destination folder and release the mouse ... the current context as well as above. These menus contain the functions available in the Viewer Window. Display Images Double-clicking an image in Zoom Mode, a Navigator Window that image. HINT Right-Click Context Menus Right-clicking over the folder and click the icon when it displays. &#...
...of folder displayed can also use the same procedures to select a range of adjacent images. Change the Display Size You can change the displayed zoom factor in the Browser Area (or selecting the image and clicking (View Image)), displays it over the destination folder and release the mouse ... the current context as well as above. These menus contain the functions available in the Viewer Window. Display Images Double-clicking an image in Zoom Mode, a Navigator Window that image. HINT Right-Click Context Menus Right-clicking over the folder and click the icon when it displays. &#...
ZoomBrowser EX 6.5 for Windows Instruction Manual
Page 23
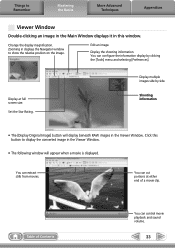
... from movies. Things to display the converted image in the Viewer Window. • The following window will display beneath RAW images in the Viewer Window. Zooming in displays the Navigator window to show the relative position on the image. Table of a movie clip. Display multiple images side by clicking the [Tools...
... from movies. Things to display the converted image in the Viewer Window. • The following window will display beneath RAW images in the Viewer Window. Zooming in displays the Navigator window to show the relative position on the image. Table of a movie clip. Display multiple images side by clicking the [Tools...
ZoomBrowser EX 6.5 for Windows Instruction Manual
Page 51
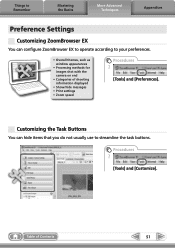
... to operate according to streamline the task buttons. Procedures 1 [Tools] and [Customize]. Table of shooting information displayed • Show/hide messages • Print settings • Zoom speed Procedures 1 [Tools] and [Preferences]. Things to Remember Mastering the Basics More Advanced Techniques Appendices Preference Settings Customizing ZoomBrowser EX You can hide items that...
... to operate according to streamline the task buttons. Procedures 1 [Tools] and [Customize]. Table of shooting information displayed • Show/hide messages • Print settings • Zoom speed Procedures 1 [Tools] and [Preferences]. Things to Remember Mastering the Basics More Advanced Techniques Appendices Preference Settings Customizing ZoomBrowser EX You can hide items that...

Digital Video Software (Macintosh) Ver.30 Instruction Manual
Page 15
... and brightness correction, sharpness adjustment, trimming, inserting text, or registering external image editing applications. Allows you to [Photo Print] ( 43). Changes the zoom ratio of the image. 1 Back/Next 2 Save 3 Edit 4 Number of the image will be displayed. [Show AF Frame] cannot be used ...for the images recorded by the camcorder. Displays an image in the current folder. Allows saving the edited image. The shooting information of Displays 5 Synchronize 6 Full Screen 7 Print 8 Show...
... and brightness correction, sharpness adjustment, trimming, inserting text, or registering external image editing applications. Allows you to [Photo Print] ( 43). Changes the zoom ratio of the image. 1 Back/Next 2 Save 3 Edit 4 Number of the image will be displayed. [Show AF Frame] cannot be used ...for the images recorded by the camcorder. Displays an image in the current folder. Allows saving the edited image. The shooting information of Displays 5 Synchronize 6 Full Screen 7 Print 8 Show...
VIXIA HF10/VIXIA HF100 Instruction Manual
Page 9
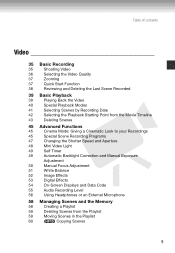
Table of contents Video 35 Basic Recording 35 Shooting Video 36 Selecting the Video Quality 37 Zooming 37 Quick Start Function 38 Reviewing and Deleting the Last Scene Recorded 39 Basic Playback 39 Playing Back the Video 40 Special Playback Modes 41 ...
Table of contents Video 35 Basic Recording 35 Shooting Video 36 Selecting the Video Quality 37 Zooming 37 Quick Start Function 38 Reviewing and Deleting the Last Scene Recorded 39 Basic Playback 39 Playing Back the Video 40 Special Playback Modes 41 ...

VIXIA HF10/VIXIA HF100 Instruction Manual
Page 11
...'s and Don'ts 111 Handling Precautions 114 Maintenance/Others 115 Using the Camcorder Abroad 116 General Information 116 System Diagram 117 Optional Accessories 120 Product Codes 121 Specifications 124 Index 11 Menu 92 Setup Menus 92 Camera Setup (Digital Zoom, Image Stabilizer, etc.) 94 Memory Operations (Initialization, etc.) 95 Display Setup (LCD...
...'s and Don'ts 111 Handling Precautions 114 Maintenance/Others 115 Using the Camcorder Abroad 116 General Information 116 System Diagram 117 Optional Accessories 120 Product Codes 121 Specifications 124 Index 11 Menu 92 Setup Menus 92 Camera Setup (Digital Zoom, Image Stabilizer, etc.) 94 Memory Operations (Initialization, etc.) 95 Display Setup (LCD...

VIXIA HF10/VIXIA HF100 Instruction Manual
Page 15
... ( 28, 90) / (play/pause) button ( 39)/ START/STOP button ( 35) (fast reverse) button ( 39)/ Zoom out W (wide-angle) button ( 37) (fast forward) button ( 39)/ Zoom in T (telephoto) button ( 37) (stop) button ( 39)/ BLC (backlight correction) button ( 49) Zoom lever ( 37) PHOTO button ( 61) Mini advanced shoe ( 57) indicator ON/OFF button Names of...
... ( 28, 90) / (play/pause) button ( 39)/ START/STOP button ( 35) (fast reverse) button ( 39)/ Zoom out W (wide-angle) button ( 37) (fast forward) button ( 39)/ Zoom in T (telephoto) button ( 37) (stop) button ( 39)/ BLC (backlight correction) button ( 49) Zoom lever ( 37) PHOTO button ( 61) Mini advanced shoe ( 57) indicator ON/OFF button Names of...
VIXIA HF10/VIXIA HF100 Instruction Manual
Page 16
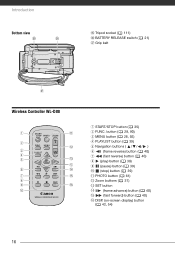
Introduction Bottom view Tripod socket ( 111) BATTERY RELEASE switch ( 21) Grip belt Wireless Controller WL-D88 16 START/STOP button ( 35) FUNC. button ( 28, 90) MENU button ( 28, 92) PLAYLIST button ( 39) Navigation buttons ( / / / ) (frame reverse) button ( 40) (fast reverse) button ( 40) (play) button ( 39) (pause) button ( 39) (stop) button ( 39) PHOTO button ( 61) Zoom buttons ( 37) SET button (frame advance) button ( 40) (fast forward) button ( 40) DISP. (on-screen display) button ( 42, 54)
Introduction Bottom view Tripod socket ( 111) BATTERY RELEASE switch ( 21) Grip belt Wireless Controller WL-D88 16 START/STOP button ( 35) FUNC. button ( 28, 90) MENU button ( 28, 92) PLAYLIST button ( 39) Navigation buttons ( / / / ) (frame reverse) button ( 40) (fast reverse) button ( 40) (play) button ( 39) (pause) button ( 39) (stop) button ( 39) PHOTO button ( 61) Zoom buttons ( 37) SET button (frame advance) button ( 40) (fast forward) button ( 40) DISP. (on-screen display) button ( 42, 54)

VIXIA HF10/VIXIA HF100 Instruction Manual
Page 18
Introduction Recording Still Images Viewing Still Images 18 Zoom ( 37), Exposure ( 49) Recording program ( 45, 47) Light metering mode ( 68) White balance ( 51) Image effect ( 52) Digital effects ( 53) Drive mode ( 67) Still image ... still images available On the memory card In the built-in memory Self timer ( 49) Image stabilizer ( 93) AF frame ( 93) Mini video light ( 48) Camcorder shake warning ( 93) Focus and exposure lock ( 61) Flash ( 66) Image number ( 97) Current image / Total number of images Histogram ( 69) Image protection mark ( 70...
Introduction Recording Still Images Viewing Still Images 18 Zoom ( 37), Exposure ( 49) Recording program ( 45, 47) Light metering mode ( 68) White balance ( 51) Image effect ( 52) Digital effects ( 53) Drive mode ( 67) Still image ... still images available On the memory card In the built-in memory Self timer ( 49) Image stabilizer ( 93) AF frame ( 93) Mini video light ( 48) Camcorder shake warning ( 93) Focus and exposure lock ( 61) Flash ( 66) Image number ( 97) Current image / Total number of images Histogram ( 69) Image protection mark ( 70...

VIXIA HF10/VIXIA HF100 Instruction Manual
Page 23
...finger, and the START/STOP button with the supplied wrist strap. Accessories 2 Pull the strap to remove it first from the front bracket on the camcorder, then to unthread it from the handgrip and finally to use both for extra convenience and protection. 1 Lift the padded handgrip's flap and detach the... strap from the rear bracket on the camcorder. TO ATTACH A WRIST STRAP Fasten the grip belt. • Adjust the grip belt so that you can reach the zoom lever with your thumb. • You can also attach the wrist strap to the strap mount...
...finger, and the START/STOP button with the supplied wrist strap. Accessories 2 Pull the strap to remove it first from the front bracket on the camcorder, then to unthread it from the handgrip and finally to use both for extra convenience and protection. 1 Lift the padded handgrip's flap and detach the... strap from the rear bracket on the camcorder. TO ATTACH A WRIST STRAP Fasten the grip belt. • Adjust the grip belt so that you can reach the zoom lever with your thumb. • You can also attach the wrist strap to the strap mount...

VIXIA HF10/VIXIA HF100 Instruction Manual
Page 25
... the LCD screen: The screen is produced using just the zoom lever and PHOTO ( 61). 25 Hold DISP. pressed down for beginners or if you just prefer not to bother with detailed camcorder settings, and flexible recording mode which lets you change the camcorder's settings to worry about any settings and can set...
... the LCD screen: The screen is produced using just the zoom lever and PHOTO ( 61). 25 Hold DISP. pressed down for beginners or if you just prefer not to bother with detailed camcorder settings, and flexible recording mode which lets you change the camcorder's settings to worry about any settings and can set...
VIXIA HF10/VIXIA HF100 Instruction Manual
Page 37
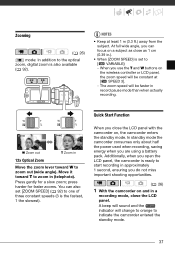
... you do not miss important shooting opportunities. ( 26) 1 With the camcorder on the wireless controller or LCD panel, the zoom speed will change to orange to indicate the camcorder entered the standby mode. 37 Zooming ( 26) mode: In addition to start recording in approximately 1 second... SPEED 3]. - Additionally, when you open the LCD panel, the camcorder is ready to the optical zoom, digital zoom is the fastest, 1 the slowest). A beep will sound and the indicator will be faster in 12x Optical Zoom Move the zoom lever toward T to one of three constant speeds (3 is also ...
... you do not miss important shooting opportunities. ( 26) 1 With the camcorder on the wireless controller or LCD panel, the zoom speed will change to orange to indicate the camcorder entered the standby mode. 37 Zooming ( 26) mode: In addition to start recording in approximately 1 second... SPEED 3]. - Additionally, when you open the LCD panel, the camcorder is ready to the optical zoom, digital zoom is the fastest, 1 the slowest). A beep will sound and the indicator will be faster in 12x Optical Zoom Move the zoom lever toward T to one of three constant speeds (3 is also ...

VIXIA HF10/VIXIA HF100 Instruction Manual
Page 42
... the Playback Starting Point from a specific point. ( 26) 1 In the index screen select the scene you want to a date displayed in white. Video 2 Move the zoom lever toward W. • The calendar screen appears. • Dates that contain scenes (that is very convenient when you move faster between calendar months. • You...
... the Playback Starting Point from a specific point. ( 26) 1 In the index screen select the scene you want to a date displayed in white. Video 2 Move the zoom lever toward W. • The calendar screen appears. • Dates that contain scenes (that is very convenient when you move faster between calendar months. • You...

VIXIA HF10/VIXIA HF100 Instruction Manual
Page 46
...BEACH]/[ SNOW] - White points may become overexposed on the screen. - The subject may appear on cloudy days or in other modes. - To avoid camcorder shake, we recommend using a tripod. It prevents the subject from being underexposed. [ BEACH] Use this mode to use a tripod especially in mode,... scenes such as in dimly lit places. [ SNOW] Use this mode to record fireworks. 46 The blur effect of the background increases the more you zoom in bright ski resorts. In such case, adjust the focus manually. • [ FIREWORKS] - Video NOTES • [ NIGHT] - Make sure ...
...BEACH]/[ SNOW] - White points may become overexposed on the screen. - The subject may appear on cloudy days or in other modes. - To avoid camcorder shake, we recommend using a tripod. It prevents the subject from being underexposed. [ BEACH] Use this mode to use a tripod especially in mode,... scenes such as in dimly lit places. [ SNOW] Use this mode to record fireworks. 46 The blur effect of the background increases the more you zoom in bright ski resorts. In such case, adjust the focus manually. • [ FIREWORKS] - Video NOTES • [ NIGHT] - Make sure ...

VIXIA HF10/VIXIA HF100 Instruction Manual
Page 48
... and 1/2000. The image may not work well. - If does not appear on the joystick guide, push the joystick ( ) toward . • appears on the initial zoom position. Available Aperture Values [1.8], [2.0], [2.4], [2.8], [3.4], [4.0], [4.8], [5.6], [6.7], [8.0] NOTES • When setting a numeric value (aperture or shutter speed), the number displayed will be lower, and autofocus may flicker when...
... and 1/2000. The image may not work well. - If does not appear on the joystick guide, push the joystick ( ) toward . • appears on the initial zoom position. Available Aperture Values [1.8], [2.0], [2.4], [2.8], [3.4], [4.0], [4.8], [5.6], [6.7], [8.0] NOTES • When setting a numeric value (aperture or shutter speed), the number displayed will be lower, and autofocus may flicker when...

VIXIA HF10/VIXIA HF100 Instruction Manual
Page 50
...with low contrast or without vertical lines • Fast moving subjects • Through wet windows • Night scenes ( 26) POINTS TO CHECK Adjust the zoom before you start the procedure. 1 If the joystick guide does not appear on the screen. 3 Adjust the ( ) the brightness of the image may ...not work well on screen, press to display it . 2 Push the joystick ( ) toward [EXP] again to return the camcorder to help you operate the zoom during exposure lock, the brightness of the image as required. The adjustment range and the length of the picture. 4 Press . • ...
...with low contrast or without vertical lines • Fast moving subjects • Through wet windows • Night scenes ( 26) POINTS TO CHECK Adjust the zoom before you start the procedure. 1 If the joystick guide does not appear on the screen. 3 Adjust the ( ) the brightness of the image may ...not work well on screen, press to display it . 2 Push the joystick ( ) toward [EXP] again to return the camcorder to help you operate the zoom during exposure lock, the brightness of the image as required. The adjustment range and the length of the picture. 4 Press . • ...

VIXIA HF10/VIXIA HF100 Instruction Manual
Page 51
... setting for more than the Special Scene recording programs. Options Default value [ AUTO] Settings are automatically set by the camcorder. White Balance The white balance function helps you wish to focus on faraway subjects such as necessary. 5 Press . • The .... • appears. • Push the joystick ( ) toward [FOCUS] again to return the camcorder to autofocus. • If you operate the zoom or joystick ( ), changes to "MF" and the camcorder returns to make white subjects appear white under different lighting conditions so that white objects will be locked...
... setting for more than the Special Scene recording programs. Options Default value [ AUTO] Settings are automatically set by the camcorder. White Balance The white balance function helps you wish to focus on faraway subjects such as necessary. 5 Press . • The .... • appears. • Push the joystick ( ) toward [FOCUS] again to return the camcorder to autofocus. • If you operate the zoom or joystick ( ), changes to "MF" and the camcorder returns to make white subjects appear white under different lighting conditions so that white objects will be locked...
VIXIA HF10/VIXIA HF100 Instruction Manual
Page 52
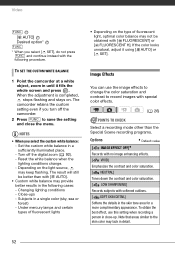
... color balance may provide better results in the following procedure. Depending on . TO SET THE CUSTOM WHITE BALANCE 1 Point the camcorder at a white object, zoom in close the menu. to record images with special color effects. ( 26) POINTS TO CHECK Select a recording mode other ...than with [ FLUORESCENT] or [ FLUORESCENT H]. Turn off the camcorder. 2 Press FUNC. If the color looks unnatural, adjust it fills the whole screen and ...
... color balance may provide better results in the following procedure. Depending on . TO SET THE CUSTOM WHITE BALANCE 1 Point the camcorder at a white object, zoom in close the menu. to record images with special color effects. ( 26) POINTS TO CHECK Select a recording mode other ...than with [ FLUORESCENT] or [ FLUORESCENT H]. Turn off the camcorder. 2 Press FUNC. If the color looks unnatural, adjust it fills the whole screen and ...

VIXIA HF10/VIXIA HF100 Instruction Manual
Page 64
...1 Select ( ) the first still image of the mode dial. • The following precautions while the ACCESS indicator is displayed. Index Screen 1 Move the zoom lever toward . 3 Select ( ) [ IMAGES] or [ IMAGES]. Still images in the built-in memory Still images on screen, press to display it. ... 1 In the index screen, move ( ) the orange selection frame to select the still image. Do not disconnect the power source or turn off the camcorder. - Images edited on the top of the screen. 2 Select ( ) the location of images selected and press . The still images index screen appears...
...1 Select ( ) the first still image of the mode dial. • The following precautions while the ACCESS indicator is displayed. Index Screen 1 Move the zoom lever toward . 3 Select ( ) [ IMAGES] or [ IMAGES]. Still images in the built-in memory Still images on screen, press to display it. ... 1 In the index screen, move ( ) the orange selection frame to select the still image. Do not disconnect the power source or turn off the camcorder. - Images edited on the top of the screen. 2 Select ( ) the location of images selected and press . The still images index screen appears...

