ZoomBrowser EX 6.5 for Windows Instruction Manual
Page 3
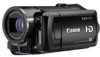
... charged batteries if you disconnect the camera while they are recommended to use an AC adapter. • See the Camera User Guide for Connecting the Camera to the Computer • When connecting the camera to the computer with the camera in sleep (standby) mode. If this occurs, disconnect the other USB devices, excluding USB mice or keyboards, at the same time to the same computer. Table of Contents 3 IMPORTANT...
... charged batteries if you disconnect the camera while they are recommended to use an AC adapter. • See the Camera User Guide for Connecting the Camera to the Computer • When connecting the camera to the computer with the camera in sleep (standby) mode. If this occurs, disconnect the other USB devices, excluding USB mice or keyboards, at the same time to the same computer. Table of Contents 3 IMPORTANT...
ZoomBrowser EX 6.5 for Windows Instruction Manual
Page 5
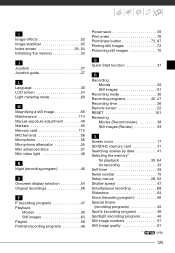
... Buttons...51 Appendices...52 List of Available Functions...52 Supported Image Types...54 Uninstalling the Software...55 Memory Card Folder Structure 56 Troubleshooting...57 5 Things to Remember Mastering the Basics More Advanced Techniques Appendices Exporting...33 Changing Image (Stills) Sizes and Types 33 Changing Movie Sizes and Types 33 Extracting Stills from Movies...34 Exporting Shooting Information 34 Creating Computer Screen Saver Images 35 Creating Computer Wallpaper Images 35 Saving to CDs...36 Uploading Movies...
... Buttons...51 Appendices...52 List of Available Functions...52 Supported Image Types...54 Uninstalling the Software...55 Memory Card Folder Structure 56 Troubleshooting...57 5 Things to Remember Mastering the Basics More Advanced Techniques Appendices Exporting...33 Changing Image (Stills) Sizes and Types 33 Changing Movie Sizes and Types 33 Extracting Stills from Movies...34 Exporting Shooting Information 34 Creating Computer Screen Saver Images 35 Creating Computer Wallpaper Images 35 Saving to CDs...36 Uploading Movies...
ZoomBrowser EX 6.5 for Windows Instruction Manual
Page 53
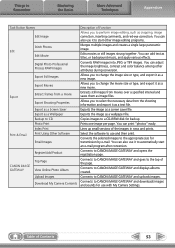
... Stitch Photos Edit Movie Digital Photo Professional Process RAW Images Export Still Images Export Movies Extract frames from a movie Export Shooting Properties Export as a Screen Saver Export as a Wallpaper Backup to CD Photo Print Index Print Print Using Other Software Email Images Register/Add Product CANON iMAGE GATEWAY Top Page View Online Photo Album Upload Images Download My Camera Contents Description of Function Allows you to perform image editing, such as image files. Connects to CANON iMAGE GATEWAY and displays albums...
... Stitch Photos Edit Movie Digital Photo Professional Process RAW Images Export Still Images Export Movies Extract frames from a movie Export Shooting Properties Export as a Screen Saver Export as a Wallpaper Backup to CD Photo Print Index Print Print Using Other Software Email Images Register/Add Product CANON iMAGE GATEWAY Top Page View Online Photo Album Upload Images Download My Camera Contents Description of Function Allows you to perform image editing, such as image files. Connects to CANON iMAGE GATEWAY and displays albums...
Digital Video Software (Macintosh) Ver.30 Instruction Manual
Page 33
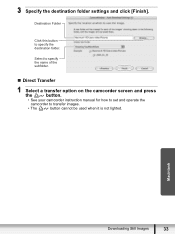
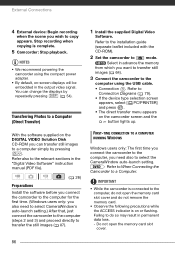
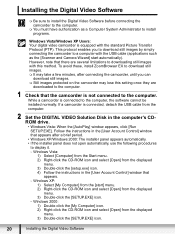
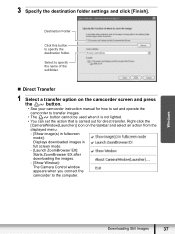
Select to specify the name of the subfolder. „ Direct Transfer 1 Select a transfer option on the camcorder screen and press the button. • See your camcorder instruction manual for how to set and operate the camcorder to specify the destination folder. Destination Folder Click this button to transfer images. • The button cannot be used when it is not lighted. Macintosh Downloading Still Images 33 3 Specify the destination folder settings and click [Finish].
Select to specify the name of the subfolder. „ Direct Transfer 1 Select a transfer option on the camcorder screen and press the button. • See your camcorder instruction manual for how to set and operate the camcorder to specify the destination folder. Destination Folder Click this button to transfer images. • The button cannot be used when it is not lighted. Macintosh Downloading Still Images 33 3 Specify the destination folder settings and click [Finish].
VIXIA HF10/VIXIA HF100 Instruction Manual
Page 3
... instructions the word "product" refers to plugs and the point from the type of power source indicated on or pinched by items placed upon or against voltage surges and built-up static charges. All the safety and operating instructions should be adhered to replace your product dealer or local power company. Do not use this manual. 11 Polarization - Do not use the camera...
... instructions the word "product" refers to plugs and the point from the type of power source indicated on or pinched by items placed upon or against voltage surges and built-up static charges. All the safety and operating instructions should be adhered to replace your product dealer or local power company. Do not use this manual. 11 Polarization - Do not use the camera...

VIXIA HF10/VIXIA HF100 Instruction Manual
Page 12
... the Canon VIXIA HF10/VIXIA HF100. "Photo" and "still image" are used to refer to menu options as they are simulated pictures taken with a still camera. In tables in the icon. • The following icons and the name of the relevant chapter or section. FUNC. ( 32) FUNC. [ MENU] [ DISPLAY SETUP] [LANGUAGE ] Desired language FUNC. Unless indicated otherwise, illustrations and menu icons refer to the "Digital Video Software" instruction manual, included as "memory card...
... the Canon VIXIA HF10/VIXIA HF100. "Photo" and "still image" are used to refer to menu options as they are simulated pictures taken with a still camera. In tables in the icon. • The following icons and the name of the relevant chapter or section. FUNC. ( 32) FUNC. [ MENU] [ DISPLAY SETUP] [LANGUAGE ] Desired language FUNC. Unless indicated otherwise, illustrations and menu icons refer to the "Digital Video Software" instruction manual, included as "memory card...

VIXIA HF10/VIXIA HF100 Instruction Manual
Page 17
... Displays Recording Movies Playing Movies (During Playback) Operating mode ( 26) Recording program ( 45, 47) White balance ( 51) Image effect ( 52) Digital effects ( 53) Recording mode ( 36) Still image quality/size (simultaneous recording) ( 68) Remote sensor off ( 96) Instant AF ( 92), MF Manual focus ( 50) 24F progressive frame rate ( 19) Memory operation ( 19) Time code/Playback time (hours : minutes : seconds) Remaining recording time On the memory card In the built-in memory Remaining battery time ( 19) Image stabilizer ( 93) Wind screen off ( 94) Headphones output ( 56) Microphone...
... Displays Recording Movies Playing Movies (During Playback) Operating mode ( 26) Recording program ( 45, 47) White balance ( 51) Image effect ( 52) Digital effects ( 53) Recording mode ( 36) Still image quality/size (simultaneous recording) ( 68) Remote sensor off ( 96) Instant AF ( 92), MF Manual focus ( 50) 24F progressive frame rate ( 19) Memory operation ( 19) Time code/Playback time (hours : minutes : seconds) Remaining recording time On the memory card In the built-in memory Remaining battery time ( 19) Image stabilizer ( 93) Wind screen off ( 94) Headphones output ( 56) Microphone...

VIXIA HF10/VIXIA HF100 Instruction Manual
Page 35
... open the memory card slot cover. - NOTES • About the Power Save mode: To save power when the camcorder is off. 2 Turn off the camcorder. - WHEN YOU HAVE FINISHED RECORDING 1 Make sure that the ACCESS indicator is powered by a battery pack, the camcorder will automatically shut off if left without any operations for recording movies ( 33). 3 Press START/STOP to shooting movies, including recording, playback, menu options, and memory operations. Video This chapter covers functions related to begin recording. • Recording...
... open the memory card slot cover. - NOTES • About the Power Save mode: To save power when the camcorder is off. 2 Turn off the camcorder. - WHEN YOU HAVE FINISHED RECORDING 1 Make sure that the ACCESS indicator is powered by a battery pack, the camcorder will automatically shut off if left without any operations for recording movies ( 33). 3 Press START/STOP to shooting movies, including recording, playback, menu options, and memory operations. Video This chapter covers functions related to begin recording. • Recording...

VIXIA HF10/VIXIA HF100 Instruction Manual
Page 36
.... * Recorded in memory 2 GB memory card 4 GB memory card 8 GB memory card FXP* 2 hr. 5 min. 15 min. 30 min. 1 hr. SP 4 hr. 45 min. 35 min. 1 hr. 10 min. 2 hr. 20 min. Changing the recording mode will change the recording time available on the content of the scenes. • The camcorder retains the last setting used even if you set the camcorder to encode video so the actual recording times will...
.... * Recorded in memory 2 GB memory card 4 GB memory card 8 GB memory card FXP* 2 hr. 5 min. 15 min. 30 min. 1 hr. SP 4 hr. 45 min. 35 min. 1 hr. 10 min. 2 hr. 20 min. Changing the recording mode will change the recording time available on the content of the scenes. • The camcorder retains the last setting used even if you set the camcorder to encode video so the actual recording times will...
VIXIA HF10/VIXIA HF100 Instruction Manual
Page 72
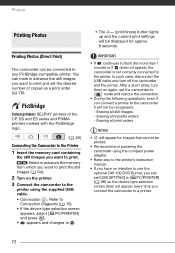
... memory card containing the still images you want to the camcorder it will be printed. • We recommend powering the camcorder using the supplied USB cable. • Connection . IMPORTANT • If continues to flash (for approx. 6 seconds. In such case, disconnect the USB cable and turn them on the printer. 3 Connect the camcorder to the printer. You can set the camcorder to mode and restore the connection. • During the following operations...
... memory card containing the still images you want to the camcorder it will be printed. • We recommend powering the camcorder using the supplied USB cable. • Connection . IMPORTANT • If continues to flash (for approx. 6 seconds. In such case, disconnect the USB cable and turn them on the printer. 3 Connect the camcorder to the printer. You can set the camcorder to mode and restore the connection. • During the following operations...
VIXIA HF10/VIXIA HF100 Instruction Manual
Page 84
... the DVD Burner and set it will be canceled. Do not disconnect the power source or turn off the camcorder or the DVD Burner. - Insert a brand new disc and close the disc tray. IMPORTANT • While the camcorder is connected to the DVD Burner, do not open the memory card slot cover. - This is being written) the operation cannot be ejected automatically and [INSERT A NEW/BLANK DISC AND...
... the DVD Burner and set it will be canceled. Do not disconnect the power source or turn off the camcorder or the DVD Burner. - Insert a brand new disc and close the disc tray. IMPORTANT • While the camcorder is connected to the DVD Burner, do not open the memory card slot cover. - This is being written) the operation cannot be ejected automatically and [INSERT A NEW/BLANK DISC AND...
VIXIA HF10/VIXIA HF100 Instruction Manual
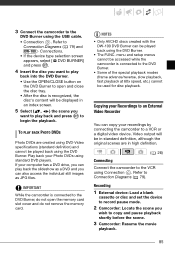
Page 85
... copy your recordings by connecting the camcorder to Connection Diagrams ( 79). Refer to a VCR or a digital video device. If your Photo DVDs using standard DVD players. Recording 1 External device: Load a blank cassette or disc and set the device to record pause mode. 2 Camcorder: Locate the scene you can be played back using the DVD Burner. menu and setup menus cannot be used for disc playback. NOTES • Only AVCHD discs created with the DW-100 DVD Burner can also access the individual still images as JPG files...
... copy your recordings by connecting the camcorder to Connection Diagrams ( 79). Refer to a VCR or a digital video device. If your Photo DVDs using standard DVD players. Recording 1 External device: Load a blank cassette or disc and set the device to record pause mode. 2 Camcorder: Locate the scene you can be played back using the DVD Burner. menu and setup menus cannot be used for disc playback. NOTES • Only AVCHD discs created with the DW-100 DVD Burner can also access the individual still images as JPG files...
VIXIA HF10/VIXIA HF100 Instruction Manual
Page 86
...; The direct transfer menu appears on the camcorder screen and the button lights up. Do not open the memory card slot cover and do so may result in the "Digital Video Software" instruction manual (PDF file). ( 26) Preparations Install the software before you connect the camcorder to the computer for the first time. (Windows users only: you also need also to the relevant sections in permanent data loss. - NOTES • We recommend powering the camcorder using the USB cable. • Connection . Select...
...; The direct transfer menu appears on the camcorder screen and the button lights up. Do not open the memory card slot cover and do so may result in the "Digital Video Software" instruction manual (PDF file). ( 26) Preparations Install the software before you connect the camcorder to the computer for the first time. (Windows users only: you also need also to the relevant sections in permanent data loss. - NOTES • We recommend powering the camcorder using the USB cable. • Connection . Select...

VIXIA HF10/VIXIA HF100 Instruction Manual
Page 96
... [DEMO MODE]: The demonstration mode displays the camcorder's main features. System Setup (Speaker Volume, Beep, etc.) SYSTEM SETUP Menu item Setting options [BATTERY INFO] [WL.REMOTE] - [ ON], [ OFF ] zzzz - z - 82 [ALL IMAGES], [TRANS.ORD] - - -z [FIRMWARE] - - - -z- * Option not available when the camcorder is powered with the compact power adapter if you can verify the battery charge (as a percentage) and the remaining recording time ( , mode) or playback time ( , mode). [WL.REMOTE]: Allows the camcorder to an HDTV using the HDMI cable. [BATTERY INFO]: Displays a screen...
... [DEMO MODE]: The demonstration mode displays the camcorder's main features. System Setup (Speaker Volume, Beep, etc.) SYSTEM SETUP Menu item Setting options [BATTERY INFO] [WL.REMOTE] - [ ON], [ OFF ] zzzz - z - 82 [ALL IMAGES], [TRANS.ORD] - - -z [FIRMWARE] - - - -z- * Option not available when the camcorder is powered with the compact power adapter if you can verify the battery charge (as a percentage) and the remaining recording time ( , mode) or playback time ( , mode). [WL.REMOTE]: Allows the camcorder to an HDTV using the HDMI cable. [BATTERY INFO]: Displays a screen...
VIXIA HF10/VIXIA HF100 Instruction Manual
Page 102
.... When using the camcorder in speaker. - Select the correct video input. 102 Sound is distorted or is connected to take photos while recording video ( 68). - A rattling can move when the camcorder is set the camcorder to [STILL I.REC OFF]. Memory Card and Accessories Cannot insert the memory card. - The memory card was not facing the correct direction. Activate the microphone attenuator or adjust the audio recording level manually ( 55). Adjust the volume ( 41). - In such case, appears. Playback looks...
.... When using the camcorder in speaker. - Select the correct video input. 102 Sound is distorted or is connected to take photos while recording video ( 68). - A rattling can move when the camcorder is set the camcorder to [STILL I.REC OFF]. Memory Card and Accessories Cannot insert the memory card. - The memory card was not facing the correct direction. Activate the microphone attenuator or adjust the audio recording level manually ( 55). Adjust the volume ( 41). - In such case, appears. Playback looks...
VIXIA HF10/VIXIA HF100 Instruction Manual
Page 106
... changed to play back. Reading data from the built-in the memory selected. TASK IN PROGRESS DO NOT DISCONNECT THE POWER SOURCE - Movies that cannot be used in the camcorder. THE MEMORY CARD COVER IS OPEN - Set [IMG NUMBERS] to free some space. There are no memory card in mode (while the the button to set to record movies on the memory card or initialize it clicks ( 32). 106 Delete some recordings ( 43, 65) to [RESET] ( erase...
... changed to play back. Reading data from the built-in the memory selected. TASK IN PROGRESS DO NOT DISCONNECT THE POWER SOURCE - Movies that cannot be used in the camcorder. THE MEMORY CARD COVER IS OPEN - Set [IMG NUMBERS] to free some space. There are no memory card in mode (while the the button to set to record movies on the memory card or initialize it clicks ( 32). 106 Delete some recordings ( 43, 65) to [RESET] ( erase...
VIXIA HF10/VIXIA HF100 Instruction Manual
Page 125
... Power save 35 Print order 76 Print/share button 73, 87 Printing still images 72 Protecting still images 70 Q Quick Start function 37 R Recording Movies 35 Still images 61 Recording mode 36 Recording programs 45, 47 Recording time 36 Remote sensor 22 RESET 101 Reviewing Movies (Record review 38 Still images (Review 93 S Screen icons 17 SD/SDHC memory card 31 Searching scenes by date 41 Selecting the memory* for playback 39, 64 for recording 33 Self timer 49 Serial number 15 Setup...
... Power save 35 Print order 76 Print/share button 73, 87 Printing still images 72 Protecting still images 70 Q Quick Start function 37 R Recording Movies 35 Still images 61 Recording mode 36 Recording programs 45, 47 Recording time 36 Remote sensor 22 RESET 101 Reviewing Movies (Record review 38 Still images (Review 93 S Screen icons 17 SD/SDHC memory card 31 Searching scenes by date 41 Selecting the memory* for playback 39, 64 for recording 33 Self timer 49 Serial number 15 Setup...
Digital Video Software (Windows) Ver.30 Instruction Manual
Page 20
... USB cable from the [start automatically). To avoid these, install ZoomBrowser EX to download still images. It may lose this method. If a camcorder is connected to a computer with the standard Picture Transfer Protocol (PTP). Windows Vista: 1) Select [Computer] from the Start menu. 2) Right-click the CD-ROM icon and select [Open] from the displayed menu. 3) Double-click the [SETUP.EXE] icon. 20 Installing the Digital Video Software Follow the instructions...
... USB cable from the [start automatically). To avoid these, install ZoomBrowser EX to download still images. It may lose this method. If a camcorder is connected to a computer with the standard Picture Transfer Protocol (PTP). Windows Vista: 1) Select [Computer] from the Start menu. 2) Right-click the CD-ROM icon and select [Open] from the displayed menu. 3) Double-click the [SETUP.EXE] icon. 20 Installing the Digital Video Software Follow the instructions...
Digital Video Software (Windows) Ver.30 Instruction Manual
Page 37
... from the displayed menu. - [Show image(s) in fullscreen mode]: Displays downloaded images in full screen mode. - [Launch ZoomBrowser EX]: Starts ZoomBrowser EX after downloading the images. - [Show Window]: The Camera Control window appears when you connect the camcorder to transfer images. • The button cannot be used when it is not lighted. • You can set the action that is carried out for how to set and operate the camcorder to the computer. Windows Downloading Still Images 37 3 Specify...
... from the displayed menu. - [Show image(s) in fullscreen mode]: Displays downloaded images in full screen mode. - [Launch ZoomBrowser EX]: Starts ZoomBrowser EX after downloading the images. - [Show Window]: The Camera Control window appears when you connect the camcorder to transfer images. • The button cannot be used when it is not lighted. • You can set the action that is carried out for how to set and operate the camcorder to the computer. Windows Downloading Still Images 37 3 Specify...
Digital Video Software (Windows) Ver.30 Instruction Manual
Page 88
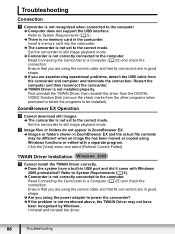
... with Windows 2000 preinstalled? Set the camcorder to still image playback mode. Î Camcorder is not mentioned above, the TWAIN Driver may be installed). Set the camcorder to a Computer ( 25) and check the connection. ZoomBrowser EX Operation Cannot download still images. Î The camcorder is not recognized when connected to the computer. Î Computer does not support the USB interface. Read Connecting the Camcorder to still image playback mode. Troubleshooting Connection Camcorder is not set to the correct mode. Insert a memory card...
... with Windows 2000 preinstalled? Set the camcorder to still image playback mode. Î Camcorder is not mentioned above, the TWAIN Driver may be installed). Set the camcorder to a Computer ( 25) and check the connection. ZoomBrowser EX Operation Cannot download still images. Î The camcorder is not recognized when connected to the computer. Î Computer does not support the USB interface. Read Connecting the Camcorder to still image playback mode. Troubleshooting Connection Camcorder is not set to the correct mode. Insert a memory card...


