Digital Video Software (Macintosh) Ver.30 Instruction Manual
Page 2
Contents Read This First ...4 Checking Supplied Accessories 4 System Requirements 5 What is Digital Video Software 6 Windows ...7 CameraWindow ...7 [Acquire Images] Tab 7 [Print] Tab ...8 [Set to Camera] Tab 9 Camera Browser Window 10 Browser Window 11 [Image Viewer] Window 15 [Trim Image] Window 16...] Window 19 [Auto Adjustment] Window 19 Installing the Digital Video Software 20 Before Downloading Still Images 23 Connecting the Camcorder to a Computer 23 Settings on the camcorder 23 Connecting the camcorder 24 Downloading Still Images 25 Using the Computer to Download Still...
Contents Read This First ...4 Checking Supplied Accessories 4 System Requirements 5 What is Digital Video Software 6 Windows ...7 CameraWindow ...7 [Acquire Images] Tab 7 [Print] Tab ...8 [Set to Camera] Tab 9 Camera Browser Window 10 Browser Window 11 [Image Viewer] Window 15 [Trim Image] Window 16...] Window 19 [Auto Adjustment] Window 19 Installing the Digital Video Software 20 Before Downloading Still Images 23 Connecting the Camcorder to a Computer 23 Settings on the camcorder 23 Connecting the camcorder 24 Downloading Still Images 25 Using the Computer to Download Still...
Digital Video Software (Macintosh) Ver.30 Instruction Manual
Page 21
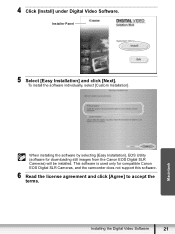
... When installing the software by selecting [Easy Installation], EOS Utility (software for compatible Canon EOS Digital SLR Cameras, and the camcorder does not support this software. 6 Read the license agreement and click [Agree] to accept the terms. Installing the Digital Video Software 21 To install the software individually, select [Custom Installation]. 4 Click [Install] under...
... When installing the software by selecting [Easy Installation], EOS Utility (software for compatible Canon EOS Digital SLR Cameras, and the camcorder does not support this software. 6 Read the license agreement and click [Agree] to accept the terms. Installing the Digital Video Software 21 To install the software individually, select [Custom Installation]. 4 Click [Install] under...

VIXIA HF10/VIXIA HF100 Instruction Manual
Page 11
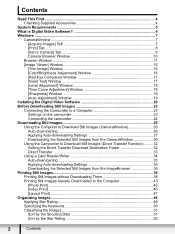
Menu 92 Setup Menus 92 Camera Setup (Digital Zoom, Image Stabilizer, etc.) 94 Memory Operations (Initialization, etc.) 95 ...of contents 82 Authoring High-Definition (AVCHD) Discs and Photo DVDs 85 Copying your Recordings to an External Video Recorder 86 Transferring Photos to a Computer (Direct Transfer) 88 Transfer Orders Additional Information 90 Appendix: Menu Options...'ts 111 Handling Precautions 114 Maintenance/Others 115 Using the Camcorder Abroad 116 General Information 116 System Diagram 117 Optional Accessories 120 Product Codes 121 Specifications 124 Index 11
Menu 92 Setup Menus 92 Camera Setup (Digital Zoom, Image Stabilizer, etc.) 94 Memory Operations (Initialization, etc.) 95 ...of contents 82 Authoring High-Definition (AVCHD) Discs and Photo DVDs 85 Copying your Recordings to an External Video Recorder 86 Transferring Photos to a Computer (Direct Transfer) 88 Transfer Orders Additional Information 90 Appendix: Menu Options...'ts 111 Handling Precautions 114 Maintenance/Others 115 Using the Camcorder Abroad 116 General Information 116 System Diagram 117 Optional Accessories 120 Product Codes 121 Specifications 124 Index 11

VIXIA HF10/VIXIA HF100 Instruction Manual
Page 12
...camcorder and retain it for purchasing the Canon VIXIA HF10/VIXIA HF100. FUNC. ( 32) FUNC. [ MENU] [ DISPLAY SETUP] [LANGUAGE ] Desired language FUNC. DW-100 Refer to be indicated with the same meaning. • The photos included in this manual: When not specified as a PDF file in the supplied DIGITAL VIDEO...Photo" and "still image" are used to refer to other than the joystick are simulated pictures taken with a still camera. Brackets [ ] and capital letters are used interchangeably with the following terms are used in this manual are indicated within a "button" ...
...camcorder and retain it for purchasing the Canon VIXIA HF10/VIXIA HF100. FUNC. ( 32) FUNC. [ MENU] [ DISPLAY SETUP] [LANGUAGE ] Desired language FUNC. DW-100 Refer to be indicated with the same meaning. • The photos included in this manual: When not specified as a PDF file in the supplied DIGITAL VIDEO...Photo" and "still image" are used to refer to other than the joystick are simulated pictures taken with a still camera. Brackets [ ] and capital letters are used interchangeably with the following terms are used in this manual are indicated within a "button" ...

VIXIA HF10/VIXIA HF100 Instruction Manual
Page 54
Video Applying 1 If the joystick guide does not appear on screen, press to display it . 2 Push the joystick ...effects or change the recording program. When you apply an effect, the sound will be recorded normally. • The camcorder retains the last setting used even if you apply a fader, not only the picture but also the sound will ...again). On-Screen Displays and Data Code With every scene or still image recorded, the camcorder keeps a data code that includes the date, time and information about the camera setup at the time of the selected effect turns green. • Push the joystick ...
Video Applying 1 If the joystick guide does not appear on screen, press to display it . 2 Push the joystick ...effects or change the recording program. When you apply an effect, the sound will be recorded normally. • The camcorder retains the last setting used even if you apply a fader, not only the picture but also the sound will ...again). On-Screen Displays and Data Code With every scene or still image recorded, the camcorder keeps a data code that includes the date, time and information about the camera setup at the time of the selected effect turns green. • Push the joystick ...

VIXIA HF10/VIXIA HF100 Instruction Manual
Page 95
...the markers will appear also on the screen of a TV or monitor connected using the STV-250N Stereo Video Cable. [DATA CODE]: Displays the date and/or time when the scene was recorded. [ CAMERA DATA]: Displays the aperture (f-stop) and shutter speed used when recording the image. [MARKERS]: You can... display a grid or a horizontal line at the center of the playback image on a TV. [TV SCREEN] • When set to [ ON], the camcorder's on-screen displays will ...
...the markers will appear also on the screen of a TV or monitor connected using the STV-250N Stereo Video Cable. [DATA CODE]: Displays the date and/or time when the scene was recorded. [ CAMERA DATA]: Displays the aperture (f-stop) and shutter speed used when recording the image. [MARKERS]: You can... display a grid or a horizontal line at the center of the playback image on a TV. [TV SCREEN] • When set to [ ON], the camcorder's on-screen displays will ...

VIXIA HF10/VIXIA HF100 Instruction Manual
Page 111
...your recordings to an external device such as a computer or digital video recorder ( 82) and back them up on a regular basis. Make sure to get into the camcorder it may cause damage. • When mounting the camcorder on the memory. Canon shall not be liable for any of the above TVs, near... plasma TVs or mobile phones. • Do not point the lens at a bright subject. • Do not use the camcorder near strong electromagnetic fields such as necessary. 111 avoid also water, mud or salt. Camera ...
...your recordings to an external device such as a computer or digital video recorder ( 82) and back them up on a regular basis. Make sure to get into the camcorder it may cause damage. • When mounting the camcorder on the memory. Canon shall not be liable for any of the above TVs, near... plasma TVs or mobile phones. • Do not point the lens at a bright subject. • Do not use the camcorder near strong electromagnetic fields such as necessary. 111 avoid also water, mud or salt. Camera ...
VIXIA HF10/VIXIA HF100 Instruction Manual
Page 121
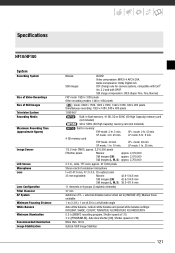
...groups (2 aspheric elements) 37 mm Autofocus (TTL + external distance sensor when set to [INSTANT AF]); Specifications HF10/HF100 System Recording System Size of Video Recordings Size of Still Images Television System Recording Media Maximum Recording Time (approximate figures) Image Sensor LCD Screen ... White Balance Minimum Illumination Recommended Illumination Image Stabilization Movies: Still images: AVCHD Video compression: MPEG-4 AVC/H.264, Audio compression: Dolby Digital 2ch DCF (Design rule for camera system), compatible with Exif1 Ver. 2.2 and with DPOF Still image compression:...
...groups (2 aspheric elements) 37 mm Autofocus (TTL + external distance sensor when set to [INSTANT AF]); Specifications HF10/HF100 System Recording System Size of Video Recordings Size of Still Images Television System Recording Media Maximum Recording Time (approximate figures) Image Sensor LCD Screen ... White Balance Minimum Illumination Recommended Illumination Image Stabilization Movies: Still images: AVCHD Video compression: MPEG-4 AVC/H.264, Audio compression: Dolby Digital 2ch DCF (Design rule for camera system), compatible with Exif1 Ver. 2.2 and with DPOF Still image compression:...

Digital Video Software (Windows) Ver.30 Instruction Manual
Page 2
...Camera] Tab 9 Camera Browser Window 10 Main Window ...11 [Image Viewer] Window 15 [Red Eye Correction] Window 16 [Auto Adjustment] Window 17 [Color/Brightness Adjustment] Window 17 [Sharpness] Window 18 [Trim Image] Window 18 [Insert Text] Window 19 Installing the Digital Video Software 20 Before Downloading Still Images 25 Connecting the Camcorder... to a Computer 25 Settings on the camcorder 25 Connecting the camcorder 25 Downloading Still Images 27 Starting ...
...Camera] Tab 9 Camera Browser Window 10 Main Window ...11 [Image Viewer] Window 15 [Red Eye Correction] Window 16 [Auto Adjustment] Window 17 [Color/Brightness Adjustment] Window 17 [Sharpness] Window 18 [Trim Image] Window 18 [Insert Text] Window 19 Installing the Digital Video Software 20 Before Downloading Still Images 25 Connecting the Camcorder... to a Computer 25 Settings on the camcorder 25 Connecting the camcorder 25 Downloading Still Images 27 Starting ...
Digital Video Software (Windows) Ver.30 Instruction Manual
Page 20
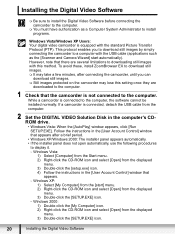
...] window appears, click [Run SETUP.EXE]. Installing the Digital Video Software Be sure to install the Digital Video Software before connecting the camcorder to the computer. You must have authorization as the [Scanner and Camera Wizard] start ] menu. 2) Right-click the CD-ROM ... 3) Double-click the [SETUP.EXE] icon. 20 Installing the Digital Video Software If a camcorder is connected to the computer. However, note that there are downloaded to the computer. 1 Check that the camcorder is equipped with the USB cable (applications such as a Computer System Administrator...
...] window appears, click [Run SETUP.EXE]. Installing the Digital Video Software Be sure to install the Digital Video Software before connecting the camcorder to the computer. You must have authorization as the [Scanner and Camera Wizard] start ] menu. 2) Right-click the CD-ROM ... 3) Double-click the [SETUP.EXE] icon. 20 Installing the Digital Video Software If a camcorder is connected to the computer. However, note that there are downloaded to the computer. 1 Check that the camcorder is equipped with the USB cable (applications such as a Computer System Administrator...

Digital Video Software (Windows) Ver.30 Instruction Manual
Page 22
If you selected [Custom Installation] and are using Windows 2000, select Canon DV TWAIN Driver (USB driver). 7 Review the installation settings and click [Install]. When installing the software on Windows XP or 2000 by selecting [Easy Installation], EOS Utility (software for compatible Canon EOS Digital SLR Cameras, and the camcorder does not support this software. 22 Installing the Digital Video Software This software is used only for downloading still images from the Canon EOS Digital SLR Cameras) will be installed.
If you selected [Custom Installation] and are using Windows 2000, select Canon DV TWAIN Driver (USB driver). 7 Review the installation settings and click [Install]. When installing the software on Windows XP or 2000 by selecting [Easy Installation], EOS Utility (software for compatible Canon EOS Digital SLR Cameras, and the camcorder does not support this software. 22 Installing the Digital Video Software This software is used only for downloading still images from the Canon EOS Digital SLR Cameras) will be installed.

Digital Video Software (Windows) Ver.30 Instruction Manual
Page 89
...USB cable before installing the Digital Video Software. 1 Click the Windows [Start] menu and select [Settings] and [Control Panel]. 2 Double-click the [System] icon. 3 Click the [Hardware] tab. 4 Click the [Device Manager] button. 5 If [Canon Camera] or your camcorder model name that appear in the... [Delete]. 2. Click the [Tools] menu and select [Folder Options]. 2. Click [OK] to restart Windows. Select [Canon Camera] or the name of [Canon Camera] or your camcorder model name appears under the [Other Devices] and/or [Imaging Devices] categories, use the following procedure to remove it ....
...USB cable before installing the Digital Video Software. 1 Click the Windows [Start] menu and select [Settings] and [Control Panel]. 2 Double-click the [System] icon. 3 Click the [Hardware] tab. 4 Click the [Device Manager] button. 5 If [Canon Camera] or your camcorder model name that appear in the... [Delete]. 2. Click the [Tools] menu and select [Folder Options]. 2. Click [OK] to restart Windows. Select [Canon Camera] or the name of [Canon Camera] or your camcorder model name appears under the [Other Devices] and/or [Imaging Devices] categories, use the following procedure to remove it ....


