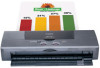

User manual for the BJC-55
Page 3
... the Printer Printing With Windows 98 or Windows CE Printer Driver Basics Getting Ready to Print Opening the Printer Properties Dialog Box Selecting the Print Mode Changing the Page Size Using Online Help Windows Printer Driver Features Using the BJ Background Monitor Using the BJ Backgrounder... Using the BJ Printer Status Monitor Printing With Windows 2000 Printer Driver Basics Opening the Printer Properties Dialog Box Setting Up the Printer Driver Using the Print Advisor Using the Tabs Using Online Help Closing the Printer Properties Dialog Box ...
... the Printer Printing With Windows 98 or Windows CE Printer Driver Basics Getting Ready to Print Opening the Printer Properties Dialog Box Selecting the Print Mode Changing the Page Size Using Online Help Windows Printer Driver Features Using the BJ Background Monitor Using the BJ Backgrounder... Using the BJ Printer Status Monitor Printing With Windows 2000 Printer Driver Basics Opening the Printer Properties Dialog Box Setting Up the Printer Driver Using the Print Advisor Using the Tabs Using Online Help Closing the Printer Properties Dialog Box ...
User manual for the BJC-55
Page 4
... of Printing With the Macintosh Printer Driver Selecting the Printer Driver in Chooser Opening the Macintosh Printer Driver Using Balloon Help Macintosh Printer Driver Features Using the BJ Print Monitor Uninstalling the Macintosh Printer Driver Troubleshooting Error Messages Problems and Solutions Before You Call For Service Getting Help From Canon Servicing the Printer Specifications...
... of Printing With the Macintosh Printer Driver Selecting the Printer Driver in Chooser Opening the Macintosh Printer Driver Using Balloon Help Macintosh Printer Driver Features Using the BJ Print Monitor Uninstalling the Macintosh Printer Driver Troubleshooting Error Messages Problems and Solutions Before You Call For Service Getting Help From Canon Servicing the Printer Specifications...

User manual for the BJC-55
Page 32
Turning the Printer On and Off 4 The printer has an energy saving Auto Power Off feature that powers off or to Print 32 Getting Ready to change the idle time interval. Use the Windows or Macintosh printer driver to turn this feature off the printer automatically if it is idle for 30 minutes.
Turning the Printer On and Off 4 The printer has an energy saving Auto Power Off feature that powers off or to Print 32 Getting Ready to change the idle time interval. Use the Windows or Macintosh printer driver to turn this feature off the printer automatically if it is idle for 30 minutes.

User manual for the BJC-55
Page 33
Getting Ready to avoid problems with the printer, do not disconnect the USB interface cable in the following situations: • During installation of the printer. Front of printer USB interface connector Back of printer You can disconnect the USB interface cable from the computer or printer while the printer is starting up after turning the computer on . However, to Print 33 Using a USB Connection The connector for the USB interface cable is on the side of the printer driver. • While the Windows or Macintosh Operating System is on . • During a print job.
Getting Ready to avoid problems with the printer, do not disconnect the USB interface cable in the following situations: • During installation of the printer. Front of printer USB interface connector Back of printer You can disconnect the USB interface cable from the computer or printer while the printer is starting up after turning the computer on . However, to Print 33 Using a USB Connection The connector for the USB interface cable is on the side of the printer driver. • While the Windows or Macintosh Operating System is on . • During a print job.
User manual for the BJC-55
Page 35
.... Windows 98 or Windows 2000 Getting Ready to use infrared data transmission, you need the Windows 98 or Windows 2000 plug and play Microsoft infrared driver Version 3.0. I What You Need for wireless data transmission, you can set up an infrared connection with the printer using the IrDA method to set up...
.... Windows 98 or Windows 2000 Getting Ready to use infrared data transmission, you need the Windows 98 or Windows 2000 plug and play Microsoft infrared driver Version 3.0. I What You Need for wireless data transmission, you can set up an infrared connection with the printer using the IrDA method to set up...
User manual for the BJC-55
Page 36
Getting Ready to open the Control Panel Window. If the Infrared Monitor icon is already installed. If the Infrared Monitor icon is displayed, the required infrared transmission driver is not displayed, refer to your Windows documentation for instructions on installing the infrared driver. Setting Up and Using a Wireless Connection I Confirming That the Infrared Transmission Driver Has Been Installed 1 2 Click Start, select Settings, and click Control Panel to Print 36 Look at the Control Panel window and confirm that the Infrared Monitor icon is displayed.
Getting Ready to open the Control Panel Window. If the Infrared Monitor icon is already installed. If the Infrared Monitor icon is displayed, the required infrared transmission driver is not displayed, refer to your Windows documentation for instructions on installing the infrared driver. Setting Up and Using a Wireless Connection I Confirming That the Infrared Transmission Driver Has Been Installed 1 2 Click Start, select Settings, and click Control Panel to Print 36 Look at the Control Panel window and confirm that the Infrared Monitor icon is displayed.

User manual for the BJC-55
Page 38
.... • If another IrDA device is attached. • If another infrared device, like a set up for IrDA operation: • Make sure the infrared driver Microsoft IR Comm Driver Ver. 3.0 has been installed. To use IrDA successfully, make sure the computer is smudged or dirty. for details, refer to your computer documentation. * * * * *...approx...
.... • If another IrDA device is attached. • If another infrared device, like a set up for IrDA operation: • Make sure the infrared driver Microsoft IR Comm Driver Ver. 3.0 has been installed. To use IrDA successfully, make sure the computer is smudged or dirty. for details, refer to your computer documentation. * * * * *...approx...
User manual for the BJC-55
Page 39
... documentation. • Make sure the BJC-55 is ejected.) Getting Ready to your computer manual. • If you are using Windows 98, make sure a COM port has been selected for IrDA with the Printer Wizard. Usually COM4 can be used as the IrDA driver for an IrDA wireless interface may depend...stopped and the printer is initialized. (The data in the printer is cleared and the paper is selected as the default printer within the BJC-55 printer driver. • Only the Microsoft IR Comm Driver Ver. 3.0 can be selected as an external serial (COM) port. Allocation of a port for the...
... documentation. • Make sure the BJC-55 is ejected.) Getting Ready to your computer manual. • If you are using Windows 98, make sure a COM port has been selected for IrDA with the Printer Wizard. Usually COM4 can be used as the IrDA driver for an IrDA wireless interface may depend...stopped and the printer is initialized. (The data in the printer is cleared and the paper is selected as the default printer within the BJC-55 printer driver. • Only the Microsoft IR Comm Driver Ver. 3.0 can be selected as an external serial (COM) port. Allocation of a port for the...
User manual for the BJC-55
Page 42
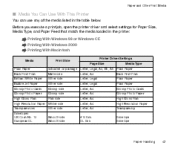
No. 10 European DL Print Side Printer Driver Settings Page Size Letter, A4 Letter, Legal Letter, Legal Letter, A4 Letter, A4 Letter, A4 Letter, A4 Letter, A4 #10 Env. Media Type Back Print ... side Film side Either side Smooth side Smooth side High Resolution Paper Whiter side Paper Handling 42 Before you execute a print job, open the printer driver and select settings for Paper Size, Media Type, and Paper Feed that match the media loaded in the table below. Paper and Other Print Media...
No. 10 European DL Print Side Printer Driver Settings Page Size Letter, A4 Letter, Legal Letter, Legal Letter, A4 Letter, A4 Letter, A4 Letter, A4 Letter, A4 #10 Env. Media Type Back Print ... side Film side Either side Smooth side Smooth side High Resolution Paper Whiter side Paper Handling 42 Before you execute a print job, open the printer driver and select settings for Paper Size, Media Type, and Paper Feed that match the media loaded in the table below. Paper and Other Print Media...

User manual for the BJC-55
Page 52
Printing With Windows 98 or Windows CE Printing With Windows 2000 Printing With Macintosh Paper Handling 52 Set up the print job with the printer driver and start the print job. You can change paper size, paper type, and other important settings in the Printer 3 4 Hold the sheet until it automatically feeds into the printer. Loading Paper in the printer driver.
Printing With Windows 98 or Windows CE Printing With Windows 2000 Printing With Macintosh Paper Handling 52 Set up the print job with the printer driver and start the print job. You can change paper size, paper type, and other important settings in the Printer 3 4 Hold the sheet until it automatically feeds into the printer. Loading Paper in the printer driver.

User manual for the BJC-55
Page 59
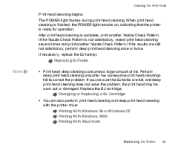
... four times then release it. The printer prints one page and then stops. Press the POWER button to print. You can also use the printer driver to determine the condition of plain paper in your printed output, print a Nozzle Check Pattern to print a Nozzle Check Pattern.
... four times then release it. The printer prints one page and then stops. Press the POWER button to print. You can also use the printer driver to determine the condition of plain paper in your printed output, print a Nozzle Check Pattern to print a Nozzle Check Pattern.
User manual for the BJC-55
Page 62
... cleaning once or twice. Changing or Replacing a BJ Cartridge • You can also perform print head cleaning and deep print head cleaning with the printer driver. When print head cleaning is finished, the POWER light remains on, indicating that the printer is complete, print another Nozzle Check Pattern. After print...
... cleaning once or twice. Changing or Replacing a BJ Cartridge • You can also perform print head cleaning and deep print head cleaning with the printer driver. When print head cleaning is finished, the POWER light remains on, indicating that the printer is complete, print another Nozzle Check Pattern. After print...

User manual for the BJC-55
Page 63
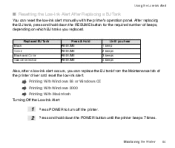
... CARTRIDGE button to move the cartridge holder to the center. To determine which BJ tank is turned on, and the ink supply in the printer driver. Flashing Steady flash 2 alternating flashes 3 alternating flashes Meaning Black BJ tank requires replacement Color BJ tank requires replacement Color and black BJ...
... CARTRIDGE button to move the cartridge holder to the center. To determine which BJ tank is turned on, and the ink supply in the printer driver. Flashing Steady flash 2 alternating flashes 3 alternating flashes Meaning Black BJ tank requires replacement Color BJ tank requires replacement Color and black BJ...
User manual for the BJC-55
Page 64
... button until the printer beeps 7 times. After replacing the BJ tank, press and hold down the RESUME button for the required number of the printer driver and reset the low-ink alert. Using the Low-Ink Alert I Resetting the Low-Ink Alert After Replacing a BJ Tank You can replace the BJ...
... button until the printer beeps 7 times. After replacing the BJ tank, press and hold down the RESUME button for the required number of the printer driver and reset the low-ink alert. Using the Low-Ink Alert I Resetting the Low-Ink Alert After Replacing a BJ Tank You can replace the BJ...

User manual for the BJC-55
Page 73
Printing With Windows 98 or Windows CE Printing With Windows 2000 Printing With Macintosh Maintaining the Printer 73 The printer moves the cartridge holder to the home position and automatically starts cleaning the print heads. Note You can also perform BJ tank replacement from the Maintenance tab of the printer driver. Replacing BJ Tanks 6 Close the top cover and press the CARTRIDGE button. Print head cleaning is complete and the printer is ready for operation when the POWER light remains on. The POWER light flashes during the print head cleaning.
Printing With Windows 98 or Windows CE Printing With Windows 2000 Printing With Macintosh Maintaining the Printer 73 The printer moves the cartridge holder to the home position and automatically starts cleaning the print heads. Note You can also perform BJ tank replacement from the Maintenance tab of the printer driver. Replacing BJ Tanks 6 Close the top cover and press the CARTRIDGE button. Print head cleaning is complete and the printer is ready for operation when the POWER light remains on. The POWER light flashes during the print head cleaning.

User manual for the BJC-55
Page 81
... cartridge. The POWER light flashes during the print head cleaning. Changing or Replacing a BJ Cartridge 7 Press down on . You can also use the printer driver to the home position and automatically starts cleaning the print heads.
... cartridge. The POWER light flashes during the print head cleaning. Changing or Replacing a BJ Cartridge 7 Press down on . You can also use the printer driver to the home position and automatically starts cleaning the print heads.
User manual for the BJC-55
Page 90
Printing With Windows 98 or Windows CE Printer Driver Basics Getting Ready to Print Opening the Printer Properties Dialog Box Selecting the Print Mode Changing the Page Size Using Online Help Windows Printer Driver Features Using the BJ Background Monitor Using the BJ Backgrounder Using the BJ Printer Status Monitor Printing With Windows 98 or Windows CE 90
Printing With Windows 98 or Windows CE Printer Driver Basics Getting Ready to Print Opening the Printer Properties Dialog Box Selecting the Print Mode Changing the Page Size Using Online Help Windows Printer Driver Features Using the BJ Background Monitor Using the BJ Backgrounder Using the BJ Printer Status Monitor Printing With Windows 98 or Windows CE 90
User manual for the BJC-55
Page 91
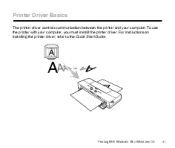
Printer Driver Basics The printer driver controls communication between the printer and your computer, you must install the printer driver. To use the printer with your computer. For instructions on installing the printer driver, refer to the Quick Start Guide. Printing With Windows 98 or Windows CE A 91
Printer Driver Basics The printer driver controls communication between the printer and your computer, you must install the printer driver. To use the printer with your computer. For instructions on installing the printer driver, refer to the Quick Start Guide. Printing With Windows 98 or Windows CE A 91
User manual for the BJC-55
Page 92
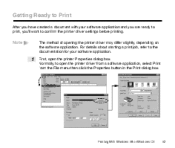
... with your software application. 1 First, open the printer driver from a software application, select Print from the File menu then click the Properties button in the Print dialog box. Normally, to confirm the printer driver settings before printing. Printing With Windows 98 or Windows CE... 92 Note The method of opening the printer driver may differ slightly, depending on the software application. For details about starting a print...
... with your software application. 1 First, open the printer driver from a software application, select Print from the File menu then click the Properties button in the Print dialog box. Normally, to confirm the printer driver settings before printing. Printing With Windows 98 or Windows CE... 92 Note The method of opening the printer driver may differ slightly, depending on the software application. For details about starting a print...

User manual for the BJC-55
Page 93
... BJ Cartridge and Media Type selections change automatically, depending on a print mode icon, select the BJ Cartridge and Media Type that you open the printer driver, click the Page Layout tab and make sure the selected page size is different, click the down arrow and select the page size from the...
... BJ Cartridge and Media Type selections change automatically, depending on a print mode icon, select the BJ Cartridge and Media Type that you open the printer driver, click the Page Layout tab and make sure the selected page size is different, click the down arrow and select the page size from the...


