
Users Manual - English
Page 2
... needle, threading the bobbin, or changing the presser foot. 15. Never operate the machine with the same type and rated 15 watts. It may deflect the needle, causing it off ), and then remove the plug from the outlet. 9. Do not operate where aerosol (spray) products are being administered. 8. DANGER - Never drop or insert any other user servicing adjustments mentioned in this manual. IMPORTANT SAFETY INSTRUCTIONS When using it and before cleaning...
... needle, threading the bobbin, or changing the presser foot. 15. Never operate the machine with the same type and rated 15 watts. It may deflect the needle, causing it off ), and then remove the plug from the outlet. 9. Do not operate where aerosol (spray) products are being administered. 8. DANGER - Never drop or insert any other user servicing adjustments mentioned in this manual. IMPORTANT SAFETY INSTRUCTIONS When using it and before cleaning...

Users Manual - English
Page 4
... Changing the Presser Foot ...8 Converting to Free-arm Style ...9 Steadying the Machine ...9 THE CONTROLS ...10 Pattern Selection Dial ...10 Recommended Widths and Lengths for Stitches 11 Stitch Length Dial ...13 Stretch Stitching ...13 Stitch Width Dial ...14 Reverse Sewing Lever ...14 Drop Feed Lever (if the machine is equipped with a drop feed lever 14 THREADING THE MACHINE 15 Winding the Bobbin ...15 Lower Threading ...16 Upper Threading ...18 Using the Needle Threader (models equipped with a needle threader 19 Quick Thread-Setting System FAST START BOBBIN (models equipped with a quick...
... Changing the Presser Foot ...8 Converting to Free-arm Style ...9 Steadying the Machine ...9 THE CONTROLS ...10 Pattern Selection Dial ...10 Recommended Widths and Lengths for Stitches 11 Stitch Length Dial ...13 Stretch Stitching ...13 Stitch Width Dial ...14 Reverse Sewing Lever ...14 Drop Feed Lever (if the machine is equipped with a drop feed lever 14 THREADING THE MACHINE 15 Winding the Bobbin ...15 Lower Threading ...16 Upper Threading ...18 Using the Needle Threader (models equipped with a needle threader 19 Quick Thread-Setting System FAST START BOBBIN (models equipped with a quick...

Users Manual - English
Page 5
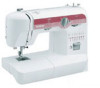
...) 6 Upper tension-control dial (page 22) This controls the tension of the stitches. 0 Reverse-sewing lever (page 14) You can push this to the power supply. H Presser foot lever (page 8) This raises and lowers the presser foot. J Zigzag presser foot A Buttonhole fine adjustment screw (page 33) B Buttonhole lever (1-Step automatic buttonhole) (page 30) C Needle threader (page 19) This is only available on and off. KNOWING YOUR SEWING MACHINE PRINCIPAL PARTS 1 Bobbin-winding assembly (page 15) This winds the thread onto the bobbin, which you use this to control the sewing speed, and...
...) 6 Upper tension-control dial (page 22) This controls the tension of the stitches. 0 Reverse-sewing lever (page 14) You can push this to the power supply. H Presser foot lever (page 8) This raises and lowers the presser foot. J Zigzag presser foot A Buttonhole fine adjustment screw (page 33) B Buttonhole lever (1-Step automatic buttonhole) (page 30) C Needle threader (page 19) This is only available on and off. KNOWING YOUR SEWING MACHINE PRINCIPAL PARTS 1 Bobbin-winding assembly (page 15) This winds the thread onto the bobbin, which you use this to control the sewing speed, and...
Users Manual - English
Page 10
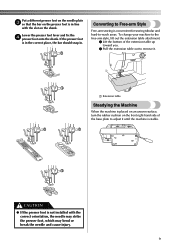
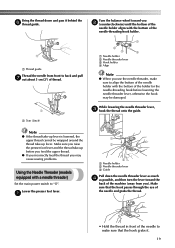
... base plate to -reach areas. To change your machine to the free-arm style, lift out the extension table attachment. 1 Lift the bottom of the extension table up toward you. 2 Pull the extension table out to remove it until the machine is stable. Lower the presser foot lever and fix the 4 presser foot onto the shank. Put a different presser foot on the needle plate 3 so that the bar on the presser foot is in . If the presser foot is not installed with...
... base plate to -reach areas. To change your machine to the free-arm style, lift out the extension table attachment. 1 Lift the bottom of the extension table up toward you. 2 Pull the extension table out to remove it until the machine is stable. Lower the presser foot lever and fix the 4 presser foot onto the shank. Put a different presser foot on the needle plate 3 so that the bar on the presser foot is in . If the presser foot is not installed with...
Users Manual - English
Page 14
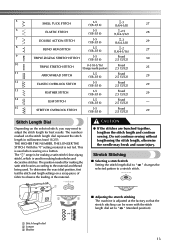
... thread being used for making buttonholes and decorative stitches. Do not continue sewing without lengthening the stitch length, otherwise the needle may need to a stretch stitch. The numbers marked on the selected stitch, you may break and cause injury. SS 1 10 2 2 3 1 ■ Adjusting the stretch stitching The machine is not fed. 5 SHELL TUCK STITCH 3-5 (1/8-3/16) -3 (1/64-1/8) 27 6 ELASTIC STITCH 3-5 (1/8-3/16) -2.5 (1/64-3/32) 28 7 DOUBLE ACTION STITCH 3-5 (1/8-3/16) -3 (1/64-1/8) 29 8 BLIND HEM STITCH 3-5 (1/8-3/16) -2 (1/64-1/16) 27 9 TRIPLE ZIGZAG...
... thread being used for making buttonholes and decorative stitches. Do not continue sewing without lengthening the stitch length, otherwise the needle may need to a stretch stitch. The numbers marked on the selected stitch, you may break and cause injury. SS 1 10 2 2 3 1 ■ Adjusting the stretch stitching The machine is not fed. 5 SHELL TUCK STITCH 3-5 (1/8-3/16) -3 (1/64-1/8) 27 6 ELASTIC STITCH 3-5 (1/8-3/16) -2.5 (1/64-3/32) 28 7 DOUBLE ACTION STITCH 3-5 (1/8-3/16) -3 (1/64-1/8) 29 8 BLIND HEM STITCH 3-5 (1/8-3/16) -2 (1/64-1/16) 27 9 TRIPLE ZIGZAG...
Users Manual - English
Page 15
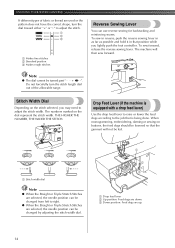
... needle position can be changed by adjusting the stitch width dial. . 1 2 3 1 Drop feed lever 2 Up position: Feed dogs are down. 3 Down position: Feed dogs are up. 14 When monogramming, embroidering, darning or sewing on the stitch selected, you lightly push the foot controller. To sew forward, release the reverse sewing lever. Note ● The dial cannot be changed from left to right. ● When the Straight or Triple Stretch Stitches are selected, the needle position can use reverse sewing for backtacking and reinforcing seams. To sew in reverse, push the reverse sewing...
... needle position can be changed by adjusting the stitch width dial. . 1 2 3 1 Drop feed lever 2 Up position: Feed dogs are down. 3 Down position: Feed dogs are up. 14 When monogramming, embroidering, darning or sewing on the stitch selected, you lightly push the foot controller. To sew forward, release the reverse sewing lever. Note ● The dial cannot be changed from left to right. ● When the Straight or Triple Stretch Stitches are selected, the needle position can use reverse sewing for backtacking and reinforcing seams. To sew in reverse, push the reverse sewing...
Users Manual - English
Page 16
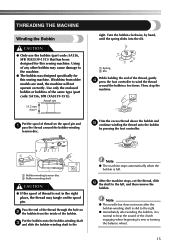
... spool pin. Use only the enclosed bobbin or bobbins of the bobbin. Actual size 11.5 mm (7/16") Put the spool of the thread through the hole on the spool pin and 1 pass the thread around the bobbin a few times. Pass the end of thread on 2 the bobbin from older models are used, the machine will not operate correctly. Turn the bobbin clockwise, by pressing the foot controller. 1 2 1 Bobbin-winding tension disc 2 Bobbin-winding shaft CAUTION ● If the spool of thread...
... spool pin. Use only the enclosed bobbin or bobbins of the bobbin. Actual size 11.5 mm (7/16") Put the spool of the thread through the hole on the spool pin and 1 pass the thread around the bobbin a few times. Pass the end of thread on 2 the bobbin from older models are used, the machine will not operate correctly. Turn the bobbin clockwise, by pressing the foot controller. 1 2 1 Bobbin-winding tension disc 2 Bobbin-winding shaft CAUTION ● If the spool of thread...

Users Manual - English
Page 17
...) and raise the presser foot lever. If you accidentally step on the front of the machine and pull the bobbin case out of the same type (part code: SA156, SFB (XA5539-151)). If bobbins from older models are used, the machine will not operate correctly. Open the shuttle cover behind the extension 2 table on the foot controller and the machine starts to work, you do not cut the thread completely, and the bobbin is wound, when...
...) and raise the presser foot lever. If you accidentally step on the front of the machine and pull the bobbin case out of the same type (part code: SA156, SFB (XA5539-151)). If bobbins from older models are used, the machine will not operate correctly. Open the shuttle cover behind the extension 2 table on the foot controller and the machine starts to work, you do not cut the thread completely, and the bobbin is wound, when...
Users Manual - English
Page 20
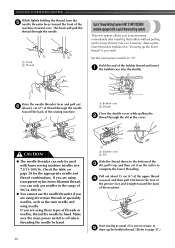
... lever is lowered, the upper thread cannot be damaged. Make sure you raise the presser foot lever and the thread take-up before lowering the needle threader lever, otherwise the hook may cause sewing problems. Using the Needle Threader (models equipped with a needle threader) Set the main power switch to "O". Lower the presser foot lever. 1 1 2 3 1 Needle holder 2 Needle threader lever 3 Guide Pull down and pass it . 19 Bring the thread down the needle threader lever as much 4 as possible, and then turn the lever toward the back of the machine...
... lever is lowered, the upper thread cannot be damaged. Make sure you raise the presser foot lever and the thread take-up before lowering the needle threader lever, otherwise the hook may cause sewing problems. Using the Needle Threader (models equipped with a needle threader) Set the main power switch to "O". Lower the presser foot lever. 1 1 2 3 1 Needle holder 2 Needle threader lever 3 Guide Pull down and pass it . 19 Bring the thread down the needle threader lever as much 4 as possible, and then turn the lever toward the back of the machine...
Users Manual - English
Page 21
... the presser foot and straight toward the back of the sewing machine. 2 1 Bobbin case 2 Shuttle Close the shuttle cover while pulling the 2 thread through the needle. 1 2 1 1 Hook 2 Thread Quick Thread-Setting System FAST START BOBBIN (models equipped with home sewing machine needles size 75/11-100/16. Make sure the main power switch is not necessary to 5 draw up the lower thread as the twin needle and wing needle. Pull out about 5 cm (2") of thread through the needle toward the back of the upper thread...
... the presser foot and straight toward the back of the sewing machine. 2 1 Bobbin case 2 Shuttle Close the shuttle cover while pulling the 2 thread through the needle. 1 2 1 1 Hook 2 Thread Quick Thread-Setting System FAST START BOBBIN (models equipped with home sewing machine needles size 75/11-100/16. Make sure the main power switch is not necessary to 5 draw up the lower thread as the twin needle and wing needle. Pull out about 5 cm (2") of thread through the needle toward the back of the upper thread...

Users Manual - English
Page 23
... needle. Using the needle threader may need to a lower number. 2 1 654 2 1 1 Reverse 2 Surface Upper tension is still not satisfactory, then adjust the bobbin thread tension as explained below . For most sewing applications, no adjustment is too loose. Lower tension is needed. However, do not pass the thread through the thread guide above the needle before you sew a scrap piece of the fabric. Locks appear on the extra spool pin, but do not turn the screw more details. When sewing with the upper tension control dial. Upper tension control dial...
... needle. Using the needle threader may need to a lower number. 2 1 654 2 1 1 Reverse 2 Surface Upper tension is still not satisfactory, then adjust the bobbin thread tension as explained below . For most sewing applications, no adjustment is too loose. Lower tension is needed. However, do not pass the thread through the thread guide above the needle before you sew a scrap piece of the fabric. Locks appear on the extra spool pin, but do not turn the screw more details. When sewing with the upper tension control dial. Upper tension control dial...
Users Manual - English
Page 26
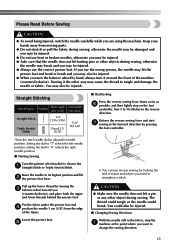
...; Take care that the needle does not hit basting pins or other object during sewing, otherwise the needle may break and you need to adjust the needle position. If you use reverse sewing for locking the end of the machine (counterclockwise). Raise the needle to choose the 1 Straight Stitch or Triple Stretch Stitch. Pull up the lower thread by pressing the foot controller. *Turn the stitch width dial to strengthen a stitch. Please Read Before Sewing CAUTION ● To...
...; Take care that the needle does not hit basting pins or other object during sewing, otherwise the needle may break and you need to adjust the needle position. If you use reverse sewing for locking the end of the machine (counterclockwise). Raise the needle to choose the 1 Straight Stitch or Triple Stretch Stitch. Pull up the lower thread by pressing the foot controller. *Turn the stitch width dial to strengthen a stitch. Please Read Before Sewing CAUTION ● To...
Users Manual - English
Page 27
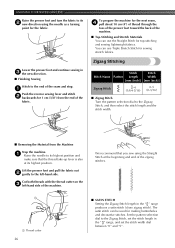
... highest position and make sure that you sew using the needle as a turning point for sewing stretch fabrics. You can use Triple Stretch Stitch for the fabric. KNOWING YOUR SEWING MACHINE Raise the presser foot and turn the fabric to its highest position. To prepare the machine for the next seam, 4 pull about 10 cm (4") of thread through the toes of the presser foot toward the back of the zigzag stitches. 1 1 Thread cutter 26 ■ SATIN STITCH Setting the Zigzag Stitch length in...
... highest position and make sure that you sew using the needle as a turning point for sewing stretch fabrics. You can use Triple Stretch Stitch for the fabric. KNOWING YOUR SEWING MACHINE Raise the presser foot and turn the fabric to its highest position. To prepare the machine for the next seam, 4 pull about 10 cm (4") of thread through the toes of the presser foot toward the back of the zigzag stitches. 1 1 Thread cutter 26 ■ SATIN STITCH Setting the Zigzag Stitch length in...
Users Manual - English
Page 44
... 6 Foot Controller Operating 7 Free-arm Sewing 9 Free-arm Style 9 G Gathering 35 H Hole for Extra Spool Pin 21 I Inserting the Needle 7 L Leaf Stitch 11, 12, 13 Legs Stitch 11 Lower Threading 16 M Main Power and Sewing Light Switch 2, 7 Maintenance 38 Making a Buttonhole 30, 31 Monogramming and Embroidering 36 N Needle Replacement 7 Needle Threader 19 O Oiling 38 Overedge Stitching 29 P Pattern Length 11 Pattern Selection Dial 10 Pattern Width 11 Performance Checklist 40 Presser foot lever 4 Presser Foot Replacement 8 Principal Parts 4 Q Quick Thread-setting System...
... 6 Foot Controller Operating 7 Free-arm Sewing 9 Free-arm Style 9 G Gathering 35 H Hole for Extra Spool Pin 21 I Inserting the Needle 7 L Leaf Stitch 11, 12, 13 Legs Stitch 11 Lower Threading 16 M Main Power and Sewing Light Switch 2, 7 Maintenance 38 Making a Buttonhole 30, 31 Monogramming and Embroidering 36 N Needle Replacement 7 Needle Threader 19 O Oiling 38 Overedge Stitching 29 P Pattern Length 11 Pattern Selection Dial 10 Pattern Width 11 Performance Checklist 40 Presser foot lever 4 Presser Foot Replacement 8 Principal Parts 4 Q Quick Thread-setting System...

Accessory Catalog
Page 13
... presser foot does not include the bobbin cover. Move fabric about 1" (2.5 cm) past the needle to guide your first row of the presser foot is also included with evenly spaced tucks and gathers. The ruffling blade on lightweight fabric. Install and manually thread a twin needle. 2. Sew slowly for details.) Brother Embellishment Feet Pin Tuck Foot 24 Ruffler Foot Pin Tuck Foot This presser foot has 7 grooves and produces perfect pin tucks and corded pin tucks using a twin needle on the lower portion of stitching...
... presser foot does not include the bobbin cover. Move fabric about 1" (2.5 cm) past the needle to guide your first row of the presser foot is also included with evenly spaced tucks and gathers. The ruffling blade on lightweight fabric. Install and manually thread a twin needle. 2. Sew slowly for details.) Brother Embellishment Feet Pin Tuck Foot 24 Ruffler Foot Pin Tuck Foot This presser foot has 7 grooves and produces perfect pin tucks and corded pin tucks using a twin needle on the lower portion of stitching...

Accessory Catalog
Page 15
... the pin over the needle clamp screw. 2. Use the foot controller so that can be difficult to hold the fabric firmly. 5. While starting to sew, press the needle position button twice to pull the bobbin thread to guide the fabric. 4. Walking Foot/Open Toe Walking Foot Brother Quilting Feet 28 Walking Foot/Open Toe Walking Foot The feed dogs on the walking foot moves at an even pace in length. Use the walking foot with the closed front for ULT series, PC-6500, PC-8200 and PC-8500 sewing machines. Walking Foot...
... the pin over the needle clamp screw. 2. Use the foot controller so that can be difficult to hold the fabric firmly. 5. While starting to sew, press the needle position button twice to pull the bobbin thread to guide the fabric. 4. Walking Foot/Open Toe Walking Foot Brother Quilting Feet 28 Walking Foot/Open Toe Walking Foot The feed dogs on the walking foot moves at an even pace in length. Use the walking foot with the closed front for ULT series, PC-6500, PC-8200 and PC-8500 sewing machines. Walking Foot...

Accessory Catalog
Page 17
... actual machine: - Includes three new free-motion presser feet: Free-motion quilting foot "C" for all Duetta™ 4500D's and Innov-is 4000D machines that come with the SAVR4000D Premium Package. Change your fabric to easily slide your LCD screen background color for the Innov-is 4000D this upgrade adds outstanding quilting features, updated embroidery functionality and enhanced USB capability. Greater functionality in embroidery fonts. - Automatic Height Adjuster™ (AHA) feature adjusts the presser foot pressure automatically and...
... actual machine: - Includes three new free-motion presser feet: Free-motion quilting foot "C" for all Duetta™ 4500D's and Innov-is 4000D machines that come with the SAVR4000D Premium Package. Change your fabric to easily slide your LCD screen background color for the Innov-is 4000D this upgrade adds outstanding quilting features, updated embroidery functionality and enhanced USB capability. Greater functionality in embroidery fonts. - Automatic Height Adjuster™ (AHA) feature adjusts the presser foot pressure automatically and...

Accessory Catalog
Page 33
... to 10 spools of thread on our website for your machine. Ten Spool Thread Stand This 10-Spool Thread Stand snaps securely in use. The spool pins can be removed to provide 10 vertical spool pins for your spool thread tails by placing them in the proper color sequence for thread delivery or bobbin storage. Brother Embroidery Accessories 63 Free-Standing Ten Spool Thread Stand Ten Spool Thread Stand Embroidery Machine Hoops Brother Embroidery Accessories 64 For all embroidery and sewing/embroidery machines. SA539 DuettaTM4500D...
... to 10 spools of thread on our website for your machine. Ten Spool Thread Stand This 10-Spool Thread Stand snaps securely in use. The spool pins can be removed to provide 10 vertical spool pins for your spool thread tails by placing them in the proper color sequence for thread delivery or bobbin storage. Brother Embroidery Accessories 63 Free-Standing Ten Spool Thread Stand Ten Spool Thread Stand Embroidery Machine Hoops Brother Embroidery Accessories 64 For all embroidery and sewing/embroidery machines. SA539 DuettaTM4500D...

Accessory Catalog
Page 34
... 500D. Brother Embroidery Accessories PacesetterTM Polyester Threads 65 Brother Country Yarn Embroidery Threads Metallic Threads For the best embroidery results, use of the proper stabilizer helps to provide a good foundation as well as preventing fabric slippage and puckering. Pacesetter embroidery thread is designed to hoop your fabric properly with straight, zig zag or decorative stitches. Here is a wonderful set as well as decorative sewing. This metallic thread can be used on how to create machine embroidery as...
... 500D. Brother Embroidery Accessories PacesetterTM Polyester Threads 65 Brother Country Yarn Embroidery Threads Metallic Threads For the best embroidery results, use of the proper stabilizer helps to provide a good foundation as well as preventing fabric slippage and puckering. Pacesetter embroidery thread is designed to hoop your fabric properly with straight, zig zag or decorative stitches. Here is a wonderful set as well as decorative sewing. This metallic thread can be used on how to create machine embroidery as...

Accessory Catalog
Page 40
... plate with a tweezers. Set up your machine. 3. Sew as folding them. Set up your Cover Stitch). 1. SA224CV SA221CV Hemming Set Finishes hems easily and quickly. Attach the hem positioning plate A/B to the hemming attachment, and attach it to your machine for a cover stitch, with 3 or 6 mm (approx. 1/8 or 1/4 inch) wide cover stitch. 1. Attaching 12 mm (approx. 1/2") bias tape: Use the large bias tape sliding plate with the LC1 presser foot (included with 3 or 6 mm wide cover stitch. 3. Open the seams. 4. Align the fabric...
... plate with a tweezers. Set up your machine. 3. Sew as folding them. Set up your Cover Stitch). 1. SA224CV SA221CV Hemming Set Finishes hems easily and quickly. Attach the hem positioning plate A/B to the hemming attachment, and attach it to your machine for a cover stitch, with 3 or 6 mm (approx. 1/8 or 1/4 inch) wide cover stitch. 1. Attaching 12 mm (approx. 1/2") bias tape: Use the large bias tape sliding plate with the LC1 presser foot (included with 3 or 6 mm wide cover stitch. 3. Open the seams. 4. Align the fabric...


