
Users Manual - English
Page 2
... the machine, set the main switch to persons: 1. This sewing machine is intended for use by pulling on the cord. SAVE THESE INSTRUCTIONS This machine is not intended for household use . Do not allow this machine to turn it to break. 12. Keep fingers away from all... or injury to the "{" position (which represents off when making any air openings blocked. The machine should be left unattended while plugged in the instruction manual. 16. Always unplug the machine before use . 1 Replace the bulb with any other user servicing adjustments mentioned in . To reduce the ...
... the machine, set the main switch to persons: 1. This sewing machine is intended for use by pulling on the cord. SAVE THESE INSTRUCTIONS This machine is not intended for household use . Do not allow this machine to turn it to break. 12. Keep fingers away from all... or injury to the "{" position (which represents off when making any air openings blocked. The machine should be left unattended while plugged in the instruction manual. 16. Always unplug the machine before use . 1 Replace the bulb with any other user servicing adjustments mentioned in . To reduce the ...

Users Manual - English
Page 4
CONTENTS IMPORTANT SAFETY INSTRUCTIONS 1 CONNECTING PLUGS AND MAIN POWER/SEWING LIGHT SWITCH 2 CONTENTS ...3 PRINCIPAL PARTS ...4 ACCESSORIES ...5 USING YOUR SEWING MACHINE 6 Connecting Plugs ...6 Main Power/Sewing Light Switch ...7 Foot Controller ...7 ...
CONTENTS IMPORTANT SAFETY INSTRUCTIONS 1 CONNECTING PLUGS AND MAIN POWER/SEWING LIGHT SWITCH 2 CONTENTS ...3 PRINCIPAL PARTS ...4 ACCESSORIES ...5 USING YOUR SEWING MACHINE 6 Connecting Plugs ...6 Main Power/Sewing Light Switch ...7 Foot Controller ...7 ...

Users Manual - English
Page 12
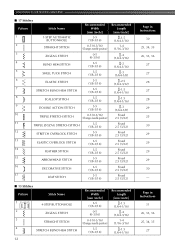
...) -3 (1/64-1/8) -3 (1/64-1/8) -3 (1/64-1/8) Fixed 2.5 (3/32) Fixed 2.5 (3/32) Fixed 2.5 (3/32) Fixed 2.5 (3/32) Fixed 2.5 (3/32) Fixed 2.5 (3/32) Fixed 2.5 (3/32) Fixed 2.5 (3/32) Fixed 2.5 (3/32) Fixed 2.5 (3/32) Page in Instructions 30 25, 34, 35 26, 33, 36 27 27 28 27 28 29 - - 25 30 29 29 29 29 30 - - - 11
...) -3 (1/64-1/8) -3 (1/64-1/8) -3 (1/64-1/8) Fixed 2.5 (3/32) Fixed 2.5 (3/32) Fixed 2.5 (3/32) Fixed 2.5 (3/32) Fixed 2.5 (3/32) Fixed 2.5 (3/32) Fixed 2.5 (3/32) Fixed 2.5 (3/32) Fixed 2.5 (3/32) Fixed 2.5 (3/32) Page in Instructions 30 25, 34, 35 26, 33, 36 27 27 28 27 28 29 - - 25 30 29 29 29 29 30 - - - 11
Users Manual - English
Page 13
Page in Instructions 30 25, 34, 35 26, 33, 36 27 27 28 27 28 29 25 30 29 29 29 29 30 - KNOWING YOUR SEWING MACHINE ■ ... Recommended Width [mm (inch)] 3-5 (1/8-3/16) 0-5 (0-3/16) 0-5 (0-3/16) (Changes needle position) 3-5 (1/8-3/16) Recommended Length [mm (inch)] -1.5 (1/64-1/16) -4 (1/64-3/16) 1-4 (1/16-3/16) -1.5 (1/64-1/16) Page in Instructions 31 26, 33, 36 25, 34, 35 27
Page in Instructions 30 25, 34, 35 26, 33, 36 27 27 28 27 28 29 25 30 29 29 29 29 30 - KNOWING YOUR SEWING MACHINE ■ ... Recommended Width [mm (inch)] 3-5 (1/8-3/16) 0-5 (0-3/16) 0-5 (0-3/16) (Changes needle position) 3-5 (1/8-3/16) Recommended Length [mm (inch)] -1.5 (1/64-1/16) -4 (1/64-3/16) 1-4 (1/16-3/16) -1.5 (1/64-1/16) Page in Instructions 31 26, 33, 36 25, 34, 35 27

Users Manual - English
Page 17
.... If bobbins from older models are used, the machine will not operate correctly. Actual size 11.5 mm (7/16") CAUTION ● Make sure you follow the instructions carefully. If you . 1 2 1 Bobbin case latch 2 Bobbin case finger 16 If you accidentally step on the front of the machine and pull the bobbin case...
.... If bobbins from older models are used, the machine will not operate correctly. Actual size 11.5 mm (7/16") CAUTION ● Make sure you follow the instructions carefully. If you . 1 2 1 Bobbin case latch 2 Bobbin case finger 16 If you accidentally step on the front of the machine and pull the bobbin case...

Users Manual - English
Page 23
... guide 2 Left needle thread passes in a clockwise direction. Decrease the thread tension by turning the dial to back. Threading the Right Needle 1 Follow the same instructions for general use the needle threader to its original position before you change fabric or thread. See page 18 for more than one full turn...
... guide 2 Left needle thread passes in a clockwise direction. Decrease the thread tension by turning the dial to back. Threading the Right Needle 1 Follow the same instructions for general use the needle threader to its original position before you change fabric or thread. See page 18 for more than one full turn...

Accessory Catalog
Page 34
...machines, PE750D and PE700II. Designed for high speed embroidery stitching, made in a 5-pack sleeve) at selected dealers. 30-Pack: CYTPK30 Brother Countr y Yarn Embroider y Threads (30 Color Thread Pack) Attention all embroiderers, Quilters and Heirloom stitchers! This metallic thread can be ...Brother sewing and embroidering machines. 61 Color Thread Set with Wooden Rack ETKSP999 PacesetterTM Polyester Threads (61 Color Thread Set with a high nap such as fur or terrycloth. Available in a 5-pack sleeve). 300 meters (328 yards) of needle and stabilizer types. Consult your instruction...
...machines, PE750D and PE700II. Designed for high speed embroidery stitching, made in a 5-pack sleeve) at selected dealers. 30-Pack: CYTPK30 Brother Countr y Yarn Embroider y Threads (30 Color Thread Pack) Attention all embroiderers, Quilters and Heirloom stitchers! This metallic thread can be ...Brother sewing and embroidering machines. 61 Color Thread Set with Wooden Rack ETKSP999 PacesetterTM Polyester Threads (61 Color Thread Set with a high nap such as fur or terrycloth. Available in a 5-pack sleeve). 300 meters (328 yards) of needle and stabilizer types. Consult your instruction...

