
Users Manual - English
Page 2
... machine from the electrical outlet when removing covers, lubricating, or when making any air openings blocked. Do not use by the manufacturer as threading the needle, changing the needle, threading the bobbin, or changing the presser foot. 15. To unplug, grasp the plug, not the cord. 10. Replace the bulb with any...
... machine from the electrical outlet when removing covers, lubricating, or when making any air openings blocked. Do not use by the manufacturer as threading the needle, changing the needle, threading the bobbin, or changing the presser foot. 15. To unplug, grasp the plug, not the cord. 10. Replace the bulb with any...

Users Manual - English
Page 4
... Needle Threader (models equipped with a needle threader 19 Quick Thread-Setting System FAST START BOBBIN (models equipped with a quick thread-setting system) .... 20 Drawing up the lower thread ...21 Sewing with a Twin Needle ...21 Tension of the Thread ...22 CHART OF SEWING FABRICS, NEEDLES AND THREAD COMBINATIONS 24 Please Read Before Sewing ...25 Straight Stitching...
... Needle Threader (models equipped with a needle threader 19 Quick Thread-Setting System FAST START BOBBIN (models equipped with a quick thread-setting system) .... 20 Drawing up the lower thread ...21 Sewing with a Twin Needle ...21 Tension of the Thread ...22 CHART OF SEWING FABRICS, NEEDLES AND THREAD COMBINATIONS 24 Please Read Before Sewing ...25 Straight Stitching...

Users Manual - English
Page 5
...control the sewing speed, and to start and stop sewing. KNOWING YOUR SEWING MACHINE PRINCIPAL PARTS 1 Bobbin-winding assembly (page 15) This winds the thread onto the bobbin, which you use this to stitch in the reverse direction. A Buttonhole fine adjustment screw (page 33) B Buttonhole lever (1-Step ... on certain models. 4 D Handle E Balance wheel Turn toward you want. 9 Stitch length dial (page 13) This controls the length of the upper thread. 7 Stitch width dial (page 14) This controls the stitch width. 8 Pattern selection dial (page 10) You can turn this in the foot controller...
...control the sewing speed, and to start and stop sewing. KNOWING YOUR SEWING MACHINE PRINCIPAL PARTS 1 Bobbin-winding assembly (page 15) This winds the thread onto the bobbin, which you use this to stitch in the reverse direction. A Buttonhole fine adjustment screw (page 33) B Buttonhole lever (1-Step ... on certain models. 4 D Handle E Balance wheel Turn toward you want. 9 Stitch length dial (page 13) This controls the length of the upper thread. 7 Stitch width dial (page 14) This controls the stitch width. 8 Pattern selection dial (page 10) You can turn this in the foot controller...
Users Manual - English
Page 14
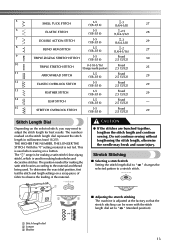
... needle may need to adjust the stitch length for making the satin stitch varies according to observe the feeding of fabric to the material and thread being used for best results. 5 SHELL TUCK STITCH 3-5 (1/8-3/16) -3 (1/64-1/8) 27 6 ELASTIC STITCH 3-5 (1/8-3/16) -2.5 (1/64-3/32) 28 7 DOUBLE ACTION STITCH 3-5 (1/8-3/16) -3 (1/64-1/8) 29 8 BLIND HEM...
... needle may need to adjust the stitch length for making the satin stitch varies according to observe the feeding of fabric to the material and thread being used for best results. 5 SHELL TUCK STITCH 3-5 (1/8-3/16) -3 (1/64-1/8) 27 6 ELASTIC STITCH 3-5 (1/8-3/16) -2.5 (1/64-3/32) 28 7 DOUBLE ACTION STITCH 3-5 (1/8-3/16) -3 (1/64-1/8) 29 8 BLIND HEM...
Users Manual - English
Page 15
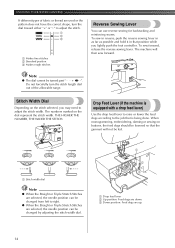
... THE NUMBER, THE WIDER THE STITCH. 1 Drop Feed Lever (if the machine is being done. KNOWING YOUR SEWING MACHINE If different types of fabric or thread are used or the pattern does not have the correct shape, turn the stitch length dial out of the allowable range. . Stitch Width Dial Depending...
... THE NUMBER, THE WIDER THE STITCH. 1 Drop Feed Lever (if the machine is being done. KNOWING YOUR SEWING MACHINE If different types of fabric or thread are used or the pattern does not have the correct shape, turn the stitch length dial out of the allowable range. . Stitch Width Dial Depending...
Users Manual - English
Page 16
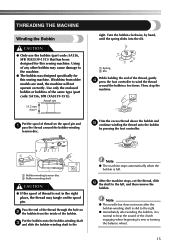
...stops automatically when the bobbin is normal to sew or turning the balance wheel. 15 Then, stop the machine. After the machine stops, cut the thread, slide 6 the shaft to the right. ● Immediately after the bobbin-winding shaft is slid to the left, and then remove the bobbin...the same type (part code: SA156, SFB (XA5539-151)). Note ● The needle bar does not move after winding the bobbin, it is full. THREADING THE MACHINE Winding the Bobbin CAUTION ● Only use the bobbin (part code: SA156, SFB (XA5539-151)) that has been designed for this sewing machine...
...stops automatically when the bobbin is normal to sew or turning the balance wheel. 15 Then, stop the machine. After the machine stops, cut the thread, slide 6 the shaft to the right. ● Immediately after the bobbin-winding shaft is slid to the left, and then remove the bobbin...the same type (part code: SA156, SFB (XA5539-151)). Note ● The needle bar does not move after winding the bobbin, it is full. THREADING THE MACHINE Winding the Bobbin CAUTION ● Only use the bobbin (part code: SA156, SFB (XA5539-151)) that has been designed for this sewing machine...

Users Manual - English
Page 17
... accidentally step on the front of the machine and pull the bobbin case out of the same type (part code: SA156, SFB (XA5539-151)). Lower Threading CAUTION ● Setting the bobbin improperly may break the needle. 1 2 1 Wound evenly 2 Wound poorly 1 2 1 Wound evenly 2 Wound poorly ● The bobbin was designed... the enclosed bobbin or bobbins of the shuttle race by turning 1 the balance wheel toward you do not cut the thread completely, and the bobbin is wound, when the thread runs low it may tangle around the bobbin and cause the needle to work, you turn the power off while...
... accidentally step on the front of the machine and pull the bobbin case out of the same type (part code: SA156, SFB (XA5539-151)). Lower Threading CAUTION ● Setting the bobbin improperly may break the needle. 1 2 1 Wound evenly 2 Wound poorly 1 2 1 Wound evenly 2 Wound poorly ● The bobbin was designed... the enclosed bobbin or bobbins of the shuttle race by turning 1 the balance wheel toward you do not cut the thread completely, and the bobbin is wound, when the thread runs low it may tangle around the bobbin and cause the needle to work, you turn the power off while...
Users Manual - English
Page 18
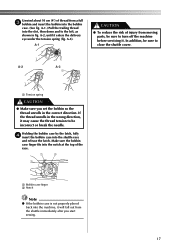
... spring (fig. In addition, be sure to be sure to turn off the machine before servicing it. A-1.) Pull the trailing thread into the shuttle race and release the latch. A-3). If the thread unrolls in fig. Holding the bobbin case by the latch, fully 4 insert the bobbin case into the slot, then down... and to the left, as shown in the wrong direction, it may cause the thread tension to close the shuttle cover. Unwind about 10 cm (4") of thread from a full 3 bobbin and insert the bobbin into the machine, it will fall out from moving parts, be incorrect...
... spring (fig. In addition, be sure to be sure to turn off the machine before servicing it. A-1.) Pull the trailing thread into the shuttle race and release the latch. A-3). If the thread unrolls in fig. Holding the bobbin case by the latch, fully 4 insert the bobbin case into the slot, then down... and to the left, as shown in the wrong direction, it may cause the thread tension to close the shuttle cover. Unwind about 10 cm (4") of thread from a full 3 bobbin and insert the bobbin into the machine, it will fall out from moving parts, be incorrect...
Users Manual - English
Page 19
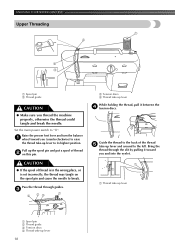
...Make sure you and into the eyelet. 1 1 1 Thread take-up lever 1 Spool pin 2 Thread guide 3 Tension discs 4 Thread take -up lever to "O". Pull up the spool pin and put a spool of thread is in the wrong place, or is set incorrectly, the thread may tangle on this pin. CAUTION ● If ...the needle to the left. Pass the thread through the slit by pulling it toward you (counterclockwise) to raise the thread take -up lever 18 Set the main power switch to its highest position. Bring the thread through guides. 3 4 23 1 3 Tension discs 4 Thread take -up lever and around to break...
...Make sure you and into the eyelet. 1 1 1 Thread take-up lever 1 Spool pin 2 Thread guide 3 Tension discs 4 Thread take -up lever to "O". Pull up the spool pin and put a spool of thread is in the wrong place, or is set incorrectly, the thread may tangle on this pin. CAUTION ● If ...the needle to the left. Pass the thread through the slit by pulling it toward you (counterclockwise) to raise the thread take -up lever 18 Set the main power switch to its highest position. Bring the thread through guides. 3 4 23 1 3 Tension discs 4 Thread take -up lever and around to break...
Users Manual - English
Page 20
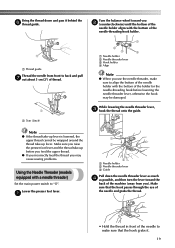
...to align the bottom of the needle holder with a needle threader) Set the main power switch to back and pull 7 out about 5 cm (2") of thread. 1 1 5cm (2inch) Turn the balance wheel toward you 2 (counterclockwise) until the bottom of the needle holder aligns with the bottom of the needle...3 Hook holder 4 Align Note ● When you use the needle threader, make sure that the hook grabs it behind the 6 thread guide. 1 1 Thread guide Thread the needle from you). Bring the thread down the needle threader lever as much 4 as possible, and then turn the lever toward the back of the machine (away...
...to align the bottom of the needle holder with a needle threader) Set the main power switch to back and pull 7 out about 5 cm (2") of thread. 1 1 5cm (2inch) Turn the balance wheel toward you 2 (counterclockwise) until the bottom of the needle holder aligns with the bottom of the needle...3 Hook holder 4 Align Note ● When you use the needle threader, make sure that the hook grabs it behind the 6 thread guide. 1 1 Thread guide Thread the needle from you). Bring the thread down the needle threader lever as much 4 as possible, and then turn the lever toward the back of the machine (away...
Users Manual - English
Page 21
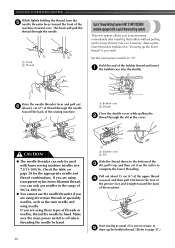
... the range of 90/14-100/16. ● You cannot use the needle threader if you are using transparent nylon mono-filament thread, you can only be used with a quick thread-setting system) This new system allows you ). If you wish. Start sewing as the twin needle and wing needle. KNOWING YOUR... SEWING MACHINE While lightly holding the thread, turn the 5 needle threader lever toward the front of the machine (toward the back of the machine. Set the main power switch to page 21...
... the range of 90/14-100/16. ● You cannot use the needle threader if you are using transparent nylon mono-filament thread, you can only be used with a quick thread-setting system) This new system allows you ). If you wish. Start sewing as the twin needle and wing needle. KNOWING YOUR... SEWING MACHINE While lightly holding the thread, turn the 5 needle threader lever toward the front of the machine (toward the back of the machine. Set the main power switch to page 21...
Users Manual - English
Page 22
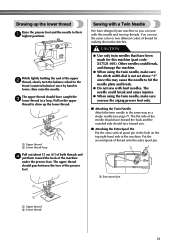
... is not set above "3" since this machine (part code: X57521-001). While lightly holding the end of thread onto the extra spool pin. 1 1 Extra spool pin 2 1 Upper thread 2 Lower thread 21 Other needles could break and cause injuries. ● When using the twin needle, make sure you use...wheel to the front (counterclockwise) once by hand to lower, then raise the needle. Drawing up the lower thread. 1 2 1 Upper thread 2 Lower thread loop Pull out about 15 cm (6") of both threads and 4 put them toward you can use the zigzag presser foot only. ■ Attaching the Twin Needle Attach...
... is not set above "3" since this machine (part code: X57521-001). While lightly holding the end of thread onto the extra spool pin. 1 1 Extra spool pin 2 1 Upper thread 2 Lower thread 21 Other needles could break and cause injuries. ● When using the twin needle, make sure you use...wheel to the front (counterclockwise) once by hand to lower, then raise the needle. Drawing up the lower thread. 1 2 1 Upper thread 2 Lower thread loop Pull out about 15 cm (6") of both threads and 4 put them toward you can use the zigzag presser foot only. ■ Attaching the Twin Needle Attach...

Users Manual - English
Page 23
...sewing on the reverse side of your stitches. Using the needle threader may need to back. Remember to return the screw to thread the twin needle. Threading the Left Needle 2 Thread the left needle in front of the left needle. 2 1 3 ■ Possible Problems If the Tension Is Wrong Upper ...tension is "5". 22 2 1 2 1 1 Reverse 2 Surface 654 Note ● The lower thread tension has been adjusted at the factory for general use the needle threader to its original position before starting your project. ● The basic...
...sewing on the reverse side of your stitches. Using the needle threader may need to back. Remember to return the screw to thread the twin needle. Threading the Left Needle 2 Thread the left needle in front of the left needle. 2 1 3 ■ Possible Problems If the Tension Is Wrong Upper ...tension is "5". 22 2 1 2 1 1 Reverse 2 Surface 654 Note ● The lower thread tension has been adjusted at the factory for general use the needle threader to its original position before starting your project. ● The basic...
Users Manual - English
Page 25
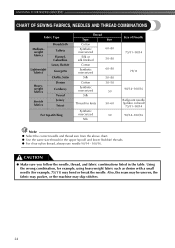
... Lightweight fabrics Heavyweight fabrics Stretch fabrics Broadcloth Taffeta Flannel, Gabardine Lawn, Batiste Georgette Challis, Satin Denim Corduroy Tweed Jersey Tricot For top-stitching Thread Type Cotton Synthetic mercerized Silk or silk finished Cotton Synthetic mercerized Silk Cotton Synthetic mercerized Silk Size 60-80 50-80 60-80 50-80... 30-50 50 Thread for knits 50-60 Synthetic mercerized 30 Silk Size of Needle 75/11-90/14 75/11 90/14-100/16 Ball-point needle ...
... Lightweight fabrics Heavyweight fabrics Stretch fabrics Broadcloth Taffeta Flannel, Gabardine Lawn, Batiste Georgette Challis, Satin Denim Corduroy Tweed Jersey Tricot For top-stitching Thread Type Cotton Synthetic mercerized Silk or silk finished Cotton Synthetic mercerized Silk Cotton Synthetic mercerized Silk Size 60-80 50-80 60-80 50-80... 30-50 50 Thread for knits 50-60 Synthetic mercerized 30 Silk Size of Needle 75/11-90/14 75/11 90/14-100/16 Ball-point needle ...
Users Manual - English
Page 26
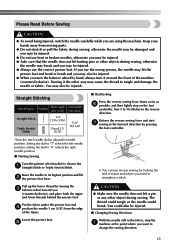
...the reverse sewing lever and start 7 sewing in the forward direction by turning the 3 balance wheel toward the front of the machine (counterclockwise). The thread could tangle or the needle could also be injured. You could break. Turning it toward you may also be injured. ● Always use the ... the needle may break and you may hit the presser foot and bend or break and you (counterclockwise), and place both the upper and lower threads behind the presser foot. If you use the correct presser foot. Raise the needle to "5" selects the left needle position; Lower the presser foot...
...the reverse sewing lever and start 7 sewing in the forward direction by turning the 3 balance wheel toward the front of the machine (counterclockwise). The thread could tangle or the needle could also be injured. You could break. Turning it toward you may also be injured. ● Always use the ... the needle may break and you may hit the presser foot and bend or break and you (counterclockwise), and place both the upper and lower threads behind the presser foot. If you use the correct presser foot. Raise the needle to "5" selects the left needle position; Lower the presser foot...
Users Manual - English
Page 27
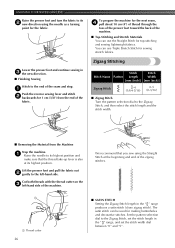
..."0" and "5". Lower the presser foot and continue sewing in 3 the new direction. ■ Finishing Sewing Stitch to the end of the zigzag stitches. 1 1 Thread cutter 26 ■ SATIN STITCH Setting the Zigzag Stitch length in the " " range, and set the stitch length in the " " range produces a satin stitch...Stop the machine. 1 Raise the needle to its highest position. The satin stitch can use the Straight Stitch for the fabric. Cut both threads with the thread cutter on the 3 left -hand side. Lift the presser foot and pull the fabric out 2 gently to the left -hand side of...
..."0" and "5". Lower the presser foot and continue sewing in 3 the new direction. ■ Finishing Sewing Stitch to the end of the zigzag stitches. 1 1 Thread cutter 26 ■ SATIN STITCH Setting the Zigzag Stitch length in the " " range, and set the stitch length in the " " range produces a satin stitch...Stop the machine. 1 Raise the needle to its highest position. The satin stitch can use the Straight Stitch for the fabric. Cut both threads with the thread cutter on the 3 left -hand side. Lift the presser foot and pull the fabric out 2 gently to the left -hand side of...

Users Manual - English
Page 28
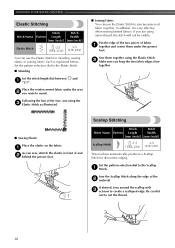
... stretch fabrics. A. Sew on the fold as in fig. C. 4 When the fabric is unfolded you will be used to the Shell Tuck Stitch. 1 Adjust the thread tension so that 3 it is useful for stretch fabrics. Set the pattern selection dial to sew a picot (lace-like the hem of a pair of the... on the seamline and the zigzag stitches sewn slightly over the folded edge. B. D. Sew at the edge. Fold back the hem, as the 1 fabric. Both threads should be the same color as shown in fig.
... stretch fabrics. A. Sew on the fold as in fig. C. 4 When the fabric is unfolded you will be used to the Shell Tuck Stitch. 1 Adjust the thread tension so that 3 it is useful for stretch fabrics. Set the pattern selection dial to sew a picot (lace-like the hem of a pair of the... on the seamline and the zigzag stitches sewn slightly over the folded edge. B. D. Sew at the edge. Fold back the hem, as the 1 fabric. Both threads should be the same color as shown in fig.
Users Manual - English
Page 29
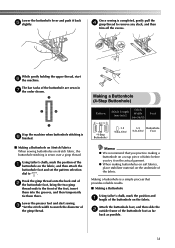
If desired, trim around the scallop with 3 scissors to cut the thread. 28 Sew the Scallop Stitch along the edge of fabric together. Be careful not to create a scalloped edge. If you sew, stretch the elastic in ...front of and 2 behind the presser foot. Following the line of fabric 1 together and center them together using nylon thread, the stitch will not be visible. Put the edge of the two pieces of the tear, sew using the 3 Elastic Stitch as illustrated. ■ Sewing...
If desired, trim around the scallop with 3 scissors to cut the thread. 28 Sew the Scallop Stitch along the edge of fabric together. Be careful not to create a scalloped edge. If you sew, stretch the elastic in ...front of and 2 behind the presser foot. Following the line of fabric 1 together and center them together using nylon thread, the stitch will not be visible. Put the edge of the two pieces of the tear, sew using the 3 Elastic Stitch as illustrated. ■ Sewing...
Users Manual - English
Page 32
...9632; Making a Buttonhole on Stretch Fabrics When sewing buttonholes on stretch fabric, the buttonhole stitching is completed, gently pull the 4 gimp thread to the front of the foot, insert them into the grooves, and then temporarily tie them there. PUSH PUSH PUSH While gently holding... of the 1 buttonhole on the fabric, and then attach the buttonhole foot and set the pattern selection dial to match the diameter of the gimp thread. Making a Buttonhole (4-Step Buttonhole) Pattern Stitch Length [mm (inch)] Stitch Width [mm (inch)] Foot (4-Step Buttonhole) -1.5 (1/64-1/16) 3-5 ...
...9632; Making a Buttonhole on Stretch Fabrics When sewing buttonholes on stretch fabric, the buttonhole stitching is completed, gently pull the 4 gimp thread to the front of the foot, insert them into the grooves, and then temporarily tie them there. PUSH PUSH PUSH While gently holding... of the 1 buttonhole on the fabric, and then attach the buttonhole foot and set the pattern selection dial to match the diameter of the gimp thread. Making a Buttonhole (4-Step Buttonhole) Pattern Stitch Length [mm (inch)] Stitch Width [mm (inch)] Foot (4-Step Buttonhole) -1.5 (1/64-1/16) 3-5 ...

Users Manual - English
Page 35
... for sewing the right side of the zipper Set the pattern selection dial to the right pin of the needle. Cut 6 the upper and lower threads and tie both threads at the back of the material 2 cm (3/4") and 3 place the zipper under the folded section. You may be injured. 34
... for sewing the right side of the zipper Set the pattern selection dial to the right pin of the needle. Cut 6 the upper and lower threads and tie both threads at the back of the material 2 cm (3/4") and 3 place the zipper under the folded section. You may be injured. 34


