
Users Manual - English
Page 4
...Threading ...18 Using the Needle Threader (models equipped with a needle threader 19 Quick Thread-Setting System FAST START BOBBIN (models equipped with a quick thread-setting system) .... 20 Drawing up the lower thread ...21 Sewing with a Twin Needle ...21...Overedge Stitching ...29 Feather Stitching ...29 Triple Zigzag Stretch Stitching ...30 Decorative Stitching ...30 Making a Buttonhole (1-Step Automatic Buttonhole 30 Making a Buttonhole (4-Step Buttonhole) ...31 Adjusting Buttonholes ...33 Sewing Buttons ...33 Zipper Insertion ...34 Gathering ...35 Darning...35 Appliqués ...36 ...
...Threading ...18 Using the Needle Threader (models equipped with a needle threader 19 Quick Thread-Setting System FAST START BOBBIN (models equipped with a quick thread-setting system) .... 20 Drawing up the lower thread ...21 Sewing with a Twin Needle ...21...Overedge Stitching ...29 Feather Stitching ...29 Triple Zigzag Stretch Stitching ...30 Decorative Stitching ...30 Making a Buttonhole (1-Step Automatic Buttonhole 30 Making a Buttonhole (4-Step Buttonhole) ...31 Adjusting Buttonholes ...33 Sewing Buttons ...33 Zipper Insertion ...34 Gathering ...35 Darning...35 Appliqués ...36 ...
Users Manual - English
Page 14
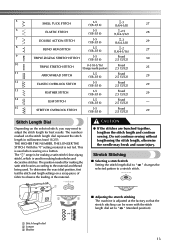
...according to " SS " (standard position). 1 Stitch length dial 2 Longer 3 Shorter 13 Stretch Stitching ■ Selecting a stretch stitch Setting the stitch length dial to " SS " changes the selected pattern to observe the feeding of fabric to a stretch stitch. Do not ...without lengthening the stitch length, otherwise the needle may need to adjust the stitch length for making buttonholes and decorative stitches. To determine the exact dial position, first test the stitch and length settings on a scrap piece of the material. 5 SHELL TUCK STITCH 3-5 (1/8-3/16) -3 (1/64-1/8) ...
...according to " SS " (standard position). 1 Stitch length dial 2 Longer 3 Shorter 13 Stretch Stitching ■ Selecting a stretch stitch Setting the stitch length dial to " SS " changes the selected pattern to observe the feeding of fabric to a stretch stitch. Do not ...without lengthening the stitch length, otherwise the needle may need to adjust the stitch length for making buttonholes and decorative stitches. To determine the exact dial position, first test the stitch and length settings on a scrap piece of the material. 5 SHELL TUCK STITCH 3-5 (1/8-3/16) -3 (1/64-1/8) ...
Users Manual - English
Page 27
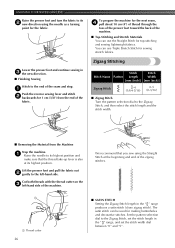
... toes of the presser foot toward the back of the machine. ■ Top-Stitching and Stretch Materials You can use Triple Stretch Stitch for making buttonholes and decorative stitches. Zigzag Stitching Stitch Stitch Stitch Name Pattern Length Width [mm (inch)] [mm (inch)] Zigzag Stitch -4 (1/64-3/16) 0-5 (0-3/16... and "5". Lower the presser foot and continue sewing in 3 the new direction. ■ Finishing Sewing Stitch to the end of the machine. Set the pattern selection dial to the left -hand side of the seam and stop. 1 Push the reverse sewing lever and stitch 2 backwards for...
... toes of the presser foot toward the back of the machine. ■ Top-Stitching and Stretch Materials You can use Triple Stretch Stitch for making buttonholes and decorative stitches. Zigzag Stitching Stitch Stitch Stitch Name Pattern Length Width [mm (inch)] [mm (inch)] Zigzag Stitch -4 (1/64-3/16) 0-5 (0-3/16... and "5". Lower the presser foot and continue sewing in 3 the new direction. ■ Finishing Sewing Stitch to the end of the machine. Set the pattern selection dial to the left -hand side of the seam and stop. 1 Push the reverse sewing lever and stitch 2 backwards for...
Users Manual - English
Page 31
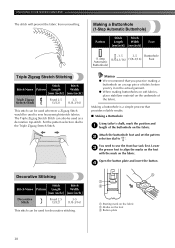
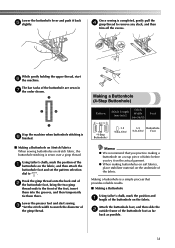
... plate and insert the button. 4 Decorative Stitching 3 1 - Attach the buttonhole foot and set the pattern 2 selection dial to sew the front bar tack first. Making a Buttonhole (1-Step Automatic Buttonhole) Stitch Stitch Pattern Length Width Foot [mm (inch)] [mm (inch)] -1.5 3-5 Buttonhole (1-Step (1/64-1/16) (1/8-3/16) Foot Automatic Buttonhole) Triple Zigzag Stretch Stitching Stitch Stitch Stitch Name Pattern...
... plate and insert the button. 4 Decorative Stitching 3 1 - Attach the buttonhole foot and set the pattern 2 selection dial to sew the front bar tack first. Making a Buttonhole (1-Step Automatic Buttonhole) Stitch Stitch Pattern Length Width Foot [mm (inch)] [mm (inch)] -1.5 3-5 Buttonhole (1-Step (1/64-1/16) (1/8-3/16) Foot Automatic Buttonhole) Triple Zigzag Stretch Stitching Stitch Stitch Stitch Name Pattern...
Users Manual - English
Page 32
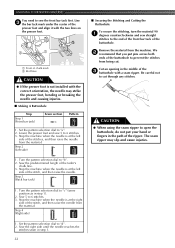
... [mm (inch)] Stitch Width [mm (inch)] Foot (4-Step Buttonhole) -1.5 (1/64-1/16) 3-5 Buttonhole (1/8-3/16) Foot Memo ● We recommend that provides reliable results. ■ Making a Buttonhole Using tailor's chalk, mark the position and 1 length of the buttonhole on the fabric, and then attach the buttonhole foot and set the pattern selection dial to match the diameter of...
... [mm (inch)] Stitch Width [mm (inch)] Foot (4-Step Buttonhole) -1.5 (1/64-1/16) 3-5 Buttonhole (1/8-3/16) Foot Memo ● We recommend that provides reliable results. ■ Making a Buttonhole Using tailor's chalk, mark the position and 1 length of the buttonhole on the fabric, and then attach the buttonhole foot and set the pattern selection dial to match the diameter of...
Users Manual - English
Page 33
...(Right side) d 1. Step Step 1 (Front bar tack) Sewn section a Pattern a/c c a 1. Stop the machine when the needle is at the left side of the buttonhole to sew the front bar tack first. Set the pattern selection dial to 6 stitches. 3. Be careful not to the end of the front bar tack of the...the presser foot. ■ Securing the Stitching and Cutting the Buttonhole To secure the stitching, turn the material 90 1 degrees counterclockwise and sew straight stitches to cut . Turn the pattern selection dial to "d". 2. Set the pattern selection dial to "c" (same position as in ...
...(Right side) d 1. Step Step 1 (Front bar tack) Sewn section a Pattern a/c c a 1. Stop the machine when the needle is at the left side of the buttonhole to sew the front bar tack first. Set the pattern selection dial to 6 stitches. 3. Be careful not to the end of the front bar tack of the...the presser foot. ■ Securing the Stitching and Cutting the Buttonhole To secure the stitching, turn the material 90 1 degrees counterclockwise and sew straight stitches to cut . Turn the pattern selection dial to "d". 2. Set the pattern selection dial to "c" (same position as in ...
Users Manual - English
Page 34
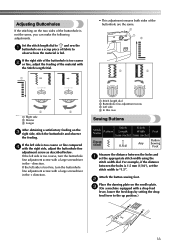
... to "1.5". Attach the button sewing foot. 2 Place the darning plate on the 3 right side, stitch the buttonhole and observe the feeding. Set the stitch length dial to " " and sew the 1 buttonhole on a scrap piece of fabric to the up position.) 33 If the left side is not the same, ... adjust the feeding of the material with the Stitch Length Dial. 1 • This adjustment ensures both sides of the buttonhole is too fine, turn the buttonhole fine adjustment screw with a drop feed lever, lower the feed dogs by setting the drop feed lever to observe how the material is 1.5 mm (1/16...
... to "1.5". Attach the button sewing foot. 2 Place the darning plate on the 3 right side, stitch the buttonhole and observe the feeding. Set the stitch length dial to " " and sew the 1 buttonhole on a scrap piece of fabric to the up position.) 33 If the left side is not the same, ... adjust the feeding of the material with the Stitch Length Dial. 1 • This adjustment ensures both sides of the buttonhole is too fine, turn the buttonhole fine adjustment screw with a drop feed lever, lower the feed dogs by setting the drop feed lever to observe how the material is 1.5 mm (1/16...
Users Manual - English
Page 44
..., 13, 29 B Blind Hem Stitch 11, 12, 13, 27 Bobbin Threading 15, 20 Bobbin Winder 15 Bridging Stitch 11 Buttonhole 30, 31 Buttonhole Fine Adjustment 33 Buttonhole Sewing 30, 31 C Changing Sewing Direction 25 Changing the Light Bulb 38 Changing the Presser Foot 8 Chart of Sewing Fabrics, ... Pattern Selection Dial 10 Pattern Width 11 Performance Checklist 40 Presser foot lever 4 Presser Foot Replacement 8 Principal Parts 4 Q Quick Thread-setting System 20 R Rampart Stitch 11 Recommended Widths and Lengths for Stitches 11 Repacking the Machine 42 Reverse Sewing Lever 14 43
..., 13, 29 B Blind Hem Stitch 11, 12, 13, 27 Bobbin Threading 15, 20 Bobbin Winder 15 Bridging Stitch 11 Buttonhole 30, 31 Buttonhole Fine Adjustment 33 Buttonhole Sewing 30, 31 C Changing Sewing Direction 25 Changing the Light Bulb 38 Changing the Presser Foot 8 Chart of Sewing Fabrics, ... Pattern Selection Dial 10 Pattern Width 11 Performance Checklist 40 Presser foot lever 4 Presser Foot Replacement 8 Principal Parts 4 Q Quick Thread-setting System 20 R Rampart Stitch 11 Recommended Widths and Lengths for Stitches 11 Repacking the Machine 42 Reverse Sewing Lever 14 43


