
Users Manual - English
Page 2
.... Use this manual. 3. Never drop or insert any object into water. This sewing machine is used as threading the needle, changing the needle, threading the bobbin, or changing the presser foot. 15. DANGER - Always unplug the machine from all instructions before use as described in this manual. Return the machine to...
.... Use this manual. 3. Never drop or insert any object into water. This sewing machine is used as threading the needle, changing the needle, threading the bobbin, or changing the presser foot. 15. DANGER - Always unplug the machine from all instructions before use as described in this manual. Return the machine to...

Users Manual - English
Page 4
... Sewing Lever ...14 Drop Feed Lever (if the machine is equipped with a drop feed lever 14 THREADING THE MACHINE 15 Winding the Bobbin ...15 Lower Threading ...16 Upper Threading ...18 Using the Needle Threader (models equipped with a needle threader 19 Quick Thread-Setting System FAST START... BOBBIN (models equipped with a quick thread-setting system) .... 20 Drawing up the lower thread ...21 Sewing with a Twin Needle ...21 Tension of the ...
... Sewing Lever ...14 Drop Feed Lever (if the machine is equipped with a drop feed lever 14 THREADING THE MACHINE 15 Winding the Bobbin ...15 Lower Threading ...16 Upper Threading ...18 Using the Needle Threader (models equipped with a needle threader 19 Quick Thread-Setting System FAST START... BOBBIN (models equipped with a quick thread-setting system) .... 20 Drawing up the lower thread ...21 Sewing with a Twin Needle ...21 Tension of the ...

Users Manual - English
Page 5
F Main power/sewing light switch (page 7) You can use for the lower thread. 2 Spool pin (page 15 and 18) Holds the spool of thread. 3 Bobbin-winding tension disc and thread guide (page 15) 4 Thread take-up lever (page 18) 5 Thread cutter (page 26) 6 Upper tension-control dial (page 22) ...receptacle (page 6) Plug in the foot controller plug and connect the machine to raise and lower the needle. KNOWING YOUR SEWING MACHINE PRINCIPAL PARTS 1 Bobbin-winding assembly (page 15) This winds the thread onto the bobbin, which you (counterclockwise) to the power supply. J Zigzag presser foot
F Main power/sewing light switch (page 7) You can use for the lower thread. 2 Spool pin (page 15 and 18) Holds the spool of thread. 3 Bobbin-winding tension disc and thread guide (page 15) 4 Thread take-up lever (page 18) 5 Thread cutter (page 26) 6 Upper tension-control dial (page 22) ...receptacle (page 6) Plug in the foot controller plug and connect the machine to raise and lower the needle. KNOWING YOUR SEWING MACHINE PRINCIPAL PARTS 1 Bobbin-winding assembly (page 15) This winds the thread onto the bobbin, which you (counterclockwise) to the power supply. J Zigzag presser foot
Users Manual - English
Page 6
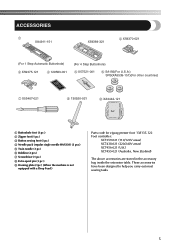
...-021 8 130920-021 9 XA3442-121 1 Buttonhole foot (1 pc.) 2 Zipper foot (1 pc.) 3 Button sewing foot (1 pc.) 4 Needle pack (regular single needle HAX130) (3 pcs.) 5 Twin needle (1 pc.) 6 Bobbins (3 pcs.) 7 Screwdriver (1 pc.) 8 Extra spool pin (1 pc.) 9 Darning plate (1pc.) (When the machine is not equipped with a Drop Feed.) Parts code for zigzag presser foot...
...-021 8 130920-021 9 XA3442-121 1 Buttonhole foot (1 pc.) 2 Zipper foot (1 pc.) 3 Button sewing foot (1 pc.) 4 Needle pack (regular single needle HAX130) (3 pcs.) 5 Twin needle (1 pc.) 6 Bobbins (3 pcs.) 7 Screwdriver (1 pc.) 8 Extra spool pin (1 pc.) 9 Darning plate (1pc.) (When the machine is not equipped with a Drop Feed.) Parts code for zigzag presser foot...
Users Manual - English
Page 16
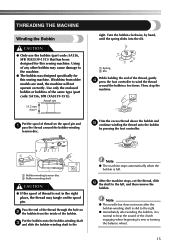
... the thread, gently 4 press the foot controller to the right. ● Immediately after winding the bobbin, it is full. Trim the excess thread above the bobbin and 5 continue winding the thread onto the bobbin by hand, until the spring slides into the slit. 1 Spring 2 Slit 2 1 While holding... operate correctly. Using of the bobbin. If bobbins from the inside of any other bobbin may tangle on the spool pin. Put the bobbin onto the bobbin-winding shaft 3 and slide the bobbin-winding shaft to the Note ● The machine stops automatically when the bobbin is normal to the left,...
... the thread, gently 4 press the foot controller to the right. ● Immediately after winding the bobbin, it is full. Trim the excess thread above the bobbin and 5 continue winding the thread onto the bobbin by hand, until the spring slides into the slit. 1 Spring 2 Slit 2 1 While holding... operate correctly. Using of the bobbin. If bobbins from the inside of any other bobbin may tangle on the spool pin. Put the bobbin onto the bobbin-winding shaft 3 and slide the bobbin-winding shaft to the Note ● The machine stops automatically when the bobbin is normal to the left,...

Users Manual - English
Page 17
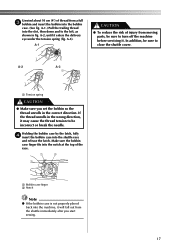
...foot controller and the machine starts to loosen, breaking the needle and resulting in injury. If bobbins from older models are used, the machine will not operate correctly. Use only the enclosed bobbin or bobbins of the shuttle race by turning 1 the balance wheel toward you could be injured. If you... accidentally step on the front of the machine and pull the bobbin case out of the same type (part code: SA156, SFB (XA5539-151)). Actual size 11.5 mm (7/16") CAUTION ● Make sure you ...
...foot controller and the machine starts to loosen, breaking the needle and resulting in injury. If bobbins from older models are used, the machine will not operate correctly. Use only the enclosed bobbin or bobbins of the shuttle race by turning 1 the balance wheel toward you could be injured. If you... accidentally step on the front of the machine and pull the bobbin case out of the same type (part code: SA156, SFB (XA5539-151)). Actual size 11.5 mm (7/16") CAUTION ● Make sure you ...
Users Manual - English
Page 18
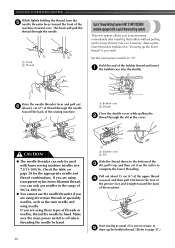
... from moving parts, be incorrect or break the needle. A-1 CAUTION ● To reduce the risk of thread from the shuttle immediately after you set the bobbin so the thread unrolls in the wrong direction, it . A-2 A-3 1 1 Tension spring CAUTION ● Make sure you start sewing. 17 A-2, until ...it will fall out from a full 3 bobbin and insert the bobbin into the machine, it enters the delivery eye under the tension spring (fig. A-3). Holding the bobbin case by the latch, fully 4 insert the bobbin case into the slot, then down and to turn off the ...
... from moving parts, be incorrect or break the needle. A-1 CAUTION ● To reduce the risk of thread from the shuttle immediately after you set the bobbin so the thread unrolls in the wrong direction, it . A-2 A-3 1 1 Tension spring CAUTION ● Make sure you start sewing. 17 A-2, until ...it will fall out from a full 3 bobbin and insert the bobbin into the machine, it enters the delivery eye under the tension spring (fig. A-3). Holding the bobbin case by the latch, fully 4 insert the bobbin case into the slot, then down and to turn off the ...
Users Manual - English
Page 21
...the thread through the slit in "Drawing up the lower thread. Hold the end of the bobbin thread and insert 1 the bobbin case into the shuttle. 1 Raise the needle threader lever and pull out 6 about 15 ...needle and thread combinations. Check the table on the cutter to start sewing immediately after inserting the bobbin without pulling up the lower thread" if you wish. If you are using these types of...1 1 Shuttle cover 2 Slit Slide the thread down to page 21.) You can, however, draw up the bobbin thread.) (Refer to the bottom of the 3 slit, pull it up, and then cut it between the ...
...the thread through the slit in "Drawing up the lower thread. Hold the end of the bobbin thread and insert 1 the bobbin case into the shuttle. 1 Raise the needle threader lever and pull out 6 about 15 ...needle and thread combinations. Check the table on the cutter to start sewing immediately after inserting the bobbin without pulling up the lower thread" if you wish. If you are using these types of...1 1 Shuttle cover 2 Slit Slide the thread down to page 21.) You can, however, draw up the bobbin thread.) (Refer to the bottom of the 3 slit, pull it up, and then cut it between the ...

Users Manual - English
Page 23
... Reverse 2 Surface Upper tension is needed. Tension of the Thread The tension of the thread will appear on your next project. Bobbin Increase the tension in the bobbin by turning the dial to back. Locks will affect the quality of the fabric. Locks appear on the surface of your stitches... the left needle. 2 1 3 ■ Possible Problems If the Tension Is Wrong Upper tension is still not satisfactory, then adjust the bobbin thread tension as explained below . Upper tension control dial Increase the tension by hand, from the spool on thin fabrics, the thread tension ...
... Reverse 2 Surface Upper tension is needed. Tension of the Thread The tension of the thread will appear on your next project. Bobbin Increase the tension in the bobbin by turning the dial to back. Locks will affect the quality of the fabric. Locks appear on the surface of your stitches... the left needle. 2 1 3 ■ Possible Problems If the Tension Is Wrong Upper tension is still not satisfactory, then adjust the bobbin thread tension as explained below . Upper tension control dial Increase the tension by hand, from the spool on thin fabrics, the thread tension ...
Users Manual - English
Page 25
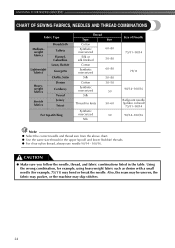
... listed in the table. Using the wrong combination, for example, using heavyweight fabric such as denim with a small needle (for the upper (spool) and lower (bobbin) threads. ● For clear nylon thread, always use needle 90/14 - 100/16. Also, the seam may be uneven, the fabric may pucker, or the...
... listed in the table. Using the wrong combination, for example, using heavyweight fabric such as denim with a small needle (for the upper (spool) and lower (bobbin) threads. ● For clear nylon thread, always use needle 90/14 - 100/16. Also, the seam may be uneven, the fabric may pucker, or the...

Users Manual - English
Page 40
.... Remove the extension table and open the 2 shuttle cover on the front of the shuttle race 3 by removing the 1 screws with machine oil. Take the bobbin case out of the free arm. Clean the shuttle hook as described in step 2. 3 When reinstalling the removed parts, hold the 4 retaining ring in place...
.... Remove the extension table and open the 2 shuttle cover on the front of the shuttle race 3 by removing the 1 screws with machine oil. Take the bobbin case out of the free arm. Clean the shuttle hook as described in step 2. 3 When reinstalling the removed parts, hold the 4 retaining ring in place...
Users Manual - English
Page 41
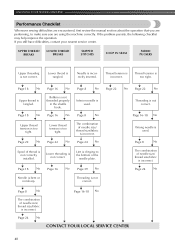
... . Page 24 No Spool of the needle plate. Threading is not correct. Page 22 No Page 22 No Threading is not correct. Page 18 No Bobbin is clinging to make sure you still have difficulties, contact your nearest service center. Lint is not threaded properly in the shuttle hook. KNOWING YOUR...
... . Page 24 No Spool of the needle plate. Threading is not correct. Page 22 No Page 22 No Threading is not correct. Page 18 No Bobbin is clinging to make sure you still have difficulties, contact your nearest service center. Lint is not threaded properly in the shuttle hook. KNOWING YOUR...

Users Manual - English
Page 42
.... Page 24 No Page 8 No Page 38 No Page 7 No Inferior needle is used . Page 18 No Page 24 No Fabric is slid toward the bobbin presser. Page 15 No Feed dogs are lowered. Inferior needle is incorrect. Do not pull the fabric. No Page 7 No The... bobbin winding shaft is pulled excessively. Main power switch is tangled. The combination of needle size/ thread size/fabric is used . Page 8 No Thread is turned ...
.... Page 24 No Page 8 No Page 38 No Page 7 No Inferior needle is used . Page 18 No Page 24 No Fabric is slid toward the bobbin presser. Page 15 No Feed dogs are lowered. Inferior needle is incorrect. Do not pull the fabric. No Page 7 No The... bobbin winding shaft is pulled excessively. Main power switch is tangled. The combination of needle size/ thread size/fabric is used . Page 8 No Thread is turned ...
Users Manual - English
Page 44
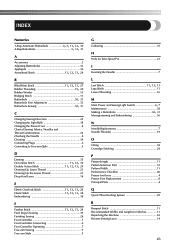
... Buttonhole 5, 12, 31 A Accessories 5 Adjusting Buttonholes 33 Appliqués 36 Arrowhead Stitch 11, 12, 13, 29 B Blind Hem Stitch 11, 12, 13, 27 Bobbin Threading 15, 20 Bobbin Winder 15 Bridging Stitch 11 Buttonhole 30, 31 Buttonhole Fine Adjustment 33 Buttonhole Sewing 30, 31 C Changing Sewing Direction 25 Changing the Light Bulb...
... Buttonhole 5, 12, 31 A Accessories 5 Adjusting Buttonholes 33 Appliqués 36 Arrowhead Stitch 11, 12, 13, 29 B Blind Hem Stitch 11, 12, 13, 27 Bobbin Threading 15, 20 Bobbin Winder 15 Bridging Stitch 11 Buttonhole 30, 31 Buttonhole Fine Adjustment 33 Buttonhole Sewing 30, 31 C Changing Sewing Direction 25 Changing the Light Bulb...
Users Manual - English
Page 45
... Blind Hem Stitch 11, 12, 27 Stretch Overlock Stitch 11, 12, 13, 29 Stretch Stitching 13 T Tension of the Thread 22 Thread Tension 22 Threading Bobbin 15 Threading Needle 19 Topstitching 26 Tree Stitch 11 Triple Stretch Stitch 11, 12, 13, 25 Triple Zigzag Stretch Stitch 11, 12, 13, 30 Twin... Needle Sewing 21 U Upper Tention Control Dial 22 Upper Threading 18 Using the Needle Threader 19 W Winding the Bobbin 15 Z Zigzag Presser Foot 4, 5 Zigzag Stitch 11, 12, 26, 33, 36 Zipper Foot 5, 34 Zipper Insertion 34 44
... Blind Hem Stitch 11, 12, 27 Stretch Overlock Stitch 11, 12, 13, 29 Stretch Stitching 13 T Tension of the Thread 22 Thread Tension 22 Threading Bobbin 15 Threading Needle 19 Topstitching 26 Tree Stitch 11 Triple Stretch Stitch 11, 12, 13, 25 Triple Zigzag Stretch Stitch 11, 12, 13, 30 Twin... Needle Sewing 21 U Upper Tention Control Dial 22 Upper Threading 18 Using the Needle Threader 19 W Winding the Bobbin 15 Z Zigzag Presser Foot 4, 5 Zigzag Stitch 11, 12, 26, 33, 36 Zipper Foot 5, 34 Zipper Insertion 34 44

Accessory Catalog
Page 6
... the needle and the presser foot. 4. Continue to sew to the end of the foot. 5. Select a desired stitch and sew. Overlock Foot For vertical bobbin machines only. Lower the presser foot so that the foot guide is Project Book (See page 53 for consistent feeding with the wrong side facing... is rolling around the curled part of the foot. 6. Raise the needle and the presser foot. 5. Non Stick Foot Designed for details.) www.brother.com Continue to sew to the end of the fabric. 4. Lower the needle into the fabric approximately 1/8" from the back and front and roll ...
... the needle and the presser foot. 4. Continue to sew to the end of the foot. 5. Select a desired stitch and sew. Overlock Foot For vertical bobbin machines only. Lower the presser foot so that the foot guide is Project Book (See page 53 for consistent feeding with the wrong side facing... is rolling around the curled part of the foot. 6. Raise the needle and the presser foot. 5. Non Stick Foot Designed for details.) www.brother.com Continue to sew to the end of the fabric. 4. Lower the needle into the fabric approximately 1/8" from the back and front and roll ...

Accessory Catalog
Page 9
...CS8150,8130,8120,8080,8070,8060,80 SE-270D,HE-120/HE120PKG Wide Tables Useful for quick and easy storage! Brother General Sewing Accessories 15 Bobbins Bobbins and Bobbin Clips Knee Lifter Bobbins There are waiting for easy reference. Available in Fall 2008. SA599 C:Innov-is 80, 40) Expand the ... Foot as you turn your machine to finish embroidering with easy-to each other for quilting and other large projects. The Bobbin Clip also allows each bobbin to clip to -thread cassette system. Use our Knee Lifter for your knee lifter and four adjustable table legs. Available ...
...CS8150,8130,8120,8080,8070,8060,80 SE-270D,HE-120/HE120PKG Wide Tables Useful for quick and easy storage! Brother General Sewing Accessories 15 Bobbins Bobbins and Bobbin Clips Knee Lifter Bobbins There are waiting for easy reference. Available in Fall 2008. SA599 C:Innov-is 80, 40) Expand the ... Foot as you turn your machine to finish embroidering with easy-to each other for quilting and other large projects. The Bobbin Clip also allows each bobbin to clip to -thread cassette system. Use our Knee Lifter for your knee lifter and four adjustable table legs. Available ...

Accessory Catalog
Page 13
...of tucks can be evenly spaced by trying different combinations of stitch length, tuck setting and depth setting. 2. Sew slowly for details.) Brother Embellishment Feet Pin Tuck Foot 24 Ruffler Foot Pin Tuck Foot This presser foot has 7 grooves and produces perfect pin tucks and corded .... For seven grooves: SA179 ABCDEJ For five grooves: SA162 IP This presser foot does not include the bobbin cover. SA143 AFJKM Ruffler Foot Makes ruffles with this presser foot. 1. www.brother.com Further rows can be adjusted. 1. The intervals of the grooves. 4. Adjust the amount of tuck...
...of tucks can be evenly spaced by trying different combinations of stitch length, tuck setting and depth setting. 2. Sew slowly for details.) Brother Embellishment Feet Pin Tuck Foot 24 Ruffler Foot Pin Tuck Foot This presser foot has 7 grooves and produces perfect pin tucks and corded .... For seven grooves: SA179 ABCDEJ For five grooves: SA162 IP This presser foot does not include the bobbin cover. SA143 AFJKM Ruffler Foot Makes ruffles with this presser foot. 1. www.brother.com Further rows can be adjusted. 1. The intervals of the grooves. 4. Adjust the amount of tuck...

Accessory Catalog
Page 15
...are created. 1. Place the fabric beneath the presser foot. 4. While starting to sew, press the needle position button twice to pull the bobbin thread to guide the fabric. 4. Lower the feed dogs. 2. Screw on the Open Toe Quilting Foot, with the needle to allow ...vinyl, leather, quilting layers and velvet can be moved between stitches and to feed the fabric consistently. When quilting is needed. 1. Brother Quilting Feet 27 Open Toe Quilting Foot Quilting Foot SA187 ABCDEFGHMNO SA129 ABCDEFGHMNO SA165 L Open Toe Quilting Foot The large opening on ...
...are created. 1. Place the fabric beneath the presser foot. 4. While starting to sew, press the needle position button twice to pull the bobbin thread to guide the fabric. 4. Lower the feed dogs. 2. Screw on the Open Toe Quilting Foot, with the needle to allow ...vinyl, leather, quilting layers and velvet can be moved between stitches and to feed the fabric consistently. When quilting is needed. 1. Brother Quilting Feet 27 Open Toe Quilting Foot Quilting Foot SA187 ABCDEFGHMNO SA129 ABCDEFGHMNO SA165 L Open Toe Quilting Foot The large opening on ...
Accessory Catalog
Page 18
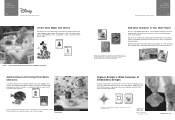
...fingertips. Add Excitement with these characters add a touch of Viacom International Inc. The collection continues to the entire family, all ages and all related titles, logos and characters are compatible only with Brother-branded home embroidery machines with every Brothermade home embroidery machine. ... Embroider the popular Nickelodeon characters and friends onto clothes, gifts and items using any Brother home embroidery machine with Disney Only Brother can offer a wide range of thread and 2 prewound bobbins. Disney appeals to grow and every card is Project Book (See page 13 for...
...fingertips. Add Excitement with these characters add a touch of Viacom International Inc. The collection continues to the entire family, all ages and all related titles, logos and characters are compatible only with Brother-branded home embroidery machines with every Brothermade home embroidery machine. ... Embroider the popular Nickelodeon characters and friends onto clothes, gifts and items using any Brother home embroidery machine with Disney Only Brother can offer a wide range of thread and 2 prewound bobbins. Disney appeals to grow and every card is Project Book (See page 13 for...


