Users Manual - English
Page 2
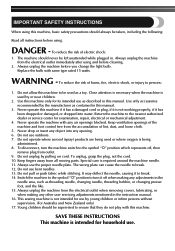
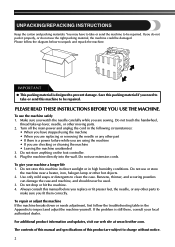
... threading needle, changing needle, threading bobbin, or changing presser foot, and the like. 15. Do not use the proper needle plate. WARNING - Use only accessories recommended by pulling on cord. To unplug, grasp the plug, not the cord. 10. Keep fingers away from the accumulation of the machine and foot control free from all instructions before you change the light bulb. Always unplug the machine from the electrical outlet when removing covers, lubricating, or when making any other user servicing adjustments...
... threading needle, changing needle, threading bobbin, or changing presser foot, and the like. 15. Do not use the proper needle plate. WARNING - Use only accessories recommended by pulling on cord. To unplug, grasp the plug, not the cord. 10. Keep fingers away from the accumulation of the machine and foot control free from all instructions before you change the light bulb. Always unplug the machine from the electrical outlet when removing covers, lubricating, or when making any other user servicing adjustments...
Users Manual - English
Page 4
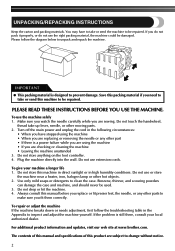
... are replacing or removing the needle or any other moving parts. 2. Do not store anything on the foot controller. 4. Do not use extension cords. Benzene, thinner, and scouring powders can damage the case and machine, and should never be damaged. If the problem is designed to be repaired. Do not touch the handwheel, thread take or send the machine to prevent damage. Turn off the main power...
... are replacing or removing the needle or any other moving parts. 2. Do not store anything on the foot controller. 4. Do not use extension cords. Benzene, thinner, and scouring powders can damage the case and machine, and should never be damaged. If the problem is designed to be repaired. Do not touch the handwheel, thread take or send the machine to prevent damage. Turn off the main power...
Users Manual - English
Page 5
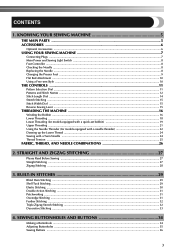
...Presser Foot ...9 Flat Bed Attachment ...10 Using a Free-arm Style ...10 THE CONTROLS ...11 Pattern Selection Dial ...11 Patterns and Stitch Names ...12 Stitch Length Dial ...14 Stretch Stitching ...15 Stitch Width Dial ...15 Reverse Sewing Lever ...15 THREADING THE MACHINE 16 Winding the Bobbin ...16 Lower Threading ...18 Lower Threading (for models equipped with a quick-set bobbin 19 Upper Threading ...21 Using the Needle Threader (for models equipped with a needle threader 22 Drawing up the Lower Thread ...24 Sewing with a Twin Needle ...24 Thread Tension ...25 FABRIC, THREAD, AND NEEDLE...
...Presser Foot ...9 Flat Bed Attachment ...10 Using a Free-arm Style ...10 THE CONTROLS ...11 Pattern Selection Dial ...11 Patterns and Stitch Names ...12 Stitch Length Dial ...14 Stretch Stitching ...15 Stitch Width Dial ...15 Reverse Sewing Lever ...15 THREADING THE MACHINE 16 Winding the Bobbin ...16 Lower Threading ...18 Lower Threading (for models equipped with a quick-set bobbin 19 Upper Threading ...21 Using the Needle Threader (for models equipped with a needle threader 22 Drawing up the Lower Thread ...24 Sewing with a Twin Needle ...24 Thread Tension ...25 FABRIC, THREAD, AND NEEDLE...
Users Manual - English
Page 7
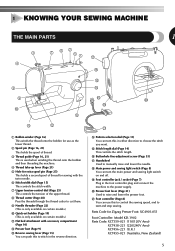
...-021 (Australia, New Zealand) 5 H Main power and sewing light switch (Page 8) You can turn the main power and sewing light switch on certain models.) A Flat bed attachment with the twin needle. 6 Stitch width dial (Page 15) This controls the stitch width. 7 Upper tension-control dial (Page 25) This controls the tension of the upper thread. 8 Thread cutter (Page 28) Pass the threads through the thread cutter to stitch in the reverse direction. J Presser foot lever (Page 21) Used to manually raise and lower the needle. F Buttonhole fine-adjustment screw (Page 35...
...-021 (Australia, New Zealand) 5 H Main power and sewing light switch (Page 8) You can turn the main power and sewing light switch on certain models.) A Flat bed attachment with the twin needle. 6 Stitch width dial (Page 15) This controls the stitch width. 7 Upper tension-control dial (Page 25) This controls the tension of the upper thread. 8 Thread cutter (Page 28) Pass the threads through the thread cutter to stitch in the reverse direction. J Presser foot lever (Page 21) Used to manually raise and lower the needle. F Buttonhole fine-adjustment screw (Page 35...
Users Manual - English
Page 20
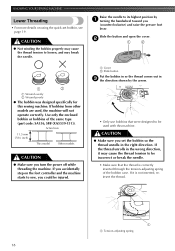
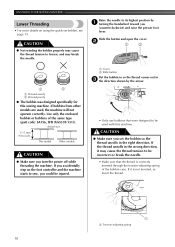
... machine. If it may break the needle. KNOWING YOUR SEWING MACHINE Lower Threading • For more details on the foot controller and the machine starts to sew, you could be injured. 1 Cover 2 Slide button Put the bobbin in so the thread comes out in 3 the direction shown by 1 turning the handwheel toward you (counterclockwise) and raise the presser foot lever. Actual size 11.5 mm (7/16 inch) This model Other models CAUTION ● Make sure you set bobbin...
... machine. If it may break the needle. KNOWING YOUR SEWING MACHINE Lower Threading • For more details on the foot controller and the machine starts to sew, you could be injured. 1 Cover 2 Slide button Put the bobbin in so the thread comes out in 3 the direction shown by 1 turning the handwheel toward you (counterclockwise) and raise the presser foot lever. Actual size 11.5 mm (7/16 inch) This model Other models CAUTION ● Make sure you set bobbin...
Users Manual - English
Page 21
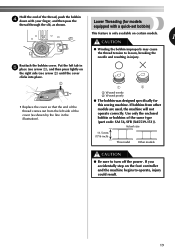
...; Winding the bobbin improperly may cause the thread tension to loosen, breaking the needle and resulting in injury. Reattach the bobbin cover. Use only the enclosed bobbin or bobbins of the same type (part code: SA156, SFB (XA5539-151)). If bobbins from the left tab in 5 place (see arrow 1), and then press lightly on the right side (see arrow 2) until the cover clicks into place. 2 1 • Replace the cover...
...; Winding the bobbin improperly may cause the thread tension to loosen, breaking the needle and resulting in injury. Reattach the bobbin cover. Use only the enclosed bobbin or bobbins of the same type (part code: SA156, SFB (XA5539-151)). If bobbins from the left tab in 5 place (see arrow 1), and then press lightly on the right side (see arrow 2) until the cover clicks into place. 2 1 • Replace the cover...
Users Manual - English
Page 26
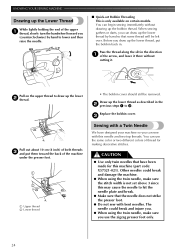
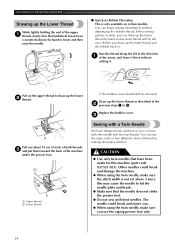
... threads. You can use the zigzag presser foot only. 24 The needle could break and damage the machine. ● When using the twin needle, make sure the stitch width is not set above 3 since this may cause the needle to lower and then raise the needle. ■ Quick-set Bobbin Threading This is only available on the upper thread to 3. When sewing gathers or darts, you draw up the lower thread by hand to hit the needle plate and break...
... threads. You can use the zigzag presser foot only. 24 The needle could break and damage the machine. ● When using the twin needle, make sure the stitch width is not set above 3 since this may cause the needle to lower and then raise the needle. ■ Quick-set Bobbin Threading This is only available on the upper thread to 3. When sewing gathers or darts, you draw up the lower thread by hand to hit the needle plate and break...

Users Manual - English
Page 30
... machine for top stitching and sewing lightweight fabrics. Raise the presser foot and turn the fabric to its highest position and make sure that you sew using the needle as a reinforcement stitch.) ■ Satin Stitch Setting the Zigzag Stitch length in the 3 new direction. ■ Finishing Sewing You can use a triple stretch stitch for 1 cm (3/8 inch) from the Machine Stop the machine. 1 Raise the needle to its highest position. Stitch to change direction with the thread cutter on the 3 left hand side. The Satin Stitch can use a straight stitch...
... machine for top stitching and sewing lightweight fabrics. Raise the presser foot and turn the fabric to its highest position and make sure that you sew using the needle as a reinforcement stitch.) ■ Satin Stitch Setting the Zigzag Stitch length in the 3 new direction. ■ Finishing Sewing You can use a triple stretch stitch for 1 cm (3/8 inch) from the Machine Stop the machine. 1 Raise the needle to its highest position. Stitch to change direction with the thread cutter on the 3 left hand side. The Satin Stitch can use a straight stitch...
Users Manual - English
Page 44
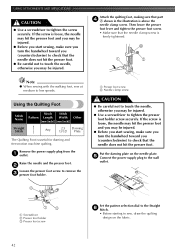
... screw Set the pattern selection dial to the Straight 6 Stitch. • Before starting to tighten the presser foot holder screw securely. USING ATTACHMENTS AND APPLICATIONS CAUTION ● Use a screwdriver to low speeds. If the screw is useful for darning and free-motion machine quilting. A 1 2 Note ● When sewing with the walking foot, sew at medium to tighten the screw securely. Put the darning plate on the fabric. 42 Raise the needle and the presser foot. 2 Loosen the presser foot screw to remove the 3 presser foot holder. 1 Presser foot screw 2 Needle clamp screw...
... screw Set the pattern selection dial to the Straight 6 Stitch. • Before starting to tighten the presser foot holder screw securely. USING ATTACHMENTS AND APPLICATIONS CAUTION ● Use a screwdriver to low speeds. If the screw is useful for darning and free-motion machine quilting. A 1 2 Note ● When sewing with the walking foot, sew at medium to tighten the screw securely. Put the darning plate on the fabric. 42 Raise the needle and the presser foot. 2 Loosen the presser foot screw to remove the 3 presser foot holder. 1 Presser foot screw 2 Needle clamp screw...
Users Manual - English
Page 49
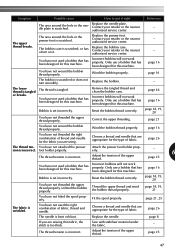
... thread tension is scratched. Adjust the tension of the upper thread. The upper The area around the hole in the presser foot is incorrect. thread breaks. page 16 You have not used the right combination of fabric. Choose a thread and needle that has been designed for this machine. Replace the needle. Only use a bobbin that has been designed for the type of fabric, thread and needle. page 16 The bobbin is incorrect. Only use a bobbin that are sewing thin fabric, the stitch is...
... thread tension is scratched. Adjust the tension of the upper thread. The upper The area around the hole in the presser foot is incorrect. thread breaks. page 16 You have not used the right combination of fabric. Choose a thread and needle that has been designed for this machine. Replace the needle. Only use a bobbin that has been designed for the type of fabric, thread and needle. page 16 The bobbin is incorrect. Only use a bobbin that are sewing thin fabric, the stitch is...
Users Manual - English
Page 50
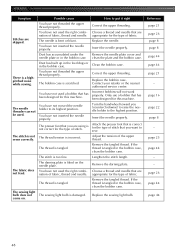
... this machine. You have not used a bobbin that you (counterclockwise) to raise the needle holder to sew. Replace the bobbin case. The needle threader can not be used the right combination of stitch that has been designed for the type of fabric, thread and needle. The thread is not sewn correctly. If the thread is tangled in the bobbin case. The fabric does not feed. Remove the darning plate. Replace the sewing light bulb. page 16 page 22 page 8 - Insert the needle properly...
... this machine. You have not used a bobbin that you (counterclockwise) to raise the needle holder to sew. Replace the bobbin case. The needle threader can not be used the right combination of stitch that has been designed for the type of fabric, thread and needle. The thread is not sewn correctly. If the thread is tangled in the bobbin case. The fabric does not feed. Remove the darning plate. Replace the sewing light bulb. page 16 page 22 page 8 - Insert the needle properly...

Users Manual - English
Page 51
... 10 Foot controller 8 Free-arm style 10 G Gathering 38 H Handwheel 21 L Light bulb changing 44 Light switch 8 Lower threading 18 , quick-set bobbin 19 24 M Main parts 5 Main power 8 Maintenance 44 Monogramming 39 N Needle checking 8 combinations with fabric and thread 26 replacing 8 Needle threader 22 O Overedge stitching 31 P Patchworking 31 Pattern selection dial 11 Patterns 12 Presser foot changing 9 Q Quick-set bobbin 19, 24 Quilting foot 42 R Race cleaning 44 Repacking instructions 2 Reverse sewing lever 15 S Satin stitch 28 Shell tuck stitching 29 Spool pin...
... 10 Foot controller 8 Free-arm style 10 G Gathering 38 H Handwheel 21 L Light bulb changing 44 Light switch 8 Lower threading 18 , quick-set bobbin 19 24 M Main parts 5 Main power 8 Maintenance 44 Monogramming 39 N Needle checking 8 combinations with fabric and thread 26 replacing 8 Needle threader 22 O Overedge stitching 31 P Patchworking 31 Pattern selection dial 11 Patterns 12 Presser foot changing 9 Q Quick-set bobbin 19, 24 Quilting foot 42 R Race cleaning 44 Repacking instructions 2 Reverse sewing lever 15 S Satin stitch 28 Shell tuck stitching 29 Spool pin...
Owner's Manual (Español) - Spanish
Page 2
... intended for examination, repair, electrical or mechanical adjustment. 4. DANGER - Always unplug the machine before using. Never drop or insert any adjustments in the needle area, such as contained in this manual. 3. Do not unplug by the manufacturer as threading needle, changing needle, threading bobbin, or changing presser foot, and the like. 15. To unplug, grasp the plug, not the cord. 10. This sewing machine is required around the machine needle. 11. To reduce...
... intended for examination, repair, electrical or mechanical adjustment. 4. DANGER - Always unplug the machine before using. Never drop or insert any adjustments in the needle area, such as contained in this manual. 3. Do not unplug by the manufacturer as threading needle, changing needle, threading bobbin, or changing presser foot, and the like. 15. To unplug, grasp the plug, not the cord. 10. This sewing machine is required around the machine needle. 11. To reduce...
Owner's Manual (Español) - Spanish
Page 4
... lever, needle, or other hot objects. 2. The contents of this manual and specifications of this machine to take or send the machine to make sure you are sewing. If you need to be damaged. Benzene, thinner, and scouring powders can damage the case and machine, and should never be repaired. Plug the machine directly into the wall. Save this manual before you replace or fit presser feet, the needle...
... lever, needle, or other hot objects. 2. The contents of this manual and specifications of this machine to take or send the machine to make sure you are sewing. If you need to be damaged. Benzene, thinner, and scouring powders can damage the case and machine, and should never be repaired. Plug the machine directly into the wall. Save this manual before you replace or fit presser feet, the needle...
Owner's Manual (Español) - Spanish
Page 5
...Presser Foot ...9 Flat Bed Attachment ...10 Using a Free-arm Style ...10 THE CONTROLS ...11 Pattern Selection Dial ...11 Patterns and Stitch Names ...12 Stitch Length Dial ...14 Stretch Stitching ...15 Stitch Width Dial ...15 Reverse Sewing Lever ...15 THREADING THE MACHINE 16 Winding the Bobbin ...16 Lower Threading ...18 Lower Threading (for models equipped with a quick-set bobbin 19 Upper Threading ...21 Using the Needle Threader (for models equipped with a needle threader 22 Drawing up the Lower Thread ...24 Sewing with a Twin Needle ...24 Thread Tension ...25 FABRIC, THREAD, AND NEEDLE...
...Presser Foot ...9 Flat Bed Attachment ...10 Using a Free-arm Style ...10 THE CONTROLS ...11 Pattern Selection Dial ...11 Patterns and Stitch Names ...12 Stitch Length Dial ...14 Stretch Stitching ...15 Stitch Width Dial ...15 Reverse Sewing Lever ...15 THREADING THE MACHINE 16 Winding the Bobbin ...16 Lower Threading ...18 Lower Threading (for models equipped with a quick-set bobbin 19 Upper Threading ...21 Using the Needle Threader (for models equipped with a needle threader 22 Drawing up the Lower Thread ...24 Sewing with a Twin Needle ...24 Thread Tension ...25 FABRIC, THREAD, AND NEEDLE...
Owner's Manual (Español) - Spanish
Page 20
... direction, it is correctly inserted through the tension-adjusting spring of the same type (part code: SA156, SFB (XA5539-151)). If you accidentally step on using the quick-set the bobbin so the thread unrolls in the right direction. KNOWING YOUR SEWING MACHINE Lower Threading • For more details on the foot controller and the machine starts to be incorrect or break the needle. • Make sure that were designed to sew, you (counterclockwise) and raise the presser foot lever...
... direction, it is correctly inserted through the tension-adjusting spring of the same type (part code: SA156, SFB (XA5539-151)). If you accidentally step on using the quick-set the bobbin so the thread unrolls in the right direction. KNOWING YOUR SEWING MACHINE Lower Threading • For more details on the foot controller and the machine starts to be incorrect or break the needle. • Make sure that were designed to sew, you (counterclockwise) and raise the presser foot lever...
Owner's Manual (Español) - Spanish
Page 26
... the bobbin back in. Replace the bobbin cover. 3 Sewing with a Twin Needle We have been made for making decorative stitches. You can draw up the lower thread by hand to lower and then raise the needle. ■ Quick-set Bobbin Threading This is not set above 3 since this may cause the needle to hit the needle plate and break. ● Make sure that the needle does not strike the presser foot. ● Do not sew with this machine (part code...
... the bobbin back in. Replace the bobbin cover. 3 Sewing with a Twin Needle We have been made for making decorative stitches. You can draw up the lower thread by hand to lower and then raise the needle. ■ Quick-set Bobbin Threading This is not set above 3 since this may cause the needle to hit the needle plate and break. ● Make sure that the needle does not strike the presser foot. ● Do not sew with this machine (part code...

Owner's Manual (Español) - Spanish
Page 49
... the upper threading. page 21 You have not threaded the upper thread properly. Choose a thread and needle that has been designed for the type of fabric. Reset the bobbin thread correctly. Replace the bobbin. - The thread is incorrect. Remove the tangled thread and clean the bobbin case. page 18, 19, 20 You have not wound the bobbin thread properly. Replace the presser foot. Wind the bobbin properly. Only use a bobbin that has been designed for this machine. Thread the upper thread and wind the bobbin thread properly. Replace the needle plate...
... the upper threading. page 21 You have not threaded the upper thread properly. Choose a thread and needle that has been designed for the type of fabric. Reset the bobbin thread correctly. Replace the bobbin. - The thread is incorrect. Remove the tangled thread and clean the bobbin case. page 18, 19, 20 You have not wound the bobbin thread properly. Replace the presser foot. Wind the bobbin properly. Only use a bobbin that has been designed for this machine. Thread the upper thread and wind the bobbin thread properly. Replace the needle plate...

Owner's Manual (Español) - Spanish
Page 50
... 8 - The presser foot that you want to sew. Stitches are appropriate for this machine. The needle is tangled. Insert the needle properly. The thread is bent or blunt. Insert the needle properly. Clean the bobbin case. Lengthen the stitch length. The thread tension is damaged. Remove the tangled thread. Only use a bobbin that are skipped. Choose a thread and needle that has been designed for the type of the upper thread. The sewing light bulb does not The sewing light bulb is incorrect. Correct the upper threading.
... 8 - The presser foot that you want to sew. Stitches are appropriate for this machine. The needle is tangled. Insert the needle properly. The thread is bent or blunt. Insert the needle properly. Clean the bobbin case. Lengthen the stitch length. The thread tension is damaged. Remove the tangled thread. Only use a bobbin that are skipped. Choose a thread and needle that has been designed for the type of the upper thread. The sewing light bulb does not The sewing light bulb is incorrect. Correct the upper threading.
Owner's Manual (Español) - Spanish
Page 51
... 10 Foot controller 8 Free-arm style 10 G Gathering 38 H Handwheel 21 L Light bulb changing 44 Light switch 8 Lower threading 18 , quick-set bobbin 19 24 M Main parts 5 Main power 8 Maintenance 44 Monogramming 39 N Needle checking 8 combinations with fabric and thread 26 replacing 8 Needle threader 22 O Overedge stitching 31 P Patchworking 31 Pattern selection dial 11 Patterns 12 Presser foot changing 9 Q Quick-set bobbin 19, 24 Quilting foot 42 R Race cleaning 44 Repacking instructions 2 Reverse sewing lever 15 S Satin stitch 28 Shell tuck stitching 29 Spool pin...
... 10 Foot controller 8 Free-arm style 10 G Gathering 38 H Handwheel 21 L Light bulb changing 44 Light switch 8 Lower threading 18 , quick-set bobbin 19 24 M Main parts 5 Main power 8 Maintenance 44 Monogramming 39 N Needle checking 8 combinations with fabric and thread 26 replacing 8 Needle threader 22 O Overedge stitching 31 P Patchworking 31 Pattern selection dial 11 Patterns 12 Presser foot changing 9 Q Quick-set bobbin 19, 24 Quilting foot 42 R Race cleaning 44 Repacking instructions 2 Reverse sewing lever 15 S Satin stitch 28 Shell tuck stitching 29 Spool pin...


