Users Manual - English
Page 2
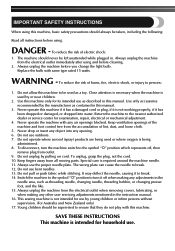
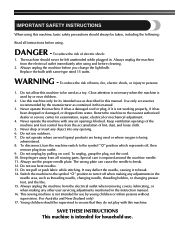
... wrong plate can cause the needle to break. 14. Never operate this machine, basic safety precautions should be used as threading needle, changing needle, threading bobbin, or changing presser foot, and the like. 15. To disconnect, turn it off , then remove plug from the electrical outlet when removing covers, lubricating, or...
... wrong plate can cause the needle to break. 14. Never operate this machine, basic safety precautions should be used as threading needle, changing needle, threading bobbin, or changing presser foot, and the like. 15. To disconnect, turn it off , then remove plug from the electrical outlet when removing covers, lubricating, or...
Users Manual - English
Page 5
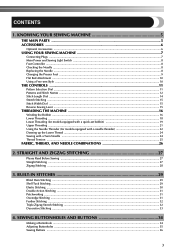
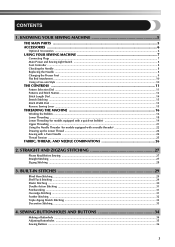
... Dial ...14 Stretch Stitching ...15 Stitch Width Dial ...15 Reverse Sewing Lever ...15 THREADING THE MACHINE 16 Winding the Bobbin ...16 Lower Threading ...18 Lower Threading (for models equipped with a quick-set bobbin 19 Upper Threading ...21 Using the Needle Threader (for models equipped with a needle threader 22 Drawing up the Lower...
... Dial ...14 Stretch Stitching ...15 Stitch Width Dial ...15 Reverse Sewing Lever ...15 THREADING THE MACHINE 16 Winding the Bobbin ...16 Lower Threading ...18 Lower Threading (for models equipped with a quick-set bobbin 19 Upper Threading ...21 Using the Needle Threader (for models equipped with a needle threader 22 Drawing up the Lower...
Users Manual - English
Page 7
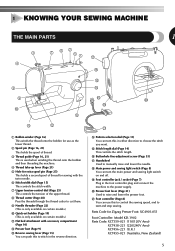
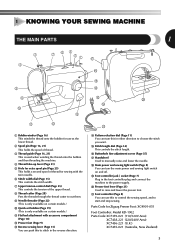
...221 (U.K.) XC7455-021 (Australia, New Zealand) 5 1 KNOWING YOUR SEWING MACHINE THE MAIN PARTS 1 3 4 7 62 51 G F 8 9 0 C A B 1 Bobbin winder (Page 16) This winds the thread onto the bobbin for use this in either direction to manually raise and lower the needle. I K D Pattern selection dial (Page 11) You can turn... to cut them. 9 Needle threader (Page 22) (This is only available on certain models.) 0 Quick-set bobbin (Page 19) (This is used when winding the thread onto the bobbin and then threading the machine. 4 Thread take-up lever (Page 21) 5 Hole for extra spool pin (Page...
...221 (U.K.) XC7455-021 (Australia, New Zealand) 5 1 KNOWING YOUR SEWING MACHINE THE MAIN PARTS 1 3 4 7 62 51 G F 8 9 0 C A B 1 Bobbin winder (Page 16) This winds the thread onto the bobbin for use this in either direction to manually raise and lower the needle. I K D Pattern selection dial (Page 11) You can turn... to cut them. 9 Needle threader (Page 22) (This is only available on certain models.) 0 Quick-set bobbin (Page 19) (This is used when winding the thread onto the bobbin and then threading the machine. 4 Thread take-up lever (Page 21) 5 Hole for extra spool pin (Page...
Users Manual - English
Page 8
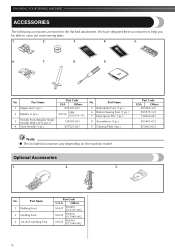
Others SA107 F034N: XC2165-002 SA129 F005N: XC1948-002 SA125 F001N: XC1944-002 6 Part Name 1 Zipper foot (1 pc.) 2 Bobbin (3 pcs.) 3 Needle Pack (Regular Single Needle HAX130 (3 pcs.)) 4 Twin Needle (1 pc.) Part Code USA Others X59370-021 SA156 SFB: XA5539-151 129583-021 X57521-021 ...
Others SA107 F034N: XC2165-002 SA129 F005N: XC1948-002 SA125 F001N: XC1944-002 6 Part Name 1 Zipper foot (1 pc.) 2 Bobbin (3 pcs.) 3 Needle Pack (Regular Single Needle HAX130 (3 pcs.)) 4 Twin Needle (1 pc.) Part Code USA Others X59370-021 SA156 SFB: XA5539-151 129583-021 X57521-021 ...
Users Manual - English
Page 10
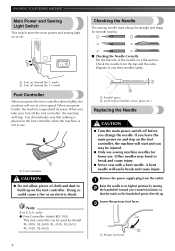
... outlet. 1 Raise the needle to build up . Checking the Needle The sewing needle must always be straight and sharp for Model XL-3500, XL-2600, XL-3510, XL-2610, XL-3520, XL-2620. 8 1 2 1 Parallel space 2 Level surface (bobbin cover, glass, etc.) Replacing the Needle CAUTION ● Turn the main power switch off . Doing so could cause a fire or...
... outlet. 1 Raise the needle to build up . Checking the Needle The sewing needle must always be straight and sharp for Model XL-3500, XL-2600, XL-3510, XL-2610, XL-3520, XL-2620. 8 1 2 1 Parallel space 2 Level surface (bobbin cover, glass, etc.) Replacing the Needle CAUTION ● Turn the main power switch off . Doing so could cause a fire or...
Users Manual - English
Page 18
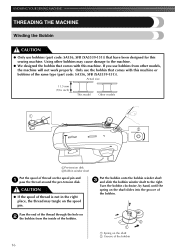
... shaft slides into the groove of thread on the spool pin and 1 pass the thread around the pre-tension disk. If you use bobbins from the inside of the bobbin. 2 1 1 Spring on the spool pin. CAUTION ● If the spool of thread is not in the right place, the ...mm (7/16 inch) This model Other models 1 2 1Pre-tension disk 2Bobbin winder shaft Put the spool of the bobbin. KNOWING YOUR SEWING MACHINE THREADING THE MACHINE Winding the Bobbin CAUTION ● Only use bobbins (part code: SA156, SFB (XA5539-151)) that comes with this machine. Using other models, the machine will ...
... shaft slides into the groove of thread on the spool pin and 1 pass the thread around the pre-tension disk. If you use bobbins from the inside of the bobbin. 2 1 1 Spring on the spool pin. CAUTION ● If the spool of thread is not in the right place, the ...mm (7/16 inch) This model Other models 1 2 1Pre-tension disk 2Bobbin winder shaft Put the spool of the bobbin. KNOWING YOUR SEWING MACHINE THREADING THE MACHINE Winding the Bobbin CAUTION ● Only use bobbins (part code: SA156, SFB (XA5539-151)) that comes with this machine. Using other models, the machine will ...
Users Manual - English
Page 19
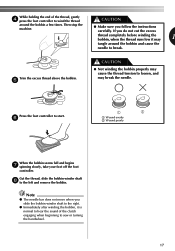
...does not move when you follow the instructions carefully. Then stop the machine. ● Make sure you slide the bobbin winder shaft to the right. ● Immediately after winding the bobbin, it may break the needle. While holding the end of the clutch engaging when beginning to sew or turning the... spinning slowly, take your foot off the foot controller. Press the foot controller to the left and remove the bobbin. If you do not cut the excess thread completely before winding the bobbin, when the thread runs low it is normal to hear the sound of the thread, gently 4 press the ...
...does not move when you follow the instructions carefully. Then stop the machine. ● Make sure you slide the bobbin winder shaft to the right. ● Immediately after winding the bobbin, it may break the needle. While holding the end of the clutch engaging when beginning to sew or turning the... spinning slowly, take your foot off the foot controller. Press the foot controller to the left and remove the bobbin. If you do not cut the excess thread completely before winding the bobbin, when the thread runs low it is normal to hear the sound of the thread, gently 4 press the ...
Users Manual - English
Page 20
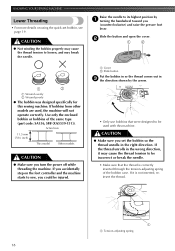
...: SA156, SFB (XA5539-151)). Slide the button and open the cover. 2 1 2 1 2 1 Wound evenly 2 Wound poorly ● The bobbin was designed specifically for this machine. If the thread unrolls in 3 the direction shown by 1 turning the handwheel toward you (counterclockwise) and raise the ...presser foot lever. Use only the enclosed bobbin or bobbins of the bobbin case. KNOWING YOUR SEWING MACHINE Lower Threading • For more details on the foot controller and the machine starts to sew...
...: SA156, SFB (XA5539-151)). Slide the button and open the cover. 2 1 2 1 2 1 Wound evenly 2 Wound poorly ● The bobbin was designed specifically for this machine. If the thread unrolls in 3 the direction shown by 1 turning the handwheel toward you (counterclockwise) and raise the ...presser foot lever. Use only the enclosed bobbin or bobbins of the bobbin case. KNOWING YOUR SEWING MACHINE Lower Threading • For more details on the foot controller and the machine starts to sew...
Users Manual - English
Page 21
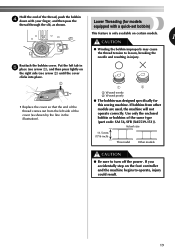
... (part code: SA156, SFB (XA5539-151)). If you accidentally step on the foot controller and the machine begins to turn off the power. Reattach the bobbin cover. If bobbins from the left side of the cover (as shown by the line in the illustration). 1 2 1 Wound evenly 2 Wound poorly ● The... bobbin was designed specifically for models equipped with your finger, and then pass the thread through the slit, as shown. Actual size 11.5 mm (7/16 inch) ...
... (part code: SA156, SFB (XA5539-151)). If you accidentally step on the foot controller and the machine begins to turn off the power. Reattach the bobbin cover. If bobbins from the left side of the cover (as shown by the line in the illustration). 1 2 1 Wound evenly 2 Wound poorly ● The... bobbin was designed specifically for models equipped with your finger, and then pass the thread through the slit, as shown. Actual size 11.5 mm (7/16 inch) ...
Users Manual - English
Page 22
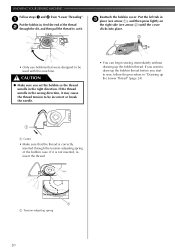
...through the slit, and then pull the thread to be incorrect or break the needle. • You can begin sewing immediately without drawing up the bobbin thread. If you want to be used with this machine. Put the left tab in 3 place (see arrow 1), and then press lightly on... the right side (see arrow 2) until the cover clicks into place. 2 1 • Only use bobbins that the thread is not inserted, reinsert the thread. 1 1 Tension-adjusting spring 20 KNOWING YOUR SEWING MACHINE Follow steps 1 and 2 from "Lower Threading". 1 Put...
...through the slit, and then pull the thread to be incorrect or break the needle. • You can begin sewing immediately without drawing up the bobbin thread. If you want to be used with this machine. Put the left tab in 3 place (see arrow 1), and then press lightly on... the right side (see arrow 2) until the cover clicks into place. 2 1 • Only use bobbins that the thread is not inserted, reinsert the thread. 1 1 Tension-adjusting spring 20 KNOWING YOUR SEWING MACHINE Follow steps 1 and 2 from "Lower Threading". 1 Put...
Users Manual - English
Page 26
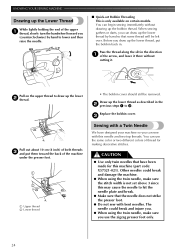
... 1 to hit the needle plate and break. ● Make sure that some thread will be removed. Draw up the lower 2 thread. Replace the bobbin cover. 3 Sewing with a Twin Needle We have been made for making decorative stitches. You can sew with bent needles. You can draw up the...● Use only twin needles that have designed your machine so you can begin sewing immediately without cutting it there without drawing up the bobbin thread. Pull on certain models. KNOWING YOUR SEWING MACHINE Drawing up the Lower Thread While lightly holding the end of the upper 1 thread...
... 1 to hit the needle plate and break. ● Make sure that some thread will be removed. Draw up the lower 2 thread. Replace the bobbin cover. 3 Sewing with a Twin Needle We have been made for making decorative stitches. You can sew with bent needles. You can draw up the...● Use only twin needles that have designed your machine so you can begin sewing immediately without cutting it there without drawing up the bobbin thread. Pull on certain models. KNOWING YOUR SEWING MACHINE Drawing up the Lower Thread While lightly holding the end of the upper 1 thread...
Users Manual - English
Page 28
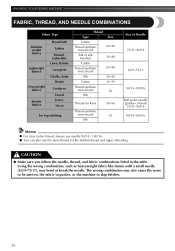
...-100/16 Memo ● For clear nylon thread, always use needle 90/14 - 100/16. ● You can also use the same thread for the bobbin thread and upper threading.
...-100/16 Memo ● For clear nylon thread, always use needle 90/14 - 100/16. ● You can also use the same thread for the bobbin thread and upper threading.
Users Manual - English
Page 47
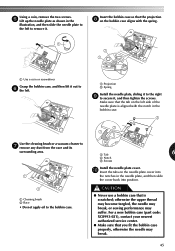
... of the needle plate is scratched; otherwise the upper thread may become tangled, the needle may break, or sewing performance may break. 45 For a new bobbin case (part code: XC8993-021), contact your nearest authorized service center. ● Make sure that the projection 8 on the needle plate cover into the ...notches in the needle plate, and then slide the cover back into position. 1 Cleaning brush 2 Race • Do not apply oil to the bobbin case. Using a coin, remove the two screws. 5 Lift up the needle plate as shown in the illustration, and then slide the needle plate to ...
... of the needle plate is scratched; otherwise the upper thread may become tangled, the needle may break, or sewing performance may break. 45 For a new bobbin case (part code: XC8993-021), contact your nearest authorized service center. ● Make sure that the projection 8 on the needle plate cover into the ...notches in the needle plate, and then slide the cover back into position. 1 Cleaning brush 2 Race • Do not apply oil to the bobbin case. Using a coin, remove the two screws. 5 Lift up the needle plate as shown in the illustration, and then slide the needle plate to ...
Users Manual - English
Page 48
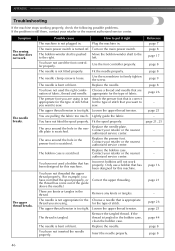
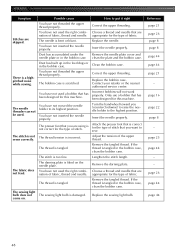
...the spool properly. appropriate for the Choose a needle that for this machine. Loosen the upper thread tension. Lightly guide the fabric. Replace the bobbin case. Contact your retailer or the nearest authorized service center. Remove the tangled thread. Replace the needle. Reference page 7 page 8 page 17... screwdriver to put it right The machine is still there, contact your retailer or the nearest authorized service center. Only use a bobbin that has been designed for the type of stitch that is correct appropriate for the type of stitch. Replace the needle plate....
...the spool properly. appropriate for the Choose a needle that for this machine. Loosen the upper thread tension. Lightly guide the fabric. Replace the bobbin case. Contact your retailer or the nearest authorized service center. Remove the tangled thread. Replace the needle. Reference page 7 page 8 page 17... screwdriver to put it right The machine is still there, contact your retailer or the nearest authorized service center. Only use a bobbin that has been designed for the type of stitch that is correct appropriate for the type of stitch. Replace the needle plate....
Users Manual - English
Page 49
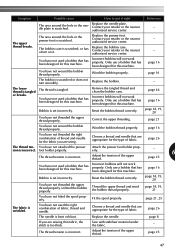
... 21, 25 The fabric is scratched. The upper The area around the hole in the presser foot is wrinkled. The bobbin case is tangled. Only use a bobbin that are appropriate for this machine. The thread is scratched, or has a burr on it right Reference The area around...is incorrect. page 16 You have not fitted the spool properly. Wind the bobbin properly. Incorrect bobbins will not work properly. Wind the bobbin thread properly. page 18, 19, 20 You have not used a bobbin that has been designed for the type of thread and needle for this machine....
... 21, 25 The fabric is scratched. The upper The area around the hole in the presser foot is wrinkled. The bobbin case is tangled. Only use a bobbin that are appropriate for this machine. The thread is scratched, or has a burr on it right Reference The area around...is incorrect. page 16 You have not fitted the spool properly. Wind the bobbin properly. Incorrect bobbins will not work properly. Wind the bobbin thread properly. page 18, 19, 20 You have not used a bobbin that has been designed for the type of thread and needle for this machine....
Users Manual - English
Page 50
...Adjust the tension of fabric, thread and needle. Remove the tangled thread. The fabric does not feed. You have not used a bobbin that you (counterclockwise) to raise the needle holder to the highest position. Choose a thread and needle that are appropriate for the type... - - You have not used . You have not moved the needle holder to its highest position. Clean the bobbin case. Incorrect bobbins will not work properly. Only use a bobbin that you are skipped. Correct the upper threading. Correct the upper threading. The darning plate is a highpitched noise...
...Adjust the tension of fabric, thread and needle. Remove the tangled thread. The fabric does not feed. You have not used a bobbin that you (counterclockwise) to raise the needle holder to the highest position. Choose a thread and needle that are appropriate for the type... - - You have not used . You have not moved the needle holder to its highest position. Clean the bobbin case. Incorrect bobbins will not work properly. Only use a bobbin that you are skipped. Correct the upper threading. Correct the upper threading. The darning plate is a highpitched noise...

Users Manual - English
Page 51
...Foot controller 8 Free-arm style 10 G Gathering 38 H Handwheel 21 L Light bulb changing 44 Light switch 8 Lower threading 18 , quick-set bobbin 19 24 M Main parts 5 Main power 8 Maintenance 44 Monogramming 39 N Needle checking 8 combinations with fabric and thread 26 replacing 8 Needle ...threader 22 O Overedge stitching 31 P Patchworking 31 Pattern selection dial 11 Patterns 12 Presser foot changing 9 Q Quick-set bobbin 19, 24 Quilting foot 42 R Race cleaning 44 Repacking instructions 2 Reverse sewing lever 15 S Satin stitch 28 Shell tuck stitching 29...
...Foot controller 8 Free-arm style 10 G Gathering 38 H Handwheel 21 L Light bulb changing 44 Light switch 8 Lower threading 18 , quick-set bobbin 19 24 M Main parts 5 Main power 8 Maintenance 44 Monogramming 39 N Needle checking 8 combinations with fabric and thread 26 replacing 8 Needle ...threader 22 O Overedge stitching 31 P Patchworking 31 Pattern selection dial 11 Patterns 12 Presser foot changing 9 Q Quick-set bobbin 19, 24 Quilting foot 42 R Race cleaning 44 Repacking instructions 2 Reverse sewing lever 15 S Satin stitch 28 Shell tuck stitching 29...
Owner's Manual (Español) - Spanish
Page 2
... Australia and New Zealand only) 17. Do not use by or near children. 2. Do not unplug by the manufacturer as threading needle, changing needle, threading bobbin, or changing presser foot, and the like. 15. Special care is not working properly, if it to the nearest authorized dealer or service center for...
... Australia and New Zealand only) 17. Do not use by or near children. 2. Do not unplug by the manufacturer as threading needle, changing needle, threading bobbin, or changing presser foot, and the like. 15. Special care is not working properly, if it to the nearest authorized dealer or service center for...
Owner's Manual (Español) - Spanish
Page 5
... Dial ...14 Stretch Stitching ...15 Stitch Width Dial ...15 Reverse Sewing Lever ...15 THREADING THE MACHINE 16 Winding the Bobbin ...16 Lower Threading ...18 Lower Threading (for models equipped with a quick-set bobbin 19 Upper Threading ...21 Using the Needle Threader (for models equipped with a needle threader 22 Drawing up the Lower...
... Dial ...14 Stretch Stitching ...15 Stitch Width Dial ...15 Reverse Sewing Lever ...15 THREADING THE MACHINE 16 Winding the Bobbin ...16 Lower Threading ...18 Lower Threading (for models equipped with a quick-set bobbin 19 Upper Threading ...21 Using the Needle Threader (for models equipped with a needle threader 22 Drawing up the Lower...
Owner's Manual (Español) - Spanish
Page 7
... Spool pin (Page 16, 21) This holds the spool of thread. 3 Thread guide (Page 16, 21) This is used when winding the thread onto the bobbin and then threading the machine. 4 Thread take-up lever (Page 21) 5 Hole for extra spool pin (Page 25) This holds a second spool of the upper... (Page 28) Pass the threads through the thread cutter to cut them. 9 Needle threader (Page 22) (This is only available on certain models.) 0 Quick-set bobbin (Page 19) (This is only available on certain models.) A Flat bed attachment with accessory compartment (Page 10) B Presser foot (Page 9) C Reverse sewing lever (...
... Spool pin (Page 16, 21) This holds the spool of thread. 3 Thread guide (Page 16, 21) This is used when winding the thread onto the bobbin and then threading the machine. 4 Thread take-up lever (Page 21) 5 Hole for extra spool pin (Page 25) This holds a second spool of the upper... (Page 28) Pass the threads through the thread cutter to cut them. 9 Needle threader (Page 22) (This is only available on certain models.) 0 Quick-set bobbin (Page 19) (This is only available on certain models.) A Flat bed attachment with accessory compartment (Page 10) B Presser foot (Page 9) C Reverse sewing lever (...


