Users Manual - English
Page 1
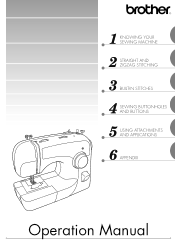
1 KNOWING YOUR SEWING MACHINE 2 STRAIGHT AND ZIGZAG STITCHING 3 BUILT-IN STITCHES 4 SEWING BUTTONHOLES AND BUTTONS 5 USING ATTACHMENTS AND APPLICATIONS 6 APPENDIX Operation Manual
1 KNOWING YOUR SEWING MACHINE 2 STRAIGHT AND ZIGZAG STITCHING 3 BUILT-IN STITCHES 4 SEWING BUTTONHOLES AND BUTTONS 5 USING ATTACHMENTS AND APPLICATIONS 6 APPENDIX Operation Manual
Users Manual - English
Page 5
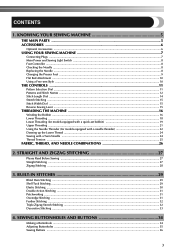
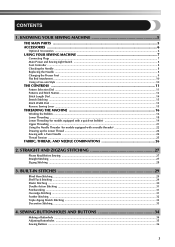
... YOUR SEWING MACHINE 7 Connecting Plugs ...7 Main Power and Sewing Light Switch ...8 Foot Controller ...8 Checking the Needle ...8 Replacing the Needle ...8 Changing the Presser Foot ...9 Flat Bed Attachment ...10 Using a Free-arm Style ...10 THE CONTROLS ...11 Pattern Selection Dial ...11 Patterns and Stitch Names ...12 Stitch Length Dial ...14 Stretch Stitching ...15...
... YOUR SEWING MACHINE 7 Connecting Plugs ...7 Main Power and Sewing Light Switch ...8 Foot Controller ...8 Checking the Needle ...8 Replacing the Needle ...8 Changing the Presser Foot ...9 Flat Bed Attachment ...10 Using a Free-arm Style ...10 THE CONTROLS ...11 Pattern Selection Dial ...11 Patterns and Stitch Names ...12 Stitch Length Dial ...14 Stretch Stitching ...15...

Users Manual - English
Page 6
USING ATTACHMENTS AND APPLICATIONS 37 Zipper Insertion ...37 Gathering ...38 Darning ...38 Appliqués ...39 Monogramming and Embroidering ...39 OPTIONAL ACCESSORIES 41 Using the Walking Foot ...41 Using the Quilting Foot ...42 Using the 1/4-inch Quilting Foot ...43 6. APPENDIX ...44 MAINTENANCE ...44 Changing the Light Bulb ...44 Cleaning ...44 Troubleshooting ...46 INDEX ...49 4 5.
USING ATTACHMENTS AND APPLICATIONS 37 Zipper Insertion ...37 Gathering ...38 Darning ...38 Appliqués ...39 Monogramming and Embroidering ...39 OPTIONAL ACCESSORIES 41 Using the Walking Foot ...41 Using the Quilting Foot ...42 Using the 1/4-inch Quilting Foot ...43 6. APPENDIX ...44 MAINTENANCE ...44 Changing the Light Bulb ...44 Cleaning ...44 Troubleshooting ...46 INDEX ...49 4 5.
Users Manual - English
Page 7
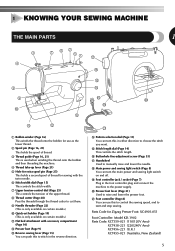
... (U.K.) XC7455-021 (Australia, New Zealand) 5 I K D Pattern selection dial (Page 11) You can turn the main power and sewing light switch on certain models.) A Flat bed attachment with the twin needle. 6 Stitch width dial (Page 15) This controls the stitch width. 7 Upper tension-control dial (Page 25) This controls the tension of...
... (U.K.) XC7455-021 (Australia, New Zealand) 5 I K D Pattern selection dial (Page 11) You can turn the main power and sewing light switch on certain models.) A Flat bed attachment with the twin needle. 6 Stitch width dial (Page 15) This controls the stitch width. 7 Upper tension-control dial (Page 25) This controls the tension of...
Users Manual - English
Page 8
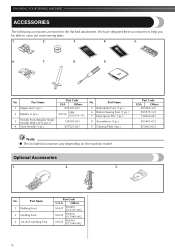
KNOWING YOUR SEWING MACHINE ACCESSORIES The following accessories are stored in the flat bed attachment. No. No. Part Name 5 Buttonhole Foot (1 pc.) 6 Button Sewing Foot (1 pc.) 7 Extra Spool Pin (1 pc.) 8 Screwdriver (1 pc.) 9 Darning Plate (1pc.) Part Code USA Others X59369-...
KNOWING YOUR SEWING MACHINE ACCESSORIES The following accessories are stored in the flat bed attachment. No. No. Part Name 5 Buttonhole Foot (1 pc.) 6 Button Sewing Foot (1 pc.) 7 Extra Spool Pin (1 pc.) 8 Screwdriver (1 pc.) 9 Darning Plate (1pc.) Part Code USA Others X59369-...
Users Manual - English
Page 12
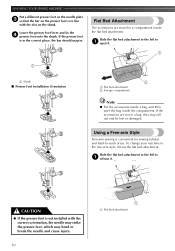
... foot is in the correct place, the bar should snap in a bag, they may bend or break the needle and cause injury. 10 1 1 Flat bed attachment Using a Free-arm Style Free-arm sewing is convenient for sewing tubular and hard-to 1 release it . 1 1 1 Shank ■ Presser Foot Installation Orientation...4 presser foot onto the shank. CAUTION ● If the presser foot is not installed with the slot on the shank. Slide the flat bed attachment to the left to -reach areas. To change your machine to 1 open it . If the accessories are stored in a compartment inside the compartment...
... foot is in the correct place, the bar should snap in a bag, they may bend or break the needle and cause injury. 10 1 1 Flat bed attachment Using a Free-arm Style Free-arm sewing is convenient for sewing tubular and hard-to 1 release it . 1 1 1 Shank ■ Presser Foot Installation Orientation...4 presser foot onto the shank. CAUTION ● If the presser foot is not installed with the slot on the shank. Slide the flat bed attachment to the left to -reach areas. To change your machine to 1 open it . If the accessories are stored in a compartment inside the compartment...

Users Manual - English
Page 27
... through the eye of the right needle. 3 2 1 1 Left needle thread passes through the guide above the needle before you pass it when you . ■ Attaching the Extra Spool Pin The tension of the thread will affect the quality of the fabric. 2 6 1 54 3 3 4 Solution Increase the tension by turning the .... Put the second spool of the machine. Thread the left needle using the thread from front to a higher number. 25 ■ Attaching the Twin Needle Attach the twin needle in the same way as too much or too little tension will weaken your seams or cause puckers on your stitches...
... through the eye of the right needle. 3 2 1 1 Left needle thread passes through the guide above the needle before you pass it when you . ■ Attaching the Extra Spool Pin The tension of the thread will affect the quality of the fabric. 2 6 1 54 3 3 4 Solution Increase the tension by turning the .... Put the second spool of the machine. Thread the left needle using the thread from front to a higher number. 25 ■ Attaching the Twin Needle Attach the twin needle in the same way as too much or too little tension will weaken your seams or cause puckers on your stitches...

Users Manual - English
Page 36
... fabric before you put pins across both ends of the buttonhole to prevent the stitches from being cut. 1 Front of chalk mark 2 Red lines 34 Attach the buttonhole foot and push the frame 2 back until the needle reaches the stitches sewn in step 1). 2. Set the pattern selection dial to 6 stitches. 3. Lower...
... fabric before you put pins across both ends of the buttonhole to prevent the stitches from being cut. 1 Front of chalk mark 2 Red lines 34 Attach the buttonhole foot and push the frame 2 back until the needle reaches the stitches sewn in step 1). 2. Set the pattern selection dial to 6 stitches. 3. Lower...

Users Manual - English
Page 39
...). Choosing a different stitch will cause the needle to the right pin of the zipper foot. When sewing the left side of the zipper, attach the shank to hit the presser foot and break, and you may be injured. 37 Lower the needle into the notch located either the left... ● Make sure the needle does not hit the zipper during sewing. Continue sewing using the pin on the other side of the needle. 5 USING ATTACHMENTS AND APPLICATIONS Zipper Insertion Stitch Name Straight Stitch Stitch Stitch Pattern Length Width [mm (inch)] [mm (inch)] 2-3 (1/16-1/8) 2.5 (center) (3/32) Foot...
...). Choosing a different stitch will cause the needle to the right pin of the zipper foot. When sewing the left side of the zipper, attach the shank to hit the presser foot and break, and you may be injured. 37 Lower the needle into the notch located either the left... ● Make sure the needle does not hit the zipper during sewing. Continue sewing using the pin on the other side of the needle. 5 USING ATTACHMENTS AND APPLICATIONS Zipper Insertion Stitch Name Straight Stitch Stitch Stitch Pattern Length Width [mm (inch)] [mm (inch)] 2-3 (1/16-1/8) 2.5 (center) (3/32) Foot...

Users Manual - English
Page 40
... (inch)] Other Any Zigzag Presser Foot Darning Plate Remove the power supply plug from you and pulling it toward you want to Straight 1 Stitch. USING ATTACHMENTS AND APPLICATIONS Gathering Stitch Name Straight Stitch Pattern Stitch Length [mm (inch)] 4 (3/16) Set the pattern selection dial to darn under the 3 presser foot together...
... (inch)] Other Any Zigzag Presser Foot Darning Plate Remove the power supply plug from you and pulling it toward you want to Straight 1 Stitch. USING ATTACHMENTS AND APPLICATIONS Gathering Stitch Name Straight Stitch Pattern Stitch Length [mm (inch)] 4 (3/16) Set the pattern selection dial to darn under the 3 presser foot together...
Users Manual - English
Page 42
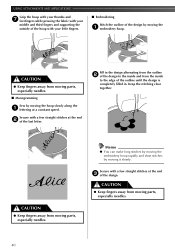
... short stitches by moving the hoop slowly along the 1 lettering at a constant speed. CAUTION ● Keep fingers away from moving parts, especially needles. 40 USING ATTACHMENTS AND APPLICATIONS Grip the hoop with your thumbs and 7 forefingers while pressing the fabric with your little fingers. ■ Embroidering Stitch the outline of the...
... short stitches by moving the hoop slowly along the 1 lettering at a constant speed. CAUTION ● Keep fingers away from moving parts, especially needles. 40 USING ATTACHMENTS AND APPLICATIONS Grip the hoop with your thumbs and 7 forefingers while pressing the fabric with your little fingers. ■ Embroidering Stitch the outline of the...
Users Manual - English
Page 43
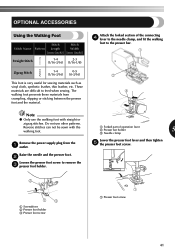
Do not use the walking foot with the walking foot. The walking foot prevents these materials from the 1 outlet. Attach the forked section of operation lever 2 Presser bar holder 5 3 Needle clamp Lower the presser foot lever and then tighten 5 the presser foot screw. 2 13 1 Screwdriver 2 ...
Do not use the walking foot with the walking foot. The walking foot prevents these materials from the 1 outlet. Attach the forked section of operation lever 2 Presser bar holder 5 3 Needle clamp Lower the presser foot lever and then tighten 5 the presser foot screw. 2 13 1 Screwdriver 2 ...
Users Manual - English
Page 44
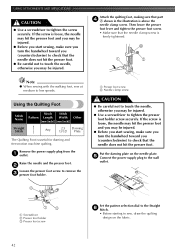
Remove the power supply plug from the 1 outlet. USING ATTACHMENTS AND APPLICATIONS CAUTION ● Use a screwdriver to sew, draw the quilting design on the needle plate. 5 Connect the power supply plug to the wall outlet. 2 ... the needle does not hit the presser foot. If the screw is loose, the needle may hit the presser foot and you may be injured. Attach the quilting foot, making sure that the needle clamp screw is useful for darning and free-motion machine quilting.
Remove the power supply plug from the 1 outlet. USING ATTACHMENTS AND APPLICATIONS CAUTION ● Use a screwdriver to sew, draw the quilting design on the needle plate. 5 Connect the power supply plug to the wall outlet. 2 ... the needle does not hit the presser foot. If the screw is loose, the needle may hit the presser foot and you may be injured. Attach the quilting foot, making sure that the needle clamp screw is useful for darning and free-motion machine quilting.

Users Manual - English
Page 45
... of stitching 4 Align this mark with the edge of the stitch depends on how 8 quickly you move the fabric to sew over the drawn design. 1 Attach the 1/4-inch Quilting Foot. 3 Position the presser foot over the fabric and 4 sew as shown in the illustration below. ■ Achieving an Accurate Seam Allowance...
... of stitching 4 Align this mark with the edge of the stitch depends on how 8 quickly you move the fabric to sew over the drawn design. 1 Attach the 1/4-inch Quilting Foot. 3 Position the presser foot over the fabric and 4 sew as shown in the illustration below. ■ Achieving an Accurate Seam Allowance...
Users Manual - English
Page 48
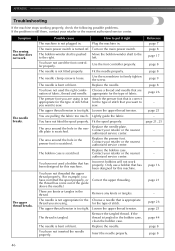
... - page 25 - Symptom The sewing machine does not work properly. You have not inserted the needle properly. Only use a bobbin that are using is not Attach the presser foot that is correct appropriate for the type of stitch that for the Choose a needle that you want to you want to put...
... - page 25 - Symptom The sewing machine does not work properly. You have not inserted the needle properly. Only use a bobbin that are using is not Attach the presser foot that is correct appropriate for the type of stitch that for the Choose a needle that you want to you want to put...
Users Manual - English
Page 49
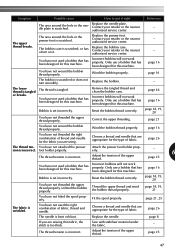
...The area around the hole in the presser foot is scratched. Replace the bobbin case. Replace the bobbin. - page 21 You have not attached the presser sion is set incorrectly. page 16 You have not threaded the right combination of fabric, thread and needle. page 16 Bobbin is... Symptom Possible cause How to put it . page 18, 19, 20 You have not threaded the upper thread properly or fitted the bobbin properly. Attach the presser foot holder properly. - 6 The thread tension is bent or blunt. Adjust the tension of the upper thread. Choose a thread and...
...The area around the hole in the presser foot is scratched. Replace the bobbin case. Replace the bobbin. - page 21 You have not attached the presser sion is set incorrectly. page 16 You have not threaded the right combination of fabric, thread and needle. page 16 Bobbin is... Symptom Possible cause How to put it . page 18, 19, 20 You have not threaded the upper thread properly or fitted the bobbin properly. Attach the presser foot holder properly. - 6 The thread tension is bent or blunt. Adjust the tension of the upper thread. Choose a thread and...
Users Manual - English
Page 50
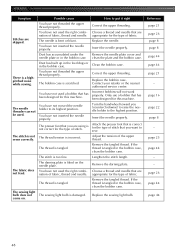
... the bobbin case. Incorrect bobbins will not work properly. You have not used the right combination of stitch that is tangled in the bobbin case. Attach the presser foot that you want to its highest position. Remove the darning plate. page 25 page 44 - - You have not inserted the needle properly...
... the bobbin case. Incorrect bobbins will not work properly. You have not used the right combination of stitch that is tangled in the bobbin case. Attach the presser foot that you want to its highest position. Remove the darning plate. page 25 page 44 - - You have not inserted the needle properly...

Users Manual - English
Page 51
... 31 Drawing up the lower thread 24 E Elastic stitching 30 Embroidering 39 F Fabric, thread, and needle combinations 26 Feather stitching 32 Flat bed attachment 10 Foot controller 8 Free-arm style 10 G Gathering 38 H Handwheel 21 L Light bulb changing 44 Light switch 8 Lower threading 18 , ...Threading lower 18, 19 needle threader 22 twin needle 25 upper 21 Triple zigzag stretch stitching 32 Troubleshooting 46 Twin needle , attaching 9 25 sewing 24 U Unpacking instructions 2 Upper tension control dial 25 Upper threading 21 W Walking foot 41 Z Zigzag stitching 28 Zipper ...
... 31 Drawing up the lower thread 24 E Elastic stitching 30 Embroidering 39 F Fabric, thread, and needle combinations 26 Feather stitching 32 Flat bed attachment 10 Foot controller 8 Free-arm style 10 G Gathering 38 H Handwheel 21 L Light bulb changing 44 Light switch 8 Lower threading 18 , ...Threading lower 18, 19 needle threader 22 twin needle 25 upper 21 Triple zigzag stretch stitching 32 Troubleshooting 46 Twin needle , attaching 9 25 sewing 24 U Unpacking instructions 2 Upper tension control dial 25 Upper threading 21 W Walking foot 41 Z Zigzag stitching 28 Zipper ...
Owner's Manual (Español) - Spanish
Page 1
1 KNOWING YOUR SEWING MACHINE 2 STRAIGHT AND ZIGZAG STITCHING 3 BUILT-IN STITCHES 4 SEWING BUTTONHOLES AND BUTTONS 5 USING ATTACHMENTS AND APPLICATIONS 6 APPENDIX Operation Manual
1 KNOWING YOUR SEWING MACHINE 2 STRAIGHT AND ZIGZAG STITCHING 3 BUILT-IN STITCHES 4 SEWING BUTTONHOLES AND BUTTONS 5 USING ATTACHMENTS AND APPLICATIONS 6 APPENDIX Operation Manual
Owner's Manual (Español) - Spanish
Page 5
... YOUR SEWING MACHINE 7 Connecting Plugs ...7 Main Power and Sewing Light Switch ...8 Foot Controller ...8 Checking the Needle ...8 Replacing the Needle ...8 Changing the Presser Foot ...9 Flat Bed Attachment ...10 Using a Free-arm Style ...10 THE CONTROLS ...11 Pattern Selection Dial ...11 Patterns and Stitch Names ...12 Stitch Length Dial ...14 Stretch Stitching ...15...
... YOUR SEWING MACHINE 7 Connecting Plugs ...7 Main Power and Sewing Light Switch ...8 Foot Controller ...8 Checking the Needle ...8 Replacing the Needle ...8 Changing the Presser Foot ...9 Flat Bed Attachment ...10 Using a Free-arm Style ...10 THE CONTROLS ...11 Pattern Selection Dial ...11 Patterns and Stitch Names ...12 Stitch Length Dial ...14 Stretch Stitching ...15...


