Brother XL 3500 Accessories - International
Brother XL 3500 Accessories
View Results Below
Free Brother International XL-3500 manuals!
Problems with Brother International XL-3500?
Ask a Question
Free Brother International XL-3500 manuals!
Problems with Brother International XL-3500?
Ask a Question
Related Manual Pages


Similar Questions

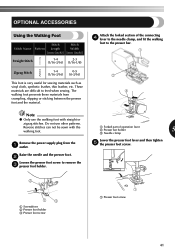
Finding Accessories
Where can I find a walking foot for this model, I can not find anyone that carries any accessories.
Where can I find a walking foot for this model, I can not find anyone that carries any accessories.
(Posted by dward0856 11 years ago)

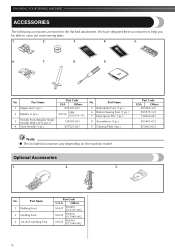
Accessories
Is there a replacement kit of accessories for Brother LS-2125? I was given a machine that works well...
Is there a replacement kit of accessories for Brother LS-2125? I was given a machine that works well...
(Posted by georgiej 12 years ago)

Accessory Kit
Is there a complete accessory kit for this machine: pedal, cord, hoop, presser foot, etc--had one do...
Is there a complete accessory kit for this machine: pedal, cord, hoop, presser foot, etc--had one do...
(Posted by mgonzalez1 12 years ago)