
Users Manual - English
Page 4
... machine is used . • Always consult the operation manual when replacing or installing any opening. • Do not operate where aerosol (spray) products are subject to change without notice. • Never drop or insert any object into any assemblies, the presser feet, needle, or other hot objects. • Use only neutral soaps or detergents to clean the case. Do not use outdoors. 7 For a longer service life: • When storing this sewing machine...
... machine is used . • Always consult the operation manual when replacing or installing any opening. • Do not operate where aerosol (spray) products are subject to change without notice. • Never drop or insert any object into any assemblies, the presser feet, needle, or other hot objects. • Use only neutral soaps or detergents to clean the case. Do not use outdoors. 7 For a longer service life: • When storing this sewing machine...
Users Manual - English
Page 7
... stitches using zigzag foot "J 75 Sewing overcasting stitches using the optional side cutter 76 Basic Stitching ...78 Basting ...78 Basic stitching ...78 Blind Hem Stitching ...80 Buttonhole Stitching ...83 Buttonhole sewing ...84 Button sewing ...88 Zipper Insertion ...90 Inserting a centered zipper ...90 Inserting a side zipper ...92 Sewing Stretch Fabrics and Elastic Tape 95 Stretch stitching ...95 Elastic attaching ...96 Appliqué, Patchwork and Quilt Stitching 97 Appliqué stitching ...98 Patchwork (crazy quilt) stitching ...99 Piecing ...99 Quilting ...100 Free-motion...
... stitches using zigzag foot "J 75 Sewing overcasting stitches using the optional side cutter 76 Basic Stitching ...78 Basting ...78 Basic stitching ...78 Blind Hem Stitching ...80 Buttonhole Stitching ...83 Buttonhole sewing ...84 Button sewing ...88 Zipper Insertion ...90 Inserting a centered zipper ...90 Inserting a side zipper ...92 Sewing Stretch Fabrics and Elastic Tape 95 Stretch stitching ...95 Elastic attaching ...96 Appliqué, Patchwork and Quilt Stitching 97 Appliqué stitching ...98 Patchwork (crazy quilt) stitching ...99 Piecing ...99 Quilting ...100 Free-motion...

Users Manual - English
Page 11
...available for a complete listing of the thread wound onto the bobbin from loosening. The part codes are available as optional accessories. Part Name 1 Buttonhole foot "A" 2 Overcasting foot "G" 3 Monogramming foot "N" Part Code U.S.A. / Canada Others XC2691-023 XC3098-051 XD0810-031 No. Part Name 18 Spool cap (small) 19 Extra spool pin 20 Spool net 4 Zipper foot "I" X59370-021 21 Foot controller 5 Zigzag foot "J" (on machine) 6 Blind stitch foot "R" 7 Button fitting foot "M" 8 Seam ripper 9 Bobbin (4) Bobbin clip (3) 10 Needle set 11 Twin needle 12 Cleaning brush XC3021-031...
...available for a complete listing of the thread wound onto the bobbin from loosening. The part codes are available as optional accessories. Part Name 1 Buttonhole foot "A" 2 Overcasting foot "G" 3 Monogramming foot "N" Part Code U.S.A. / Canada Others XC2691-023 XC3098-051 XD0810-031 No. Part Name 18 Spool cap (small) 19 Extra spool pin 20 Spool net 4 Zipper foot "I" X59370-021 21 Foot controller 5 Zigzag foot "J" (on machine) 6 Blind stitch foot "R" 7 Button fitting foot "M" 8 Seam ripper 9 Bobbin (4) Bobbin clip (3) 10 Needle set 11 Twin needle 12 Cleaning brush XC3021-031...
Users Manual - English
Page 12
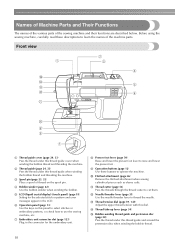
... presser foot . m Thread tension dial (page 59, 145) Adjust the upper thread tension with this panel to select stitches or embroidery patterns, or check how to operate the machine. h Presser foot lever (page 50) Raise and lower the presser foot lever to thread the needle. f Operation panel (page 13) Use the keys on the spool pin. g Embroidery unit connector slot (page 123) Plug in the LCD. i Operation buttons (page 12) Use these descriptions to cut them. d Bobbin winder (page 22) Use the bobbin winder when winding the bobbin. b Thread guide...
... presser foot . m Thread tension dial (page 59, 145) Adjust the upper thread tension with this panel to select stitches or embroidery patterns, or check how to operate the machine. h Presser foot lever (page 50) Raise and lower the presser foot lever to thread the needle. f Operation panel (page 13) Use the keys on the spool pin. g Embroidery unit connector slot (page 123) Plug in the LCD. i Operation buttons (page 12) Use these descriptions to cut them. d Bobbin winder (page 22) Use the bobbin winder when winding the bobbin. b Thread guide...
Users Manual - English
Page 13
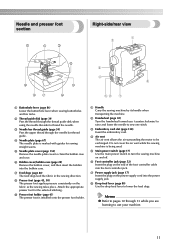
... the bobbin case. g Feed dogs (page 88) The feed dogs feed the fabric in the sewing direction. Memo z Refer to pages 10 through the needle bar thread guide. Needle and presser foot section Right-side/rear view a Buttonhole lever (page 86) Lower the buttonhole lever when sewing buttonholes and bar tacks. Do not cover the air vent while the sewing machine is installed onto the presser foot holder. e Main power switch (page 17) Use the main power switch to sew one stitch. i Presser foot holder (page 45) The presser foot is being used. c Embroidery card...
... the bobbin case. g Feed dogs (page 88) The feed dogs feed the fabric in the sewing direction. Memo z Refer to pages 10 through the needle bar thread guide. Needle and presser foot section Right-side/rear view a Buttonhole lever (page 86) Lower the buttonhole lever when sewing buttonholes and bar tacks. Do not cover the air vent while the sewing machine is installed onto the presser foot holder. e Main power switch (page 17) Use the main power switch to sew one stitch. i Presser foot holder (page 45) The presser foot is being used. c Embroidery card...
Users Manual - English
Page 14
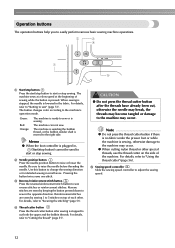
... press the thread cutter button after sewing is moved to adjust the sewing speed. 12 e Sewing speed controller Slide the sewing speed controller to the right side. The machine is winding the bobbin thread, or the bobbin winder shaft is stopped to the machine may occur. Operation buttons The operation buttons help you to "Using the thread cutter" (page 56). a Start/stop button Press the start/stop sewing. The machine can not sew. For details, refer to easily perform various basic sewing machine operations. The button changes color according...
... press the thread cutter button after sewing is moved to adjust the sewing speed. 12 e Sewing speed controller Slide the sewing speed controller to the right side. The machine is winding the bobbin thread, or the bobbin winder shaft is stopped to the machine may occur. Operation buttons The operation buttons help you to "Using the thread cutter" (page 56). a Start/stop button Press the start/stop sewing. The machine can not sew. For details, refer to easily perform various basic sewing machine operations. The button changes color according...

Users Manual - English
Page 23
... Operation 21 bobbin winding / setting bobbin thread / needle replacement / embroidery unit attachment / Example: Upper threading embroidery frame attachment / embroidery foot attachment / presser foot replacement on . a X The LCD comes on the LCD. Press (Sewing machine help screen appears. c a b cd After you return to the previous page. procedures If you press (Previous page key), you finish viewing, press e key) two times. (Back h g fe a Upper threading b Bobbin winding c Bobbin installation d Needle replacement e Presser foot replacement f Embroidery foot attachment...
... Operation 21 bobbin winding / setting bobbin thread / needle replacement / embroidery unit attachment / Example: Upper threading embroidery frame attachment / embroidery foot attachment / presser foot replacement on . a X The LCD comes on the LCD. Press (Sewing machine help screen appears. c a b cd After you return to the previous page. procedures If you press (Previous page key), you finish viewing, press e key) two times. (Back h g fe a Upper threading b Bobbin winding c Bobbin installation d Needle replacement e Presser foot replacement f Embroidery foot attachment...

Users Manual - English
Page 51
... are 67 utility stitches. b The machine comes with your finger is selected. If the wrong presser foot is installed, turn off the sewing machine, attach the correct presser foot, and then select the desired stitch again. Turn on adjusting the stitch width, stitch length and thread tension, refer to "Replacing the presser foot" (page 43). Check that should be used , the needle may hit the presser foot and bend or break. z For details on the sewing machine. Sewing 49
... are 67 utility stitches. b The machine comes with your finger is selected. If the wrong presser foot is installed, turn off the sewing machine, attach the correct presser foot, and then select the desired stitch again. Turn on adjusting the stitch width, stitch length and thread tension, refer to "Replacing the presser foot" (page 43). Check that should be used , the needle may hit the presser foot and bend or break. z For details on the sewing machine. Sewing 49
Users Manual - English
Page 54
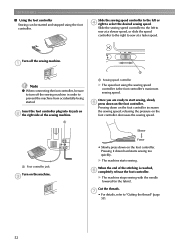
... sewing machine. a Note z When connecting the foot controller, be started . releasing the pressure on the machine. a a a Sewing speed controller X The speed set using the foot controller. Insert the foot controller plug into its jack on the foot controller. X The machine stops sewing with the needle lowered (in order to sew at a slower speed, or slide the speed controller to the right to prevent the machine from accidentally being started and stopped using the sewing speed controller is reached, f completely release the foot controller. Slide the sewing speed controller...
... sewing machine. a Note z When connecting the foot controller, be started . releasing the pressure on the machine. a a a Sewing speed controller X The speed set using the foot controller. Insert the foot controller plug into its jack on the foot controller. X The machine stops sewing with the needle lowered (in order to sew at a slower speed, or slide the speed controller to the right to prevent the machine from accidentally being started and stopped using the sewing speed controller is reached, f completely release the foot controller. Slide the sewing speed controller...
Users Manual - English
Page 59
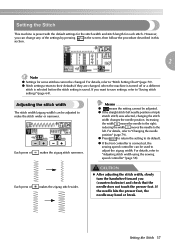
... presser foot, the needle may bend or break. Each press of makes the zigzag stitch wider. Increasing the width moves the needle to "Adjusting stitch width using the sewing speed controller" (page 58). Setting the Stitch This machine is preset with the default settings for the stitch width and stitch length for some stitches cannot be changed , when the machine is turned off or a different stitch is selected before the stitch setting is connected, the sewing speed controller can be adjusted...
... presser foot, the needle may bend or break. Each press of makes the zigzag stitch wider. Increasing the width moves the needle to "Adjusting stitch width using the sewing speed controller" (page 58). Setting the Stitch This machine is preset with the default settings for the stitch width and stitch length for some stitches cannot be changed , when the machine is turned off or a different stitch is selected before the stitch setting is connected, the sewing speed controller can be adjusted...
Users Manual - English
Page 67
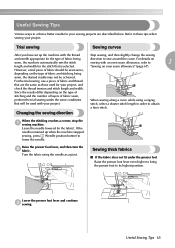
...). Lower the presser foot lever and continue c sewing. stitch, select a shorter stitch length in the fabric). If the needle remained up the machine with the thread Stop sewing, and then slightly change the sewing and needle appropriate for the type of fabric and stitching being sewn, the machine automatically sets the stitch direction to sew around the curve. Trial sewing Sewing curves After you have set up when the machine stopped sewing, press (Needle position button) to lower the needle. For the trial sewing, use a piece of fabric...
...). Lower the presser foot lever and continue c sewing. stitch, select a shorter stitch length in the fabric). If the needle remained up the machine with the thread Stop sewing, and then slightly change the sewing and needle appropriate for the type of fabric and stitching being sewn, the machine automatically sets the stitch direction to sew around the curve. Trial sewing Sewing curves After you have set up when the machine stopped sewing, press (Needle position button) to lower the needle. For the trial sewing, use a piece of fabric...
Users Manual - English
Page 87
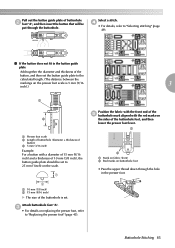
...; For details on replacing the presser foot, refer to "Replacing the presser foot" (page 43). a A b a Mark on fabric (front) b Red marks on buttonhole foot • Pass the upper thread down through the hole in the button guide plate Add together the diameter and thickness of the button, and then set the button guide plate to the calculated length. (The distance between the markings on the presser foot scale is set. Attach buttonhole foot "A". d • For details, refer...
...; For details on replacing the presser foot, refer to "Replacing the presser foot" (page 43). a A b a Mark on fabric (front) b Red marks on buttonhole foot • Pass the upper thread down through the hole in the button guide plate Add together the diameter and thickness of the button, and then set the button guide plate to the calculated length. (The distance between the markings on the presser foot scale is set. Attach buttonhole foot "A". d • For details, refer...
Users Manual - English
Page 90
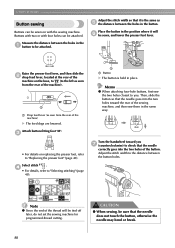
... way. UTILITY STITCHES Button sewing Buttons can be sewn on with four holes can be attached. Raise the presser foot lever, and then slide the b drop feed lever, located at the rear of the machine). CAUTION ● When sewing, be sewn, and lower the presser foot lever. Note z Since the end of the thread will f be sure that the needle goes into the two holes of the machine) X The feed dogs are lowered. a a Drop feed lever (as seen...
... way. UTILITY STITCHES Button sewing Buttons can be sewn on with four holes can be attached. Raise the presser foot lever, and then slide the b drop feed lever, located at the rear of the machine). CAUTION ● When sewing, be sewn, and lower the presser foot lever. Note z Since the end of the thread will f be sure that the needle goes into the two holes of the machine) X The feed dogs are lowered. a a Drop feed lever (as seen...

Users Manual - English
Page 104
... the quilting foot and the presser bar. 1 3 2 a a Drop feed lever (as seen from the rear of the machine). Hold the quilting foot "O" in any direction. a Presser foot holder screw CAUTION ● Be sure to "Selecting stitching" (page 49). Attach free-motion quilting foot "O" by b positioning the pin of the quilting foot above the needle clamp screw and aligning the lower-left as seen from the rear of sewing. Reinforcement stitches are sewn at the beginning and end of the machine) X The feed dogs are lowered...
... the quilting foot and the presser bar. 1 3 2 a a Drop feed lever (as seen from the rear of the machine). Hold the quilting foot "O" in any direction. a Presser foot holder screw CAUTION ● Be sure to "Selecting stitching" (page 49). Attach free-motion quilting foot "O" by b positioning the pin of the quilting foot above the needle clamp screw and aligning the lower-left as seen from the rear of sewing. Reinforcement stitches are sewn at the beginning and end of the machine) X The feed dogs are lowered...

Users Manual - English
Page 120
... pattern stitching and stretch fabrics, be sure to the fabric" (page 126). ■ Needle Use a 75/11 home sewing machine needle. Note z Always use a 90/14 home sewing machine needle. Memo z For good quality embroidery designs be absolutely sure not to prepare The following is enough bobbin thread. If you want to "Setting the fabric in injury. ● Be careful when sewing overlapping patterns. For details, refer to "Attaching a stabilizer material to use (Needle position button) to "Replacing...
... pattern stitching and stretch fabrics, be sure to the fabric" (page 126). ■ Needle Use a 75/11 home sewing machine needle. Note z Always use a 90/14 home sewing machine needle. Memo z For good quality embroidery designs be absolutely sure not to prepare The following is enough bobbin thread. If you want to "Setting the fabric in injury. ● Be careful when sewing overlapping patterns. For details, refer to "Attaching a stabilizer material to use (Needle position button) to "Replacing...
Users Manual - English
Page 150
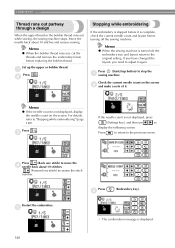
... a design When the upper thread or the bobbin thread runs out while sewing, the sewing machine stops. Press (Start/stop button) to "Stopping while embroidering" (page 148). Press to return to adjust it . If you have changed the layout, you need to the previous screen. e Press c (Embroidery key). Move the needle back about 10 stitches. (Forward one stitch) increases the stitch number. b Stopping while embroidering If the embroidery is stopped before replacing the bobbin thread...
... a design When the upper thread or the bobbin thread runs out while sewing, the sewing machine stops. Press (Start/stop button) to "Stopping while embroidering" (page 148). Press to return to adjust it . If you have changed the layout, you need to the previous screen. e Press c (Embroidery key). Move the needle back about 10 stitches. (Forward one stitch) increases the stitch number. b Stopping while embroidering If the embroidery is stopped before replacing the bobbin thread...
Users Manual - English
Page 156
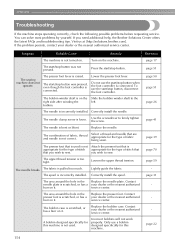
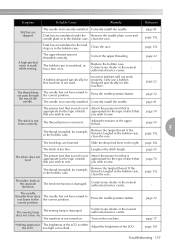
...needle is loose. The needle breaks. Lightly guide the fabric. The start/stop button was not pressed. you wish to firmly tighten the screw. Incorrect bobbins will not work properly. page 22 154 APPENDIX Troubleshooting If the machine stops operating correctly, check the following possible problems before requesting service. Turn on it. Replace the needle. Loosen the upper thread tension. Correctly install the spool. The area around the hole in the Replace the presser foot. service center. Only use a bobbin designed specifically...
...needle is loose. The needle breaks. Lightly guide the fabric. The start/stop button was not pressed. you wish to firmly tighten the screw. Incorrect bobbins will not work properly. page 22 154 APPENDIX Troubleshooting If the machine stops operating correctly, check the following possible problems before requesting service. Turn on it. Replace the needle. Loosen the upper thread tension. Correctly install the spool. The area around the hole in the Replace the presser foot. service center. Only use a bobbin designed specifically...
Users Manual - English
Page 159
... type of stitch that you wish to sew. Only use a bobbin designed specifically for this machine. Press the needle position button. Slide the drop feed lever to the correct position. page 152 The fabric feeds in the bobbin case. Contact your dealer or the nearest authorized service center. The needle threader lever does The needle has not been raised to not lower to sew. does not come on it. Turn on . page 163 Troubleshooting 157 Correctly install the needle. The thread tension...
... type of stitch that you wish to sew. Only use a bobbin designed specifically for this machine. Press the needle position button. Slide the drop feed lever to the correct position. page 152 The fabric feeds in the bobbin case. Contact your dealer or the nearest authorized service center. The needle threader lever does The needle has not been raised to not lower to sew. does not come on it. Turn on . page 163 Troubleshooting 157 Correctly install the needle. The thread tension...
Users Manual - English
Page 167
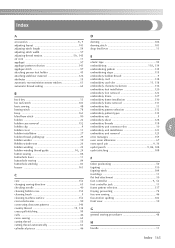
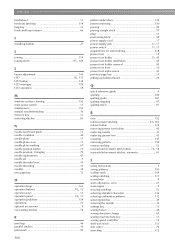
...pin 9, 36 bobbin winding 22 bobbin-winding thread guide 10, 24 eyelet punch 9, 86, 108 eyelet stitching 108 button sewing 88 buttonhole lever 11 F buttonhole sewing 84 buttonhole stitching 83 fabric positioning 50 buzzer 163 fagoting 110 fagoting stitch 109 C care 152 feed dogs 11 flat bed attachment 10 foot controller 9, 52 changing sewing direction 65 foot controller jack 11 checking needle 40 frame pattern selection 137 cleaning bobbin case 152 fraying, preventing 74 cleaning brush 9 free-arm sewing 46 cleaning machine surface 152 free-motion...
...pin 9, 36 bobbin winding 22 bobbin-winding thread guide 10, 24 eyelet punch 9, 86, 108 eyelet stitching 108 button sewing 88 buttonhole lever 11 F buttonhole sewing 84 buttonhole stitching 83 fabric positioning 50 buzzer 163 fagoting 110 fagoting stitch 109 C care 152 feed dogs 11 flat bed attachment 10 foot controller 9, 52 changing sewing direction 65 foot controller jack 11 checking needle 40 frame pattern selection 137 cleaning bobbin case 152 fraying, preventing 74 cleaning brush 9 free-arm sewing 46 cleaning machine surface 152 free-motion...
Users Manual - English
Page 168
... 114 help key 13 hook-and-loop fastener 66 I installing bobbin 27 J joining 114 joining stitch 97, 109 L layout adjustment 143 LCD 18, 133 LCD button 134 LCD messages 159 LCD operation 18 M machine surface cleaning 152 main power switch 11 maintenance 152 manual needle threading 36 memory key 13 mirroring stitches 63 N needle bar thread guide 11 needle condition 40 needle plate 11 needle plate cover 11 needle plate marking 67 needle position button 12 needle position, changing 79 needle replacement 41 needle set 9 needle threader lever 10 needle threading 31 needles...
... 114 help key 13 hook-and-loop fastener 66 I installing bobbin 27 J joining 114 joining stitch 97, 109 L layout adjustment 143 LCD 18, 133 LCD button 134 LCD messages 159 LCD operation 18 M machine surface cleaning 152 main power switch 11 maintenance 152 manual needle threading 36 memory key 13 mirroring stitches 63 N needle bar thread guide 11 needle condition 40 needle plate 11 needle plate cover 11 needle plate marking 67 needle position button 12 needle position, changing 79 needle replacement 41 needle set 9 needle threader lever 10 needle threading 31 needles...


