Users Manual - English
Page 2
... center for household use." The embroidery machine should always be taken, including the following: "Read all moving parts. Always unplug the embroidery machine from all instructions before changing the light bulb. Never operate this manual. Do not unplug by the manufacturer... unplug before using." WARNING - To reduce the risk of the embroidery machine and foot control free from outlet. 9. Use this manual. 3. Use only accessories recommended by pulling on cord. Never operate the embroidery machine with same type rated 2.4 watts. Keep ventilation openings of burns...
... center for household use." The embroidery machine should always be taken, including the following: "Read all moving parts. Always unplug the embroidery machine from all instructions before changing the light bulb. Never operate this manual. Do not unplug by the manufacturer... unplug before using." WARNING - To reduce the risk of the embroidery machine and foot control free from outlet. 9. Use this manual. 3. Use only accessories recommended by pulling on cord. Never operate the embroidery machine with same type rated 2.4 watts. Keep ventilation openings of burns...
Users Manual - English
Page 4
... power switch and unplug the cord when: ● Operation is an advanced computerized home embroidery machine. To fully enjoy all of the operation manual to inspect and adjust the machine yourself. Plug the machine directly into the wall. Do not store your embroidery machine beside a space heater, iron, or other moving parts. 2. Benzene, thinner, and scouring powders...
... power switch and unplug the cord when: ● Operation is an advanced computerized home embroidery machine. To fully enjoy all of the operation manual to inspect and adjust the machine yourself. Plug the machine directly into the wall. Do not store your embroidery machine beside a space heater, iron, or other moving parts. 2. Benzene, thinner, and scouring powders...
Users Manual - English
Page 19
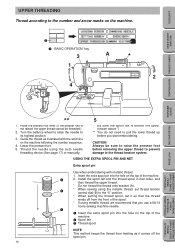
...thread from the front of the machine. 2. Lower the presser foot. 5. CAUTION Always be threaded.) 2. Turn the balance wheel to raise the needle to the number and arrow marks on the top of the spool. * If using the auto needle threading device (See page 17) or manually. 5 * Be sure the ... it so that you start embroidering. USING THE EXTRA SPOOL PIN AND NET Extra spool pin Use when embroidering with the solid line on the machine following the number sequence. 4. Raise the presser foot lever (If the presser foot is behind the spool. (shown above *) ** You do not need...
...thread from the front of the machine. 2. Lower the presser foot. 5. CAUTION Always be threaded.) 2. Turn the balance wheel to raise the needle to the number and arrow marks on the top of the spool. * If using the auto needle threading device (See page 17) or manually. 5 * Be sure the ... it so that you start embroidering. USING THE EXTRA SPOOL PIN AND NET Extra spool pin Use when embroidering with the solid line on the machine following the number sequence. 4. Raise the presser foot lever (If the presser foot is behind the spool. (shown above *) ** You do not need...


