

Accessory Catalog
Page 13
Install and manually thread a twin needle. 2. Use a stiff card to slide the fabric from left into gathers or...setting and depth setting. 2. SA143 AFJKM Ruffler Foot Makes ruffles with this presser foot. 1. Sew slowly for details.) Brother Embellishment Feet Pin Tuck Foot 24 Ruffler Foot Pin Tuck Foot This presser foot has 7 grooves and produces perfect pin ... Move fabric about 1" (2.5 cm) past the needle to sew the first row in one of the grooves. 4. www.brother.com Draw a reference line to guide your first row of stitching and use that to get started. The ruffling blade on...
Install and manually thread a twin needle. 2. Use a stiff card to slide the fabric from left into gathers or...setting and depth setting. 2. SA143 AFJKM Ruffler Foot Makes ruffles with this presser foot. 1. Sew slowly for details.) Brother Embellishment Feet Pin Tuck Foot 24 Ruffler Foot Pin Tuck Foot This presser foot has 7 grooves and produces perfect pin ... Move fabric about 1" (2.5 cm) past the needle to sew the first row in one of the grooves. 4. www.brother.com Draw a reference line to guide your first row of stitching and use that to get started. The ruffling blade on...

Accessory Catalog
Page 34
...A and B (Black and White): The 1,100-meter (approx.1,200-yds) filament thread is color keyed to hoop your machine. Consult your instruction manual for advice on how to the Brother Embroidery Cards giving you just the right color for each design. Individual colors are strong, soft and smooth, and perfectly balanced to...is ideal for the Quattro™ 6000D, Duetta™ 4500D/Innov-is 4000D, 2500D, 1500D, 1200 series, PC and ULT series machines and the PE-400D and Innov-is important that can stand on the top surface of thread per spool. It is Project Book (See page 33 for placement...
...A and B (Black and White): The 1,100-meter (approx.1,200-yds) filament thread is color keyed to hoop your machine. Consult your instruction manual for advice on how to the Brother Embroidery Cards giving you just the right color for each design. Individual colors are strong, soft and smooth, and perfectly balanced to...is ideal for the Quattro™ 6000D, Duetta™ 4500D/Innov-is 4000D, 2500D, 1500D, 1200 series, PC and ULT series machines and the PE-400D and Innov-is important that can stand on the top surface of thread per spool. It is Project Book (See page 33 for placement...
Users Manual - English
Page 1
GETTING READY EMBROIDERY APPENDIX Computerized Embroidery Machine Operation Manual
GETTING READY EMBROIDERY APPENDIX Computerized Embroidery Machine Operation Manual
Users Manual - English
Page 2
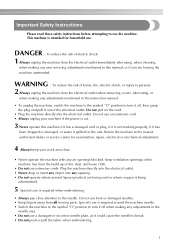
...to persons. 2 Always unplug the machine from the electrical outlet immediately after using, when cleaning, when making any adjustments mentioned in the instruction manual. • To unplug the machine, switch the machine to the symbol "O" position to turn it off when making any user servicing adjustments ...lint, dust, and loose cloth. • Do not use . Do not pull on the unit. Special care is cut. 3 Never operate this manual, or if you are being used or where oxygen is being administered. 5 Special care is intended for examination, repair, electrical or mechanical adjustment. ...
...to persons. 2 Always unplug the machine from the electrical outlet immediately after using, when cleaning, when making any adjustments mentioned in the instruction manual. • To unplug the machine, switch the machine to the symbol "O" position to turn it off when making any user servicing adjustments ...lint, dust, and loose cloth. • Do not use . Do not pull on the unit. Special care is cut. 3 Never operate this manual, or if you are being used or where oxygen is being administered. 5 Special care is intended for examination, repair, electrical or mechanical adjustment. ...

Users Manual - English
Page 3
...replaced by authorized dealer. • In the event a malfunction occurs or adjustment is required, first follow the troubleshooting table in the manual. The contents of this manual and specifications of this machine only for the plug supplied with this equipment, you should never be used. • Always consult the...objects. • Use only neutral soaps or detergents to clean the case. For additional product information and updates, visit our web site at www.brother.com FOR USERS IN THE UK, EIRE, MALTA AND CYPRUS ONLY IMPORTANT • In the event of replacing the plug fuse, use or ...
...replaced by authorized dealer. • In the event a malfunction occurs or adjustment is required, first follow the troubleshooting table in the manual. The contents of this manual and specifications of this machine only for the plug supplied with this equipment, you should never be used. • Always consult the...objects. • Use only neutral soaps or detergents to clean the case. For additional product information and updates, visit our web site at www.brother.com FOR USERS IN THE UK, EIRE, MALTA AND CYPRUS ONLY IMPORTANT • In the event of replacing the plug fuse, use or ...
Users Manual - English
Page 4
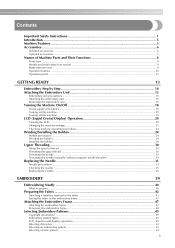
... Installing the bobbin ...28 Upper Threading ...30 About the spool of thread...30 Threading the upper thread ...30 Threading the needle ...32 Threading the needle manually (without using the needle threader 34 Replacing the Needle ...35 Needle precautions ...35 Checking the needle ...35 Replacing the needle...36 EMBROIDERY 39 Embroidering Neatly...
... Installing the bobbin ...28 Upper Threading ...30 About the spool of thread...30 Threading the upper thread ...30 Threading the needle ...32 Threading the needle manually (without using the needle threader 34 Replacing the Needle ...35 Needle precautions ...35 Checking the needle ...35 Replacing the needle...36 EMBROIDERY 39 Embroidering Neatly...
Users Manual - English
Page 6
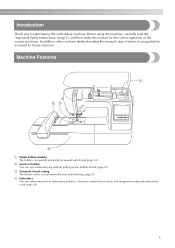
... and easily be wound with thread (page 24). Before using the machine, carefully read the "Important Safety Instructions" (page 1), and then study this manual for purchasing this manual, store it where it can quickly be cut automatically after you for the correct operation of the various functions. c Automatic thread cutting The thread...
... and easily be wound with thread (page 24). Before using the machine, carefully read the "Important Safety Instructions" (page 1), and then study this manual for purchasing this manual, store it where it can quickly be cut automatically after you for the correct operation of the various functions. c Automatic thread cutting The thread...

Users Manual - English
Page 7
...-050 XD1628-051 XD1629-051 XD0474-051 SA444/EF84 EF84: XD0600- 002 XC1807-121 XZ5004-021 XC4487-051 6 Part Name 10 Spool net 11 Operation manual 12 Quick reference guide 13 Embroidery foot "Q" (on machine) Embroidery set 4 Cleaning brush 5 Screwdriver (large) 6 Screwdriver (small) 7 Spool cap (large) 8 Spool cap (medium) 9 Spool cap...
...-050 XD1628-051 XD1629-051 XD0474-051 SA444/EF84 EF84: XD0600- 002 XC1807-121 XZ5004-021 XC4487-051 6 Part Name 10 Spool net 11 Operation manual 12 Quick reference guide 13 Embroidery foot "Q" (on machine) Embroidery set 4 Cleaning brush 5 Screwdriver (large) 6 Screwdriver (small) 7 Spool cap (large) 8 Spool cap (medium) 9 Spool cap...

Users Manual - English
Page 14
... Installing the bobbin 28 Upper Threading ...30 About the spool of thread 30 Threading the upper thread 30 Threading the needle 32 Threading the needle manually (without using the needle threader 34 Replacing the Needle 35 Needle precautions 35 Checking the needle 35 Replacing the needle 36 1 GETTING READY The various...
... Installing the bobbin 28 Upper Threading ...30 About the spool of thread 30 Threading the upper thread 30 Threading the needle 32 Threading the needle manually (without using the needle threader 34 Replacing the Needle 35 Needle precautions 35 Checking the needle 35 Replacing the needle 36 1 GETTING READY The various...
Users Manual - English
Page 24
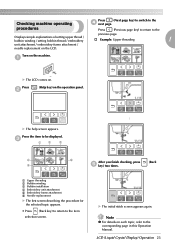
... the d next page. LCD (Liquid Crystal Display) Operation 23 Checking machine operating Press (Next page key) to switch to the corresponding page in this Operation Manual. X The help screen appears. procedures Press (Previous page key) to return to the previous page. c 1 2 3 4 6 After you finish checking, press (Back 5 e key) two times...
... the d next page. LCD (Liquid Crystal Display) Operation 23 Checking machine operating Press (Next page key) to switch to the corresponding page in this Operation Manual. X The help screen appears. procedures Press (Previous page key) to return to the previous page. c 1 2 3 4 6 After you finish checking, press (Back 5 e key) two times...

Users Manual - English
Page 33
... be threaded. Memo z The needle threader can easily be passed behind the needle bar thread k guide. The thread can be sure to "Threading the needle manually (without using your right hand, as shown. 1 a Needle bar thread guide 32 Look through this window and check that the thread is equipped with a thickness...
... be threaded. Memo z The needle threader can easily be passed behind the needle bar thread k guide. The thread can be sure to "Threading the needle manually (without using your right hand, as shown. 1 a Needle bar thread guide 32 Look through this window and check that the thread is equipped with a thickness...

Users Manual - English
Page 35
... through the eye of 130/20 or thicker which cannot be used with a thickness of the needle c from front to start embroidering. Threading the needle manually (without using the needle threader) X The upper threading is not raised, the needle threader cannot thread the needle. GETTING READY Raise the presser foot lever...
... through the eye of 130/20 or thicker which cannot be used with a thickness of the needle c from front to start embroidering. Threading the needle manually (without using the needle threader) X The upper threading is not raised, the needle threader cannot thread the needle. GETTING READY Raise the presser foot lever...

Users Manual - English
Page 84
... 28 bobbin winder 8 LCD button 51 , LCD operation 20 50 3 bobbin winding 24 bobbin winding thread guide 8 M Brother poly #90 bobbin thread 7 buzzer 82 machine settings 21 , main power switch 9 19 C characters 52 maintenance 70 manual needle threading 34 , memory key 11 63 cleaning 70 cleaning brush 6 N D dust cover 6 E , embroidery card 7 55...
... 28 bobbin winder 8 LCD button 51 , LCD operation 20 50 3 bobbin winding 24 bobbin winding thread guide 8 M Brother poly #90 bobbin thread 7 buzzer 82 machine settings 21 , main power switch 9 19 C characters 52 maintenance 70 manual needle threading 34 , memory key 11 63 cleaning 70 cleaning brush 6 N D dust cover 6 E , embroidery card 7 55...


