

Accessory Catalog
Page 3
... with features that enables easy sewing and embroidery. Create 12" x 7" or 10-1/4" x 6-1/4" embroidery, edit and size designs, and make your machine in automatic machine embroidery. Innov-is QC1000 Advanced Sewing & Quilting Machine A quilting machine filled with a compact yet powerful sewing and quilting machine. if you have made Brother the most requested in the illustrations. C Innov-is compatible. Loaded with models in sewing and embroidery utilizing the latest innovations including USB media and touch screen...
... with features that enables easy sewing and embroidery. Create 12" x 7" or 10-1/4" x 6-1/4" embroidery, edit and size designs, and make your machine in automatic machine embroidery. Innov-is QC1000 Advanced Sewing & Quilting Machine A quilting machine filled with a compact yet powerful sewing and quilting machine. if you have made Brother the most requested in the illustrations. C Innov-is compatible. Loaded with models in sewing and embroidery utilizing the latest innovations including USB media and touch screen...

Accessory Catalog
Page 7
Attach the seam guide on stitch settings. 1. Selecting a stitch designated for the Side Cutter allows you to accomplish perfect straight stitching. Slip the left side under the presser foot. 5. Sew the stitches keeping a certain seam allowance. SA108 GHILOP Straight Stitch Foot and Straight Stitch Needle Plate Use the Straight Stitch Foot with the Straight Stitch Needle Plate to create a beautiful finish without any adjustment on the needle plate with all Brother presser feet. Installing the Straight Stitch Needle Plate automatically sets the needle position to your fabric ...
Attach the seam guide on stitch settings. 1. Selecting a stitch designated for the Side Cutter allows you to accomplish perfect straight stitching. Slip the left side under the presser foot. 5. Sew the stitches keeping a certain seam allowance. SA108 GHILOP Straight Stitch Foot and Straight Stitch Needle Plate Use the Straight Stitch Foot with the Straight Stitch Needle Plate to create a beautiful finish without any adjustment on the needle plate with all Brother presser feet. Installing the Straight Stitch Needle Plate automatically sets the needle position to your fabric ...

Accessory Catalog
Page 11
.... 3. Attach the presser foot and select a stitch from the right of 7 mm feed width. 1. Sew. Perfect for quilting appliqué! 1. Place cord under the presser foot. 3. It can be used with brother sewing machines of the presser foot, and place each cord into each hole on the presser foot. 2. Insert cords or threads into each guide (to fit the width of the braid. 6. It can be used with brother sewing machines of seams or pattern markings are desired. Attach the presser foot and pull cords...
.... 3. Attach the presser foot and select a stitch from the right of 7 mm feed width. 1. Sew. Perfect for quilting appliqué! 1. Place cord under the presser foot. 3. It can be used with brother sewing machines of the presser foot, and place each cord into each hole on the presser foot. 2. Insert cords or threads into each guide (to fit the width of the braid. 6. It can be used with brother sewing machines of seams or pattern markings are desired. Attach the presser foot and pull cords...

Accessory Catalog
Page 12
... helps you are using zigzag stitch with transparent thread. Decrease the upper thread tension and test various settings to make fringes). For gathering: 1. Stitch in the presser foot with the guideline and sew. Creating tailor tacks: 1. Requires Low Shank Adapter for gathering fabrics. Place the fabric to the seam or pattern line and sew. Gathering Foot Used for ULT series, PC-6500, PC-8200 and PC-8500 sewing machines. Increase the upper thread tension. 3. Zigzag-sew with a single zigzag stitch. Line up the center guide...
... helps you are using zigzag stitch with transparent thread. Decrease the upper thread tension and test various settings to make fringes). For gathering: 1. Stitch in the presser foot with the guideline and sew. Creating tailor tacks: 1. Requires Low Shank Adapter for gathering fabrics. Place the fabric to the seam or pattern line and sew. Gathering Foot Used for ULT series, PC-6500, PC-8200 and PC-8500 sewing machines. Increase the upper thread tension. 3. Zigzag-sew with a single zigzag stitch. Line up the center guide...

Accessory Catalog
Page 13
... started. The ruffling blade on lightweight fabric. SA143 AFJKM Ruffler Foot Makes ruffles with this presser foot. 1. For seven grooves: SA179 ABCDEJ For five grooves: SA162 IP This presser foot does not include the bobbin cover. Draw a reference line to guide your first row of stitching and use that to sew the first row in one of stitch length, tuck setting and depth setting. 2. Install and manually thread a twin needle. 2. Sew slowly for details.) Brother...
... started. The ruffling blade on lightweight fabric. SA143 AFJKM Ruffler Foot Makes ruffles with this presser foot. 1. For seven grooves: SA179 ABCDEJ For five grooves: SA162 IP This presser foot does not include the bobbin cover. Draw a reference line to guide your first row of stitching and use that to sew the first row in one of stitch length, tuck setting and depth setting. 2. Install and manually thread a twin needle. 2. Sew slowly for details.) Brother...

Accessory Catalog
Page 15
... sewing machines. While starting to sew, press the needle position button twice to pull the bobbin thread to guide the fabric. 4. Requires Low Shank Adapter for straight stitch. 3. Sew. Brother Quilting Feet 27 Open Toe Quilting Foot Quilting Foot SA187 ABCDEFGHMNO SA129 ABCDEFGHMNO SA165 L Open Toe Quilting Foot The large opening on the front of fabric and the walking foot with the pin over the needle clamp screw. 2. Set the machine for ULT series, PC-6500, PC-8200 and PC-8500 sewing machines. Lower the feed dogs. 2. Begin to sew moving the fabric...
... sewing machines. While starting to sew, press the needle position button twice to pull the bobbin thread to guide the fabric. 4. Requires Low Shank Adapter for straight stitch. 3. Sew. Brother Quilting Feet 27 Open Toe Quilting Foot Quilting Foot SA187 ABCDEFGHMNO SA129 ABCDEFGHMNO SA165 L Open Toe Quilting Foot The large opening on the front of fabric and the walking foot with the pin over the needle clamp screw. 2. Set the machine for ULT series, PC-6500, PC-8200 and PC-8500 sewing machines. Lower the feed dogs. 2. Begin to sew moving the fabric...

Accessory Catalog
Page 17
... Only compatible with center needle position straight stitch Open toe quilting foot "O" for greater visibility Echo quilting foot "E" for perfect echo quilting - The Border Frame enables you superior stitch quality when stitching over differing fabric thicknesses. - Automatic Height Adjuster™ (AHA) feature adjusts the presser foot pressure automatically and continuously to give you to repeat designs vertically or horizontally. Includes three new free-motion presser feet: Free-motion quilting foot "C" for more features to your machine with USB hub devices* to provide...
... Only compatible with center needle position straight stitch Open toe quilting foot "O" for greater visibility Echo quilting foot "E" for perfect echo quilting - The Border Frame enables you superior stitch quality when stitching over differing fabric thicknesses. - Automatic Height Adjuster™ (AHA) feature adjusts the presser foot pressure automatically and continuously to give you to repeat designs vertically or horizontally. Includes three new free-motion presser feet: Free-motion quilting foot "C" for more features to your machine with USB hub devices* to provide...

Accessory Catalog
Page 33
... embroidery, quilting or sewing project. Ten Spool Thread Stand This 10-Spool Thread Stand snaps securely in use. Spend less time changing threads, and more on to your machine. SA539 DuettaTM4500D,Innov-is 4000D/2500D/1500D SA560 QuattroTM 6000D Embroidery Machine Hoops Select hoops appropriate for your machine to provide 10 vertical spool pins for details, www.brother.com. Some hoops can be removed to accommodate a variety of spool sizes. Each thread has it's own thread guide...
... embroidery, quilting or sewing project. Ten Spool Thread Stand This 10-Spool Thread Stand snaps securely in use. Spend less time changing threads, and more on to your machine. SA539 DuettaTM4500D,Innov-is 4000D/2500D/1500D SA560 QuattroTM 6000D Embroidery Machine Hoops Select hoops appropriate for your machine to provide 10 vertical spool pins for details, www.brother.com. Some hoops can be removed to accommodate a variety of spool sizes. Each thread has it's own thread guide...

Accessory Catalog
Page 34
...-is Project Book (See page 33 for fabrics and applications when it is important that can stand on your machine. Brother Embroidery Accessories PacesetterTM Polyester Threads 65 Brother Country Yarn Embroidery Threads Metallic Threads For the best embroidery results, use these embroidery threads especially designed for Brother sewing and embroidering machines. 61 Color Thread Set with Wooden Rack ETKSP999 PacesetterTM Polyester Threads (61 Color Thread Set with a high nap such as fur or terrycloth. Make sure...
...-is Project Book (See page 33 for fabrics and applications when it is important that can stand on your machine. Brother Embroidery Accessories PacesetterTM Polyester Threads 65 Brother Country Yarn Embroidery Threads Metallic Threads For the best embroidery results, use these embroidery threads especially designed for Brother sewing and embroidering machines. 61 Color Thread Set with Wooden Rack ETKSP999 PacesetterTM Polyester Threads (61 Color Thread Set with a high nap such as fur or terrycloth. Make sure...

Accessory Catalog
Page 36
... SA180B SA181 Needle Felting Attachment Felting Needle Brother Sewing Machine Attachments for PQ Series 70 Needle Felting Attachment Use this unique attachment to use it just like an ordinary presser foot, and embellish fabrics with Dust Box and Needle Guide. Felting Needle Needle Felted Cap & Scarf www.brother.com SA173 Ver y Narrow Foot Very convenient for PQ Series One package includes five metal bobbins. Attach the Needle Felting Attachment and lower the feed dogs. 2. Move the fabric while sewing. Brother Sewing Machine Attachments for...
... SA180B SA181 Needle Felting Attachment Felting Needle Brother Sewing Machine Attachments for PQ Series 70 Needle Felting Attachment Use this unique attachment to use it just like an ordinary presser foot, and embellish fabrics with Dust Box and Needle Guide. Felting Needle Needle Felted Cap & Scarf www.brother.com SA173 Ver y Narrow Foot Very convenient for PQ Series One package includes five metal bobbins. Attach the Needle Felting Attachment and lower the feed dogs. 2. Move the fabric while sewing. Brother Sewing Machine Attachments for...

Accessory Catalog
Page 40
...cover stitch, with the LC1 presser foot included in the machine. 2. Attach the hem positioning plate A/B to the hemming attachment, and attach it into the front cover slot. 3. Set up your machine for a chain stitch, the center needle. 2. Set T1/T2 presser foot. 2. Brother Cover Stitch Feet 78 Top Stitching Foot Set Top Stitching Foot Set Use included presser foot to top stitch with a tweezers. Fold fabric and set through the holder). 4. SA224CV SA221CV Hemming Set Finishes hems easily and quickly. Sew. Brother Cover Stitch Feet 77 Bias Tape Binding Set Hemming Set...
...cover stitch, with the LC1 presser foot included in the machine. 2. Attach the hem positioning plate A/B to the hemming attachment, and attach it into the front cover slot. 3. Set up your machine for a chain stitch, the center needle. 2. Set T1/T2 presser foot. 2. Brother Cover Stitch Feet 78 Top Stitching Foot Set Top Stitching Foot Set Use included presser foot to top stitch with a tweezers. Fold fabric and set through the holder). 4. SA224CV SA221CV Hemming Set Finishes hems easily and quickly. Sew. Brother Cover Stitch Feet 77 Bias Tape Binding Set Hemming Set...

Users Manual - English
Page 7
Part Name 10 Spool net 11 Operation manual 12 Quick reference guide 13 Embroidery foot "Q" (on machine) Embroidery set 4 Cleaning brush 5 Screwdriver (large) 6 Screwdriver (small) 7 Spool cap (large) 8 Spool cap (medium) 9 Spool cap (small) Part Code U.S.A. / Canada Others X54243-051 SA156 SFB: XA5539- 151 X59535-051 X59476-051 XC8349-051 X55468-051 130012-054 X55260-153 130013-154 No. Part Name 1 Seam ripper 2 Bobbin (4) 3 Needle set (large) 14 H 18cm X W 13 cm (H 7 inches X W 5 inches...
Part Name 10 Spool net 11 Operation manual 12 Quick reference guide 13 Embroidery foot "Q" (on machine) Embroidery set 4 Cleaning brush 5 Screwdriver (large) 6 Screwdriver (small) 7 Spool cap (large) 8 Spool cap (medium) 9 Spool cap (small) Part Code U.S.A. / Canada Others X54243-051 SA156 SFB: XA5539- 151 X59535-051 X59476-051 XC8349-051 X55468-051 130012-054 X55260-153 130013-154 No. Part Name 1 Seam ripper 2 Bobbin (4) 3 Needle set (large) 14 H 18cm X W 13 cm (H 7 inches X W 5 inches...
Users Manual - English
Page 11
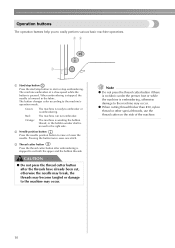
... machine can not embroider. Orange: The machine is winding the bobbin thread, or the bobbin winder shaft is embroidering. b Needle position button Press the needle position button to the machine's operation mode. c Thread cutter button Press the thread cutter button after the threads have already been cut both the upper and the bobbin threads. Green: The machine is ready to embroider or is moved to the machine may occur. Note z Do not press the thread cutter button if there is no fabric under the presser foot...
... machine can not embroider. Orange: The machine is winding the bobbin thread, or the bobbin winder shaft is embroidering. b Needle position button Press the needle position button to the machine's operation mode. c Thread cutter button Press the thread cutter button after the threads have already been cut both the upper and the bobbin threads. Green: The machine is ready to embroider or is moved to the machine may occur. Note z Do not press the thread cutter button if there is no fabric under the presser foot...
Users Manual - English
Page 15
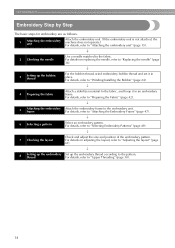
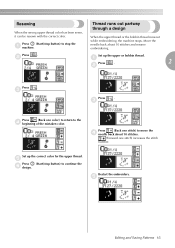
... "Upper Threading" (page 30). 14 thread For details, refer to "Selecting Embroidery Patterns" (page 49). ↓ 7 Checking the layout Check and adjust the size and position of the embroidery pattern. For details on replacing the needle, refer to the fabric, and hoop it in an embroidery frame. For details, refer to "Winding/Installing the Bobbin" (page 24). ↓ 4 Preparing the fabric Attach a stabilizer material to "Replacing the needle" (page 36). ↓ 3 Setting up...
... "Upper Threading" (page 30). 14 thread For details, refer to "Selecting Embroidery Patterns" (page 49). ↓ 7 Checking the layout Check and adjust the size and position of the embroidery pattern. For details on replacing the needle, refer to the fabric, and hoop it in an embroidery frame. For details, refer to "Winding/Installing the Bobbin" (page 24). ↓ 4 Preparing the fabric Attach a stabilizer material to "Replacing the needle" (page 36). ↓ 3 Setting up...
Users Manual - English
Page 24
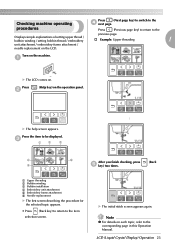
... in this Operation Manual. c 1 2 3 4 6 After you finish checking, press (Back 5 e key) two times. Displays simple explanations of setting upper thread / bobbin winding / setting bobbin thread / embroidery † Example: Upper threading 1 unit attachment / embroidery frame attachment / needle replacement on the machine. procedures Press (Previous page key) to return to be displayed. Press the item to the previous page. Turn on the LCD. a Upper threading b Bobbin winding c Bobbin installation d Embroidery unit attachment e Embroidery frame attachment f Needle...
... in this Operation Manual. c 1 2 3 4 6 After you finish checking, press (Back 5 e key) two times. Displays simple explanations of setting upper thread / bobbin winding / setting bobbin thread / embroidery † Example: Upper threading 1 unit attachment / embroidery frame attachment / needle replacement on the machine. procedures Press (Previous page key) to return to be displayed. Press the item to the previous page. Turn on the LCD. a Upper threading b Bobbin winding c Bobbin installation d Embroidery unit attachment e Embroidery frame attachment f Needle...
Users Manual - English
Page 29
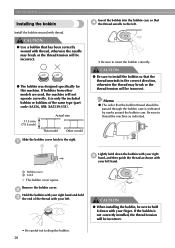
.... CAUTION ● When installing the bobbin, be incorrect. ● The bobbin was designed specifically for this machine. a 1 2 Lightly hold c the end of the same type (part code: SA156, SFB: XA5539-151). 11.5 mm (7/16 inch) Actual size This model Other model • Be sure to thread the machine as shown with your left . GETTING READY Installing the bobbin Insert the bobbin into the bobbin case so that d the thread unrolls to the...
.... CAUTION ● When installing the bobbin, be incorrect. ● The bobbin was designed specifically for this machine. a 1 2 Lightly hold c the end of the same type (part code: SA156, SFB: XA5539-151). 11.5 mm (7/16 inch) Actual size This model Other model • Be sure to thread the machine as shown with your left . GETTING READY Installing the bobbin Insert the bobbin into the bobbin case so that d the thread unrolls to the...
Users Manual - English
Page 66
... . Restart the embroidery. e Editing and Saving Patterns 65 b Set up the correct color for the upper thread. Press (Back one stitch) to continue the f design. Press (Start/stop button) to stop button) to move the d needle back about 10 stitches and resume embroidering. c Press . a Press . 2 b Press . Set up the upper or bobbin thread. Thread runs out partway through a design When the upper thread or the bobbin thread runs out while embroidering, the machine stops. Resewing...
... . Restart the embroidery. e Editing and Saving Patterns 65 b Set up the correct color for the upper thread. Press (Back one stitch) to continue the f design. Press (Start/stop button) to stop button) to move the d needle back about 10 stitches and resume embroidering. c Press . a Press . 2 b Press . Set up the upper or bobbin thread. Thread runs out partway through a design When the upper thread or the bobbin thread runs out while embroidering, the machine stops. Resewing...
Users Manual - English
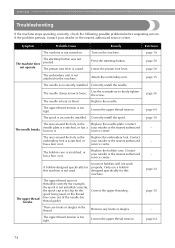
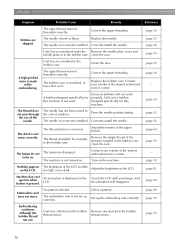
Page 75
... the start /stop button. The needle clamp screw is too tight. Replace the needle. The upper thread tension is loose. The spool is scratched, or has a burr on it . Correctly install the spool. needle plate is incorrectly installed. The bobbin case is not turned on it . A bobbin designed specifically for this machine is too big for the spool being used . The upper thread breaks. Remove any knots or tangles. Lower the presser foot lever. Loosen the upper thread tension. Replace the bobbin case. Incorrect bobbins will not work properly. Only use a bobbin...
... the start /stop button. The needle clamp screw is too tight. Replace the needle. The upper thread tension is loose. The spool is scratched, or has a burr on it . Correctly install the spool. needle plate is incorrectly installed. The bobbin case is not turned on it . A bobbin designed specifically for this machine is too big for the spool being used . The upper thread breaks. Remove any knots or tangles. Lower the presser foot lever. Loosen the upper thread tension. Replace the bobbin case. Incorrect bobbins will not work properly. Only use a bobbin...

Users Manual - English
Page 76
... machine is not used. Only use a bobbin designed specifically for this machine. Symptom Probable Cause Remedy Reference The thread is incorrect. Remove the tangled thread. Correctly install the needle. page 28 The lower thread is incorrectly installed. Correct the upper threading. The bobbin thread is tangled or breaks. The area around the hole in the Replace the embroidery foot. Incorrect bobbins will not work properly. Only use a bobbin designed specifically for this machine. Replace the bobbin case. The thread tension is incorrectly installed...
... machine is not used. Only use a bobbin designed specifically for this machine. Symptom Probable Cause Remedy Reference The thread is incorrect. Remove the tangled thread. Correctly install the needle. page 28 The lower thread is incorrectly installed. Correct the upper threading. The bobbin thread is tangled or breaks. The area around the hole in the Replace the embroidery foot. Incorrect bobbins will not work properly. Only use a bobbin designed specifically for this machine. Replace the bobbin case. The thread tension is incorrectly installed...
Users Manual - English
Page 77
.... Replace the needle. Replace the bobbin case. The needle has not been raised to the correct position. Remove the tangle thread. The machine is not set up the embroidery unit correctly. Machine does not operate when button is incorrect. The needle is incorrectly installed. The needle is bent or blunt. A bobbin designed specifically for example, in the bobbin case, clean the race. Press the needle position button. Contact your retailer or the nearest authorized service center. The embroidery unit...
.... Replace the needle. Replace the bobbin case. The needle has not been raised to the correct position. Remove the tangle thread. The machine is not set up the embroidery unit correctly. Machine does not operate when button is incorrect. The needle is incorrectly installed. The needle is bent or blunt. A bobbin designed specifically for example, in the bobbin case, clean the race. Press the needle position button. Contact your retailer or the nearest authorized service center. The embroidery unit...


