
Accessory Catalog
Page 2
... the latest information on our website: www.brother.com HA1-B2 Brother "at Brother continue to work hard to a new level of straw hats Contents 02 FZ2-B1 Brother Sewing Machine Lineup 03-04 Brother General Sewing Accessories 05-16 Brother Embellishment Feet 17-24 Brother Quilting Feet 25-28 Brother Embroidery Accessories 29-66 Brother Sewing Machine Attachments for the production of art and...
... the latest information on our website: www.brother.com HA1-B2 Brother "at Brother continue to work hard to a new level of straw hats Contents 02 FZ2-B1 Brother Sewing Machine Lineup 03-04 Brother General Sewing Accessories 05-16 Brother Embellishment Feet 17-24 Brother Quilting Feet 25-28 Brother Embroidery Accessories 29-66 Brother Sewing Machine Attachments for the production of art and...

Accessory Catalog
Page 3
..., SE270D, HE120/PKG, CS80, CS8060, CS8150 Cassette-type Sewing & Embroidery Combination Machines Utilizing an easy to learn and enjoy. Innov-is the perfect multifunction machine. Innov-is 4000D, you have made Brother the most requested in the "A" category.). PE750, PE700/PE700 Embroidery Only Machines Packed with models in automatic machine embroidery. Brother Sewing Machine Lineup 04 A Quattro™ 6000D Duetta™ 4500D...
..., SE270D, HE120/PKG, CS80, CS8060, CS8150 Cassette-type Sewing & Embroidery Combination Machines Utilizing an easy to learn and enjoy. Innov-is the perfect multifunction machine. Innov-is 4000D, you have made Brother the most requested in the "A" category.). PE750, PE700/PE700 Embroidery Only Machines Packed with models in automatic machine embroidery. Brother Sewing Machine Lineup 04 A Quattro™ 6000D Duetta™ 4500D...

Accessory Catalog
Page 33
...provide 10 vertical spool pins for details, www.brother.com. Ask your next embroidery, quilting or sewing project. Place your threads in use. Take control of your machine. For Quattro™ 6000D: • Extra-large: 300 x 200 mm (approx. 12 x 8 inches... (approx. 4-1/4 x 4-1/4 inches) SA418 SA417 • Small: 70 x 70mm (approx. 2-3/4 x 2-3/4 inches) SA416 • Extra-Small: 20 x 50mm (approx. 1 x 2 inches) SA415 For PE-100 • Super: 100 x 160 mm (approx. 4 x 6-1/4 inches) SA413 • Regular: 100 x 100 mm (approx. 4 x 4 inches) SA412 • Small: 60 x 60 mm ...
...provide 10 vertical spool pins for details, www.brother.com. Ask your next embroidery, quilting or sewing project. Place your threads in use. Take control of your machine. For Quattro™ 6000D: • Extra-large: 300 x 200 mm (approx. 12 x 8 inches... (approx. 4-1/4 x 4-1/4 inches) SA418 SA417 • Small: 70 x 70mm (approx. 2-3/4 x 2-3/4 inches) SA416 • Extra-Small: 20 x 50mm (approx. 1 x 2 inches) SA415 For PE-100 • Super: 100 x 160 mm (approx. 4 x 6-1/4 inches) SA413 • Regular: 100 x 100 mm (approx. 4 x 4 inches) SA412 • Small: 60 x 60 mm ...

Accessory Catalog
Page 34
... PC and ULT series machines and the PE-400D and Innov-is ideal for our embroidery only machines, PE750D and PE700II. ...embroidery thread spools 300 meters (328 yards). Stabilizers and Water Soluble Stabilizers When doing machine embroidery, the use of needle and stabilizer types. Individual colors are also available at selected Dealers. Brother Embroidery Accessories PacesetterTM Polyester Threads 65 Brother Country Yarn Embroidery Threads Metallic Threads For the best embroidery results, use these embroidery threads especially designed for Brother sewing and embroidering machines...
... PC and ULT series machines and the PE-400D and Innov-is ideal for our embroidery only machines, PE750D and PE700II. ...embroidery thread spools 300 meters (328 yards). Stabilizers and Water Soluble Stabilizers When doing machine embroidery, the use of needle and stabilizer types. Individual colors are also available at selected Dealers. Brother Embroidery Accessories PacesetterTM Polyester Threads 65 Brother Country Yarn Embroidery Threads Metallic Threads For the best embroidery results, use these embroidery threads especially designed for Brother sewing and embroidering machines...
Users Manual - English
Page 5
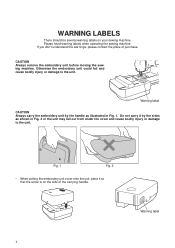
.... Warning label 2 WARNING LABELS There should be several warning labels on the side of purchase. Please heed warning labels when operating the sewing machine. Otherwise the embroidery unit could fall out from under the cover and cause bodily injury or damage to the unit. Do not carry it so that the... arrow is on your sewing machine. Warning label CAUTION Always carry the embroidery unit by the sides as illustrated in Fig. 2 or the unit may fall and cause bodily injury or damage to ...
.... Warning label 2 WARNING LABELS There should be several warning labels on the side of purchase. Please heed warning labels when operating the sewing machine. Otherwise the embroidery unit could fall out from under the cover and cause bodily injury or damage to the unit. Do not carry it so that the... arrow is on your sewing machine. Warning label CAUTION Always carry the embroidery unit by the sides as illustrated in Fig. 2 or the unit may fall and cause bodily injury or damage to ...
Users Manual - English
Page 6
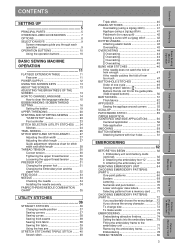
... SCREEN 13 HOW TO CHANGE LANGUAGE 14 How to the embroidery unit 77 Removing the embroidery frame 77 Embroidering 78 THREAD TENSION 80 3 Patterns (Memory Card) Patterns (Programmed in Machine) Sewing Chart Error Messages Maintenance Troubleshooting Embroidering Utility Stitches Basic Sewing Machine Operation Setting Up Contents Embroidery unit and memory cards (optional 62 2. CONTENTS SETTING UP 5 PRINCIPAL...
... SCREEN 13 HOW TO CHANGE LANGUAGE 14 How to the embroidery unit 77 Removing the embroidery frame 77 Embroidering 78 THREAD TENSION 80 3 Patterns (Memory Card) Patterns (Programmed in Machine) Sewing Chart Error Messages Maintenance Troubleshooting Embroidering Utility Stitches Basic Sewing Machine Operation Setting Up Contents Embroidery unit and memory cards (optional 62 2. CONTENTS SETTING UP 5 PRINCIPAL...
Users Manual - English
Page 7
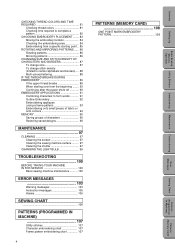
... messages 105 Alarms 105 SEWING CHART 106 PATTERNS (PROGRAMMED IN MACHINE) 107 Utility stitches 107 Character embroidering chart 107 Frame pattern embroidering chart 107 4 PATTERNS (MEMORY CARD) 108 ONE POINT MARK EMBROIDERY PATTERN 108 Patterns (Memory Card) Patterns (Programmed in Machine) Sewing Chart Error Messages Maintenance Troubleshooting Embroidering Utility Stitches Basic Sewing Machine Operation Setting Up Contents
... messages 105 Alarms 105 SEWING CHART 106 PATTERNS (PROGRAMMED IN MACHINE) 107 Utility stitches 107 Character embroidering chart 107 Frame pattern embroidering chart 107 4 PATTERNS (MEMORY CARD) 108 ONE POINT MARK EMBROIDERY PATTERN 108 Patterns (Memory Card) Patterns (Programmed in Machine) Sewing Chart Error Messages Maintenance Troubleshooting Embroidering Utility Stitches Basic Sewing Machine Operation Setting Up Contents
Users Manual - English
Page 8
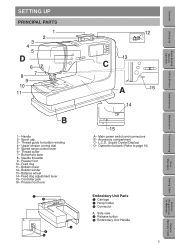
...- Main power switch and connectors B- Needle threader 9- Bobbin winder 13- L.C.D. (Liquid Crystal Display) D- Side view 4 Release button 5 Embroidery Unit Handle 5 Patterns (Memory Card) Patterns (Programmed in Machine) Sewing Chart Error Messages Maintenance Troubleshooting Embroidering Utility Stitches Basic Sewing Machine Operation Setting Up Contents Thread guide for bobbin winding 4- Thread cutter 7- Presser foot lever 1 2 A 3 4 5 12 13...
...- Main power switch and connectors B- Needle threader 9- Bobbin winder 13- L.C.D. (Liquid Crystal Display) D- Side view 4 Release button 5 Embroidery Unit Handle 5 Patterns (Memory Card) Patterns (Programmed in Machine) Sewing Chart Error Messages Maintenance Troubleshooting Embroidering Utility Stitches Basic Sewing Machine Operation Setting Up Contents Thread guide for bobbin winding 4- Thread cutter 7- Presser foot lever 1 2 A 3 4 5 12 13...
Users Manual - English
Page 10
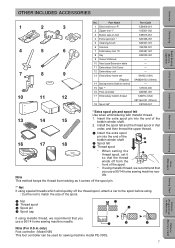
... OTHER INCLUDED ACCESSORIES Setting Up Basic Sewing Machine Operation Utility Stitches Embroidering Maintenance Troubleshooting 1 2 3 R 4 5 6 7 8 9 10 11 12 No. Part Name 1 Blind stitch foot "R" 2 Zipper foot "I" 3 Button sew-on foot 4 Extra spool pin * 5 Cleaning brush 6 Scissors 7 Embroidery foot "Q" 8 Key 9 Owner's... bobbin winder shaft. 2. only) Foot controller : Model N5V This foot controller can be used for sewing machine model PE-300S. 7 Error Messages Sewing Chart Patterns (Programmed in that order, and then thread the upper thread. 16 17 18 1 Insert...
... OTHER INCLUDED ACCESSORIES Setting Up Basic Sewing Machine Operation Utility Stitches Embroidering Maintenance Troubleshooting 1 2 3 R 4 5 6 7 8 9 10 11 12 No. Part Name 1 Blind stitch foot "R" 2 Zipper foot "I" 3 Button sew-on foot 4 Extra spool pin * 5 Cleaning brush 6 Scissors 7 Embroidery foot "Q" 8 Key 9 Owner's... bobbin winder shaft. 2. only) Foot controller : Model N5V This foot controller can be used for sewing machine model PE-300S. 7 Error Messages Sewing Chart Patterns (Programmed in that order, and then thread the upper thread. 16 17 18 1 Insert...

Users Manual - English
Page 11
Contents Setting Up Basic Sewing Machine Operation Utility Stitches OPTIONS 1 2 3 No. Part Name 1 Embroidery frame set (Small) 2 Backing material (Stabilizer material) Memory card No.1 Alphabet No.2 Flower No.6 Moskowitz's World No.7 Country ...001 XA5386-001 XA5567-001 XA5629-001 XA5659-001 XA5753-001 XA5781-001 XA5978-001 XA6111-001 WARNING Embroidery Cards purchased overseas or non Brother brand embroidery cards may not work with your machine. Embroidering Maintenance Troubleshooting Error Messages Sewing Chart Patterns (Programmed in Machine) Patterns (Memory Card) 8
Contents Setting Up Basic Sewing Machine Operation Utility Stitches OPTIONS 1 2 3 No. Part Name 1 Embroidery frame set (Small) 2 Backing material (Stabilizer material) Memory card No.1 Alphabet No.2 Flower No.6 Moskowitz's World No.7 Country ...001 XA5386-001 XA5567-001 XA5629-001 XA5659-001 XA5753-001 XA5781-001 XA5978-001 XA6111-001 WARNING Embroidery Cards purchased overseas or non Brother brand embroidery cards may not work with your machine. Embroidering Maintenance Troubleshooting Error Messages Sewing Chart Patterns (Programmed in Machine) Patterns (Memory Card) 8
Users Manual - English
Page 26
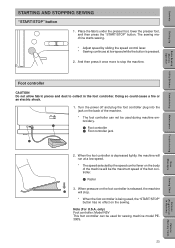
... (Programmed in the foot controller. When pressure on the body of the machine will stop the machine. Contents Setting Up Basic Sewing Machine Operation Utility Stitches Embroidering Maintenance Troubleshooting STARTING AND STOPPING SEWING "START/STOP" button 1. Foot controller CAUTION Do not allow fabric pieces ... plug into the jack on the sewing. Place the fabric under the presser foot, lower the presser foot, and then press the "START/STOP" button. only) Foot controller: Model N5V This foot controller can not be used during machine embroidery. 1 1 Foot controller 2 Foot...
... (Programmed in the foot controller. When pressure on the body of the machine will stop the machine. Contents Setting Up Basic Sewing Machine Operation Utility Stitches Embroidering Maintenance Troubleshooting STARTING AND STOPPING SEWING "START/STOP" button 1. Foot controller CAUTION Do not allow fabric pieces ... plug into the jack on the sewing. Place the fabric under the presser foot, lower the presser foot, and then press the "START/STOP" button. only) Foot controller: Model N5V This foot controller can not be used during machine embroidery. 1 1 Foot controller 2 Foot...
Users Manual - English
Page 35
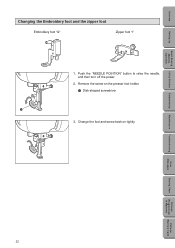
Change the foot and screw back on the presser foot holder. 1 Disk-shaped screwdriver 1 3. Remove the screw on tightly. Contents Setting Up Basic Sewing Machine Operation Utility Stitches Changing the Embroidery foot and the zipper foot Embroidery foot "Q" Zipper foot "I" 1. Embroidering Maintenance Troubleshooting Error Messages Sewing Chart Patterns (Programmed in Machine) Patterns (Memory Card) 32 Push the "NEEDLE POSITION" button to raise the needle, and then turn off the power. 2.
Change the foot and screw back on the presser foot holder. 1 Disk-shaped screwdriver 1 3. Remove the screw on tightly. Contents Setting Up Basic Sewing Machine Operation Utility Stitches Changing the Embroidery foot and the zipper foot Embroidery foot "Q" Zipper foot "I" 1. Embroidering Maintenance Troubleshooting Error Messages Sewing Chart Patterns (Programmed in Machine) Patterns (Memory Card) 32 Push the "NEEDLE POSITION" button to raise the needle, and then turn off the power. 2.

Users Manual - English
Page 65
... so could result. 1 Hoop holder 2 Carriage 3 Connector 2 3 - Raise needle with this operation. - Turn power off before removing the embroidery unit or memory cards. - Attach the embroidery foot. Do not move the sewing machine while the embroidery unit is also tightened. 1 62 Patterns (Memory Card) Screw back on the foot holder and remove foot holder. Injury...
... so could result. 1 Hoop holder 2 Carriage 3 Connector 2 3 - Raise needle with this operation. - Turn power off before removing the embroidery unit or memory cards. - Attach the embroidery foot. Do not move the sewing machine while the embroidery unit is also tightened. 1 62 Patterns (Memory Card) Screw back on the foot holder and remove foot holder. Injury...
Users Manual - English
Page 66
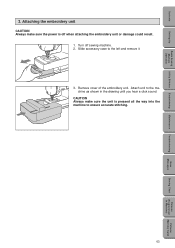
... you hear a click sound. Remove cover of the embroidery unit. Attach unit to the machine as shown in Machine) Patterns (Memory Card) CAUTION Always make sure the power is pressed all the way into the machine to the left and remove it. 3. Contents Setting Up Basic Sewing Machine Operation Utility Stitches Embroidering Maintenance Troubleshooting 3. Turn off...
... you hear a click sound. Remove cover of the embroidery unit. Attach unit to the machine as shown in Machine) Patterns (Memory Card) CAUTION Always make sure the power is pressed all the way into the machine to the left and remove it. 3. Contents Setting Up Basic Sewing Machine Operation Utility Stitches Embroidering Maintenance Troubleshooting 3. Turn off...
Users Manual - English
Page 67
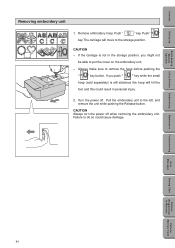
...Utility Stitches Embroidering Maintenance Troubleshooting Error Messages Sewing Chart Patterns (Programmed in the storage position, you push " " key while the small hoop (sold separately) is not in Machine) Patterns (Memory Card) 64 Remove embroidery hoop. Push " " key. Always... make sure to remove the hoop before pushing the " " key button. Turn the power off when removing the embroidery unit. Contents Setting Up Basic Sewing Machine Operation Removing embroidery unit 1. ...
...Utility Stitches Embroidering Maintenance Troubleshooting Error Messages Sewing Chart Patterns (Programmed in the storage position, you push " " key while the small hoop (sold separately) is not in Machine) Patterns (Memory Card) 64 Remove embroidery hoop. Push " " key. Always... make sure to remove the hoop before pushing the " " key button. Turn the power off when removing the embroidery unit. Contents Setting Up Basic Sewing Machine Operation Removing embroidery unit 1. ...
Users Manual - English
Page 68
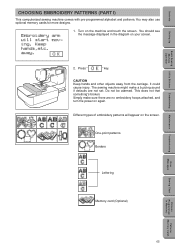
... screen. Press " " key. Simply make a buzzing sound if defaults are no embroidery hoops attached, and turn the power on your screen. 2. It could cause injury. This does not that something's broken. Contents Setting Up Basic Sewing Machine Operation Utility Stitches Embroidering CHOOSING EMBROIDERY PATTERNS (PART I) This computerized sewing machine comes with pre-programmed alphabet and patterns.
... screen. Press " " key. Simply make a buzzing sound if defaults are no embroidery hoops attached, and turn the power on your screen. 2. It could cause injury. This does not that something's broken. Contents Setting Up Basic Sewing Machine Operation Utility Stitches Embroidering CHOOSING EMBROIDERY PATTERNS (PART I) This computerized sewing machine comes with pre-programmed alphabet and patterns.
Users Manual - English
Page 74
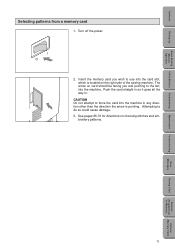
... should be facing you and pointing to the left, into the machine in any direction other than the direction the arrow is pointing. See pages 65-70 for directions on choosing stitches and embroidery patterns. Attempting to force the card into the machine. Contents Setting Up Basic Sewing Machine Operation Selecting patterns from a memory card 1.
... should be facing you and pointing to the left, into the machine in any direction other than the direction the arrow is pointing. See pages 65-70 for directions on choosing stitches and embroidery patterns. Attempting to force the card into the machine. Contents Setting Up Basic Sewing Machine Operation Selecting patterns from a memory card 1.
Users Manual - English
Page 75
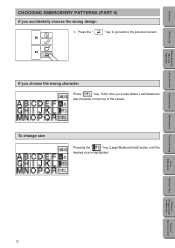
... the wrong design 1. To change size Pressing the " " key (Large/Medium/Small) button until the desired size is highlighted. Contents Setting Up Basic Sewing Machine Operation Utility Stitches CHOOSING EMBROIDERY PATTERNS (PART II) If you choose the wrong character Press " " key. Each time you press delete it will delete the last character on...
... the wrong design 1. To change size Pressing the " " key (Large/Medium/Small) button until the desired size is highlighted. Contents Setting Up Basic Sewing Machine Operation Utility Stitches CHOOSING EMBROIDERY PATTERNS (PART II) If you choose the wrong character Press " " key. Each time you press delete it will delete the last character on...
Users Manual - English
Page 77
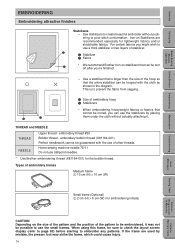
... to embroider any patterns. For certain fabrics you might wish to be hooped with the use ballpoint needles. * Use Brother embroidering thread (X81164-001) for lightweight fabrics and/or stretchable fabrics. THREAD and NEEDLE THREAD NEEDLE Upper thread - Types...using this frame, be torn 2 off after you're finished. - Contents Setting Up Basic Sewing Machine Operation Utility Stitches Embroidering EMBROIDERING Embroidering attractive finishes Stabilizers - embroidery thread #50 Bobbin thread - If the frame are recommended especially for the bobbin thread.
... to embroider any patterns. For certain fabrics you might wish to be hooped with the use ballpoint needles. * Use Brother embroidering thread (X81164-001) for lightweight fabrics and/or stretchable fabrics. THREAD and NEEDLE THREAD NEEDLE Upper thread - Types...using this frame, be torn 2 off after you're finished. - Contents Setting Up Basic Sewing Machine Operation Utility Stitches Embroidering EMBROIDERING Embroidering attractive finishes Stabilizers - embroidery thread #50 Bobbin thread - If the frame are recommended especially for the bobbin thread.
Users Manual - English
Page 78
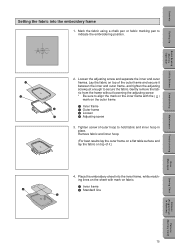
...frame with mark on the outer frame. 1 Inner frame 3 2 Outer frame 3 Loosen 4 4 Adjusting screw 3. Place the embroidery sheet into the embroidery frame 1. Lay the fabric on top of outer hoop to secure the fabric. Remove fabric and inner hoop. (For best results... the fabric from the frame without loosening the adjusting screw. * Be sure to indicate the embroidering position. 1 2 2. Contents Setting Up Basic Sewing Machine Operation Utility Stitches Embroidering Setting the fabric into the inner frame, while matching lines on the sheet with the ( ) mark on fabric. 1 ...
...frame with mark on the outer frame. 1 Inner frame 3 2 Outer frame 3 Loosen 4 4 Adjusting screw 3. Place the embroidery sheet into the embroidery frame 1. Lay the fabric on top of outer hoop to secure the fabric. Remove fabric and inner hoop. (For best results... the fabric from the frame without loosening the adjusting screw. * Be sure to indicate the embroidering position. 1 2 2. Contents Setting Up Basic Sewing Machine Operation Utility Stitches Embroidering Setting the fabric into the inner frame, while matching lines on the sheet with the ( ) mark on fabric. 1 ...


