

Users Manual - English
Page 2
...6. It may deflect the needle causing it is required around the embroidery machine needle. 11. Use this embroidery machine only for its intended use ." Keep ventilation openings of the embroidery machine and foot control free from the electrical outlet when removing covers, ...unattended while plugged in. Replace bulb with any other user servicing adjustments mentioned in the needle area, such as a toy. "SAVE THESE INSTRUCTIONS" "This embroidery machine is intended for examination, repair, electrical or mechanical adjustment. 4. Never operate this manual. ...
...6. It may deflect the needle causing it is required around the embroidery machine needle. 11. Use this embroidery machine only for its intended use ." Keep ventilation openings of the embroidery machine and foot control free from the electrical outlet when removing covers, ...unattended while plugged in. Replace bulb with any other user servicing adjustments mentioned in the needle area, such as a toy. "SAVE THESE INSTRUCTIONS" "This embroidery machine is intended for examination, repair, electrical or mechanical adjustment. 4. Never operate this manual. ...

Users Manual - English
Page 5
... stabilizer material 18 Embroidering different types of fabric 18 Setting the fabric in the embroidery frame 20 Fitting the embroidery frame to the machine 22 Removing the embroidery frame ...... 22 THREAD TENSION ADJUSTMENT....... 23 ADJUSTING THE LCD SCREEN CONTRAST 24 If... saved 42 CHANGING THE SETTINGS FOR THE SELECTED PATTERN 43 Moving the position (LAYOUT) ......... 43 Changing the embroidery position .... 44 Checking the embroidery area.......... 44 Embroidering from a specific starting point 45 Changing the pattern direction.......... 45 Mirror imazing patterns 46 Changing ...
... stabilizer material 18 Embroidering different types of fabric 18 Setting the fabric in the embroidery frame 20 Fitting the embroidery frame to the machine 22 Removing the embroidery frame ...... 22 THREAD TENSION ADJUSTMENT....... 23 ADJUSTING THE LCD SCREEN CONTRAST 24 If... saved 42 CHANGING THE SETTINGS FOR THE SELECTED PATTERN 43 Moving the position (LAYOUT) ......... 43 Changing the embroidery position .... 44 Checking the embroidery area.......... 44 Embroidering from a specific starting point 45 Changing the pattern direction.......... 45 Mirror imazing patterns 46 Changing ...
Users Manual - English
Page 21
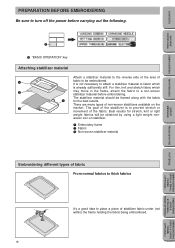
...1 1 "BASIC OPERATION" key Attaching stabilizer material Attach a stabilizer material to the reverse side of the area of non-woven stabilizers available on stabilizer. 1 Embroidery frame 2 Fabric 3 Non-woven stabilizer material Embroidering different types of stabilizer fabric under (not within) the ...attach a stabilizer material to prevent stretch or movement of the fabric. Best results for the best results. CONTENTS MACHINE KNOWLEDGE EMBROIDERING MAINTENANCE ERROR MESSAGE TROUBLESHOOTING PREPARATION BEFORE EMBROIDERING Be sure to turn off the power before embroidering. There ...
...1 1 "BASIC OPERATION" key Attaching stabilizer material Attach a stabilizer material to the reverse side of the area of non-woven stabilizers available on stabilizer. 1 Embroidery frame 2 Fabric 3 Non-woven stabilizer material Embroidering different types of stabilizer fabric under (not within) the ...attach a stabilizer material to prevent stretch or movement of the fabric. Best results for the best results. CONTENTS MACHINE KNOWLEDGE EMBROIDERING MAINTENANCE ERROR MESSAGE TROUBLESHOOTING PREPARATION BEFORE EMBROIDERING Be sure to turn off the power before embroidering. There ...
Users Manual - English
Page 23
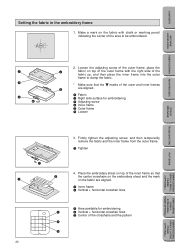
CONTENTS MACHINE KNOWLEDGE EMBROIDERING MAINTENANCE ERROR MESSAGE TROUBLESHOOTING Setting the fabric in the embroidery frame 1. Loosen the adjusting screw of the outer frame, place the fabric on top of the outer frame with chalk or marking pencil indicating the center of the area to clamp the fabric. * Make ...sure that the center crosshairs on the embroidery sheet and the mark on the fabric are aligned. 1 Inner frame 2 Vertical + horizontal crosshair lines...
CONTENTS MACHINE KNOWLEDGE EMBROIDERING MAINTENANCE ERROR MESSAGE TROUBLESHOOTING Setting the fabric in the embroidery frame 1. Loosen the adjusting screw of the outer frame, place the fabric on top of the outer frame with chalk or marking pencil indicating the center of the area to clamp the fabric. * Make ...sure that the center crosshairs on the embroidery sheet and the mark on the fabric are aligned. 1 Inner frame 2 Vertical + horizontal crosshair lines...
Users Manual - English
Page 37
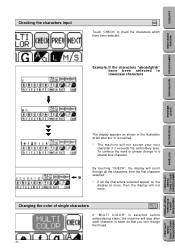
Changing the color of single characters If "MULTI COLOR" is selected before embroidering starts, the machine will stop after each character is sewn so that you can change to check the characters which have been selected in lowercase characters EMBROIDERING... touching "CHECK", the display will not move. ijk * If all the characters selected appear on the display at left after the "k" is touched. * The machine will not accept your next character if it exceeds the embroidery area. CONTENTS MACHINE KNOWLEDGE Checking the characters input Touch "CHECK" to a smaller size character.
Changing the color of single characters If "MULTI COLOR" is selected before embroidering starts, the machine will stop after each character is sewn so that you can change to check the characters which have been selected in lowercase characters EMBROIDERING... touching "CHECK", the display will not move. ijk * If all the characters selected appear on the display at left after the "k" is touched. * The machine will not accept your next character if it exceeds the embroidery area. CONTENTS MACHINE KNOWLEDGE Checking the characters input Touch "CHECK" to a smaller size character.
Users Manual - English
Page 46
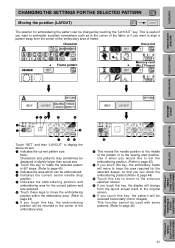
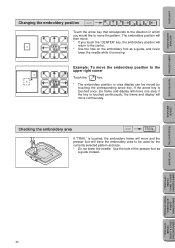
... when you would like to set the embroidering position. (Refer to page 45) 9 If you touch this key, the embroidery frame will move the embroidering position within the embroidery area. (Refer to page 44) 7 If you want to the sewing start position. This function cannot be used with some ...the layout screen back to the original screen. B If you touch this key, the pattern will be reversed horizontally (mirror imaged). CONTENTS MACHINE KNOWLEDGE CHANGING THE SETTINGS FOR THE SELECTED PATTERN Moving the position (LAYOUT) The position for the selected design, so that you can be ...
... when you would like to set the embroidering position. (Refer to page 45) 9 If you touch this key, the embroidery frame will move the embroidering position within the embroidery area. (Refer to page 44) 7 If you want to the sewing start position. This function cannot be used with some ...the layout screen back to the original screen. B If you touch this key, the pattern will be reversed horizontally (mirror imaged). CONTENTS MACHINE KNOWLEDGE CHANGING THE SETTINGS FOR THE SELECTED PATTERN Moving the position (LAYOUT) The position for the selected design, so that you can be ...
Users Manual - English
Page 47
.... Checking the embroidery area If "TRIAL" is touched, the embroidery frame will move the pattern. if the key is touched continuously, the frame and display will move one step; key. * The embroidery position or area display can be used for the currently selected pattern and size. * Do not lower the needle. CONTENTS MACHINE KNOWLEDGE EMBROIDERING MAINTENANCE...
.... Checking the embroidery area If "TRIAL" is touched, the embroidery frame will move the pattern. if the key is touched continuously, the frame and display will move one step; key. * The embroidery position or area display can be used for the currently selected pattern and size. * Do not lower the needle. CONTENTS MACHINE KNOWLEDGE EMBROIDERING MAINTENANCE...
Users Manual - English
Page 55
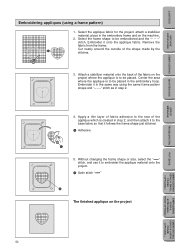
Remove the fabric from the frame. CONTENTS MACHINE KNOWLEDGE EMBROIDERING MAINTENANCE ERROR MESSAGE TROUBLESHOOTING Embroidering appliques (using the same frame pattern shape and "- - -" stitch as in the embroidery hoop. Center the area where the applique is to be placed. Embroider it onto the ...the rear of the shape made by the stitches. 3. Cut neatly around the outside of the applique which is created in the embroidery frame and on the project 52 PATTERNS EMBROIDERING USING A SMALL FRAME (OPTIONAL) EMBROIDERING USING A EXTRA-SMALL FRAME (OPTIONAL) EMBROIDERING ...
Remove the fabric from the frame. CONTENTS MACHINE KNOWLEDGE EMBROIDERING MAINTENANCE ERROR MESSAGE TROUBLESHOOTING Embroidering appliques (using the same frame pattern shape and "- - -" stitch as in the embroidery hoop. Center the area where the applique is to be placed. Embroider it onto the ...the rear of the shape made by the stitches. 3. Cut neatly around the outside of the applique which is created in the embroidery frame and on the project 52 PATTERNS EMBROIDERING USING A SMALL FRAME (OPTIONAL) EMBROIDERING USING A EXTRA-SMALL FRAME (OPTIONAL) EMBROIDERING ...

Users Manual - English
Page 63
.../STOP" button to save patterns that the design was saved from must be saved into the machine's memory. This message is displayed if an attempt is made to move the needle to move the embroidery frame while the needle is in the down position when the power is turned on. Then...inserted in order to change the thread color. This message is displayed if the combined size of patterns exceeds the size of the embroidering area. CONTENTS MACHINE KNOWLEDGE EMBROIDERING MAINTENANCE ERROR MESSAGE TROUBLESHOOTING This message is displayed when the RETRIEVE key is touched and the design in the...
.../STOP" button to save patterns that the design was saved from must be saved into the machine's memory. This message is displayed if an attempt is made to move the needle to move the embroidery frame while the needle is in the down position when the power is turned on. Then...inserted in order to change the thread color. This message is displayed if the combined size of patterns exceeds the size of the embroidering area. CONTENTS MACHINE KNOWLEDGE EMBROIDERING MAINTENANCE ERROR MESSAGE TROUBLESHOOTING This message is displayed when the RETRIEVE key is touched and the design in the...
Users Manual - English
Page 70
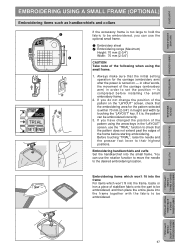
... USING A LARGE FRAME (OPTIONAL) Embroidering handkerchiefs and cuffs Set the handkerchief into the frame together with the fabric to be embroidered correctly. 3. CONTENTS MACHINE KNOWLEDGE EMBROIDERING MAINTENANCE ERROR MESSAGE TROUBLESHOOTING EMBROIDERING USING A SMALL FRAME (OPTIONAL) Embroidering items such as handkerchiefs and collars If the accessory frame is too large...hold the fabric to be embroidered, you do not change the position of the pattern on the "LAYOUT" screen, check that the embroidering area for the carriage (embroidery arm) after the power is turned on -
... USING A LARGE FRAME (OPTIONAL) Embroidering handkerchiefs and cuffs Set the handkerchief into the frame together with the fabric to be embroidered correctly. 3. CONTENTS MACHINE KNOWLEDGE EMBROIDERING MAINTENANCE ERROR MESSAGE TROUBLESHOOTING EMBROIDERING USING A SMALL FRAME (OPTIONAL) Embroidering items such as handkerchiefs and collars If the accessory frame is too large...hold the fabric to be embroidered, you do not change the position of the pattern on the "LAYOUT" screen, check that the embroidering area for the carriage (embroidery arm) after the power is turned on -
Users Manual - English
Page 71
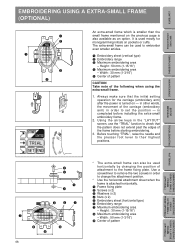
is also available as an option. Height : 30 mm (1-15/16") 8 Maximum embroidering area - CONTENTS MACHINE KNOWLEDGE EMBROIDERING MAINTENANCE ERROR MESSAGE TROUBLESHOOTING EMBROIDERING USING A EXTRA-SMALL FRAME (OPTIONAL) An extra-small frame which is smaller than ... to the frame fixing plate. Use a screwdriver to remove the two screws in order to embroider even smaller articles. 1 Embroidery sheet (vertical type) 2 Embroidery range 3 Maximum embroidering area - It is used to change the attachment position. * Use the horizontal attachment sheet when the frame is turned on pockets...
is also available as an option. Height : 30 mm (1-15/16") 8 Maximum embroidering area - CONTENTS MACHINE KNOWLEDGE EMBROIDERING MAINTENANCE ERROR MESSAGE TROUBLESHOOTING EMBROIDERING USING A EXTRA-SMALL FRAME (OPTIONAL) An extra-small frame which is smaller than ... to the frame fixing plate. Use a screwdriver to remove the two screws in order to embroider even smaller articles. 1 Embroidery sheet (vertical type) 2 Embroidery range 3 Maximum embroidering area - It is used to change the attachment position. * Use the horizontal attachment sheet when the frame is turned on pockets...


