Software & Network Users Manual - English
Page 2
Table of Contents Section I Windows® 1 Printing Using the Brother printer driver...2 Features ...2 Choosing the right type of paper...3 Simultaneous printing, scanning and faxing 3 Clearing data from the memory ...3 Checking the print quality ...3 Status Monitor...4 Monitoring the machine's status ... Paper Source (MFC-5860CN only 12 Advanced tab...13 Color ...14 Scaling ...16 Watermark ...17 Device Options ...19 Support tab ...21 2 Scanning Scanning a document using the TWAIN driver 22 TWAIN compliant...22 Accessing the Scanner...23 Scanning a document into the PC ...24 Settings in the ...
Table of Contents Section I Windows® 1 Printing Using the Brother printer driver...2 Features ...2 Choosing the right type of paper...3 Simultaneous printing, scanning and faxing 3 Clearing data from the memory ...3 Checking the print quality ...3 Status Monitor...4 Monitoring the machine's status ... Paper Source (MFC-5860CN only 12 Advanced tab...13 Color ...14 Scaling ...16 Watermark ...17 Device Options ...19 Support tab ...21 2 Scanning Scanning a document using the TWAIN driver 22 TWAIN compliant...22 Accessing the Scanner...23 Scanning a document into the PC ...24 Settings in the ...
Software & Network Users Manual - English
Page 3
...® PaperPort® SE with OCR 43 3 ControlCenter3 Using ControlCenter3 ...44 Switching the user interface ...46 Turning the AutoLoad feature off...46 SCAN...47 CUSTOM SCAN ...47 PHOTOCAPTURE (USB only) (Not available for MFC-3360C 47 COPY ...48 PC-FAX (MFC models only) ...48 DEVICE SETTING...48... Image (example: Microsoft® Paint)...49 OCR (Word Processing program) ...51 E-mail ...52 File attachments ...52 File ...53 CUSTOM SCAN ...54 Customizing a user-defined button...55 PHOTOCAPTURE (USB only) (Not available for MFC-3360C 59 Open PCC Folder (PCC: PhotoCapture Center 59 Copy...
...® PaperPort® SE with OCR 43 3 ControlCenter3 Using ControlCenter3 ...44 Switching the user interface ...46 Turning the AutoLoad feature off...46 SCAN...47 CUSTOM SCAN ...47 PHOTOCAPTURE (USB only) (Not available for MFC-3360C 47 COPY ...48 PC-FAX (MFC models only) ...48 DEVICE SETTING...48... Image (example: Microsoft® Paint)...49 OCR (Word Processing program) ...51 E-mail ...52 File attachments ...52 File ...53 CUSTOM SCAN ...54 Customizing a user-defined button...55 PHOTOCAPTURE (USB only) (Not available for MFC-3360C 59 Open PCC Folder (PCC: PhotoCapture Center 59 Copy...
Software & Network Users Manual - English
Page 4
Scan to Image ...72 Scan to OCR ...72 Scan to File...73 5 Remote Setup (Not available for DCP models and MFC-240C) Remote Setup...74 6 Brother PC-FAX Software (MFC models only) PC-FAX sending ...76 Setting up user information...77 Sending setup...78 Setting up a cover page...79 ...Entering cover page information...79 Address Book ...80 Speed Dial setup ...81 Brother Address Book ...82 Setting up a member in the Address Book 82 Setting up a group for broadcasting 83 Editing member information...83 Deleting a member ...
Scan to Image ...72 Scan to OCR ...72 Scan to File...73 5 Remote Setup (Not available for DCP models and MFC-240C) Remote Setup...74 6 Brother PC-FAX Software (MFC models only) PC-FAX sending ...76 Setting up user information...77 Sending setup...78 Setting up a cover page...79 ...Entering cover page information...79 Address Book ...80 Speed Dial setup ...81 Brother Address Book ...82 Setting up a member in the Address Book 82 Setting up a group for broadcasting 83 Editing member information...83 Deleting a member ...
Software & Network Users Manual - English
Page 5
...® 8 Printing and Faxing Setting up your USB-equipped Apple® Macintosh 98 Simultaneous printing, scanning and faxing 98 Clearing data from the memory ...98 Checking the print quality ...98 Status Monitor ...99 Using the Brother Ink driver ...100 Choosing page setup options ...100 Choosing printing options ...101 Media Type...101 Quality...
...® 8 Printing and Faxing Setting up your USB-equipped Apple® Macintosh 98 Simultaneous printing, scanning and faxing 98 Clearing data from the memory ...98 Checking the print quality ...98 Status Monitor ...99 Using the Brother Ink driver ...100 Choosing page setup options ...100 Choosing printing options ...101 Media Type...101 Quality...
Software & Network Users Manual - English
Page 6
Scan to Image ...131 Scan to OCR ...132 Scan to E-mail ...133 Scan to File...134 COPY / PC-FAX (PC-FAX is not available for DCP models 135 DEVICE SETTINGS ...136 Remote Setup (Not available for DCP models ... for DCP models and MFC-240C 137 Ink Level ...137 11 Network Scanning (For models with built-in network support) Before using Network Scanning ...138 Configuring network scanning ...138 Using the Scan key...140 Scan to E-mail ...140 Scan to Image ...141 Scan to OCR ...141 Scan to File...142 12 Remote Setup & PhotoCapture Center® Remote Setup...
Scan to Image ...131 Scan to OCR ...132 Scan to E-mail ...133 Scan to File...134 COPY / PC-FAX (PC-FAX is not available for DCP models 135 DEVICE SETTINGS ...136 Remote Setup (Not available for DCP models ... for DCP models and MFC-240C 137 Ink Level ...137 11 Network Scanning (For models with built-in network support) Before using Network Scanning ...138 Configuring network scanning ...138 Using the Scan key...140 Scan to E-mail ...140 Scan to Image ...141 Scan to OCR ...141 Scan to File...142 12 Remote Setup & PhotoCapture Center® Remote Setup...
Software & Network Users Manual - English
Page 7
Section I Windows® I Printing 2 Scanning 22 ControlCenter3 44 Network Scanning (For models with built-in network support) 68 Remote Setup (Not available for DCP models and MFC-240C) 74 Brother PC-FAX Software (MFC models only) 76 PhotoCapture Center® (Not available for MFC-3360C) 94
Section I Windows® I Printing 2 Scanning 22 ControlCenter3 44 Network Scanning (For models with built-in network support) 68 Remote Setup (Not available for DCP models and MFC-240C) 74 Brother PC-FAX Software (MFC models only) 76 PhotoCapture Center® (Not available for MFC-3360C) 94
Software & Network Users Manual - English
Page 9
... 1 If the LCD shows Data Remaining, you want to check the print quality and find out how to read About paper in memory, or while scanning a document into the PC. However, when the machine is copying or receiving a fax on the control panel. Clearing data from your PC while sending or...
... 1 If the LCD shows Data Remaining, you want to check the print quality and find out how to read About paper in memory, or while scanning a document into the PC. However, when the machine is copying or receiving a fax on the control panel. Clearing data from your PC while sending or...
Software & Network Users Manual - English
Page 28
... PaperPort® SE with your machine, but you can select either driver when scanning documents. This means that you can not only scan images directly into hundreds of other software applications that Brother included with OCR on page 40. • If your applications. 2 „...page 22) and a Windows® Imaging Acquisition (WIA) driver (See Scanning a document using the TWAIN driver 2 TWAIN compliant 2 The Brother MFL-Pro Suite software includes a TWAIN compliant scanner driver. 2 Scanning 2 Scanning operations and the drivers used will differ depending on the operating system you ...
... PaperPort® SE with your machine, but you can select either driver when scanning documents. This means that you can not only scan images directly into hundreds of other software applications that Brother included with OCR on page 40. • If your applications. 2 „...page 22) and a Windows® Imaging Acquisition (WIA) driver (See Scanning a document using the TWAIN driver 2 TWAIN compliant 2 The Brother MFL-Pro Suite software includes a TWAIN compliant scanner driver. 2 Scanning 2 Scanning operations and the drivers used will differ depending on the operating system you ...

Software & Network Users Manual - English
Page 29
... other operating systems: Choose Brother MFC-XXXX USB or Brother MFC-XXXX LAN. (Where XXXX is your model name) d Click Scan. The scanning steps may vary when using from the Scanner drop-down list. The Scanner Setup dialog box appears: 23 Or click the Scan button. Note • ...For Windows® XP: Choose TW-Brother MFC-XXXX USB or TW-Brother MFC-XXXX LAN. • For other software applications. b Click File, then Scan. c Choose the scanner you are for scanning in the left side of the screen. Scanning Accessing the Scanner 2...
... other operating systems: Choose Brother MFC-XXXX USB or Brother MFC-XXXX LAN. (Where XXXX is your model name) d Click Scan. The scanning steps may vary when using from the Scanner drop-down list. The Scanner Setup dialog box appears: 23 Or click the Scan button. Note • ...For Windows® XP: Choose TW-Brother MFC-XXXX USB or TW-Brother MFC-XXXX LAN. • For other software applications. b Click File, then Scan. c Choose the scanner you are for scanning in the left side of the screen. Scanning Accessing the Scanner 2...
Software & Network Users Manual - English
Page 30
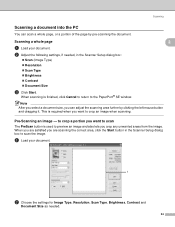
... page, or a portion of the page by clicking the left mouse button and dragging it. a Load your document. Scanning a whole page a Load your document. 1 b Choose the settings for Image Type, Resolution, Scan Type, Brightness, Contrast and Document Size as needed , in the Scanner Setup dialog box to the PaperPort® SE window...
... page, or a portion of the page by clicking the left mouse button and dragging it. a Load your document. Scanning a whole page a Load your document. 1 b Choose the settings for Image Type, Resolution, Scan Type, Brightness, Contrast and Document Size as needed , in the Scanner Setup dialog box to the PaperPort® SE window...
Software & Network Users Manual - English
Page 31
... 100 × 100 dpi Use for each of the Scanner Setup dialog box. Resolution and Scan Type will be automatically altered for scanning text documents 200 × 200 dpi Scan Type 24 bit color 24 bit color Black & White 25 Scanning c Click PreScan. d Press and hold down the left mouse button and drag it over the...
... 100 × 100 dpi Use for each of the Scanner Setup dialog box. Resolution and Scan Type will be automatically altered for scanning text documents 200 × 200 dpi Scan Type 24 bit color 24 bit color Black & White 25 Scanning c Click PreScan. d Press and hold down the left mouse button and drag it over the...
Software & Network Users Manual - English
Page 32
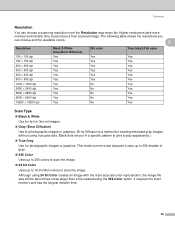
...) Yes Yes Yes Yes Yes Yes Yes Yes Yes Yes Yes 256 color Yes Yes Yes Yes Yes Yes No No No No No True Gray/24 bit color Yes Yes Yes Yes Yes Yes Yes Yes Yes Yes Yes Scan Type 2 „ Black & White Use for text or line art images. „... or graphics. Higher resolutions take more exact because it uses up to 256 shades of gray. „ 256 Color Uses up to 256 colors to scan the image. „ 24 bit Color Uses up to 16.8 million colors to give a gray appearance.) „ True Gray Use for creating simulated gray images without using 24 bit...
...) Yes Yes Yes Yes Yes Yes Yes Yes Yes Yes Yes 256 color Yes Yes Yes Yes Yes Yes No No No No No True Gray/24 bit color Yes Yes Yes Yes Yes Yes Yes Yes Yes Yes Yes Scan Type 2 „ Black & White Use for text or line art images. „... or graphics. Higher resolutions take more exact because it uses up to 256 shades of gray. „ 256 Color Uses up to 256 colors to scan the image. „ 24 bit Color Uses up to 16.8 million colors to give a gray appearance.) „ True Gray Use for creating simulated gray images without using 24 bit...
Software & Network Users Manual - English
Page 33
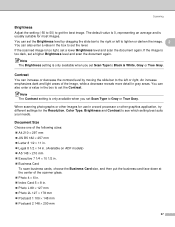
... the slide bar to get the best image. Note The Contrast setting is usually suitable for the Resolution, Color Type, Brightness and Contrast to Black & White, Gray or True Gray. Document Size 2 Choose one of the following sizes: „ A4 210 × 297 mm „ JIS B5 182 × 257 mm „... left to lighten or darken the image. 2 You can also enter a value in the box to set the Contrast. If the scanned image is only available when you set Scan Type to set the level. Contrast 2 You can increase or decrease the contrast level by dragging the slide bar to the right...
... the slide bar to get the best image. Note The Contrast setting is usually suitable for the Resolution, Color Type, Brightness and Contrast to Black & White, Gray or True Gray. Document Size 2 Choose one of the following sizes: „ A4 210 × 297 mm „ JIS B5 182 × 257 mm „... left to lighten or darken the image. 2 You can also enter a value in the box to set the Contrast. If the scanned image is only available when you set Scan Type to set the level. Contrast 2 You can increase or decrease the contrast level by dragging the slide bar to the right...
Software & Network Users Manual - English
Page 34
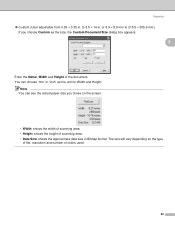
...; Data Size: shows the approximate data size in . The size will vary depending on the screen. • Width: shows the width of scanning area. • Height: shows the height of colors used. 28 or 8.9 × 8.9 mm to 8.5 × 14 in Bitmap format. You can see the actual paper size you choose Custom... You can choose 'mm' or 'inch' as the size, the Custom Document Size dialog box appears. 2 Enter the Name, Width and Height of the document. Scanning „ Custom (User adjustable from 0.35 × 0.35 in.
...; Data Size: shows the approximate data size in . The size will vary depending on the screen. • Width: shows the width of scanning area. • Height: shows the height of colors used. 28 or 8.9 × 8.9 mm to 8.5 × 14 in Bitmap format. You can see the actual paper size you choose Custom... You can choose 'mm' or 'inch' as the size, the Custom Document Size dialog box appears. 2 Enter the Name, Width and Height of the document. Scanning „ Custom (User adjustable from 0.35 × 0.35 in.

Software & Network Users Manual - English
Page 35
... name). • If you choose TW-Brother MFC-XXXX, the TWAIN driver will vary when scanning from the Scanner drop-down list. The Scan panel appears on ScanSoft® PaperPort® SE. Or click the Scan button. d Click Scan. The Scan dialog box appears: 29 The process will ...that support WIA or TWAIN scanning. c Choose the scanner you are based on the left side of the screen. You can scan images directly into any other applications. b Click File, then Scan. Scanning Scanning a document using from other applications that Brother included with your machine or ...
... name). • If you choose TW-Brother MFC-XXXX, the TWAIN driver will vary when scanning from the Scanner drop-down list. The Scan panel appears on ScanSoft® PaperPort® SE. Or click the Scan button. d Click Scan. The Scan dialog box appears: 29 The process will ...that support WIA or TWAIN scanning. c Choose the scanner you are based on the left side of the screen. You can scan images directly into any other applications. b Click File, then Scan. Scanning Scanning a document using from other applications that Brother included with your machine or ...
Software & Network Users Manual - English
Page 36
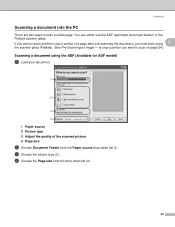
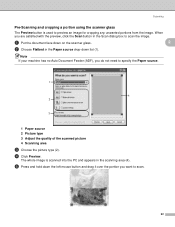
... your document. 1 2 3 4 1 Paper source 2 Picture type 3 Adjust the quality of a page after pre-scanning the document, you want to scan a whole page. If you want to scan and then crop a portion of the scanned picture 4 Page size b Choose Document Feeder from the drop-down list (1). d Choose the Page size from the...Paper source drop-down list (4). 30 You can either use the ADF (automatic document feeder) or the Flatbed scanner glass. Scanning Scanning a document into the PC 2 There are two ways to scan on page 24.) Scanning a document using 2 the scanner glass (Flatbed). (See Pre...
... your document. 1 2 3 4 1 Paper source 2 Picture type 3 Adjust the quality of a page after pre-scanning the document, you want to scan a whole page. If you want to scan and then crop a portion of the scanned picture 4 Page size b Choose Document Feeder from the drop-down list (1). d Choose the Page size from the...Paper source drop-down list (4). 30 You can either use the ADF (automatic document feeder) or the Flatbed scanner glass. Scanning Scanning a document into the PC 2 There are two ways to scan on page 24.) Scanning a document using 2 the scanner glass (Flatbed). (See Pre...
Software & Network Users Manual - English
Page 37
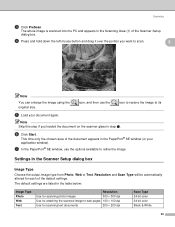
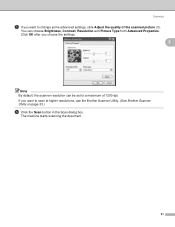
You can be set to change some advanced settings, click Adjust the quality of 1200 dpi. The machine starts scanning the document. 31 Scanning e If you want to a maximum of the scanned picture (3). If you want to scan at higher resolutions, use the Brother Scanner Utility. (See Brother Scanner Utility on page 33.) f Click the Scan button in the Scan dialog box. Click OK after you choose the settings. 2 Note By default, the scanner resolution can choose Brightness, Contrast, Resolution and Picture Type from Advanced Properties.
You can be set to change some advanced settings, click Adjust the quality of 1200 dpi. The machine starts scanning the document. 31 Scanning e If you want to a maximum of the scanned picture (3). If you want to scan at higher resolutions, use the Brother Scanner Utility. (See Brother Scanner Utility on page 33.) f Click the Scan button in the Scan dialog box. Click OK after you choose the settings. 2 Note By default, the scanner resolution can choose Brightness, Contrast, Resolution and Picture Type from Advanced Properties.
Software & Network Users Manual - English
Page 38
...2 The Preview button is scanned into the PC and appears in the scanning area (4). d Click Preview. e Press and hold down on the scanner glass. 2 b Choose Flatbed in the Scan dialog box to scan. 32 Note If your machine has no Auto Document Feeder (ADF), you want to scan the image. When you ...are satisfied with the preview, click the Scan button in the Paper source drop-down list (1). a Put the...
...2 The Preview button is scanned into the PC and appears in the scanning area (4). d Click Preview. e Press and hold down on the scanner glass. 2 b Choose Flatbed in the Scan dialog box to scan. 32 Note If your machine has no Auto Document Feeder (ADF), you want to scan the image. When you ...are satisfied with the preview, click the Scan button in the Paper source drop-down list (1). a Put the...

Software & Network Users Manual - English
Page 39
.... Click OK after you could lose your application window). The machine starts scanning the document. Brother Scanner Utility 2 The Brother Scanner Utility is scanned and you choose a setting. 2 g Click the Scan button in the Scan dialog box. This time only the chosen area of the scanned picture (3). Make sure that you have enough memory or hard disk...
.... Click OK after you could lose your application window). The machine starts scanning the document. Brother Scanner Utility 2 The Brother Scanner Utility is scanned and you choose a setting. 2 g Click the Scan button in the Scan dialog box. This time only the chosen area of the scanned picture (3). Make sure that you have enough memory or hard disk...
Software & Network Users Manual - English
Page 40
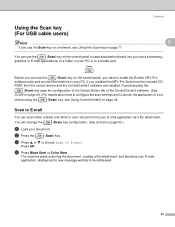
... you have to install the Brother MFL-Pro software suite and connect the machine to your E-mail application, displaying the new message waiting to scan documents directly into your document. Scan to E-mail. d Press Black Start or Color Start. c Press a or b to choose Scan to E-mail 2 You can use the Scan key on a network, see Using...
... you have to install the Brother MFL-Pro software suite and connect the machine to your E-mail application, displaying the new message waiting to scan documents directly into your document. Scan to E-mail. d Press Black Start or Color Start. c Press a or b to choose Scan to E-mail 2 You can use the Scan key on a network, see Using...


