Users Manual Basic - English
Page 5
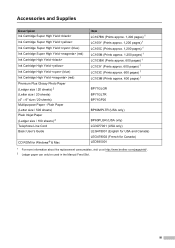
... USA and Canada) LEG478002 (French for Canada) LED935001 1 For more information about the replacement consumables, visit us at http://www.brother.com/pageyield/. 2 Ledger paper can only be used in the Manual Feed Slot. Accessories and Supplies Description Ink Cartridge Super High Yield Ink Cartridge Super High Yield Ink Cartridge Super High...
... USA and Canada) LEG478002 (French for Canada) LED935001 1 For more information about the replacement consumables, visit us at http://www.brother.com/pageyield/. 2 Ledger paper can only be used in the Manual Feed Slot. Accessories and Supplies Description Ink Cartridge Super High Yield Ink Cartridge Super High Yield Ink Cartridge Super High...

Users Manual Basic - English
Page 7
The contents of this manual and the specifications of Brother Industries, Ltd., this product are subject to change without notice in the specifications and materials contained herein and shall not be responsible for any ...) caused by reliance on the materials presented, including but not limited to typographical and other errors relating to make changes without notice. v Brother reserves the right to the publication. Compilation and Publication Notice Under the supervision of this manual has been compiled and published, covering the latest product descriptions and specifications.
The contents of this manual and the specifications of Brother Industries, Ltd., this product are subject to change without notice in the specifications and materials contained herein and shall not be responsible for any ...) caused by reliance on the materials presented, including but not limited to typographical and other errors relating to make changes without notice. v Brother reserves the right to the publication. Compilation and Publication Notice Under the supervision of this manual has been compiled and published, covering the latest product descriptions and specifications.
Users Manual Basic - English
Page 9
... in the documentation 1 Accessing the Advanced User's Guide, Software User's Guide and Network User's Guide 2 Viewing User's Guides 2 Accessing Brother Support (Windows 4 Accessing Brother Support (Macintosh 5 Control panel overview 6 3.7" Touchscreen LCD 8 Setting the Ready screen 11 Basic Operations 12 Shortcut Settings 13 Adding Copy ...media 18 Loading paper in paper tray 18 Loading smaller paper (Photo, Photo L and envelopes 21 Loading paper in the manual feed slot 25 Unprintable area 29 Paper settings...30 Paper Size and Type 30 Acceptable paper and other print media 31 ...
... in the documentation 1 Accessing the Advanced User's Guide, Software User's Guide and Network User's Guide 2 Viewing User's Guides 2 Accessing Brother Support (Windows 4 Accessing Brother Support (Macintosh 5 Control panel overview 6 3.7" Touchscreen LCD 8 Setting the Ready screen 11 Basic Operations 12 Shortcut Settings 13 Adding Copy ...media 18 Loading paper in paper tray 18 Loading smaller paper (Photo, Photo L and envelopes 21 Loading paper in the manual feed slot 25 Unprintable area 29 Paper settings...30 Paper Size and Type 30 Acceptable paper and other print media 31 ...
Users Manual Basic - English
Page 10
... 43 5 Receiving a fax 44 Receive Modes ...44 Choose the correct Receive Mode 44 Using Receive Modes 46 Fax Only ...46 Fax/Tel...46 Manual ...46 External TAD 46 Receive Mode settings 47 Ring Delay ...47 F/T Ring Time (Fax/Tel mode only 47 Easy Receive 48 Fax Preview (...Connecting an external or extension telephone 58 Using external and extension telephones 59 Using a non-Brother cordless external telephone 59 Using remote codes 59 7 Dialing and storing numbers 61 How to dial ...61 Manual dialing 61 Dialing from the Address Book 61 Fax Redial ...62 Storing numbers 62 Storing ...
... 43 5 Receiving a fax 44 Receive Modes ...44 Choose the correct Receive Mode 44 Using Receive Modes 46 Fax Only ...46 Fax/Tel...46 Manual ...46 External TAD 46 Receive Mode settings 47 Ring Delay ...47 F/T Ring Time (Fax/Tel mode only 47 Easy Receive 48 Fax Preview (...Connecting an external or extension telephone 58 Using external and extension telephones 59 Using a non-Brother cordless external telephone 59 Using remote codes 59 7 Dialing and storing numbers 61 How to dial ...61 Manual dialing 61 Dialing from the Address Book 61 Fax Redial ...62 Storing numbers 62 Storing ...

Users Manual Basic - English
Page 24
... menu. 2 Receive Mode Lets you see the current Receive Mode. Fax (Fax Only) Fax/Tel (Fax/Tel) External TAD (External TAD) Manual (Manual) NOTE When the Distinctive Ring feature is set to Ready mode. For details, see how many new faxes you setup a Wi-Fi network connection. You...
... menu. 2 Receive Mode Lets you see the current Receive Mode. Fax (Fax Only) Fax/Tel (Fax/Tel) External TAD (External TAD) Manual (Manual) NOTE When the Distinctive Ring feature is set to Ready mode. For details, see how many new faxes you setup a Wi-Fi network connection. You...
Users Manual Basic - English
Page 28
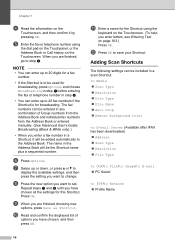
... a sequential number. j Read and confirm the displayed list of Group numbers from the Address Book and individual fax numbers from the Address Book or entered manually. (See Advanced User's Guide: Broadcasting (Black & White only).) • When you enter a fax number in a Shortcut, it by pressing OK. Press OK. Adding Scan Shortcuts...
... a sequential number. j Read and confirm the displayed list of Group numbers from the Address Book and individual fax numbers from the Address Book or entered manually. (See Advanced User's Guide: Broadcasting (Black & White only).) • When you enter a fax number in a Shortcut, it by pressing OK. Press OK. Adding Scan Shortcuts...

Users Manual Basic - English
Page 29
... a or b to confirm is chosen as the PC Name. Press OK to view the list of the following : To enter an E-mail address manually, press Manual. Go to step h. Go to step m. NOTE Press Detail to confirm the Profile Name you have entered. Press OK to display the Profile Name, and...
... a or b to confirm is chosen as the PC Name. Press OK to view the list of the following : To enter an E-mail address manually, press Manual. Go to step h. Go to step m. NOTE Press Detail to confirm the Profile Name you have entered. Press OK to display the Profile Name, and...

Users Manual Basic - English
Page 39
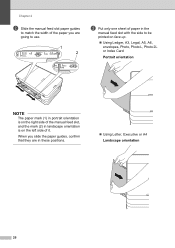
...can load special print media into this slot one sheet at a time. NOTE • The machine automatically turns on Manual Feed mode when you put paper in the manual feed slot. • If you are using paper that is longer than Letter size or envelopes with the flap on..., envelopes, Photo (4 6 in.), Photo L (3.5 5 in.), Photo 2L (5 7 in.) and Index Card (5 8 in the manual feed slot 2 a Open the manual feed slot cover. Use the manual feed slot to print or copy on the short edge, close the paper support flap. 25 Loading paper Loading paper in .).
...can load special print media into this slot one sheet at a time. NOTE • The machine automatically turns on Manual Feed mode when you put paper in the manual feed slot. • If you are using paper that is longer than Letter size or envelopes with the flap on..., envelopes, Photo (4 6 in.), Photo L (3.5 5 in.), Photo 2L (5 7 in.) and Index Card (5 8 in the manual feed slot 2 a Open the manual feed slot cover. Use the manual feed slot to print or copy on the short edge, close the paper support flap. 25 Loading paper Loading paper in .).
Users Manual Basic - English
Page 40
... the width of the paper you slide the paper guides, confirm that they are going to use. 1 2 c Put only one sheet of paper in the manual feed slot with the side to be printed on face up. Using Ledger, A3, Legal, A5, A6, envelopes, Photo, Photo L, Photo 2L or Index... Card Portrait orientation 2 NOTE The paper mark (1) in portrait orientation is on the left side of the manual feed slot, and the mark (2) in these positions. Using Letter, Executive or A4 Landscape orientation 2 26
... the width of the paper you slide the paper guides, confirm that they are going to use. 1 2 c Put only one sheet of paper in the manual feed slot with the side to be printed on face up. Using Ledger, A3, Legal, A5, A6, envelopes, Photo, Photo L, Photo 2L or Index... Card Portrait orientation 2 NOTE The paper mark (1) in portrait orientation is on the left side of the manual feed slot, and the mark (2) in these positions. Using Letter, Executive or A4 Landscape orientation 2 26
Users Manual Basic - English
Page 41
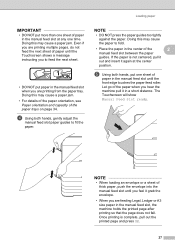
... NOTE • When loading an envelope or a sheet of thick paper, push the envelope into the manual feed slot until the front edge touches the paper feed roller. Once printing is not centered, pull it... shows a message instructing you to feed the next sheet. • DO NOT put paper in the manual feed slot when you are printing from the paper tray. NOTE • DO NOT press the paper ...guides too tightly against the paper. The Touchscreen will show Manual Feed Slot ready. If the paper is complete, pull out the printed page and press OK. 27 ...
... NOTE • When loading an envelope or a sheet of thick paper, push the envelope into the manual feed slot until the front edge touches the paper feed roller. Once printing is not centered, pull it... shows a message instructing you to feed the next sheet. • DO NOT put paper in the manual feed slot when you are printing from the paper tray. NOTE • DO NOT press the paper ...guides too tightly against the paper. The Touchscreen will show Manual Feed Slot ready. If the paper is complete, pull out the printed page and press OK. 27 ...
Users Manual Basic - English
Page 42
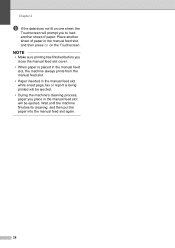
...ejected. NOTE • Make sure printing has finished before you close the manual feed slot cover. • When paper is placed in the manual feed slot, the machine always prints from the manual feed slot. • Paper inserted in the manual feed slot while a test page, fax or report is being printed will... be ejected. • During the machine's cleaning process, paper you place in the manual feed slot, and then press OK on the Touchscreen. Wait until the machine finishes its cleaning, and then put the paper into the manual feed slot again. 28 Place another sheet of paper in the...
...ejected. NOTE • Make sure printing has finished before you close the manual feed slot cover. • When paper is placed in the manual feed slot, the machine always prints from the manual feed slot. • Paper inserted in the manual feed slot while a test page, fax or report is being printed will... be ejected. • During the machine's cleaning process, paper you place in the manual feed slot, and then press OK on the Touchscreen. Wait until the machine finishes its cleaning, and then put the paper into the manual feed slot again. 28 Place another sheet of paper in the...
Users Manual Basic - English
Page 47
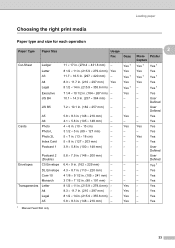
...; 355.6 mm) - Yes Legal 8 1/2 14 in . (89 127 mm) - - - User Defined JIS B5 7.2 10.1 in . (210 297 mm) - Yes 1 - Yes - Yes 1 Manual Feed Slot only 33 Yes A4 8.3 11.7 in . (182 257 mm) - - - Loading paper Choosing the right print media 2 Paper type and size for...
...; 355.6 mm) - Yes Legal 8 1/2 14 in . (89 127 mm) - - - User Defined JIS B5 7.2 10.1 in . (210 297 mm) - Yes 1 - Yes - Yes 1 Manual Feed Slot only 33 Yes A4 8.3 11.7 in . (182 257 mm) - - - Loading paper Choosing the right print media 2 Paper type and size for...
Users Manual Basic - English
Page 48
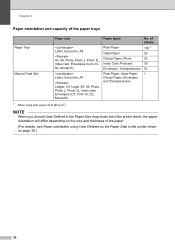
... 20 lb (80 g/m2). NOTE When you choose User Defined in the printer driver on the size and thickness of the paper trays 2 Paper Tray Manual Feed Slot Paper size Letter, Executive, A4 A5, A6, Photo, Photo L, Photo 2L, Index card, Envelopes (Com-10, DL, Monarch) Letter, Executive, A4 Ledger, A3...
... 20 lb (80 g/m2). NOTE When you choose User Defined in the printer driver on the size and thickness of the paper trays 2 Paper Tray Manual Feed Slot Paper size Letter, Executive, A4 A5, A6, Photo, Photo L, Photo 2L, Index card, Envelopes (Com-10, DL, Monarch) Letter, Executive, A4 Ledger, A3...

Users Manual Basic - English
Page 58
... control the telephone line and must answer every call . If you be using Voice Mail on the same telephone line as the Brother machine. Choose Manual as your Receive Mode. (See Fax/Tel on page 46.) Important Note: You cannot receive voice messages on either Voice Mail ... Will you be using a Distinctive Ring number for instructions on setting up your Brother machine, there is a strong possibility that Voice Mail and the Brother machine will automatically answer every call yourself. (See Manual on the external TAD and fax messages are printed. Voice messages are stored on...
... control the telephone line and must answer every call . If you be using Voice Mail on the same telephone line as the Brother machine. Choose Manual as your Receive Mode. (See Fax/Tel on page 46.) Important Note: You cannot receive voice messages on either Voice Mail ... Will you be using a Distinctive Ring number for instructions on setting up your Brother machine, there is a strong possibility that Voice Mail and the Brother machine will automatically answer every call yourself. (See Manual on the external TAD and fax messages are printed. Voice messages are stored on...
Users Manual Basic - English
Page 59
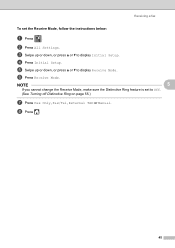
b Press All Settings. f Press Receive Mode. h Press . 45 Receiving a fax To set to display Initial Setup. d Press Initial Setup. e Swipe up or down , or press a or b to display Receive Mode. NOTE 5 If you cannot change the Receive Mode, make sure the Distinctive Ring feature is set the Receive Mode, follow the instructions below: a Press . c Swipe up or down , or press a or b to Off. (See Turning off Distinctive Ring on page 55.) g Press Fax Only, Fax/Tel, External TAD or Manual.
b Press All Settings. f Press Receive Mode. h Press . 45 Receiving a fax To set to display Initial Setup. d Press Initial Setup. e Swipe up or down , or press a or b to display Receive Mode. NOTE 5 If you cannot change the Receive Mode, make sure the Distinctive Ring feature is set the Receive Mode, follow the instructions below: a Press . c Swipe up or down , or press a or b to Off. (See Turning off Distinctive Ring on page 55.) g Press Fax Only, Fax/Tel, External TAD or Manual.
Users Manual Basic - English
Page 60
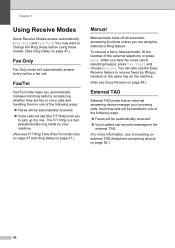
...answering device manage your incoming calls. You can record a message on the external TAD. (For more information, see Easy Receive on page 47.) Manual 5 Manual mode turns off all automatic answering functions unless you hear fax tones (short repeating beeps), press Fax Start and choose Receive. When you are ...call. To receive a fax in one of the following ways: Faxes will be automatically received. Voice calls will be handled in Manual mode, lift the handset of the following ways: Faxes will start the F/T Ring to tell you to pick up the line.
...answering device manage your incoming calls. You can record a message on the external TAD. (For more information, see Easy Receive on page 47.) Manual 5 Manual mode turns off all automatic answering functions unless you hear fax tones (short repeating beeps), press Fax Start and choose Receive. When you are ...call. To receive a fax in one of the following ways: Faxes will be automatically received. Voice calls will be handled in Manual mode, lift the handset of the following ways: Faxes will start the F/T Ring to tell you to pick up the line.
Users Manual Basic - English
Page 66
... to answer after 4 rings and your Voice Mail is set to answer after 2 rings, then your Brother machine will prevent your Brother machine from being able to leave a message in Manual Mode, see Choose the correct Receive Mode on page 44.) 52 Voice Mail 6 If you have Voice... a person with a different ring pattern and is used for receiving faxes. (See Distinctive Ring on page 53.) OR Set your Brother machine's Receive Mode to "Manual." Brother uses the term "Distinctive Ring," but telephone companies market the service under a variety of your Voice Mail. If the incoming call ...
... to answer after 4 rings and your Voice Mail is set to answer after 2 rings, then your Brother machine will prevent your Brother machine from being able to leave a message in Manual Mode, see Choose the correct Receive Mode on page 44.) 52 Voice Mail 6 If you have Voice... a person with a different ring pattern and is used for receiving faxes. (See Distinctive Ring on page 53.) OR Set your Brother machine's Receive Mode to "Manual." Brother uses the term "Distinctive Ring," but telephone companies market the service under a variety of your Voice Mail. If the incoming call ...
Users Manual Basic - English
Page 68
The Receive Mode is automatically set to Manual and you choose the pattern that was "registered"). d Press Fax. 54 e Swipe up or down , or press a or b to display Fax. g Press Distinctive. This ensures the Brother machine will only answer the Distinctive Ring number and will not interfere when your main telephone number is...
The Receive Mode is automatically set to Manual and you choose the pattern that was "registered"). d Press Fax. 54 e Swipe up or down , or press a or b to display Fax. g Press Distinctive. This ensures the Brother machine will only answer the Distinctive Ring number and will not interfere when your main telephone number is...
Users Manual Basic - English
Page 69
... device) 6 You may choose to 10 seconds of CNG tones left for the fax "handshake." i Press Off. However, when you carefully follow the instructions in Manual mode. If it exceeds five rings. 55 The machine cannot hear CNG tones until the TAD has answered the call and receives the fax. We...
... device) 6 You may choose to 10 seconds of CNG tones left for the fax "handshake." i Press Off. However, when you carefully follow the instructions in Manual mode. If it exceeds five rings. 55 The machine cannot hear CNG tones until the TAD has answered the call and receives the fax. We...

Users Manual Basic - English
Page 71
...-record the OGM to answer calls. For example: "After the beep, leave a message or send a fax by giving your Fax Receive Code for people sending manual faxes. i Set the Receive Mode to four rings or less. (The machine's Ring Delay setting does not apply.) g Record the outgoing message on the external... the machine cannot hear fax tones over a resonant or loud voice. Gently push the scanner cover support down and close the scanner cover using both manual and automatic fax reception.
...-record the OGM to answer calls. For example: "After the beep, leave a message or send a fax by giving your Fax Receive Code for people sending manual faxes. i Set the Receive Mode to four rings or less. (The machine's Ring Delay setting does not apply.) g Record the outgoing message on the external... the machine cannot hear fax tones over a resonant or loud voice. Gently push the scanner cover support down and close the scanner cover using both manual and automatic fax reception.


