Users Manual - English
Page 70
... color fax, the machine's "handshake" will stop all print operations. If the problem continues, call Brother Customer Service. Try to cool down. 56 Send the fax again or connect the machine to check your telephone line. The other person or other person's fax machine stopped the call. Set Distinctive Ring... interference / VoIP uu page 74.) The document was not inserted or fed (See Using the ADF uu page 21.) properly, or the document scanned from Manual to print again. An ink cartridge is too warm. The machine will ask that the fax be sent as a black & white ...
... color fax, the machine's "handshake" will stop all print operations. If the problem continues, call Brother Customer Service. Try to cool down. 56 Send the fax again or connect the machine to check your telephone line. The other person or other person's fax machine stopped the call. Set Distinctive Ring... interference / VoIP uu page 74.) The document was not inserted or fed (See Using the ADF uu page 21.) properly, or the document scanned from Manual to print again. An ink cartridge is too warm. The machine will ask that the fax be sent as a black & white ...
Users Manual - English
Page 87
Print a Network Configuration list (uuAdvanced User's Guide: Reports) and check the current Network settings printed in ControlCenter2. In Port number: Enter 54925. network. Choose B Network Reset. (uuNetwork User's Guide) 73 Make sure that came ...If you are using a wireless connection or are using the WLAN Report. Reset the network settings. (uuNetwork User's Guide) Press the Menu key, choose Network and then press OK. To add port 54925 for Network scanning, enter the information below: In Name: Enter any description, for example Brother NetScan. Press the Menu key...
Print a Network Configuration list (uuAdvanced User's Guide: Reports) and check the current Network settings printed in ControlCenter2. In Port number: Enter 54925. network. Choose B Network Reset. (uuNetwork User's Guide) 73 Make sure that came ...If you are using a wireless connection or are using the WLAN Report. Reset the network settings. (uuNetwork User's Guide) Press the Menu key, choose Network and then press OK. To add port 54925 for Network scanning, enter the information below: In Name: Enter any description, for example Brother NetScan. Press the Menu key...

Advanced Users Manual - English
Page 43
...sending faxes over the phone lines from your machine to the EXT. Temporary settings You can choose certain options for easy dialing. Scanning The process of sending an electronic image of dialing on the top of rings before the machine answers in real time. Super...at an extension telephone by pressing this code (# 5 1). Remaining jobs You can connect an external telephone answering device or answering machine to the receiving fax machine. TAD (telephone answering device) You can check which jobs are waiting in numerical order. User Settings A printed report that shows ...
...sending faxes over the phone lines from your machine to the EXT. Temporary settings You can choose certain options for easy dialing. Scanning The process of sending an electronic image of dialing on the top of rings before the machine answers in real time. Super...at an extension telephone by pressing this code (# 5 1). Remaining jobs You can connect an external telephone answering device or answering machine to the receiving fax machine. TAD (telephone answering device) You can check which jobs are waiting in numerical order. User Settings A printed report that shows ...
Quick Setup Guide - English
Page 30
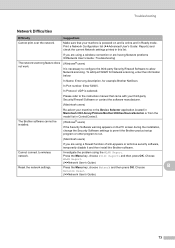
... take a few seconds for all screens to add the following network ports. For network scanning, add UDP port 54925. For network PC-Fax receiving, add UDP port 54926. ... 7, when the Windows® Security screen appears, click the check box and click Install to enable network connection and continue with your network connection, add UDP port 137 and 161. The WEP key is ...installation. (Recommended) and click Next. It may appear. IMPORTANT DO NOT cancel any of the Brother drivers will automatically start. g When the On-Line Registration screen is not found on -screen ...
... take a few seconds for all screens to add the following network ports. For network scanning, add UDP port 54925. For network PC-Fax receiving, add UDP port 54926. ... 7, when the Windows® Security screen appears, click the check box and click Install to enable network connection and continue with your network connection, add UDP port 137 and 161. The WEP key is ...installation. (Recommended) and click Next. It may appear. IMPORTANT DO NOT cancel any of the Brother drivers will automatically start. g When the On-Line Registration screen is not found on -screen ...
Quick Setup Guide - English
Page 34
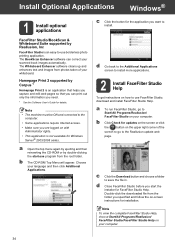
... double-clicking the start the installer for Windows Server® 2003/2008 series. Choose your scanned book images automatically. d Go back to the Additional Applications screen to install more applications. ... right corner of your computer. Note • The machine must be ON and connected to use borderless photo printing application. c Click the button for installation. a To run FaceFilter Studio..., go to save the file in. b Click Check for details. c Click the Download button and choose a folder to the Reallusion update web ...
... double-clicking the start the installer for Windows Server® 2003/2008 series. Choose your scanned book images automatically. d Go back to the Additional Applications screen to install more applications. ... right corner of your computer. Note • The machine must be ON and connected to use borderless photo printing application. c Click the button for installation. a To run FaceFilter Studio..., go to save the file in. b Click Check for details. c Click the Download button and choose a folder to the Reallusion update web ...

Network Glossary - English
Page 8
... 1 mDNS allows the Brother print server to automatically configure itself to work in both the IPv4 or IPv6 environment when using Web Services, see the Software User's Guide. SNMP 1 The Simple Network Management Protocol (SNMP) is used for printing and scanning via Web Services (Windows...for the NetBIOS name resolution by right-clicking the machine icon from your computer. 4 The Web Services also lets you check the current status of network connections and protocols WINS 1 Windows® Internet Name Service is Port 9100) 1 Another commonly used printing protocols on a...
... 1 mDNS allows the Brother print server to automatically configure itself to work in both the IPv4 or IPv6 environment when using Web Services, see the Software User's Guide. SNMP 1 The Simple Network Management Protocol (SNMP) is used for printing and scanning via Web Services (Windows...for the NetBIOS name resolution by right-clicking the machine icon from your computer. 4 The Web Services also lets you check the current status of network connections and protocols WINS 1 Windows® Internet Name Service is Port 9100) 1 Another commonly used printing protocols on a...
Network Users Manual - English
Page 71
... information on the network during the MFL-Pro Suite installation. (See page 68.) The Brother machine cannot print or scan over the network. (See page 69.) The Brother machine is allowed in the Network Glossary. Are you using your WLAN access point/router for information on... point/router may encounter when using MAC address filtering? First check the following items are fully closed. Paper is inserted properly in the paper tray. (For wired networks) A network cable is securely connected to the Brother machine and the router or hub. 8 Go to the page...
... information on the network during the MFL-Pro Suite installation. (See page 68.) The Brother machine cannot print or scan over the network. (See page 69.) The Brother machine is allowed in the Network Glossary. Are you using your WLAN access point/router for information on... point/router may encounter when using MAC address filtering? First check the following items are fully closed. Paper is inserted properly in the paper tray. (For wired networks) A network cable is securely connected to the Brother machine and the router or hub. 8 Go to the page...

Network Users Manual - English
Page 74
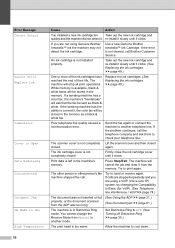
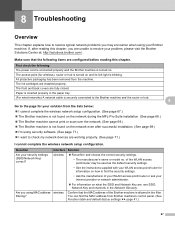
Troubleshooting The Brother machine cannot print or scan over the network. Right-click on the network even after using the Status Monitor. wired/ wireless If the correct IP address and Subnet mask are ... by printing the Network Configuration Report. 8 Note The Network Connection Repair Tool will start automatically if you check the Enable Network Connection Repair Tool box using the Network Connection Repair Tool, ask the network administrator for this information, or visit the Brother Solutions Center at http://solutions.brother.com/. If the failed printing job is...
Troubleshooting The Brother machine cannot print or scan over the network. Right-click on the network even after using the Status Monitor. wired/ wireless If the correct IP address and Subnet mask are ... by printing the Network Configuration Report. 8 Note The Network Connection Repair Tool will start automatically if you check the Enable Network Connection Repair Tool box using the Network Connection Repair Tool, ask the network administrator for this information, or visit the Brother Solutions Center at http://solutions.brother.com/. If the failed printing job is...
Network Users Manual - English
Page 75
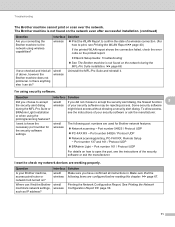
...? To allow access, BRAdmin Light installation see Printing the WLAN Report uu page 40.) If the printed WLAN report shows the connection failed, check the error code on the network even after successful installation. (continued) Question Interface Solution Are you did not choose to open... the MFL-Pro Suite and reinstall it. Printing the Network Configuration Report. The Brother machine is not found on the printed report. I want to know the necessary port number for Brother network features: Network scanning i Port number 54925 / Protocol UDP PC-FAX RX i Port ...
...? To allow access, BRAdmin Light installation see Printing the WLAN Report uu page 40.) If the printed WLAN report shows the connection failed, check the error code on the network even after successful installation. (continued) Question Interface Solution Are you did not choose to open... the MFL-Pro Suite and reinstall it. Printing the Network Configuration Report. The Brother machine is not found on the printed report. I want to know the necessary port number for Brother network features: Network scanning i Port number 54925 / Protocol UDP PC-FAX RX i Port ...
Software Users Manual - English
Page 84
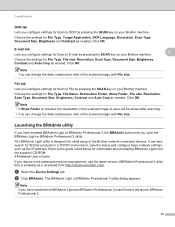
..., such as needed. It can change the data compression ratio of the Brother network connected devices. Note If you have installed BRAdmin Light or BRAdmin Professional 3, the BRAdmin button lets you configure settings for Scan to the guide noted below for File Type, File Name, Destination Folder...utility that is available as a download from the supplied CD-ROM. The BRAdmin Light utility is checked, the destination of the scanned image to File by pressing the SCAN key on your Brother machine. Note • If Show Folder is designed for File Type, Target Application, OCR Language,...
..., such as needed. It can change the data compression ratio of the Brother network connected devices. Note If you have installed BRAdmin Light or BRAdmin Professional 3, the BRAdmin button lets you configure settings for Scan to the guide noted below for File Type, File Name, Destination Folder...utility that is available as a download from the supplied CD-ROM. The BRAdmin Light utility is checked, the destination of the scanned image to File by pressing the SCAN key on your Brother machine. Note • If Show Folder is designed for File Type, Target Application, OCR Language,...

Software Users Manual - English
Page 99
... you configure settings for File Type, Target Application, OCR Language, Resolution, Scan Type, Document Size, Brightness and Contrast as needed. Note • If Show Folder is checked, the destination of the Brother network connected devices. The BRAdmin Light utility is available as needed . Click OK. ...Choose the settings for initial setup of the scanned image to save will launch BRAdmin Professional 3. 90...
... you configure settings for File Type, Target Application, OCR Language, Resolution, Scan Type, Document Size, Brightness and Contrast as needed. Note • If Show Folder is checked, the destination of the Brother network connected devices. The BRAdmin Light utility is available as needed . Click OK. ...Choose the settings for initial setup of the scanned image to save will launch BRAdmin Professional 3. 90...

Software Users Manual - English
Page 127
... for network scanning by entering the information below: 1 In Description of service: Enter any description, for example "Brother Network Print"....checked, and then click OK. 118 g If you still have trouble with your network: Enter "Localhost". 3 In External Port number for this service: Enter "54926". 4 In Internal Port number for example 192.168.0.12) of service: Enter any description, for example "Brother... PC-Fax". 2 In Name or IP address (for this service on your network connection...
... for network scanning by entering the information below: 1 In Description of service: Enter any description, for example "Brother Network Print"....checked, and then click OK. 118 g If you still have trouble with your network: Enter "Localhost". 3 In External Port number for this service: Enter "54926". 4 In Internal Port number for example 192.168.0.12) of service: Enter any description, for example "Brother... PC-Fax". 2 In Name or IP address (for this service on your network connection...

Software Users Manual - English
Page 130
The Windows Firewall with your network connection such as Network Scanning or Printing, check the File and Printer Sharing box in the Exceptions tab and then click OK. Windows® 7 users a Click the button, Control Panel, System and Security and then Windows Firewall. Make sure the Windows Firewall state is set to On. c Click Inbound Rules. 7 7 121 Firewall settings (For Network users) j If you still have trouble with Advanced Security window appears. b Click Advanced settings.
The Windows Firewall with your network connection such as Network Scanning or Printing, check the File and Printer Sharing box in the Exceptions tab and then click OK. Windows® 7 users a Click the button, Control Panel, System and Security and then Windows Firewall. Make sure the Windows Firewall state is set to On. c Click Inbound Rules. 7 7 121 Firewall settings (For Network users) j If you still have trouble with Advanced Security window appears. b Click Advanced settings.


