Software & Network Users Manual - English
Page 10
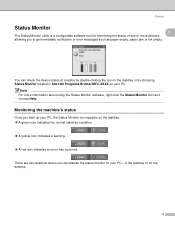
...notification of error messages such as paper empty, paper jam or ink empty. You can display the status monitor on your PC. Note For more devices, allowing you start up your PC, the Status Monitor icon appears on your PC-in Start/All Programs/Brother/MFC-XXXX on the tasktray. „... A green icon indicates the normal stand-by choosing Status Monitor located in the tasktray or on the desktop. 4 Printing Status Monitor 1 1 The Status Monitor utility is a configurable software tool for monitoring the status of one or more ...
...notification of error messages such as paper empty, paper jam or ink empty. You can display the status monitor on your PC. Note For more devices, allowing you start up your PC, the Status Monitor icon appears on your PC-in Start/All Programs/Brother/MFC-XXXX on the tasktray. „... A green icon indicates the normal stand-by choosing Status Monitor located in the tasktray or on the desktop. 4 Printing Status Monitor 1 1 The Status Monitor utility is a configurable software tool for monitoring the status of one or more ...
Software & Network Users Manual - English
Page 105
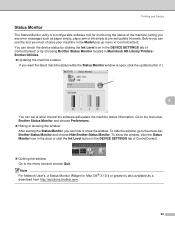
...SETTINGS tab of ControlCenter2 or by choosing Brother Status Monitor located in Macintosh HD/Library/Printers/ Brother/Utilities. „ Updating the machine's status If you want the latest machine status while the Status Monitor window is also available as paper empty, paper jam or ink empty at what interval ...'s, a Status Monitor Widget for monitoring the status of the machine, letting you see error messages such as a download from http://solutions.brother.com. 99 You can check the device status by clicking the Ink Level icon in the DEVICE SETTINGS tab of ControlCenter2. „ Quitting...
...SETTINGS tab of ControlCenter2 or by choosing Brother Status Monitor located in Macintosh HD/Library/Printers/ Brother/Utilities. „ Updating the machine's status If you want the latest machine status while the Status Monitor window is also available as paper empty, paper jam or ink empty at what interval ...'s, a Status Monitor Widget for monitoring the status of the machine, letting you see error messages such as a download from http://solutions.brother.com. 99 You can check the device status by clicking the Ink Level icon in the DEVICE SETTINGS tab of ControlCenter2. „ Quitting...

Users Manual - English
Page 15
Adjusting Brightness, Contrast and Color 106 Cropping ...108 Borderless printing 108 Setting your changes as new default 108 Restoring all the settings to factory settings 108 Scan to Card ...109 ... Routine Maintenance Troubleshooting 130 If you are having difficulty with your machine 130 Error messages 136 Transferring your faxes or Fax Journal report 139 Document jam 140 Printer jam or paper jam 141 Dial Tone ...142 xiii
Adjusting Brightness, Contrast and Color 106 Cropping ...108 Borderless printing 108 Setting your changes as new default 108 Restoring all the settings to factory settings 108 Scan to Card ...109 ... Routine Maintenance Troubleshooting 130 If you are having difficulty with your machine 130 Error messages 136 Transferring your faxes or Fax Journal report 139 Document jam 140 Printer jam or paper jam 141 Dial Tone ...142 xiii
Users Manual - English
Page 27
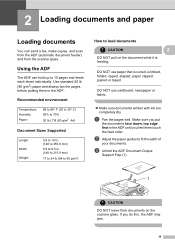
Use standard 20 lb (80 g/m2) paper and always fan the pages before putting them in the ADF until you feel them touch the feed roller. DO NOT use paper that is feeding. Make sure you do this, the ADF may jam. 11 If you put the documents face down, top edge first in... the ADF. 2 Loading documents and paper 2 Loading documents 2 You can hold up to 10 pages and feeds...
Use standard 20 lb (80 g/m2) paper and always fan the pages before putting them in the ADF until you feel them touch the feed roller. DO NOT use paper that is feeding. Make sure you do this, the ADF may jam. 11 If you put the documents face down, top edge first in... the ADF. 2 Loading documents and paper 2 Loading documents 2 You can hold up to 10 pages and feeds...

Users Manual - English
Page 29
...print quality for the settings you have chosen, always set the Paper Type to prevent smudging or paper jams. „ Avoid touching the printed surface of the paper immediately after printing; You can be sure to choose the ...Brother paper Paper Type Letter Plain Letter Glossy Photo Letter Inkjet (Matte) 4 × 6 in. Loading documents and paper Acceptable paper and other media 2 The print quality can use plain paper, inkjet paper (coated paper), glossy paper, transparencies and envelopes. We recommend testing various paper types before buying large quantities. Keep the paper...
...print quality for the settings you have chosen, always set the Paper Type to prevent smudging or paper jams. „ Avoid touching the printed surface of the paper immediately after printing; You can be sure to choose the ...Brother paper Paper Type Letter Plain Letter Glossy Photo Letter Inkjet (Matte) 4 × 6 in. Loading documents and paper Acceptable paper and other media 2 The print quality can use plain paper, inkjet paper (coated paper), glossy paper, transparencies and envelopes. We recommend testing various paper types before buying large quantities. Keep the paper...
Users Manual - English
Page 33
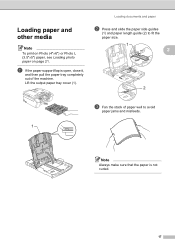
Loading documents and paper b Press and slide the paper side guides (1) and paper length guide (2) to fit the paper size. 1 2 2 c Fan the stack of paper well to avoid paper jams and misfeeds. 1 Note Always make sure that the paper is open, close it, and then pull the paper tray completely out of the machine. Loading paper and other media 2 Note To print on Photo (4"×6") or Photo L (3.5"×5") paper, see Loading photo paper on page 21. Lift the output paper tray cover (1). a If the paper support flap is not curled. 17
Loading documents and paper b Press and slide the paper side guides (1) and paper length guide (2) to fit the paper size. 1 2 2 c Fan the stack of paper well to avoid paper jams and misfeeds. 1 Note Always make sure that the paper is open, close it, and then pull the paper tray completely out of the machine. Loading paper and other media 2 Note To print on Photo (4"×6") or Photo L (3.5"×5") paper, see Loading photo paper on page 21. Lift the output paper tray cover (1). a If the paper support flap is not curled. 17

Users Manual - English
Page 42
... a or b to prevent smudging or paper jams. 26 Press OK. When you use transparencies or glossy paper, remove each sheet at once to choose General Setup. d Press a or b to choose General Setup. b Press a or b to choose Plain Paper, Inkjet Paper, Brother Photo, Other Photo or Transparency. a ...Press Menu. Note The machine ejects paper with printed surfaces face up onto the paper tray in the mode you are using. e Press Stop/Exit. Press OK...
... a or b to prevent smudging or paper jams. 26 Press OK. When you use transparencies or glossy paper, remove each sheet at once to choose General Setup. d Press a or b to choose General Setup. b Press a or b to choose Plain Paper, Inkjet Paper, Brother Photo, Other Photo or Transparency. a ...Press Menu. Note The machine ejects paper with printed surfaces face up onto the paper tray in the mode you are using. e Press Stop/Exit. Press OK...
Users Manual - English
Page 147
... Make sure you are using the paper support flap. (See Loading paper and other media on page 17.) There are using the proper types of paper. (See Acceptable paper and to print on page 17.) Printed pages double feed and cause a paper jam. Make sure the paper is loaded properly in the Software.... (See Cleaning the machine printer or at any one time. Check that more than normal printing. (See Printing for Windows® or Printing and Faxing for Macintosh® in the paper tray and the paper side guide is not full color in the printer driver Basic tab. Check the printing...
... Make sure you are using the paper support flap. (See Loading paper and other media on page 17.) There are using the proper types of paper. (See Acceptable paper and to print on page 17.) Printed pages double feed and cause a paper jam. Make sure the paper is loaded properly in the Software.... (See Cleaning the machine printer or at any one time. Check that more than normal printing. (See Printing for Windows® or Printing and Faxing for Macintosh® in the paper tray and the paper side guide is not full color in the printer driver Basic tab. Check the printing...
Users Manual - English
Page 153
... with the media card. The number you want to access a Speed Dial Set up . Allow the machine to convert it, the color fax will ask that is busy. The paper is working. Storing Speed-Dial numbers on page 143.) The media card in the media drive Put the correct media card into... company. (See Caller ID on page 141. One or more of the ink cartridges are running out of paper or paper is too cold. You did not receive calls or you know is jammed in the machine. The machine is out of ink. See Printer jam or paper jam on page 56.) An ink cartridge is not...
... with the media card. The number you want to access a Speed Dial Set up . Allow the machine to convert it, the color fax will ask that is busy. The paper is working. Storing Speed-Dial numbers on page 143.) The media card in the media drive Put the correct media card into... company. (See Caller ID on page 141. One or more of the ink cartridges are running out of paper or paper is too cold. You did not receive calls or you know is jammed in the machine. The machine is out of ink. See Printer jam or paper jam on page 56.) An ink cartridge is not...
Users Manual - English
Page 154
...in the memory. (See Printing a fax from the memory on the CD-ROM.) Paper Jam Paper is full. Wrong USB device A non-PictBridge compatible or Unplug the device from the ... or Printing and Faxing for several minutes and then reconnect it. „ (MFC-665CW and MFC-845CW only) Disconnect the machine from the PictBridge port, broken device has been then ...one of the following : „ Press Stop/Exit and wait until the other operations in progress finish and then try again. „ Clear the data in progress Do one of paper (Letter, Legal or A4), and then press Black Start or Color...
...in the memory. (See Printing a fax from the memory on the CD-ROM.) Paper Jam Paper is full. Wrong USB device A non-PictBridge compatible or Unplug the device from the ... or Printing and Faxing for several minutes and then reconnect it. „ (MFC-665CW and MFC-845CW only) Disconnect the machine from the PictBridge port, broken device has been then ...one of the following : „ Press Stop/Exit and wait until the other operations in progress finish and then try again. „ Clear the data in progress Do one of paper (Letter, Legal or A4), and then press Black Start or Color...

Users Manual - English
Page 156
.... Note To avoid document jams close the ADF cover properly by pressing it down in the top of the ADF unit B a Take out any paper from the ADF that is not jammed. Document is jammed inside the ADF unit B a Take out any paper from the ADF that is not jammed. b Lift the document cover.... c Pull the jammed document out to the left .
.... Note To avoid document jams close the ADF cover properly by pressing it down in the top of the ADF unit B a Take out any paper from the ADF that is not jammed. Document is jammed inside the ADF unit B a Take out any paper from the ADF that is not jammed. b Lift the document cover.... c Pull the jammed document out to the left .
Users Manual - English
Page 157
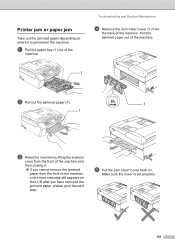
...on the LCD after you cannot remove the jammed paper from the back of the machine. Make sure the cover is jammed in the machine. Printer jam or paper jam B Take out the jammed paper depending on where it . „ If you have removed the jammed paper, please go to the next step. ...Troubleshooting and Routine Maintenance d Remove the Jam Clear Cover (1) from the front of...
...on the LCD after you cannot remove the jammed paper from the back of the machine. Make sure the cover is jammed in the machine. Printer jam or paper jam B Take out the jammed paper depending on where it . „ If you have removed the jammed paper, please go to the next step. ...Troubleshooting and Routine Maintenance d Remove the Jam Clear Cover (1) from the front of...

Users Manual - English
Page 158
... detect pause. Press OK. e Press Stop/Exit. 142 Dial Tone B Setting the dial tone to choose Dial Tone. Press OK. Note If the paper is no jammed paper left in the corners of the machine to lift the scanner cover (1) until it locks securely into the machine. a Press Menu. Make sure that... there is jammed under the print head, unplug the machine from the power source, and then move the print head to release the lock (1). d Press a or b to choose Initial Setup. f Using both hands, use the plastic tabs on both sides of the machine. 1 h Push the paper tray firmly back ...
... detect pause. Press OK. e Press Stop/Exit. 142 Dial Tone B Setting the dial tone to choose Dial Tone. Press OK. Note If the paper is no jammed paper left in the corners of the machine to lift the scanner cover (1) until it locks securely into the machine. a Press Menu. Make sure that... there is jammed under the print head, unplug the machine from the power source, and then move the print head to release the lock (1). d Press a or b to choose Initial Setup. f Using both hands, use the plastic tabs on both sides of the machine. 1 h Push the paper tray firmly back ...

Users Manual - English
Page 163
...platen wipe it locks securely into the open position. d Put the Jam Clear Cover back on both sides of the machine. b Unplug the machine from the AC power outlet before cleaning the printer platen (1). e Put the paper tray firmly back in the machine. If ink is set properly. Troubleshooting...Cleaning the machine printer platen B WARNING Be sure to unplug the machine from the AC power outlet and remove the Jam Clear Cover (1). 1 c Clean the Paper Pick-up roller B a Pull the paper tray completely out of the machine to lift the 1 scanner cover until it off with isopropyl alcohol on a ...
...platen wipe it locks securely into the open position. d Put the Jam Clear Cover back on both sides of the machine. b Unplug the machine from the AC power outlet before cleaning the printer platen (1). e Put the paper tray firmly back in the machine. If ink is set properly. Troubleshooting...Cleaning the machine printer platen B WARNING Be sure to unplug the machine from the AC power outlet and remove the Jam Clear Cover (1). 1 c Clean the Paper Pick-up roller B a Pull the paper tray completely out of the machine to lift the 1 scanner cover until it off with isopropyl alcohol on a ...

Users Manual - English
Page 213
... Ink cartridges checking ink volume 150 ink dot counter 143 replacing 143 J Jams document 140 paper 140 L LCD (liquid crystal display 158 Brightness 31, 32 Contrast 31 ...of Area (Caller ID 56 Outgoing Message (Msg Ctr OGM) ......... 71 P Packing the machine 154 Paging 77 Paper 13, 19, 177 capacity 16 loading 17, 19, 21 printable area 23 size 27 size of document 11 type... (PBX 61 roll over lines 59 two-line phone system 59 Photo Bypass Tray (USA 21 Photo Paper Tray (Canada 21 PhotoCapture Center® Borderless 108 CompactFlash 100 Cropping 106, 108 DPOF printing 104 from...
... Ink cartridges checking ink volume 150 ink dot counter 143 replacing 143 J Jams document 140 paper 140 L LCD (liquid crystal display 158 Brightness 31, 32 Contrast 31 ...of Area (Caller ID 56 Outgoing Message (Msg Ctr OGM) ......... 71 P Packing the machine 154 Paging 77 Paper 13, 19, 177 capacity 16 loading 17, 19, 21 printable area 23 size 27 size of document 11 type... (PBX 61 roll over lines 59 two-line phone system 59 Photo Bypass Tray (USA 21 Photo Paper Tray (Canada 21 PhotoCapture Center® Borderless 108 CompactFlash 100 Cropping 106, 108 DPOF printing 104 from...
Users Manual - English
Page 214
Print difficulties 130, 132 drivers 186 fax from memory 51 paper jams 141 report 88 resolution 186 specifications 186 Printing index 103 on small paper 22 photos 103, 104 See Software User's Guide on the CD-ROM Programming your machine 158 Q Quick-Dial Access codes and credit ... 86 Remote Setup See Software User's Guide on the CD-ROM. MultiMediaCard 100 Preview photos 102 Print settings Brightness 106 Contrast 106 Paper & print size 106 Paper type 106 Quality 105, 106 Return to factory setting 108 Set new default 108 True2Life 107 Printing Index 103 Printing photos 103,...
Print difficulties 130, 132 drivers 186 fax from memory 51 paper jams 141 report 88 resolution 186 specifications 186 Printing index 103 on small paper 22 photos 103, 104 See Software User's Guide on the CD-ROM Programming your machine 158 Q Quick-Dial Access codes and credit ... 86 Remote Setup See Software User's Guide on the CD-ROM. MultiMediaCard 100 Preview photos 102 Print settings Brightness 106 Contrast 106 Paper & print size 106 Paper type 106 Quality 105, 106 Return to factory setting 108 Set new default 108 True2Life 107 Printing Index 103 Printing photos 103,...
Users Manual - English
Page 215
... 133 Network 135 phone line or connections 132 PhotoCapture Center 134 printing 130 printing received faxes 132 receiving faxes 132 sending faxes 133 software 134 paper jam 141 True2Life® PhotoCapture Center 107 Two-line phone system 59 TX Lock 34 V Volume, setting beeper 27 handset 28 volume amplify (for hearing -impaired...
... 133 Network 135 phone line or connections 132 PhotoCapture Center 134 printing 130 printing received faxes 132 receiving faxes 132 sending faxes 133 software 134 paper jam 141 True2Life® PhotoCapture Center 107 Two-line phone system 59 TX Lock 34 V Volume, setting beeper 27 handset 28 volume amplify (for hearing -impaired...

Quick Setup Guide - English
Page 8
... the paper side guides (1) and paper length guide (2) to fit the paper size. 1 Note Avoid using in an area where it is flat in a reinforced concrete building, near metal furniture or doors. STEP1 Setting Up the Machine 6 Position the antenna on the 1 base unit 1 Move the antenna to the up to avoid paper jams and... misfeeds. 4 Gently put the paper into the paper tray print side down and top edge first.
... the paper side guides (1) and paper length guide (2) to fit the paper size. 1 Note Avoid using in an area where it is flat in a reinforced concrete building, near metal furniture or doors. STEP1 Setting Up the Machine 6 Position the antenna on the 1 base unit 1 Move the antenna to the up to avoid paper jams and... misfeeds. 4 Gently put the paper into the paper tray print side down and top edge first.


