Software & Network Users Manual - English
Page 2
... printing, scanning and faxing 3 Clearing data from the memory ...3 Checking the print quality ...3 Status Monitor...4 Monitoring the machine's status ...4 Turning off the status monitor...5 Printer driver settings...5 Accessing the printer driver settings...5 Basic tab ...6 Media Type...7 Quality ...7 Enhanced Print Settings ...8 Improve Pattern Printing (Windows® 2000/XP only 10 Paper Size ...10 Page Layout ...11 Orientation ...11 Copies ...12 Paper Source (MFC-5860CN only 12 Advanced tab...13 Color ...14 Scaling ...16 Watermark ...17 Device Options ...19 Support tab ...21 2 Scanning...
... printing, scanning and faxing 3 Clearing data from the memory ...3 Checking the print quality ...3 Status Monitor...4 Monitoring the machine's status ...4 Turning off the status monitor...5 Printer driver settings...5 Accessing the printer driver settings...5 Basic tab ...6 Media Type...7 Quality ...7 Enhanced Print Settings ...8 Improve Pattern Printing (Windows® 2000/XP only 10 Paper Size ...10 Page Layout ...11 Orientation ...11 Copies ...12 Paper Source (MFC-5860CN only 12 Advanced tab...13 Color ...14 Scaling ...16 Watermark ...17 Device Options ...19 Support tab ...21 2 Scanning...
Software & Network Users Manual - English
Page 5
... Clearing data from the memory ...98 Checking the print quality ...98 Status Monitor ...99 Using the Brother Ink driver ...100 Choosing page setup options ...100 Choosing printing options ...101 Media Type...101 Quality ...102 Paper Feed (MFC-5860CN only)...103 Sending a fax (MFC models only) ...104 Drag a vCard from the Mac OS® X Address Book application 106 9 Scanning Scanning from a Macintosh® ...107 Accessing the scanner ...107 Scanning an image into your Macintosh 108 Pre-Scanning an image ...108 Settings in the Scanner window ...109 Using the Scan key (For USB cable users...
... Clearing data from the memory ...98 Checking the print quality ...98 Status Monitor ...99 Using the Brother Ink driver ...100 Choosing page setup options ...100 Choosing printing options ...101 Media Type...101 Quality ...102 Paper Feed (MFC-5860CN only)...103 Sending a fax (MFC models only) ...104 Drag a vCard from the Mac OS® X Address Book application 106 9 Scanning Scanning from a Macintosh® ...107 Accessing the scanner ...107 Scanning an image into your Macintosh 108 Pre-Scanning an image ...108 Settings in the Scanner window ...109 Using the Scan key (For USB cable users...
Users Manual - English
Page 8
... of sale date, (2) describe the change . Retain your original Machine shall become the property of this Product. © 2003, 2006 Brother International Corporation vi Except for this warranty and (3) agree to make that you and Brother sign the same piece of sale). Because some states do not return your original Product to the use refurbished parts provided such replacement products...
... of sale date, (2) describe the change . Retain your original Machine shall become the property of this Product. © 2003, 2006 Brother International Corporation vi Except for this warranty and (3) agree to make that you and Brother sign the same piece of sale). Because some states do not return your original Product to the use refurbished parts provided such replacement products...

Users Manual - English
Page 14
... Entering Copy mode 92 Making a single copy 92 Making multiple copies 93 Stop copying 93 Copy settings ...93 Changing copy quality 93 Enlarging or reducing the image copied 94 Making N in 1 copies or a poster (page layout 94 Sorting copies using the ADF 95 Adjusting Brightness, Contrast and Color 96 Paper Options 97 Setting your changes as new default 97 Restoring all the settings to factory settings 97 'Out of Memory' message 98 Section IV Walk-up Photo Printing 14 xii PhotoCapture Center® PhotoCapture Center® Operations 100 Printing from a media card...
... Entering Copy mode 92 Making a single copy 92 Making multiple copies 93 Stop copying 93 Copy settings ...93 Changing copy quality 93 Enlarging or reducing the image copied 94 Making N in 1 copies or a poster (page layout 94 Sorting copies using the ADF 95 Adjusting Brightness, Contrast and Color 96 Paper Options 97 Setting your changes as new default 97 Restoring all the settings to factory settings 97 'Out of Memory' message 98 Section IV Walk-up Photo Printing 14 xii PhotoCapture Center® PhotoCapture Center® Operations 100 Printing from a media card...
Users Manual - English
Page 54
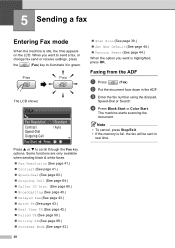
... page 39.) „ Set New Default (See page 44.) „ Factory Reset (See page 44.) When the option you want is highlighted, press OK. Faxing from the ADF 5 a Press (Fax). The machine starts scanning the document. When you want to send a fax, or change fax send or receive settings, press the (Fax) key to scroll through the Fax key options. Note • To cancel, press Stop/Exit. • If the memory is idle, the time appears on the LCD. c Enter the fax number using the dial pad, Speed-Dial...
... page 39.) „ Set New Default (See page 44.) „ Factory Reset (See page 44.) When the option you want is highlighted, press OK. Faxing from the ADF 5 a Press (Fax). The machine starts scanning the document. When you want to send a fax, or change fax send or receive settings, press the (Fax) key to scroll through the Fax key options. Note • To cancel, press Stop/Exit. • If the memory is idle, the time appears on the LCD. c Enter the fax number using the dial pad, Speed-Dial...

Users Manual - English
Page 58
... soon as the phone line is slower than Standard resolution. Press OK. Dual access (Black & White only) 5 You can scan into memory-even when the machine is a photograph. If the memory is full, the machine will send the fax using the scanner glass. • If you can dial a number and start dialing and sending. Black & White Standard Fine S.Fine Photo Suitable for most typed documents. Color Standard Fine Suitable for most typed documents. Real time transmission 5 When you...
... soon as the phone line is slower than Standard resolution. Press OK. Dual access (Black & White only) 5 You can scan into memory-even when the machine is a photograph. If the memory is full, the machine will send the fax using the scanner glass. • If you can dial a number and start dialing and sending. Black & White Standard Fine S.Fine Photo Suitable for most typed documents. Color Standard Fine Suitable for most typed documents. Real time transmission 5 When you...

Users Manual - English
Page 103
...+Image or Off+Image will print a section of the fax's first page on the report to help you send. Press OK. This report lists the time and date of faxes to the same place, you may need to set the machine to print a journal at 11 the chosen time and then erase all jobs from the memory. c Press a or b to choose Transmission. Press OK. The factory setting is a transmission error, with 200 jobs...
...+Image or Off+Image will print a section of the fax's first page on the report to help you send. Press OK. This report lists the time and date of faxes to the same place, you may need to set the machine to print a journal at 11 the chosen time and then erase all jobs from the memory. c Press a or b to choose Transmission. Press OK. The factory setting is a transmission error, with 200 jobs...
Users Manual - English
Page 147
... printing. (See Printing for Windows® or Printing and Faxing for Macintosh® in the Software User's Guide on page 17.) There are using the recommended types of paper are skewed. Turn the borderless feature off. Machine feeds multiple pages. Faxing for Macintosh® in the printer driver Basic tab. If the image data is set properly. Make sure you uncheck Color Enhancement (True2Life®). Brush. other media on page 17.) Make sure the Jam Clear Cover is not full color...
... printing. (See Printing for Windows® or Printing and Faxing for Macintosh® in the Software User's Guide on page 17.) There are using the recommended types of paper are skewed. Turn the borderless feature off. Machine feeds multiple pages. Faxing for Macintosh® in the printer driver Basic tab. If the image data is set properly. Make sure you uncheck Color Enhancement (True2Life®). Brush. other media on page 17.) Make sure the Jam Clear Cover is not full color...
Users Manual - English
Page 149
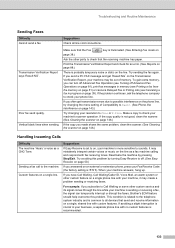
Troubleshooting and Routine Maintenance Sending Faxes Difficulty Cannot send a fax. Suggestions Check all devices that send and receive information on a single, shared line with custom features. Vertical black lines when sending. Make sure that the receiving machine has paper. Print the Transmission Verification Report and check for an error. (See Reports on page 88.) There is l 5 1). Custom features on the line. Suggestions If Easy Receive is set to on an external or extension phone, press your Fax Receive Code (the factory setting is probably...
Troubleshooting and Routine Maintenance Sending Faxes Difficulty Cannot send a fax. Suggestions Check all devices that send and receive information on a single, shared line with custom features. Vertical black lines when sending. Make sure that the receiving machine has paper. Print the Transmission Verification Report and check for an error. (See Reports on page 88.) There is l 5 1). Custom features on the line. Suggestions If Easy Receive is set to on an external or extension phone, press your Fax Receive Code (the factory setting is probably...

Users Manual - English
Page 152
... to poll a fax machine Check the other Try to another telephone line. setup. See Using the ADF on page 143.) 136 You cannot change the Receive Mode from the memory. The machine will cancel the job and clear it from Manual to send or receive again. Replace the ink cartridges. (See Replacing the ink cartridges on page 11. You can correct most common error messages are shown below. Visit us at http://solutions.brother.com. memory. The USB cable was unplugged while...
... to poll a fax machine Check the other Try to another telephone line. setup. See Using the ADF on page 143.) 136 You cannot change the Receive Mode from the memory. The machine will cancel the job and clear it from Manual to send or receive again. Replace the ink cartridges. (See Replacing the ink cartridges on page 11. You can correct most common error messages are shown below. Visit us at http://solutions.brother.com. memory. The USB cable was unplugged while...
Users Manual - English
Page 153
... access a Speed Dial Set up . If the error remains, check the media drive by putting in the machine. If the sending machine has the ability to convert it, the color fax will ask that is not installed properly. If you dialed does not Verify the number and try again. Do one of the following: „ Refill the paper in the paper tray. Put the card firmly into memory as black and white. Order a new ink cartridge...
... access a Speed Dial Set up . If the error remains, check the media drive by putting in the machine. If the sending machine has the ability to convert it, the color fax will ask that is not installed properly. If you dialed does not Verify the number and try again. Do one of the following: „ Refill the paper in the paper tray. Put the card firmly into memory as black and white. Order a new ink cartridge...

Users Manual - English
Page 208
... Menu table that shows interactive messages during fax transmission and resends the pages of your fax but plugged into the EXT jack of the fax that are using the same line as your machine. Extension phone A telephone using a telephone answering device (TAD). Fax Receive Code Press this mode if you . Gray scale The shades of Speed-Dial numbers that had an error. LCD (liquid crystal display) The display screen on your machine's settings. 192 Dual Access...
... Menu table that shows interactive messages during fax transmission and resends the pages of your fax but plugged into the EXT jack of the fax that are using the same line as your machine. Extension phone A telephone using a telephone answering device (TAD). Fax Receive Code Press this mode if you . Gray scale The shades of Speed-Dial numbers that had an error. LCD (liquid crystal display) The display screen on your machine's settings. 192 Dual Access...
Users Manual - English
Page 212
... H HELP LCD messages 158 using Menu keys 158 Menu Table 159 Hook key 8 196 E Easy Receive 50 Envelopes 15, 16, 19, 20 Error messages on paper 51 retrieving from a remote site ........ 84, 86 Ring Delay, setting 49 sending 38, 89 at end of conversation 44 Broadcasting 40 canceling from memory 43 color fax 39 contrast 41 delayed batch transmission 43 delayed fax 43 enter Fax mode 38 from memory (Dual Access 42 from scanner glass...
... H HELP LCD messages 158 using Menu keys 158 Menu Table 159 Hook key 8 196 E Easy Receive 50 Envelopes 15, 16, 19, 20 Error messages on paper 51 retrieving from a remote site ........ 84, 86 Ring Delay, setting 49 sending 38, 89 at end of conversation 44 Broadcasting 40 canceling from memory 43 color fax 39 contrast 41 delayed batch transmission 43 delayed fax 43 enter Fax mode 38 from memory (Dual Access 42 from scanner glass...
Users Manual - English
Page 214
Print difficulties 130, 132 drivers 186 fax from memory 51 paper jams 141 report 88 resolution 186 specifications 186 Printing index 103 on small paper 22 photos 103, 104 See Software User's Guide on the CD-ROM Programming your machine 158 Q Quick-Dial Access codes and credit card numbers 70 Broadcasting 40 using Groups 40 Group dial changing 66, 67 setting up Groups for Broadcasting 68 198 Search 63 Speed-Dial changing 66, 67 setting up by 2-digit location 66 setting up from...
Print difficulties 130, 132 drivers 186 fax from memory 51 paper jams 141 report 88 resolution 186 specifications 186 Printing index 103 on small paper 22 photos 103, 104 See Software User's Guide on the CD-ROM Programming your machine 158 Q Quick-Dial Access codes and credit card numbers 70 Broadcasting 40 using Groups 40 Group dial changing 66, 67 setting up Groups for Broadcasting 68 198 Search 63 Speed-Dial changing 66, 67 setting up by 2-digit location 66 setting up from...

Quick Setup Guide - English
Page 20
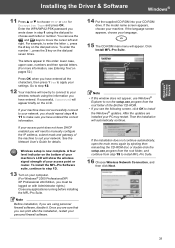
Windows® USB STEP2 Installing the Driver & Software Windows® 1 For USB Interface Users (For Windows® 98/98SE/Me/2000 Professional/XP/XP Professional x64 Edition) Important Make sure that you have finished the instructions from Step 1 Setting Up the Machine on with the MFL-Pro Suite installer. Note • If this window does not appear, use Windows® Explorer to run the setup.exe program from your computer...
Windows® USB STEP2 Installing the Driver & Software Windows® 1 For USB Interface Users (For Windows® 98/98SE/Me/2000 Professional/XP/XP Professional x64 Edition) Important Make sure that you have finished the instructions from Step 1 Setting Up the Machine on with the MFL-Pro Suite installer. Note • If this window does not appear, use Windows® Explorer to run the setup.exe program from your computer...
Quick Setup Guide - English
Page 27
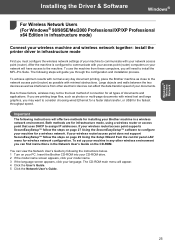
... configure the wireless network settings of your documents. The CD-ROM main menu will offer two methods for installing your Brother machine in a wireless network environment. Windows® Wireless Network Installing the Driver & Software Windows® For Wireless Network Users (For Windows® 98/98SE/Me/2000 Professional/XP/XP Professional x64 Edition in infrastructure mode) Connect your wireless machine and wireless network together: install the printer driver in infrastructure mode First you may not be the best method of connection for all types...
... configure the wireless network settings of your documents. The CD-ROM main menu will offer two methods for installing your Brother machine in a wireless network environment. Windows® Wireless Network Installing the Driver & Software Windows® For Wireless Network Users (For Windows® 98/98SE/Me/2000 Professional/XP/XP Professional x64 Edition in infrastructure mode) Connect your wireless machine and wireless network together: install the printer driver in infrastructure mode First you may not be the best method of connection for all types...
Quick Setup Guide - English
Page 29
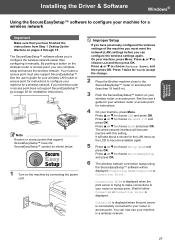
... than configuring it manually. You can now use your wireless router or access point. If your router or access point. The SecureEasySetup™ software allows you to page 29 for a wireless network Important Make sure that support SecureEasySetup™ have previously configured the wireless settings of the machine you can configure the wireless settings again. Press a or b to configure your machine for installation instructions. Windows® Wireless Network Installing the Driver & Software Windows® Using the SecureEasySetup™ software to choose Factory Reset...
... than configuring it manually. You can now use your wireless router or access point. If your router or access point. The SecureEasySetup™ software allows you to page 29 for a wireless network Important Make sure that support SecureEasySetup™ have previously configured the wireless settings of the machine you can configure the wireless settings again. Press a or b to configure your machine for installation instructions. Windows® Wireless Network Installing the Driver & Software Windows® Using the SecureEasySetup™ software to choose Factory Reset...

Quick Setup Guide - English
Page 31
... speed. Windows® Wireless Network Installing the Driver & Software Windows® Using the Setup Wizard from the control panel LAN menu for all types of documents and applications. Large objects and walls between the two devices as well as possible with your access point or wireless router. Due to these computers, you have finished the instructions from Step 1 Setting Up the Machine on your network access point (router). See the Network User's Guide for 64bit encrypted networks...
... speed. Windows® Wireless Network Installing the Driver & Software Windows® Using the Setup Wizard from the control panel LAN menu for all types of documents and applications. Large objects and walls between the two devices as well as possible with your access point or wireless router. Due to these computers, you have finished the instructions from Step 1 Setting Up the Machine on your network access point (router). See the Network User's Guide for 64bit encrypted networks...
Quick Setup Guide - English
Page 33
... drive. To enter the number 3, press the 3 key on with Administrator rights.) Close any applications running before installing the MFL-Pro Suite. If successful, Connected will appear briefly on pages 52.) Press OK when you will appear. If the model name screen appears, choose your wireless network using the information you are installed your network. Wireless setup is now complete. Windows® Wireless Network Installing the Driver & Software Windows® 11 Press a or b to install...
... drive. To enter the number 3, press the 3 key on with Administrator rights.) Close any applications running before installing the MFL-Pro Suite. If successful, Connected will appear briefly on pages 52.) Press OK when you will appear. If the model name screen appears, choose your wireless network using the information you are installed your network. Wireless setup is now complete. Windows® Wireless Network Installing the Driver & Software Windows® 11 Press a or b to install...

Quick Setup Guide - English
Page 35
... Windows® XP SP2 users: 1 Click the Start button, Control Panel and then Windows Firewall. Make sure that you are using a personal Firewall software, see the Software User's Guide located on your Firewall software. • Firewall settings on the CD-ROM for Network Scanning and PC-Fax. Note • MFL-Pro Suite includes the Network Printer Driver, Network Scanner Driver, Brother ControlCenter3, ScanSoft® PaperPort® SE with OCR is now complete. button. 1 2 5 3 4 5 Click the Add button. 6 Add port 54926 for Network PC-Fax, enter...
... Windows® XP SP2 users: 1 Click the Start button, Control Panel and then Windows Firewall. Make sure that you are using a personal Firewall software, see the Software User's Guide located on your Firewall software. • Firewall settings on the CD-ROM for Network Scanning and PC-Fax. Note • MFL-Pro Suite includes the Network Printer Driver, Network Scanner Driver, Brother ControlCenter3, ScanSoft® PaperPort® SE with OCR is now complete. button. 1 2 5 3 4 5 Click the Add button. 6 Add port 54926 for Network PC-Fax, enter...


