Network Users Manual - English
Page 50
... been detected. i Press OK. (Windows®) You have completed the wireless network setup. Connecting to the factory settings and try again. Connection succeeded. - Check that only one router or access point has the SecureEasySetup™ mode, the Wi-Fi Protected Setup™ ... available for DCP-365CN, DCP-395CN and MFC-295CN) LCD messages when using the SES/WPS/AOSS control panel menu LCD shows Setting WLAN Connecting SES Connecting WPS Connecting AOSS Connected Connection Error No Access Point Connection Fail Connection status Searching or accessing the access point, ...
... been detected. i Press OK. (Windows®) You have completed the wireless network setup. Connecting to the factory settings and try again. Connection succeeded. - Check that only one router or access point has the SecureEasySetup™ mode, the Wi-Fi Protected Setup™ ... available for DCP-365CN, DCP-395CN and MFC-295CN) LCD messages when using the SES/WPS/AOSS control panel menu LCD shows Setting WLAN Connecting SES Connecting WPS Connecting AOSS Connected Connection Error No Access Point Connection Fail Connection status Searching or accessing the access point, ...
Network Users Manual - English
Page 52
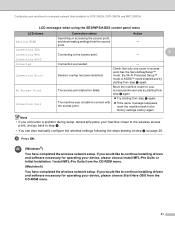
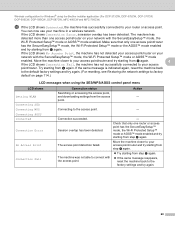
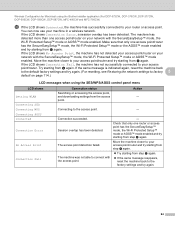
... has been detected. i Press . (Windows®) You have completed the wireless network setup. The access point detection failed. Check that only one router or access point has the SecureEasySetup™ mode, the Wi-Fi Protected Setup™ mode or AOSS™ mode enabled... (Not available for DCP-365CN, DCP-395CN and MFC-295CN) LCD messages when using the SES/WPS/AOSS control panel menu LCD shows Setting WLAN Connecting SES Connecting WPS Connecting AOSS Connected Connection Error No Access Point Connection Fail Connection status Action Searching or accessing the access point, and...
... has been detected. i Press . (Windows®) You have completed the wireless network setup. The access point detection failed. Check that only one router or access point has the SecureEasySetup™ mode, the Wi-Fi Protected Setup™ mode or AOSS™ mode enabled... (Not available for DCP-365CN, DCP-395CN and MFC-295CN) LCD messages when using the SES/WPS/AOSS control panel menu LCD shows Setting WLAN Connecting SES Connecting WPS Connecting AOSS Connected Connection Error No Access Point Connection Fail Connection status Action Searching or accessing the access point, and...

Network Users Manual - English
Page 61
Wireless configuration for Windows® using the Brother installer application (For DCP-373CW, DCP-375CW, DCP-377CW, DCP-593CW, DCP-595CW, DCP-597CW, MFC-495CW and MFC-795CW) h Temporarily connect the Brother wireless device to your access point using a network cable (not included) and click Next. 4 i Choose the machine you wish to configure, and click Next. If the list is "BRNxxxxxxxxxxxx". 52 Note The default Node name is blank, check if the access point and the machine are powered on, and then click Refresh.
Wireless configuration for Windows® using the Brother installer application (For DCP-373CW, DCP-375CW, DCP-377CW, DCP-593CW, DCP-595CW, DCP-597CW, MFC-495CW and MFC-795CW) h Temporarily connect the Brother wireless device to your access point using a network cable (not included) and click Next. 4 i Choose the machine you wish to configure, and click Next. If the list is "BRNxxxxxxxxxxxx". 52 Note The default Node name is blank, check if the access point and the machine are powered on, and then click Refresh.
Network Users Manual - English
Page 65
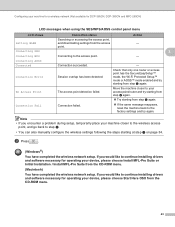
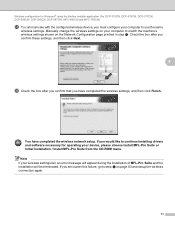
...this failure, go to continue installing drivers and software necessary for Windows® using the Brother installer application (For DCP-373CW, DCP-375CW, DCP-377CW, DCP-593CW, DCP-595CW, DCP-597CW, MFC-495CW and MFC-795CW) p Disconnect the network cable between your access point (hub or router) and the... machine, and click Next. 4 q Check the box after you confirm that you would like to step d on page 50 and setup the wireless connection again. 56 You have ...
...this failure, go to continue installing drivers and software necessary for Windows® using the Brother installer application (For DCP-373CW, DCP-375CW, DCP-377CW, DCP-593CW, DCP-595CW, DCP-597CW, MFC-495CW and MFC-795CW) p Disconnect the network cable between your access point (hub or router) and the... machine, and click Next. 4 q Check the box after you confirm that you would like to step d on page 50 and setup the wireless connection again. 56 You have ...
Network Users Manual - English
Page 69
...Check that only one access point/router on your access point/router and try again. 60 You can now use your network with the access point. - Wireless configuration for Windows® using the SES/WPS/AOSS control panel menu LCD shows Setting WLAN Connecting SES Connecting WPS Connecting AOSS Connected Connection Error No Access Point Connection Fail Connection... using the Brother installer application (For DCP-373CW, DCP-375CW, DCP-377CW, DCP-593CW, DCP-595CW, DCP-597CW, MFC-495CW and MFC-795CW) l If the LCD shows Connected, the machine has successfully connected to your ...
...Check that only one access point/router on your access point/router and try again. 60 You can now use your network with the access point. - Wireless configuration for Windows® using the SES/WPS/AOSS control panel menu LCD shows Setting WLAN Connecting SES Connecting WPS Connecting AOSS Connected Connection Error No Access Point Connection Fail Connection... using the Brother installer application (For DCP-373CW, DCP-375CW, DCP-377CW, DCP-593CW, DCP-595CW, DCP-597CW, MFC-495CW and MFC-795CW) l If the LCD shows Connected, the machine has successfully connected to your ...

Network Users Manual - English
Page 75
....x.x IP address to a network. 4 You can see the Brother wireless machine in the list. and check the Network Connection Details. Wireless configuration for Windows® using the Brother installer application (For DCP-373CW, DCP-375CW, DCP-377CW, DCP-593CW, DCP-595CW, DCP-597CW, MFC-495CW and MFC-795CW) j To communicate with the install skipping steps h, i and...
....x.x IP address to a network. 4 You can see the Brother wireless machine in the list. and check the Network Connection Details. Wireless configuration for Windows® using the Brother installer application (For DCP-373CW, DCP-375CW, DCP-377CW, DCP-593CW, DCP-595CW, DCP-597CW, MFC-495CW and MFC-795CW) j To communicate with the install skipping steps h, i and...
Network Users Manual - English
Page 80
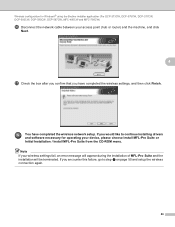
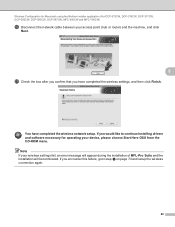
... Wireless configuration for Windows® using the Brother installer application (For DCP-373CW, DCP-375CW, DCP-377CW, DCP-593CW, DCP-595CW, DCP-597CW, MFC-495CW and MFC-795CW) r To communicate with the configured ... / Install MFL-Pro Suite from the CD-ROM menu. Check the box after you confirm these settings, and then click Next. 4 s Check the box after you confirm that you encounter this failure, ...Finish. Note If your computer to step e on page 63 and setup the wireless connection again. 71 If you have completed the wireless network setup. Manually change the wireless settings on ...
... Wireless configuration for Windows® using the Brother installer application (For DCP-373CW, DCP-375CW, DCP-377CW, DCP-593CW, DCP-595CW, DCP-597CW, MFC-495CW and MFC-795CW) r To communicate with the configured ... / Install MFL-Pro Suite from the CD-ROM menu. Check the box after you confirm these settings, and then click Next. 4 s Check the box after you confirm that you encounter this failure, ...Finish. Note If your computer to step e on page 63 and setup the wireless connection again. 71 If you have completed the wireless network setup. Manually change the wireless settings on ...

Network Users Manual - English
Page 85
If the list is "BRNxxxxxxxxxxxx". 76 Wireless Configuration for Macintosh using the Brother installer application (For DCP-373CW, DCP-375CW, DCP-377CW, DCP-593CW, DCP-595CW, DCP-597CW, MFC-495CW and MFC-795CW) h Temporarily connect the Brother wireless device to your access point using a network cable and click Next. 5 i Choose the machine you wish to configure, and click Next. Note The default Node name is blank, check if the access point and the machine are powered on, and then click Refresh.
If the list is "BRNxxxxxxxxxxxx". 76 Wireless Configuration for Macintosh using the Brother installer application (For DCP-373CW, DCP-375CW, DCP-377CW, DCP-593CW, DCP-595CW, DCP-597CW, MFC-495CW and MFC-795CW) h Temporarily connect the Brother wireless device to your access point using a network cable and click Next. 5 i Choose the machine you wish to configure, and click Next. Note The default Node name is blank, check if the access point and the machine are powered on, and then click Refresh.
Network Users Manual - English
Page 89
... the machine, and click Next. 5 q Check the box after you confirm that you encounter this failure, go to continue installing drivers and software necessary for Macintosh using the Brother installer application (For DCP-373CW, DCP-375CW,... DCP-377CW, DCP-593CW, DCP-595CW, DCP-597CW, MFC-495CW and MFC-795CW) p Disconnect the network cable between your... d on page 74 and setup the wireless connection again. 80 You have completed the wireless settings, and then click Finish.
... the machine, and click Next. 5 q Check the box after you confirm that you encounter this failure, go to continue installing drivers and software necessary for Macintosh using the Brother installer application (For DCP-373CW, DCP-375CW,... DCP-377CW, DCP-593CW, DCP-595CW, DCP-597CW, MFC-495CW and MFC-795CW) p Disconnect the network cable between your... d on page 74 and setup the wireless connection again. 80 You have completed the wireless settings, and then click Finish.
Network Users Manual - English
Page 93
...more than one access point/router on page 114.) LCD messages when using the Brother installer application (For DCP-373CW, DCP-375CW, DCP-377CW, DCP-593CW, DCP-595CW, DCP-597CW, MFC-495CW and MFC-795CW) l If the LCD shows Connected, the machine has successfully connected to your... access point/router and try again. (For resetting, see Restoring the network settings to the factory settings and try again. 84 If the same message is indicated again, reset the machine back to your machine in a wireless network. Check that only one...
...more than one access point/router on page 114.) LCD messages when using the Brother installer application (For DCP-373CW, DCP-375CW, DCP-377CW, DCP-593CW, DCP-595CW, DCP-597CW, MFC-495CW and MFC-795CW) l If the LCD shows Connected, the machine has successfully connected to your... access point/router and try again. (For resetting, see Restoring the network settings to the factory settings and try again. 84 If the same message is indicated again, reset the machine back to your machine in a wireless network. Check that only one...
Network Users Manual - English
Page 98
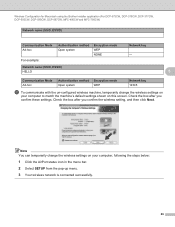
.... 2 Select SETUP from the pop-up menu. 3 Your wireless network is connected successfully. 89 Check the box after you confirm the wireless setting, and then click Next. Wireless Configuration for Macintosh using the Brother installer application (For DCP-373CW, DCP-375CW, DCP-377CW, DCP-593CW, DCP...-595CW, DCP-597CW, MFC-495CW and MFC-795CW) Network name:(SSID, ESSID) Communication Mode Ad-hoc For example: Authentication method Open system Encryption mode WEP NONE Network key - Check the box ...
.... 2 Select SETUP from the pop-up menu. 3 Your wireless network is connected successfully. 89 Check the box after you confirm the wireless setting, and then click Next. Wireless Configuration for Macintosh using the Brother installer application (For DCP-373CW, DCP-375CW, DCP-377CW, DCP-593CW, DCP...-595CW, DCP-597CW, MFC-495CW and MFC-795CW) Network name:(SSID, ESSID) Communication Mode Ad-hoc For example: Authentication method Open system Encryption mode WEP NONE Network key - Check the box ...
Network Users Manual - English
Page 103
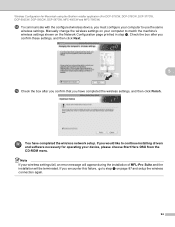
...Check the box after you confirm that you have completed the wireless network setup. If you would like to use the same wireless settings. Note If your computer to step e on the Network Configuration page printied in step p. Wireless Configuration for Macintosh using the Brother... installer application (For DCP-373CW, DCP-375CW, DCP-377CW, DCP-593CW, DCP-595CW, DCP-597CW, MFC-495CW and MFC-795CW) r To ...machine's wireless settings shown on page 87 and setup the wireless connection again. 94 Manually change the wireless settings on your wireless settings ...
...Check the box after you confirm that you have completed the wireless network setup. If you would like to use the same wireless settings. Note If your computer to step e on the Network Configuration page printied in step p. Wireless Configuration for Macintosh using the Brother... installer application (For DCP-373CW, DCP-375CW, DCP-377CW, DCP-593CW, DCP-595CW, DCP-597CW, MFC-495CW and MFC-795CW) r To ...machine's wireless settings shown on page 87 and setup the wireless connection again. 94 Manually change the wireless settings on your wireless settings ...
Network Users Manual - English
Page 106
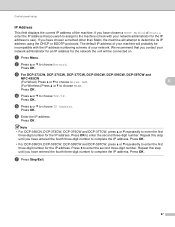
... to determine its IP address using the DHCP or BOOTP protocols. c For DCP-373CW, DCP-375CW, DCP-377CW, DCP-593CW, DCP-595CW, DCP-597CW and MFC-495CW (For Wired) Press a or b to choose Wired LAN. 6 (For Wireless) Press a or b to choose Network. We recommend that you have chosen .../Exit. 97 If you have chosen a method other than Static, the machine will probably be connected on. f Enter the IP address. Repeat this step until you wish to assign to the machine (check with the IP address numbering scheme of your network administrator for the IP address to complete the...
... to determine its IP address using the DHCP or BOOTP protocols. c For DCP-373CW, DCP-375CW, DCP-377CW, DCP-593CW, DCP-595CW, DCP-597CW and MFC-495CW (For Wired) Press a or b to choose Wired LAN. 6 (For Wireless) Press a or b to choose Network. We recommend that you have chosen .../Exit. 97 If you have chosen a method other than Static, the machine will probably be connected on. f Enter the IP address. Repeat this step until you wish to assign to the machine (check with the IP address numbering scheme of your network administrator for the IP address to complete the...
Network Users Manual - English
Page 140
...of the Brother machine in some instances it can take up to two minutes for the print server to load its IP address after setting the IP address). 131 The LCD displays LAN Active: The print server is connected to print. c Print the Network Configuration List and check if the... Terminal icon. 4 Try pinging the print server from the host operating system command prompt with an Ethernet cable connection Make sure you have completed the IP address setting of the Brother print server according to Chapter 2 of this User's Guide before installing the network print software or printer driver...
...of the Brother machine in some instances it can take up to two minutes for the print server to load its IP address after setting the IP address). 131 The LCD displays LAN Active: The print server is connected to print. c Print the Network Configuration List and check if the... Terminal icon. 4 Try pinging the print server from the host operating system command prompt with an Ethernet cable connection Make sure you have completed the IP address setting of the Brother print server according to Chapter 2 of this User's Guide before installing the network print software or printer driver...
Network Users Manual - English
Page 141
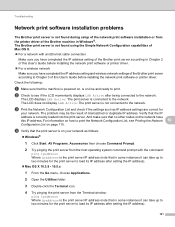
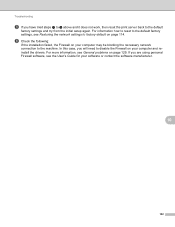
... how to reset to the default factory settings, see Restoring the network settings to the machine. f Check the following: If the installation failed, the Firewall on your computer may be blocking the necessary network connection to factory default on page 114. For more information, see the User's Guide for your software or...
... how to reset to the default factory settings, see Restoring the network settings to the machine. f Check the following: If the installation failed, the Firewall on your computer may be blocking the necessary network connection to factory default on page 114. For more information, see the User's Guide for your software or...
Network Users Manual - English
Page 144
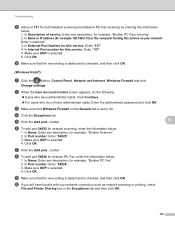
In Internal Port number for this service: Enter "137". 4. c Make sure that Windows Firewall on your network connection such as network scanning or printing, check File and Printer Sharing box in the Exceptions tab and then click OK. 10 10 135 In Port number:...;): a Click the button, Control Panel, Network and Internet, Windows Firewall and click Change settings. In Name: Enter any description, for example, "Brother Scanner". 2. In Description of service: Enter any description, for network PC Fax, enter the information below: 1. b When the User Account Control ...
In Internal Port number for this service: Enter "137". 4. c Make sure that Windows Firewall on your network connection such as network scanning or printing, check File and Printer Sharing box in the Exceptions tab and then click OK. 10 10 135 In Port number:...;): a Click the button, Control Panel, Network and Internet, Windows Firewall and click Change settings. In Name: Enter any description, for example, "Brother Scanner". 2. In Description of service: Enter any description, for network PC Fax, enter the information below: 1. b When the User Account Control ...
Network Users Manual - English
Page 150
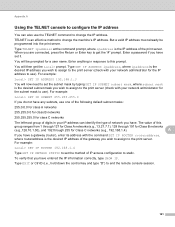
...IP ADDRESS 192.168.1.3 You will be programmed into the print server. A If you have any subnets, use one of the following default subnet masks: 255.0.0.0 for class A networks 255.255.0.0 for class B networks 255.255... is the desired IP address you wish to assign to the print server (check with the command SET IP ROUTER routeraddress, where routeraddress is the desired subnet mask you wish to...mask is the desired IP address of the gateway you wish to assign to use). When you are connected, press the Return or Enter key to change the machine's IP address. Appendix A Using the TELNET ...
...IP ADDRESS 192.168.1.3 You will be programmed into the print server. A If you have any subnets, use one of the following default subnet masks: 255.0.0.0 for class A networks 255.255.0.0 for class B networks 255.255... is the desired IP address you wish to assign to the print server (check with the command SET IP ROUTER routeraddress, where routeraddress is the desired subnet mask you wish to...mask is the desired IP address of the gateway you wish to assign to use). When you are connected, press the Return or Enter key to change the machine's IP address. Appendix A Using the TELNET ...
Software Users Manual - English
Page 36
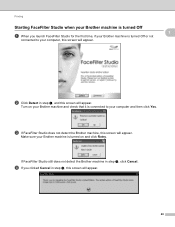
... d If you launch FaceFilter Studio for the first time, if your Brother machine is turned Off or not connected to your computer and then click Yes. Make sure your Brother machine is connected to your Brother machine and check that it is turned on and click Retry. c If FaceFilter Studio does... not detect the Brother machine, this screen will appear. 29 If FaceFilter Studio still does not detect the Brother machine in step a, and ...
... d If you launch FaceFilter Studio for the first time, if your Brother machine is turned Off or not connected to your computer and then click Yes. Make sure your Brother machine is connected to your Brother machine and check that it is turned on and click Retry. c If FaceFilter Studio does... not detect the Brother machine, this screen will appear. 29 If FaceFilter Studio still does not detect the Brother machine in step a, and ...
Software Users Manual - English
Page 109
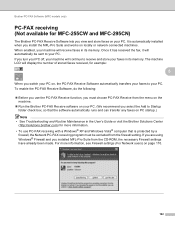
...received, for example: 5 New Fax 03 03 When you turn your PC off, your PC. Brother PC-FAX Software (MFC models only) PC-FAX receiving (Not available for MFC-255CW and MFC-295CN) 5 The Brother PC-FAX Receive Software lets you installed MFL-Pro Suite from the CD-ROM, the necessary Firewall ... protected by a firewall, the Network PC-FAX receiving program must be sent to Startup folder check box, so that the software automatically runs and can transfer any faxes on locally or network connected machines. It is automatically installed when you select the Add to your PC. (We recommend...
...received, for example: 5 New Fax 03 03 When you turn your PC off, your PC. Brother PC-FAX Software (MFC models only) PC-FAX receiving (Not available for MFC-255CW and MFC-295CN) 5 The Brother PC-FAX Receive Software lets you installed MFL-Pro Suite from the CD-ROM, the necessary Firewall ... protected by a firewall, the Network PC-FAX receiving program must be sent to Startup folder check box, so that the software automatically runs and can transfer any faxes on locally or network connected machines. It is automatically installed when you select the Add to your PC. (We recommend...
Software Users Manual - English
Page 121
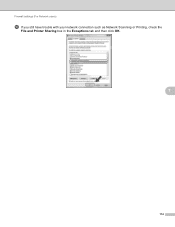
Firewall settings (For Network users) j If you still have trouble with your network connection such as Network Scanning or Printing, check the File and Printer Sharing box in the Exceptions tab and then click OK. 7 114
Firewall settings (For Network users) j If you still have trouble with your network connection such as Network Scanning or Printing, check the File and Printer Sharing box in the Exceptions tab and then click OK. 7 114


