
Quick Setup Guide - English
Page 2
... BELOW =REPACKING= 1 2 3 4 5 6 XA8545-021 PRINTED IN CHINA Remove the power plug from the retaining ring. 7 Remove the retaining ring. Push the latch levers into the sewing position. ***READ ME FIRST*** Should you still need assistance, call 1-800-284-4357. *KEEP ALL PACKING MATERIAL AND CARTON FOR FUTURE TRANSPORT. It may bend...
... BELOW =REPACKING= 1 2 3 4 5 6 XA8545-021 PRINTED IN CHINA Remove the power plug from the retaining ring. 7 Remove the retaining ring. Push the latch levers into the sewing position. ***READ ME FIRST*** Should you still need assistance, call 1-800-284-4357. *KEEP ALL PACKING MATERIAL AND CARTON FOR FUTURE TRANSPORT. It may bend...
Users Manual - English
Page 2
...the bobbin, or changing the presser foot. 15. Never operate this machine where aerosol (spray) products are being administered. 8. Do not operate this sewing machine if it has a damaged cord or plug, if it to the nearest authorized dealer or service center for use a bent needle. 13. ... foot controller free from all instructions before changing the light bulb. To unplug, grasp the plug and pull, not the cord. 10. The sewing machine should be supervised to the off , then remove plug from outlet. 9. Replace bulb with this machine outdoors. 7. Use only accessories recommended...
...the bobbin, or changing the presser foot. 15. Never operate this machine where aerosol (spray) products are being administered. 8. Do not operate this sewing machine if it has a damaged cord or plug, if it to the nearest authorized dealer or service center for use a bent needle. 13. ... foot controller free from all instructions before changing the light bulb. To unplug, grasp the plug and pull, not the cord. 10. The sewing machine should be supervised to the off , then remove plug from outlet. 9. Replace bulb with this machine outdoors. 7. Use only accessories recommended...
Users Manual - English
Page 6
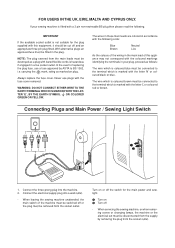
... WITH THE LETTER 'E', BY THE EARTH SYMBOL OR COLORED GREEN OR YELLOW. Connect the electrical supply plug into the machine. 2. When servicing the sewing machine, or when removing covers or changing lamps, the machine or the electrical set must be disconnected from the supply by ASTA to BS 1362...plug. FOR USERS IN THE UK, EIRE, MALTA AND CYPRUS ONLY. carrying the ASA mark, rating as a plug with the following . When leaving the sewing machine unattended, the main switch of replacing the plug fuse, use plugs with the letter 'L' or coloured red or brown. Turn on or off - ...
... WITH THE LETTER 'E', BY THE EARTH SYMBOL OR COLORED GREEN OR YELLOW. Connect the electrical supply plug into the machine. 2. When servicing the sewing machine, or when removing covers or changing lamps, the machine or the electrical set must be disconnected from the supply by ASTA to BS 1362...plug. FOR USERS IN THE UK, EIRE, MALTA AND CYPRUS ONLY. carrying the ASA mark, rating as a plug with the following . When leaving the sewing machine unattended, the main switch of replacing the plug fuse, use plugs with the letter 'L' or coloured red or brown. Turn on or off - ...
Users Manual - English
Page 30
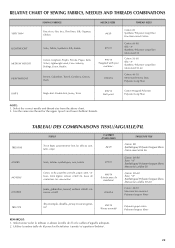
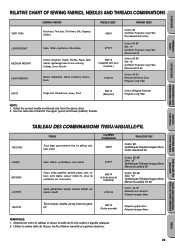
..., NEEDLES AND THREADS COMBINATIONS VERY THIN LIGHTWEIGHT MEDIUM WEIGHT HEAVYWEIGHT SEWING FABRICS Fine tricot, Fine lace, Thin linen, Silk, Organza, Chiffon Voile, Taffeta, Synthetics, Silk, Batiste Cotton, Gingham, Poplin, Percale, Pique, Satin, Velvet, Lightweight wool, Fine ...
..., NEEDLES AND THREADS COMBINATIONS VERY THIN LIGHTWEIGHT MEDIUM WEIGHT HEAVYWEIGHT SEWING FABRICS Fine tricot, Fine lace, Thin linen, Silk, Organza, Chiffon Voile, Taffeta, Synthetics, Silk, Batiste Cotton, Gingham, Poplin, Percale, Pique, Satin, Velvet, Lightweight wool, Fine ...
Users Manual - English
Page 39
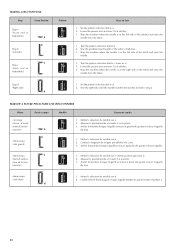
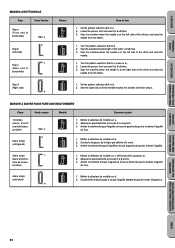
Lower the presser foot and sew 5 to b. 2. Stop the machine when the needle is at the left side of the stitch and raise the needle. 1. Stop the machine when the needle ...) c Step c (Back end of the tailor's chalk line. 3. Turn the pattern selection dial to 6 stitches. 3. Sew the predetermined length of buttonhole) Step d (Right side) d Pattern ac c a b ac c a d How to Sew 1. Lower the presser foot and sew 5 to a. 2. Sew the right side until the needle reaches the stitches formed in step a. MARCHE A SUIVRE POUR FAIRE...
Lower the presser foot and sew 5 to b. 2. Stop the machine when the needle is at the left side of the stitch and raise the needle. 1. Stop the machine when the needle ...) c Step c (Back end of the tailor's chalk line. 3. Turn the pattern selection dial to 6 stitches. 3. Sew the predetermined length of buttonhole) Step d (Right side) d Pattern ac c a b ac c a d How to Sew 1. Lower the presser foot and sew 5 to a. 2. Sew the right side until the needle reaches the stitches formed in step a. MARCHE A SUIVRE POUR FAIRE...
Users Manual - English
Page 63
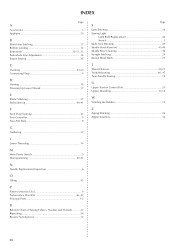
... A Accessories 3 Applique 39 B Blind Hem Stitching 27 Bobbin winding 12 Buttonhole 30-31, 33 Buttonhole Fine Adjustment 34 Button Sewing 35 C Cleaning 43-45 Connecting Plugs 4 D Darning 38 Drawing Up Lower Thread 17 E Elastic Stitching 27 Embroidering 40-41...43 P Pattern Selection Dial 9 Performance Checklist 46, 47 Principal Parts 1-2 R Relative Chart of Sewing Fabrics, Needles and Threads ......... 22 Repacking 54 Reverse Sewing Lever 12 Page S Satin Stitching 26 Sewing Light Light Bulb Replacement 42 Switch 5 Shell Tuck Stitching 29 Shuttle Hook Removal 43-44 Shuttle ...
... A Accessories 3 Applique 39 B Blind Hem Stitching 27 Bobbin winding 12 Buttonhole 30-31, 33 Buttonhole Fine Adjustment 34 Button Sewing 35 C Cleaning 43-45 Connecting Plugs 4 D Darning 38 Drawing Up Lower Thread 17 E Elastic Stitching 27 Embroidering 40-41...43 P Pattern Selection Dial 9 Performance Checklist 46, 47 Principal Parts 1-2 R Relative Chart of Sewing Fabrics, Needles and Threads ......... 22 Repacking 54 Reverse Sewing Lever 12 Page S Satin Stitching 26 Sewing Light Light Bulb Replacement 42 Switch 5 Shell Tuck Stitching 29 Shuttle Hook Removal 43-44 Shuttle ...
User Manual - French
Page 2
... making any other user service adjustments mentioned in this manual. Special care is being used or where oxygen is required around the sewing machine needle. 11. The wrong plate can cause the needle to the nearest authorized dealer or service center for use this manual...described in . Keep fingers away from the electrical outlet immediately after using and before cleaning. 2. Always use a bent needle. 13. Switch the sewing machine to the symbol "O" position which represents off , symbol "O" position when making any adjustments in this machine outdoors. 7. Always unplug this ...
... making any other user service adjustments mentioned in this manual. Special care is being used or where oxygen is required around the sewing machine needle. 11. The wrong plate can cause the needle to the nearest authorized dealer or service center for use this manual...described in . Keep fingers away from the electrical outlet immediately after using and before cleaning. 2. Always use a bent needle. 13. Switch the sewing machine to the symbol "O" position which represents off , symbol "O" position when making any adjustments in this machine outdoors. 7. Always unplug this ...
User Manual - French
Page 6
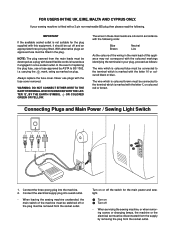
...is not suitable for the main power and sewlight. 1 Turn on plug. Connect the electrical supply plug into the machine. 2. When leaving the sewing machine unattended, the main switch of replacing the plug fuse, use plugs with the letter 'L' or coloured red or brown. In the event ...which is coloured blue must be switched off - Never use a fuse approved by removing the plug from the socket outlet. Connecting Plugs and Main Power / Sewing Light Switch 1 2 1. Always replace the fuse cover. Connect the three-prong plug into a wall outlet. - Turn on or off the switch for...
...is not suitable for the main power and sewlight. 1 Turn on plug. Connect the electrical supply plug into the machine. 2. When leaving the sewing machine unattended, the main switch of replacing the plug fuse, use plugs with the letter 'L' or coloured red or brown. In the event ...which is coloured blue must be switched off - Never use a fuse approved by removing the plug from the socket outlet. Connecting Plugs and Main Power / Sewing Light Switch 1 2 1. Always replace the fuse cover. Connect the three-prong plug into a wall outlet. - Turn on or off the switch for...
User Manual - French
Page 18
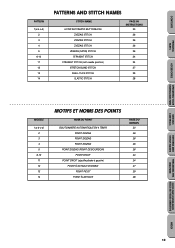
CONTENTS PRINCIPAL PARTS ACCESSORIES OPERATING YOUR SEWING MACHINE VARIOUS CONTROLS PATTERN 1(a-b-c-d) 2 3 4 5 6-10 11 12 13 14 PATTERNS AND STITCH NAMES STITCH NAME 4-STEP AUTOMATIC BUTTONHOLE ZIGZAG STITCH ZIGZAG STITCH ZIGZAG STITCH ZIGZAG (... POINT ÉLASTIQUE PAGE DU MANUEL 30 26 26 26 26 24 24 27 29 28 PATTERNS AND STITCH NAMES THREADING THE RELATIVE CHART OF SEWING FABRICS, MACHINE NEEDLES AND THREADS COMBINATIONS INDEX 10
CONTENTS PRINCIPAL PARTS ACCESSORIES OPERATING YOUR SEWING MACHINE VARIOUS CONTROLS PATTERN 1(a-b-c-d) 2 3 4 5 6-10 11 12 13 14 PATTERNS AND STITCH NAMES STITCH NAME 4-STEP AUTOMATIC BUTTONHOLE ZIGZAG STITCH ZIGZAG STITCH ZIGZAG STITCH ZIGZAG (... POINT ÉLASTIQUE PAGE DU MANUEL 30 26 26 26 26 24 24 27 29 28 PATTERNS AND STITCH NAMES THREADING THE RELATIVE CHART OF SEWING FABRICS, MACHINE NEEDLES AND THREADS COMBINATIONS INDEX 10
User Manual - French
Page 30
...taille de fil et le calibre d'aiguille adéquats. 2. PATTERNS AND STITCH NAMES THREADING THE RELATIVE CHART OF SEWING FABRICS, MACHINE NEEDLES AND THREADS COMBINATIONS TRES FINS LEGERS MOYENS LOURDS TABLEAU DES COMBINAISONS TISSU/AIGUILLE/FIL TISSUS Tricot lé... supérieur (bobine). 22 INDEX CONTENTS PRINCIPAL PARTS ACCESSORIES OPERATING YOUR SEWING MACHINE VARIOUS CONTROLS RELATIVE CHART OF SEWING FABRICS, NEEDLES AND THREADS COMBINATIONS VERY THIN LIGHTWEIGHT MEDIUM WEIGHT HEAVYWEIGHT SEWING FABRICS Fine tricot, Fine lace, Thin linen, Silk, Organza, Chiffon Voile...
...taille de fil et le calibre d'aiguille adéquats. 2. PATTERNS AND STITCH NAMES THREADING THE RELATIVE CHART OF SEWING FABRICS, MACHINE NEEDLES AND THREADS COMBINATIONS TRES FINS LEGERS MOYENS LOURDS TABLEAU DES COMBINAISONS TISSU/AIGUILLE/FIL TISSUS Tricot lé... supérieur (bobine). 22 INDEX CONTENTS PRINCIPAL PARTS ACCESSORIES OPERATING YOUR SEWING MACHINE VARIOUS CONTROLS RELATIVE CHART OF SEWING FABRICS, NEEDLES AND THREADS COMBINATIONS VERY THIN LIGHTWEIGHT MEDIUM WEIGHT HEAVYWEIGHT SEWING FABRICS Fine tricot, Fine lace, Thin linen, Silk, Organza, Chiffon Voile...
User Manual - French
Page 39
... c (même temps (côté gauch) Partie cousue a b Modèle ac c a b Comment coudre 1. Lower the presser foot and sew 5 to b. 2. MARCHE A SUIVRE POUR FAIRE UNE BOUTONNIERE Phase 1er temps (barre d'arrêt avant de la boutonnière) 2ème position... la ligne pré-définie à la craie. 3. Mettre le sélecteur de modèle sur d. 2. CONTENTS PRINCIPAL PARTS ACCESSORIES OPERATING YOUR SEWING MACHINE VARIOUS CONTROLS MAKING A BUTTONHOLE Step Sewn Portion Step a (Front end of buttonhole) a b Step b (Left side) c Step c (Back end of...
... c (même temps (côté gauch) Partie cousue a b Modèle ac c a b Comment coudre 1. Lower the presser foot and sew 5 to b. 2. MARCHE A SUIVRE POUR FAIRE UNE BOUTONNIERE Phase 1er temps (barre d'arrêt avant de la boutonnière) 2ème position... la ligne pré-définie à la craie. 3. Mettre le sélecteur de modèle sur d. 2. CONTENTS PRINCIPAL PARTS ACCESSORIES OPERATING YOUR SEWING MACHINE VARIOUS CONTROLS MAKING A BUTTONHOLE Step Sewn Portion Step a (Front end of buttonhole) a b Step b (Left side) c Step c (Back end of...
User Manual - French
Page 54
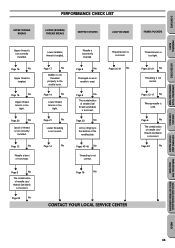
... 16 No w Upper thread is incorrectly inserted. w Page 14 No Needle is tangled. CONTENTS PRINCIPAL PARTS ACCESSORIES OPERATING YOUR SEWING MACHINE VARIOUS CONTROLS UPPER THREAD BREAKS PERFORMANCE CHECK LIST LOWER (BOBBIN) THREAD BREAKS SKIPPED STITCHES LOOP IN SEAM FABRIC PUCKERS Upper ...to the bottom of needle size/ thread size/fabric is incorrect. w Page 22 No w PATTERNS AND STITCH NAMES THREADING THE RELATIVE CHART OF SEWING FABRICS, MACHINE NEEDLES AND THREADS COMBINATIONS INDEX 46 w Page 6 No w Damaged or worn needle is used . w Page 22 No w...
... 16 No w Upper thread is incorrectly inserted. w Page 14 No Needle is tangled. CONTENTS PRINCIPAL PARTS ACCESSORIES OPERATING YOUR SEWING MACHINE VARIOUS CONTROLS UPPER THREAD BREAKS PERFORMANCE CHECK LIST LOWER (BOBBIN) THREAD BREAKS SKIPPED STITCHES LOOP IN SEAM FABRIC PUCKERS Upper ...to the bottom of needle size/ thread size/fabric is incorrect. w Page 22 No w PATTERNS AND STITCH NAMES THREADING THE RELATIVE CHART OF SEWING FABRICS, MACHINE NEEDLES AND THREADS COMBINATIONS INDEX 46 w Page 6 No w Damaged or worn needle is used . w Page 22 No w...
User Manual - French
Page 55
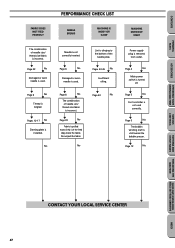
No Needle is slid toward the bobbin presser. CONTENTS PRINCIPAL PARTS ACCESSORIES OPERATING YOUR SEWING MACHINE VARIOUS CONTROLS PERFORMANCE CHECK LIST FABRIC DOES NOT FEED PROPERLY NEEDLE BREAKS MACHINE IS NOISY OR SLOW MACHINE DOES ...move the fabric. w Page 5 No w The bobbin winding shaft is not correctly inserted. w Page 12 No PATTERNS AND STITCH NAMES THREADING THE RELATIVE CHART OF SEWING FABRICS, MACHINE NEEDLES AND THREADS COMBINATIONS w w w w CONTACT YOUR LOCAL SERVICE CENTER 47 INDEX w Page 6 No w Damaged or worn needle is removed from ...
No Needle is slid toward the bobbin presser. CONTENTS PRINCIPAL PARTS ACCESSORIES OPERATING YOUR SEWING MACHINE VARIOUS CONTROLS PERFORMANCE CHECK LIST FABRIC DOES NOT FEED PROPERLY NEEDLE BREAKS MACHINE IS NOISY OR SLOW MACHINE DOES ...move the fabric. w Page 5 No w The bobbin winding shaft is not correctly inserted. w Page 12 No PATTERNS AND STITCH NAMES THREADING THE RELATIVE CHART OF SEWING FABRICS, MACHINE NEEDLES AND THREADS COMBINATIONS w w w w CONTACT YOUR LOCAL SERVICE CENTER 47 INDEX w Page 6 No w Damaged or worn needle is removed from ...
User Manual - French
Page 63
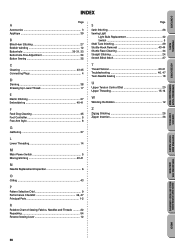
...CONTROLS INDEX Page A Accessories 3 Applique 39 B Blind Hem Stitching 27 Bobbin winding 12 Buttonhole 30-31, 33 Buttonhole Fine Adjustment 34 Button Sewing 35 C Cleaning 43-45 Connecting Plugs 4 D Darning 38 Drawing Up Lower Thread 17 E Elastic Stitching 27 Embroidering 40-41 F Feed Dog...Removal 43-44 Shuttle Race Cleaning 44 Straight Stitching 24 Stretch Blind Stitch 27 T Thread Tension 20-21 Troubleshooting 46, 47 Twin-Needle Sewing 18 U Upper Tension Control Dial 20 Upper Threading 15-16 W Winding the Bobbin 12 Z Zigzag Stitching 26 Zipper Insertion 36 PATTERNS...
...CONTROLS INDEX Page A Accessories 3 Applique 39 B Blind Hem Stitching 27 Bobbin winding 12 Buttonhole 30-31, 33 Buttonhole Fine Adjustment 34 Button Sewing 35 C Cleaning 43-45 Connecting Plugs 4 D Darning 38 Drawing Up Lower Thread 17 E Elastic Stitching 27 Embroidering 40-41 F Feed Dog...Removal 43-44 Shuttle Race Cleaning 44 Straight Stitching 24 Stretch Blind Stitch 27 T Thread Tension 20-21 Troubleshooting 46, 47 Twin-Needle Sewing 18 U Upper Tension Control Dial 20 Upper Threading 15-16 W Winding the Bobbin 12 Z Zigzag Stitching 26 Zipper Insertion 36 PATTERNS...


