Quick Setup Guide - English
Page 1
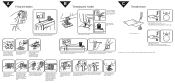
.... Hold the bobbin case as shown, insert the bobbin with the top opening around the bobbin winder thread guide. 2 3 4 4 Raise the presser foot lifter. 5 * Raise the thread takeup lever to a lower number. 3 4 654 87 32 Upper tension is in place. Thread the needle from the bottom toward the ...
.... Hold the bobbin case as shown, insert the bobbin with the top opening around the bobbin winder thread guide. 2 3 4 4 Raise the presser foot lifter. 5 * Raise the thread takeup lever to a lower number. 3 4 654 87 32 Upper tension is in place. Thread the needle from the bottom toward the ...
Users Manual - English
Page 2
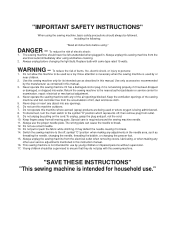
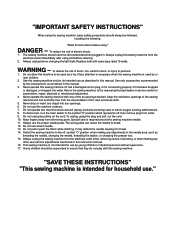
... 3. Switch the sewing machine to the symbol "O" position which represents off , symbol "O" position when making any of the sewing machine and foot controller free from all instructions before using." This sewing machine is not working properly, if it to break. 12. The sewing machine should ...by pulling on the cord. Do not unplug by the manufacturer as threading the needle, changing the needle, threading the bobbin, or changing the presser foot. 15. Do not pull or push the fabric while stitching. DANGER - Always unplug before cleaning. 2. To reduce the risk of burns, fire...
... 3. Switch the sewing machine to the symbol "O" position which represents off , symbol "O" position when making any of the sewing machine and foot controller free from all instructions before using." This sewing machine is not working properly, if it to break. 12. The sewing machine should ...by pulling on the cord. Do not unplug by the manufacturer as threading the needle, changing the needle, threading the bobbin, or changing the presser foot. 15. Do not pull or push the fabric while stitching. DANGER - Always unplug before cleaning. 2. To reduce the risk of burns, fire...
Users Manual - English
Page 39
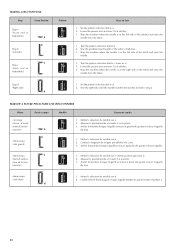
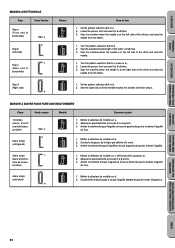
...the needle is at the left side of the stitches and raise the needle from the fabric. 1. Turn the pattern selection dial to a. 2. Lower the presser foot and sew 5 to d. 2. Set the pattern selection dial to 6 stitches. 3. Abaisser le pied-de-biche et coudre 5 à 6 points. Arr... pour a). Coudre la longueur de la ligne pré-définie à la craie. 3. Mettre le sélecteur de modèle sur b. 2. Lower the presser foot and sew 5 to b. 2. Stop the machine when the needle is at the right side of buttonhole) Step d (Right side) d Pattern ac c a b ac ...
...the needle is at the left side of the stitches and raise the needle from the fabric. 1. Turn the pattern selection dial to a. 2. Lower the presser foot and sew 5 to d. 2. Set the pattern selection dial to 6 stitches. 3. Abaisser le pied-de-biche et coudre 5 à 6 points. Arr... pour a). Coudre la longueur de la ligne pré-définie à la craie. 3. Mettre le sélecteur de modèle sur b. 2. Lower the presser foot and sew 5 to b. 2. Stop the machine when the needle is at the right side of buttonhole) Step d (Right side) d Pattern ac c a b ac ...
Users Manual - English
Page 55
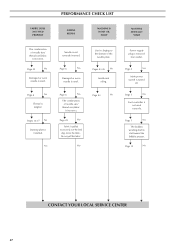
... Power supply plug is incorrect. M Page 22 No M Fabric is not used correctly. M Page 5 No M Foot controller is pulled excessively. M Page 5 No M The bobbin winding shaft is tangled. M Page 6 No M Thread is slid toward the bobbin presser. M Pages 43-45 No M Insufficient oiling. PERFORMANCE CHECK LIST FABRIC DOES NOT FEED PROPERLY NEEDLE...
... Power supply plug is incorrect. M Page 22 No M Fabric is not used correctly. M Page 5 No M Foot controller is pulled excessively. M Page 5 No M The bobbin winding shaft is tangled. M Page 6 No M Thread is slid toward the bobbin presser. M Pages 43-45 No M Insufficient oiling. PERFORMANCE CHECK LIST FABRIC DOES NOT FEED PROPERLY NEEDLE...
User Manual - French
Page 2
...supervision. 17. Never operate the sewing machine with same type rated 15 watts. Keep the ventilation openings of the sewing machine and foot controller free from the electrical outlet when removing covers, lubricating, or when making any other user service adjustments mentioned in this sewing...pull, not the cord. 10. Special care is used as threading the needle, changing the needle, threading the bobbin, or changing the presser foot. 15. Switch the sewing machine to the off , then remove plug from all instructions before using." Always unplug the sewing machine from ...
...supervision. 17. Never operate the sewing machine with same type rated 15 watts. Keep the ventilation openings of the sewing machine and foot controller free from the electrical outlet when removing covers, lubricating, or when making any other user service adjustments mentioned in this sewing...pull, not the cord. 10. Special care is used as threading the needle, changing the needle, threading the bobbin, or changing the presser foot. 15. Switch the sewing machine to the off , then remove plug from all instructions before using." Always unplug the sewing machine from ...
User Manual - French
Page 39
...224; la phase a. Mettre le sélecteur de modèle sur a. 2. Abaisser le pied-de-biche et coudre 5 ou 6 points. 3. Lower the presser foot and sew 5 to c (same as a). 2. MARCHE A SUIVRE POUR FAIRE UNE BOUTONNIERE Phase 1er temps (barre d'arrêt avant de la boutonnière)...buttonhole) a b Step b (Left side) c Step c (Back end of the tailor's chalk line. 3. Set the pattern selection dial to 6 stitches. 3. Lower the presser foot and sew 5 to a. 2. Stop the machine when the needle is at the left side of the stitches and raise the needle from the fabric. 1. Sew...
...224; la phase a. Mettre le sélecteur de modèle sur a. 2. Abaisser le pied-de-biche et coudre 5 ou 6 points. 3. Lower the presser foot and sew 5 to c (same as a). 2. MARCHE A SUIVRE POUR FAIRE UNE BOUTONNIERE Phase 1er temps (barre d'arrêt avant de la boutonnière)...buttonhole) a b Step b (Left side) c Step c (Back end of the tailor's chalk line. 3. Set the pattern selection dial to 6 stitches. 3. Lower the presser foot and sew 5 to a. 2. Stop the machine when the needle is at the left side of the stitches and raise the needle from the fabric. 1. Sew...
User Manual - French
Page 55
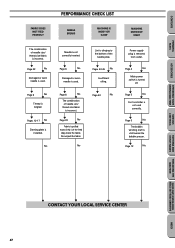
... 4 No w Main power switch is tangled. No Needle is clinging to the bottom of needle size/ thread size/fabric is slid toward the bobbin presser. w Page 5 No w Foot controller is used. w Page 12 No PATTERNS AND STITCH NAMES THREADING THE RELATIVE CHART OF SEWING FABRICS, MACHINE NEEDLES AND THREADS COMBINATIONS w w w w CONTACT YOUR...
... 4 No w Main power switch is tangled. No Needle is clinging to the bottom of needle size/ thread size/fabric is slid toward the bobbin presser. w Page 5 No w Foot controller is used. w Page 12 No PATTERNS AND STITCH NAMES THREADING THE RELATIVE CHART OF SEWING FABRICS, MACHINE NEEDLES AND THREADS COMBINATIONS w w w w CONTACT YOUR...


