Quick Setup Guide - English
Page 1
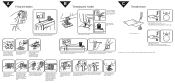
... the spool pin. Hold the bobbin case as shown, insert the bobbin with the top opening around the bobbin winder thread guide. 2 3 4 4 Raise the presser foot lifter. 5 * Raise the thread takeup lever to its highest position and remove the bobbin case by turning the dial a higher number. Thread the needle from... around the take -up lever. When the bobbin is full, it is too loose. (Locks appear on the reverse side of the thread, depress the foot controller.
... the spool pin. Hold the bobbin case as shown, insert the bobbin with the top opening around the bobbin winder thread guide. 2 3 4 4 Raise the presser foot lifter. 5 * Raise the thread takeup lever to its highest position and remove the bobbin case by turning the dial a higher number. Thread the needle from... around the take -up lever. When the bobbin is full, it is too loose. (Locks appear on the reverse side of the thread, depress the foot controller.
Users Manual - English
Page 2
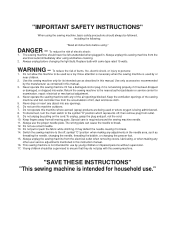
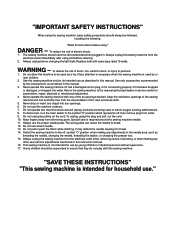
...this machine to persons: 1. Use only accessories recommended by or near children. 2. Keep the ventilation openings of the sewing machine and foot controller free from the electrical outlet immediately after using and before cleaning. 2. The wrong plate can cause the needle to the nearest authorized...It may deflect the needle causing it is used as threading the needle, changing the needle, threading the bobbin, or changing the presser foot. 15. Switch the sewing machine to break. 14. Always unplug the sewing machine from the electrical outlet when removing covers, lubricating, or...
...this machine to persons: 1. Use only accessories recommended by or near children. 2. Keep the ventilation openings of the sewing machine and foot controller free from the electrical outlet immediately after using and before cleaning. 2. The wrong plate can cause the needle to the nearest authorized...It may deflect the needle causing it is used as threading the needle, changing the needle, threading the bobbin, or changing the presser foot. 15. Switch the sewing machine to break. 14. Always unplug the sewing machine from the electrical outlet when removing covers, lubricating, or...
Users Manual - English
Page 39
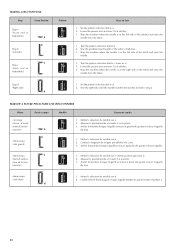
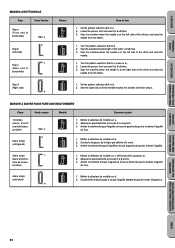
Lower the presser foot and sew 5 to 6 stitches. 3. Abaisser le pied-de-biche et coudre 5 ou 6 points. 3. c 2. MAKING A BUTTONHOLE Step Sewn Portion Step a (Front end of buttonhole) a b Step b (Left ... et coudre 5 à 6 points. Mettre le sélecteur de modèle sur d. 2. Mettre le sélecteur de modèle sur b. 2. d 1. Lower the presser foot and sew 5 to 6 stitches. 3. Sew the right side until the needle reaches the stitches formed in step a. a 3. Arrêter la machine lorsque l'aiguille se...
Lower the presser foot and sew 5 to 6 stitches. 3. Abaisser le pied-de-biche et coudre 5 ou 6 points. 3. c 2. MAKING A BUTTONHOLE Step Sewn Portion Step a (Front end of buttonhole) a b Step b (Left ... et coudre 5 à 6 points. Mettre le sélecteur de modèle sur d. 2. Mettre le sélecteur de modèle sur b. 2. d 1. Lower the presser foot and sew 5 to 6 stitches. 3. Sew the right side until the needle reaches the stitches formed in step a. a 3. Arrêter la machine lorsque l'aiguille se...
Users Manual - English
Page 55
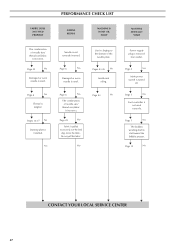
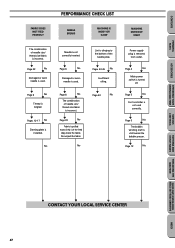
... CENTER 47 M Pages 12-17 No M Darning plate is not correctly inserted. No Needle is installed. M Page 4 No M Main power switch is used. M Page 5 No M Foot controller is not used . M Page 22 No M Damaged or worn needle is turned off. M Page 22 No M Fabric is slid toward the bobbin presser. M Pages...
... CENTER 47 M Pages 12-17 No M Darning plate is not correctly inserted. No Needle is installed. M Page 4 No M Main power switch is used. M Page 5 No M Foot controller is not used . M Page 22 No M Damaged or worn needle is turned off. M Page 22 No M Fabric is slid toward the bobbin presser. M Pages...
Users Manual - English
Page 63
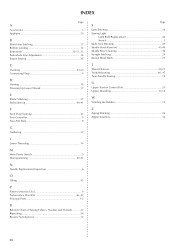
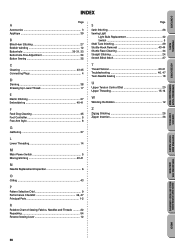
... Button Sewing 35 C Cleaning 43-45 Connecting Plugs 4 D Darning 38 Drawing Up Lower Thread 17 E Elastic Stitching 27 Embroidering 40-41 F Feed Dog Cleaning 45 Foot Controller 5 Free-Arm Style 8 G Gathering 37 L Lower Threading 14 M Main Power Switch 5 Monogramming 40-41 N Needle Replacement/inspection 6 O Oiling 43 P Pattern Selection Dial 9 Performance Checklist...
... Button Sewing 35 C Cleaning 43-45 Connecting Plugs 4 D Darning 38 Drawing Up Lower Thread 17 E Elastic Stitching 27 Embroidering 40-41 F Feed Dog Cleaning 45 Foot Controller 5 Free-Arm Style 8 G Gathering 37 L Lower Threading 14 M Main Power Switch 5 Monogramming 40-41 N Needle Replacement/inspection 6 O Oiling 43 P Pattern Selection Dial 9 Performance Checklist...
User Manual - French
Page 2
...use." Always unplug this sewing machine. Use only accessories recommended by or near children. 2. Keep the ventilation openings of the sewing machine and foot controller free from outlet. 9. To disconnect, turn the main switch to be used by the manufacturer as described in this manual. Special care... is used as threading the needle, changing the needle, threading the bobbin, or changing the presser foot. 15. The wrong plate can cause the needle to persons: 1. To reduce the risk of lint, dust and loose cloth. 5. Use ...
...use." Always unplug this sewing machine. Use only accessories recommended by or near children. 2. Keep the ventilation openings of the sewing machine and foot controller free from outlet. 9. To disconnect, turn the main switch to be used by the manufacturer as described in this manual. Special care... is used as threading the needle, changing the needle, threading the bobbin, or changing the presser foot. 15. The wrong plate can cause the needle to persons: 1. To reduce the risk of lint, dust and loose cloth. 5. Use ...
User Manual - French
Page 39
...as a). 2. Abaisser le pied-de-biche et coudre 5 ou 6 points. 3. Mettre le sélecteur de modèle sur d. 2. Lower the presser foot and sew 5 to b. 2. Coudre la longueur de la ligne pré-définie à la craie. 3. Mettre le sélecteur de modèle ...Step c (Back end of buttonhole) Step d (Right side) d Pattern ac c a b ac c a d How to a. 2. Set the pattern selection dial to Sew 1. Lower the presser foot and sew 5 to 6 stitches. 3. Sew the right side until the needle reaches the stitches formed in step a. MARCHE A SUIVRE POUR FAIRE UNE BOUTONNIERE Phase 1er...
...as a). 2. Abaisser le pied-de-biche et coudre 5 ou 6 points. 3. Mettre le sélecteur de modèle sur d. 2. Lower the presser foot and sew 5 to b. 2. Coudre la longueur de la ligne pré-définie à la craie. 3. Mettre le sélecteur de modèle ...Step c (Back end of buttonhole) Step d (Right side) d Pattern ac c a b ac c a d How to a. 2. Set the pattern selection dial to Sew 1. Lower the presser foot and sew 5 to 6 stitches. 3. Sew the right side until the needle reaches the stitches formed in step a. MARCHE A SUIVRE POUR FAIRE UNE BOUTONNIERE Phase 1er...
User Manual - French
Page 55
... 22 No w Fabric is installed. w Page 43 No Power supply plug is turned off. w Page 4 No w Main power switch is removed from outlet. w Page 5 No w Foot controller is not correctly inserted. No Needle is not used correctly. No Lint is tangled. w Page 6 No w Thread is clinging to the bottom of the...
... 22 No w Fabric is installed. w Page 43 No Power supply plug is turned off. w Page 4 No w Main power switch is removed from outlet. w Page 5 No w Foot controller is not correctly inserted. No Needle is not used correctly. No Lint is tangled. w Page 6 No w Thread is clinging to the bottom of the...
User Manual - French
Page 63
... Button Sewing 35 C Cleaning 43-45 Connecting Plugs 4 D Darning 38 Drawing Up Lower Thread 17 E Elastic Stitching 27 Embroidering 40-41 F Feed Dog Cleaning 45 Foot Controller 5 Free-Arm Style 8 G Gathering 37 L Lower Threading 14 M Main Power Switch 5 Monogramming 40-41 N Needle Replacement/inspection 6 O Oiling 43 P Pattern Selection Dial 9 Performance Checklist...
... Button Sewing 35 C Cleaning 43-45 Connecting Plugs 4 D Darning 38 Drawing Up Lower Thread 17 E Elastic Stitching 27 Embroidering 40-41 F Feed Dog Cleaning 45 Foot Controller 5 Free-Arm Style 8 G Gathering 37 L Lower Threading 14 M Main Power Switch 5 Monogramming 40-41 N Needle Replacement/inspection 6 O Oiling 43 P Pattern Selection Dial 9 Performance Checklist...


