Quick Setup Guide - English
Page 1
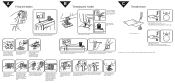
...guide hole. Hold the bobbin case as shown, insert the bobbin with the top opening around the bobbin winder thread guide. 2 3 4 4 Raise the presser foot lifter. 5 * Raise the thread takeup lever to ensure it will stop winding. Place the thread spool on the spool pin and pass the thread around... 2" of the channel to thread the take -up lever and back down the right channel on both sides of the thread, depress the foot controller. The latch should hold the bobbin case in place. Thread the needle from inside, and slide the winding shaft to its highest position...
...guide hole. Hold the bobbin case as shown, insert the bobbin with the top opening around the bobbin winder thread guide. 2 3 4 4 Raise the presser foot lifter. 5 * Raise the thread takeup lever to ensure it will stop winding. Place the thread spool on the spool pin and pass the thread around... 2" of the channel to thread the take -up lever and back down the right channel on both sides of the thread, depress the foot controller. The latch should hold the bobbin case in place. Thread the needle from inside, and slide the winding shaft to its highest position...
Users Manual - English
Page 2
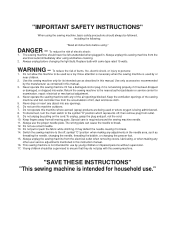
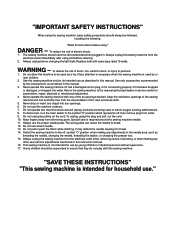
... not allow this machine where aerosol (spray) products are being used as threading the needle, changing the needle, threading the bobbin, or changing the presser foot. 15. Keep the ventilation openings of lint, dust and loose cloth. 5. To disconnect, turn the main switch to the symbol "O" position which represents...and pull, not the cord. 10. Switch the sewing machine to the off , then remove plug from the accumulation of the sewing machine and foot controller free from outlet. 9. Do not use a bent needle. 13. "SAVE THESE INSTRUCTIONS" "This sewing machine is not intended for its ...
... not allow this machine where aerosol (spray) products are being used as threading the needle, changing the needle, threading the bobbin, or changing the presser foot. 15. Keep the ventilation openings of lint, dust and loose cloth. 5. To disconnect, turn the main switch to the symbol "O" position which represents...and pull, not the cord. 10. Switch the sewing machine to the off , then remove plug from the accumulation of the sewing machine and foot controller free from outlet. 9. Do not use a bent needle. 13. "SAVE THESE INSTRUCTIONS" "This sewing machine is not intended for its ...
Users Manual - English
Page 39
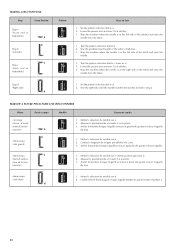
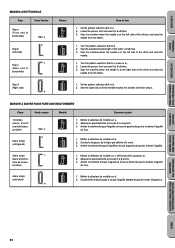
... needle is at the left side of the stitch and raise the needle from the fabric. 1. Turn the pattern selection dial to 6 stitches. 3. Lower the presser foot and sew 5 to b. 2. Mettre le sélecteur de modèle sur c (même temps (côté droit) c ac 1. d 31 Stop the ...èle sur a. 2. Coudre la lèvre droite jusqu'à ce que l'aiguille atteigne les points formés à la phase a. Lower the presser foot and sew 5 to d. 2. d 1. Stop the machine when the needle is at the left side of the stitches and raise the needle from the fabric. 1....
... needle is at the left side of the stitch and raise the needle from the fabric. 1. Turn the pattern selection dial to 6 stitches. 3. Lower the presser foot and sew 5 to b. 2. Mettre le sélecteur de modèle sur c (même temps (côté droit) c ac 1. d 31 Stop the ...èle sur a. 2. Coudre la lèvre droite jusqu'à ce que l'aiguille atteigne les points formés à la phase a. Lower the presser foot and sew 5 to d. 2. d 1. Stop the machine when the needle is at the left side of the stitches and raise the needle from the fabric. 1....
Users Manual - English
Page 55
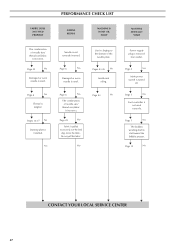
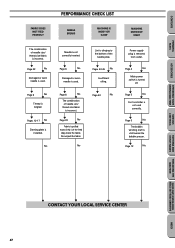
...combination of needle size/ thread size/fabric is turned off. M Page 22 No M Damaged or worn needle is not used correctly. M Page 5 No M Foot controller is used . M Pages 12-17 No M Darning plate is used . M Page 6 No M Damaged or worn needle is installed. M Page ...5 No M The bobbin winding shaft is removed from outlet. M Page 43 No Power supply plug is slid toward the bobbin presser. M Page 12 No M M M M CONTACT YOUR LOCAL SERVICE CENTER 47 M Page 6 No M The combination of the needle plate. M Page 22 ...
...combination of needle size/ thread size/fabric is turned off. M Page 22 No M Damaged or worn needle is not used correctly. M Page 5 No M Foot controller is used . M Pages 12-17 No M Darning plate is used . M Page 6 No M Damaged or worn needle is installed. M Page ...5 No M The bobbin winding shaft is removed from outlet. M Page 43 No Power supply plug is slid toward the bobbin presser. M Page 12 No M M M M CONTACT YOUR LOCAL SERVICE CENTER 47 M Page 6 No M The combination of the needle plate. M Page 22 ...
User Manual - French
Page 2
...in. Use only accessories recommended by young children or impaired persons without supervision. 17. Keep the ventilation openings of the sewing machine and foot controller free from outlet. 9. To disconnect, turn the main switch to the symbol "O" position which represents off , symbol "O" position... is not intended for household use by the manufacturer as threading the needle, changing the needle, threading the bobbin, or changing the presser foot. 15. Never operate this machine where aerosol (spray) products are being administered. 8. Special care is intended for use ." It ...
...in. Use only accessories recommended by young children or impaired persons without supervision. 17. Keep the ventilation openings of the sewing machine and foot controller free from outlet. 9. To disconnect, turn the main switch to the symbol "O" position which represents off , symbol "O" position... is not intended for household use by the manufacturer as threading the needle, changing the needle, threading the bobbin, or changing the presser foot. 15. Never operate this machine where aerosol (spray) products are being administered. 8. Special care is intended for use ." It ...
User Manual - French
Page 39
Lower the presser foot and sew 5 to b. 2. MARCHE A SUIVRE POUR FAIRE UNE BOUTONNIERE Phase 1er temps (barre d'arrêt avant de la boutonnière) 2ème position que ... THREADING THE RELATIVE CHART OF SEWING FABRICS, MACHINE NEEDLES AND THREADS COMBINATIONS INDEX 31 Mettre le sélecteur de modèle sur a. 2. Lower the presser foot and sew 5 to c (same as a). 2. Stop the machine when the needle is at the right side of the stitches and raise the needle from the...
Lower the presser foot and sew 5 to b. 2. MARCHE A SUIVRE POUR FAIRE UNE BOUTONNIERE Phase 1er temps (barre d'arrêt avant de la boutonnière) 2ème position que ... THREADING THE RELATIVE CHART OF SEWING FABRICS, MACHINE NEEDLES AND THREADS COMBINATIONS INDEX 31 Mettre le sélecteur de modèle sur a. 2. Lower the presser foot and sew 5 to c (same as a). 2. Stop the machine when the needle is at the right side of the stitches and raise the needle from the...
User Manual - French
Page 55
...used. w Page 6 No w Damaged or worn needle is used correctly. Let the feed dogs move the fabric. w Page 5 No w Foot controller is removed from outlet. w Page 12 No PATTERNS AND STITCH NAMES THREADING THE RELATIVE CHART OF SEWING FABRICS, MACHINE NEEDLES AND THREADS COMBINATIONS ... w Insufficient oiling. w Page 5 No w The bobbin winding shaft is pulled excessively. w Page 22 No w Fabric is slid toward the bobbin presser. w Page 4 No w Main power switch is incorrect. w Page 6 No w The combination of needle size/ thread size/fabric is incorrect. ...
...used. w Page 6 No w Damaged or worn needle is used correctly. Let the feed dogs move the fabric. w Page 5 No w Foot controller is removed from outlet. w Page 12 No PATTERNS AND STITCH NAMES THREADING THE RELATIVE CHART OF SEWING FABRICS, MACHINE NEEDLES AND THREADS COMBINATIONS ... w Insufficient oiling. w Page 5 No w The bobbin winding shaft is pulled excessively. w Page 22 No w Fabric is slid toward the bobbin presser. w Page 4 No w Main power switch is incorrect. w Page 6 No w The combination of needle size/ thread size/fabric is incorrect. ...


